
angular组件交互
摘要:本文主要介绍angular组件间的交互,以下将会把七种交互方式代码进行展示,并且分析各种方式所使用的情景。七种交互方式的描述(如"通过输入型绑定把数据从父组件传到子组件"这般)来源于Angular中文网。
一、通过输入型绑定把数据从父组件传到子组件
1.适用情景及描述
这种方式比较容易理解,一般适用于将父组件中的值传送给子组件进行使用。在父组件中,通过在其引用的子组件标签中使用[]进行单项传值,而在子组件中通过@Input()来接收父组件传过来的值。
2.代码实现(只展示部分关键代码,下同)
app.component.html(父组件html)
<!-- 其中 childInputData 为子组件中与@Input关联的变量,
		 appInputData 为父组件中需要传到子组件中值 -->
<app-child-input-component [childInputData]="appInputData"></app-child-input-component>
app.component.ts(父组件ts)
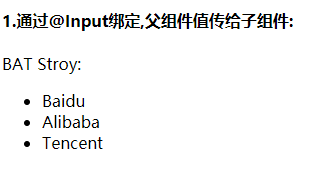
public appInputData = ['Baidu', 'Alibaba', 'Tencent'];
child-input-component.html(子组件html)
BAT Stroy:
<ul>
  <li *ngFor="let data of childInputData">{{data}}</li>
</ul>
child-input-component.ts(子组件ts)
@Component({
  selector: 'app-child-input-component',
  templateUrl: './child-input-component.component.html',
  styleUrls: ['./child-input-component.component.css']
})
export class ChildInputComponentComponent {
  // 父组件通过 @Input 传值给子组件
  @Input() childInputData: any;
}
3.最终效果
二、通过setter截听输入属性值的变化
1.使用情景及描述
通过setter截听输入值变化也是使用@Input()从父组件中向子组件传值,与单纯使用@Input()不同的是如果我们可以直接在使用set来对传过来的变量进行操作,并实时的将修改后的值展示出来。
2.代码实现
app.component.html(父组件html)
一天的的工作:
<app-child-set-component *ngFor="let work of appSetterData" [childSetter]="work"></app-child-set-component>
app.component.ts(父组件ts)
public appSetterData = ['work', '', 'sleep', '', 'drink'];
child-set-component.ts(子组件html)
{{item}},
child-set-component.ts(子组件ts)
import { Component, Input } from '@angular/core';

@Component({
  selector: 'app-child-set-component',
  templateUrl: './child-set-component.component.html',
  styleUrls: ['./child-set-component.component.css']
})
export class ChildSetComponentComponent {
  // 通过setter截听输入值的变化
  private item = ''; // 定义了一个私有的变量,用来存放父组件传来的值
  // 这边方法名childSetter是与父组件html单项绑定的值的那个名字
  @Input() set childSetter(temp: string) {
      // 这边当数组中工作内容为空时会塞进去一些奇奇怪怪的东西:)
    this.item = temp.trim() || 'Touch the fish';
  }

  // 重新为变量赋值
  get childSetter(): string {
    return this.item;
  }
}
3.最终效果

三、通过ngOnChanges()来截听输入属性值的变化
1. 适用情景及描述
使用ngOnChanges()可以监听到属性值的变化,当属性值发生变化是可以出发ngOnChanges()方法,该方法接受当前和上一属性值的 SimpleChanges 对象在 ngOnInit() 之前以及所绑定的一个或多个输入属性的值发生变化时都会调用。
这种方式适用于子组件需要在对父组件所传值发生变化时进行响应的情景,例如: 父组件传给子组件的值是通过异步请求得到的,当直接使用@Input()方式传值给子组件时,若请求还没有完成,那么子组件将得到一个空值,这是就需要使用ngOnChanges()截听父组件传来值的变化,当所传值有变化时再进行下一步操作。
2.代码实现
app.component.html(父组件html)
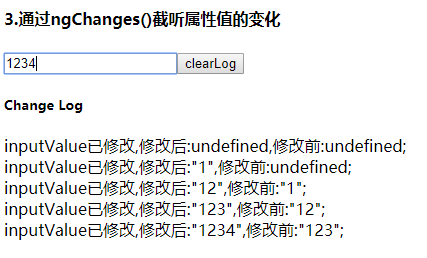
<h4>3.通过ngChanges()截听属性值的变化</h4>
<input type="text" [(ngModel)]="appInputValue">
<button (click)="resetInputValue();">clearLog</button>
<app-child-ngonchange-component [inputValue]="appInputValue"></app-child-ngonchange-component>
app.component.ts(父组件ts)
/**
 * 属性装饰器,用于配置一个视图查询。
 * 变更检测器会在视图的 DOM 中查找能匹配上该选择器的第一个元素或指令.
 * 如果视图的 DOM 发生了变化,出现了匹配该选择器的新的子节点,该属性就会被更新。
 *
 * 此处用在 通过 ngOnChanges()截听属性值的变化
*/
@ViewChild(ChildNgonchangeComponentComponent, { static: false })
onChangeChild: ChildNgonchangeComponentComponent;

// 通过 ngOnChanges()截听属性值的变化
public appInputValue: string;

resetInputValue() {
  this.appInputValue = 'init';
  if (this.onChangeChild) {
    this.onChangeChild.clearLog();
    }
}
child-ngonchange-component.component.html(子组件html)
<h5>Change Log</h5>
<div *ngFor="let log of changeLog">{{log}}</div>
child-ngonchange-component.ts(子组件ts)
import { Component, Input, OnChanges, OnInit, SimpleChanges } from '@angular/core';

@Component({
  selector: 'app-child-ngonchange-component',
  templateUrl: './child-ngonchange-component.component.html',
  styleUrls: ['./child-ngonchange-component.component.css']
})
export class ChildNgonchangeComponentComponent implements OnInit, OnChanges {
  @Input() inputValue: string;

  // 存放修改log
  public changeLog: string[] = [];

  ngOnChanges(changes: SimpleChanges) {
    for (const proName in changes) {
      if (changes.hasOwnProperty(proName)) {
        // 此处需要判断对象中是否存在key
        const chng = changes[proName];
        const cur = JSON.stringify(chng.currentValue);
        const prev = JSON.stringify(chng.previousValue);
        this.changeLog.push(`${proName}已修改,修改后:${cur},修改前:${prev};`);
      }
    }
  }

  clearLog() {
    this.changeLog = [];
  }

  ngOnInit() {}
}
3.最终效果
四、父组件监听子组件的事件
1.适用情景及描述
父组件监听子组件的事件一般用于子组件向父组件传值的情形,通过弹射一个事件将需要的值传出去。这种方式需要通过@Ouput()来实现。
2.代码实现
app.component.html(父组件html)
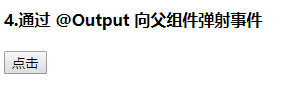
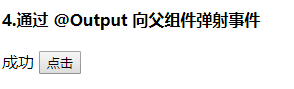
<h4>4.通过 @Output 向父组件弹射事件</h4>
{{outputEvent}}
<!-- 这边的 (onclick) 事件为 子组件中通过EventEmitter 弹射出来-->
<app-child-output-component (onclick)="appOnClick($event)"></app-child-output-component>
app.component.ts(父组件ts)
// 通过 @Output 弹射事件到父组件
public outputEvent: string;

appOnClick(isClick: boolean) {
  if (isClick) {
    this.outputEvent = '成功';
  }
}
child-output-component.component.html(子组件html)
<button (click)="click(true)">点击</button>
child-output-component.ts(子组件ts)
import { Component, EventEmitter, Output } from '@angular/core';

@Component({
  selector: 'app-child-output-component',
  templateUrl: './child-output-component.component.html',
  styleUrls: ['./child-output-component.component.css']
})
export class ChildOutputComponentComponent {
  // 暴露自定义事件onClick()
  @Output() onclick = new EventEmitter<boolean>();

  click(isClick: boolean) {
    // click普通方法
    this.onclick.emit(isClick); // 向父组件弹射isClick变量,在被点击时候出发
  }
}
3.最终效果
点击之前
点击之后
五、父组件与子组件通过本地变量互动
1.适用情景及描述
组件间通过本地变量互动比较简单,主要适用于在父组件的html中调用子组件的公共变量和公共方法。
2.代码实现
app.component.html(父组件html)
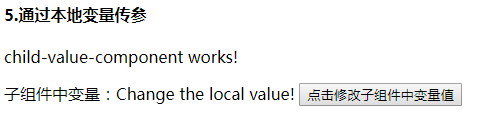
<h4>5.通过本地变量传参</h4>
<app-child-value-component #childData></app-child-value-component>
子组件中变量:{{childData.localValue}}
<button (click)="childData.localFunction()">点击修改子组件中变量值</button>
child-value-component.ts(子组件ts)
import { Component } from '@angular/core';

@Component({
  selector: 'app-child-value-component',
  templateUrl: './child-value-component.component.html',
  styleUrls: ['./child-value-component.component.css']
})
export class ChildValueComponentComponent {
  // 本地变量
  public localValue = 'This is a local value.';

  // 本地方法
  localFunction() {
    this.localValue = 'Change the local value!';
  }
}
3.最终效果
点击之前

点击之后
六、父组件调用@ViewChild()
1.适用情景及描述
区别于使用本地变量的交互方式,使用@ViewChild()将子组件注入到私有属性里面,可以实现在父组件的ts文件中调用子组件的公共方法和公共变量。
2.代码实现
app.component.html(父组件html)
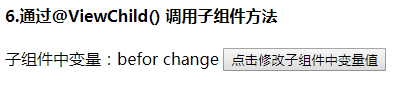
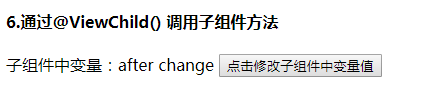
<h4>6.通过@ViewChild() 调用子组件方法</h4>
子组件中变量:{{data.viewChildValue}}
<app-child-viewchild-component #data></app-child-viewchild-component>
<button (click)="viewChildClick()">点击修改子组件中变量值</button>
app.component.ts(父组件ts)
@ViewChild(ChildViewchildComponentComponent, { static: false })
private viewChild: ChildViewchildComponentComponent;

viewChildClick() {
  this.viewChild.click();
}
child-viewchild-component.ts(子组件ts)
import { Component } from '@angular/core';

@Component({
  selector: 'app-child-viewchild-component',
  templateUrl: './child-viewchild-component.component.html',
  styleUrls: ['./child-viewchild-component.component.css']
})
export class ChildViewchildComponentComponent {
  public viewChildValue = 'befor change';
  click() {
    this.viewChildValue = 'after change';
  }
}
3.最终效果
点击之前
点击之后
七、父组件和子组件通过服务通讯
1.适用情景及描述
这种当时一般用于子父组件互相操作同一变量的情况。
2.代码实现
tService.ts(服务)
import { Injectable } from '@angular/core';
@Injectable()
export class TService {
  public info = '';
  constructor() {}
  setData(value: string) {
    this.info = value;
    console.log('设置:' + value);
  }
  getData() {
    console.log('获取:' + this.info);
    return this.info;
  }
}
child-service-component.ts(子组件ts)
import { Component, OnInit } from '@angular/core';
import { TService } from '../service/tService';
@Component({
  selector: 'app-child-service-component',
  templateUrl: './child-service-component.component.html',
  styleUrls: ['./child-service-component.component.css']
})
export class ChildServiceComponentComponent {
  constructor(private tService: TService) {}

  setChildValue() {
    this.tService.setData('child data show');
  }
}
child-service-component.html(子组件html)
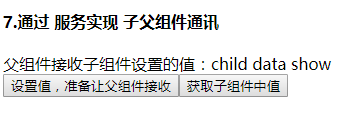
<button (click)="setChildValue()">设置值,准备让父组件接收</button>
app.component.ts(父组件ts)
// 通过service获取子组件中的
getChildData() {
  this.serviceChildDate = this.tservice.getData();
}
app.component.html(父组件html)
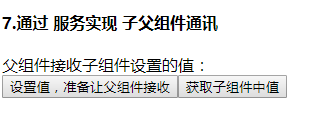
<h4>7.通过 服务实现 子父组件通讯</h4>
父组件接收子组件设置的值:{{serviceChildDate}} <br />
<app-child-service-component></app-child-service-component>
<button (click)="getChildData()">获取子组件中值</button>
3.最终效果
点击之前
点击之后
八、参考文献
[1] Angular组件之间的交互
[2] Angular中文网

 浙公网安备 33010602011771号