ubuntu16.04 安装zabbix-server和zabbix-agent
一、必要条件
0、必要条件
zabbix-server已经安装lnmp或者lamp环境
安装nginx
1 sudo apt-get install nginx
安装mysql
1 sudo apt-get install mysql-server mysql-client
安装php
1 sudo apt-get install php-fpm php-gd php-mbstring php-curl php-xml php-mcrypt php-mysql php-zip php-json php-redis php-memcached
配置php.ini
max_execution_time = 600
max_input_time = 600
memory_limit = 256M
post_max_size = 32M
upload_max_filesize = 16M
date.timezone = Asia/Shanghai
1 ps -ef | grep nginx #查看nginx进程
2 /usr/sbin/nginx -t  #确认nginx的配置文件位置
root@HOSTNAME:~# /usr/sbin/nginx -t
nginx: the configuration file /etc/nginx/nginx.conf syntax is ok
nginx: configuration file /etc/nginx/nginx.conf test is successful
/etc/nginx/nginx.conf的部分内容如下:
        include /etc/nginx/conf.d/*.conf;
        include /etc/nginx/sites-enabled/*;

#从配置文件/etc/nginx/nginx.conf,可以确认,目前默认使用的是/etc/nginx/sites-enabled/default
#编辑/etc/nginx/sites-enabled/default文件,打开php-fpm,这里使用的是php-fpm
{......}

        # pass the PHP scripts to FastCGI server listening on 127.0.0.1:9000
        #
        location ~ \.php$ {
                include snippets/fastcgi-php.conf;

        #       # With php7.0-cgi alone:
        #       fastcgi_pass 127.0.0.1:9000;
                # With php7.0-fpm:
                fastcgi_pass unix:/run/php/php7.0-fpm.sock;
        }

{......}
二、服务端安装(zabbix-server)
1、安装zabbix-server
1 sudo wget http://repo.zabbix.com/zabbix/4.2/ubuntu/pool/main/z/zabbix-release/zabbix-release_4.2-1%2Bxenial_all.deb
2 sudo dpkg -i zabbix-release_4.2-1+xenial_all.deb
3 sudo apt-get update
4 sudo apt-get install zabbix-server-mysql zabbix-frontend-php
2、初始化zabbix数据库
1 mysql -u root -p
#以下命令是在mysql中运行
1 create database zabbixdb character set utf8;
2 grant all privileges on zabbixdb.* to 'zabbixuser'@'localhost' identified by 'password';
3 flush privileges;
导入数据
1 cd /usr/share/doc/zabbix-server-mysql/
2 zcat create.sql.gz | mysql -uroot -p zabbixdb  #此处输入mysql的root密码
配置zabbix-server
1 vim /etc/zabbix/zabbix_server.conf
修改以下关键位置
[...]
DBHost=localhost
[...]
DBName=zabbixdb
[...]
DBUser=zabbixuser
[...]
DBPassword=password
[...]
注意:如果开启了ufw,需要添加以下配置
firewall-cmd --permanent --add-port=10050/tcp
firewall-cmd --permanent --add-port=10051/tcp
systemctl restart firewalld
如果开启了selinux(Linux系统,比如Centos、Redhat等),添加以下配置
setsebool -P httpd_can_connect_zabbix=1
semanage permissive -a zabbix_agent_t
3、配置zabbix-server的前端
将zabbix文件移动(或者拷贝)到网站目录下
1 mv /usr/share/zabbix /var/www/html
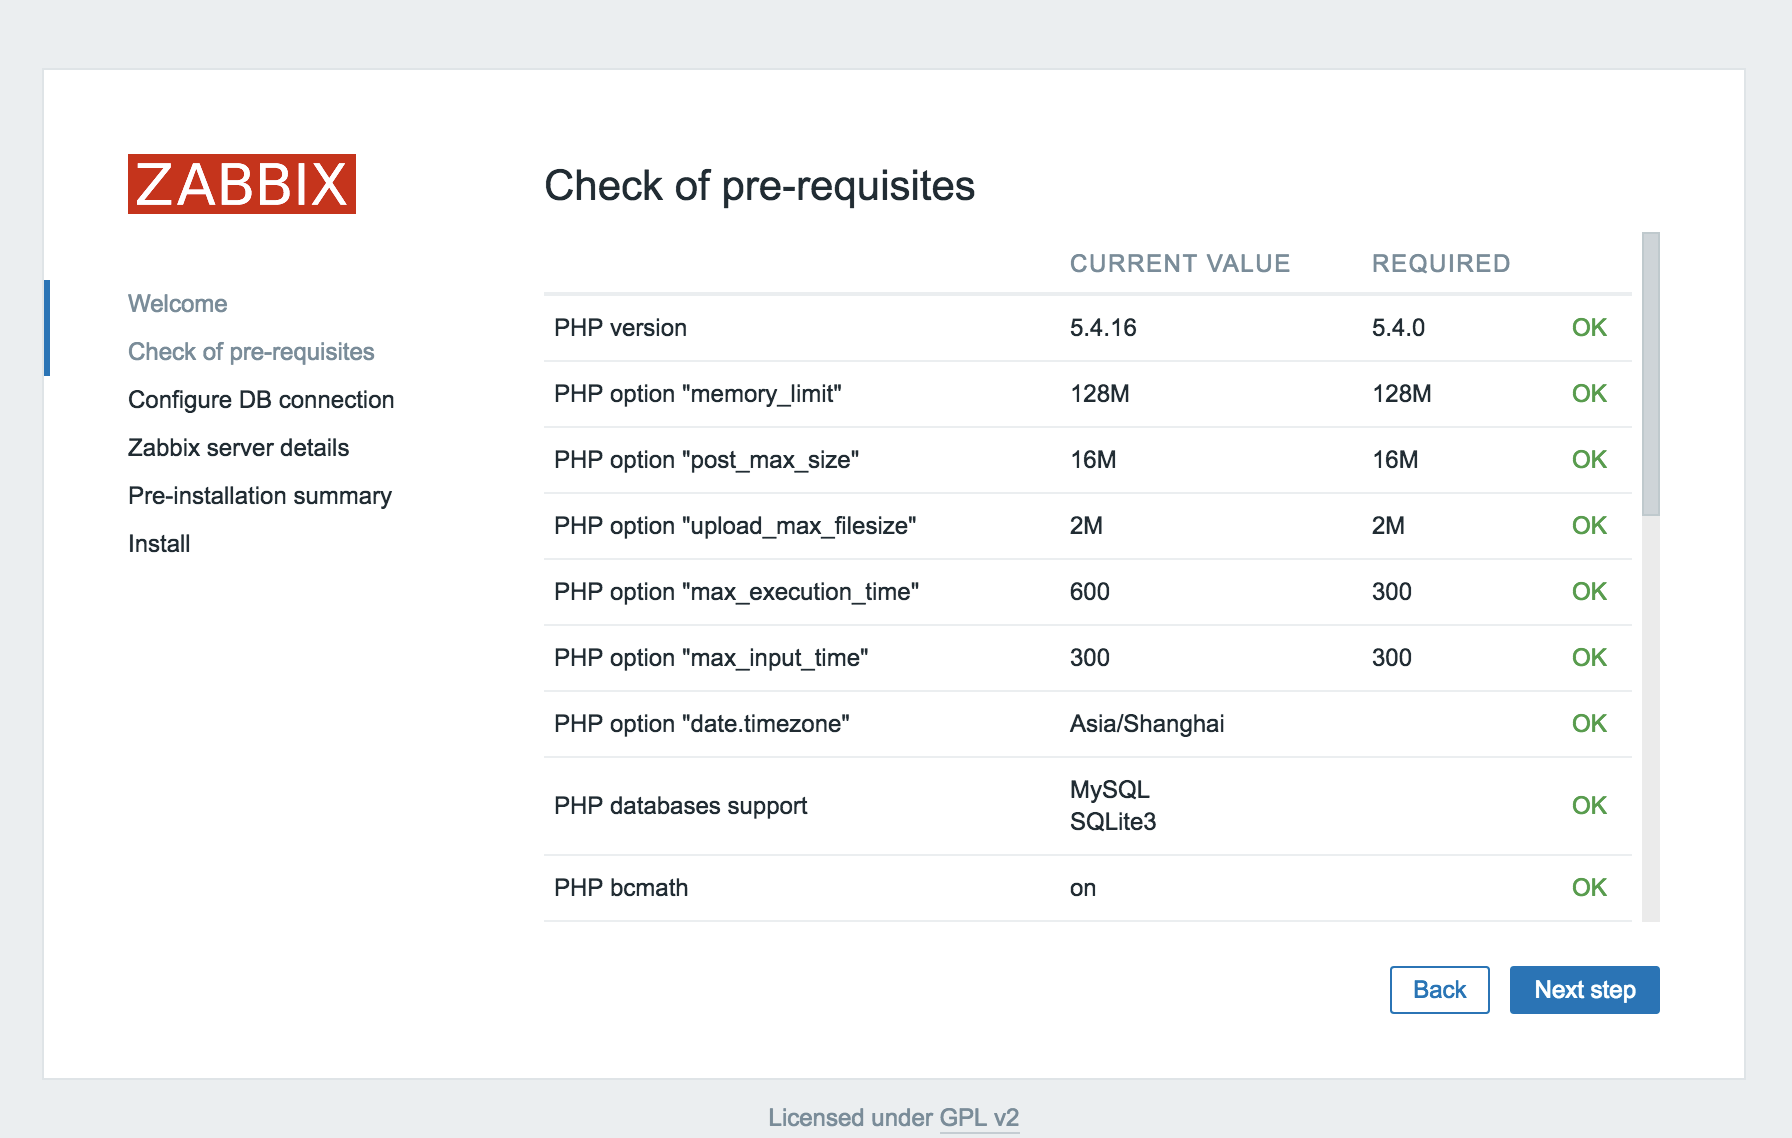
访问 http://ip-address/zabbix或者 http://domain-name/zabbix
所有选项都是ok才可以下一步
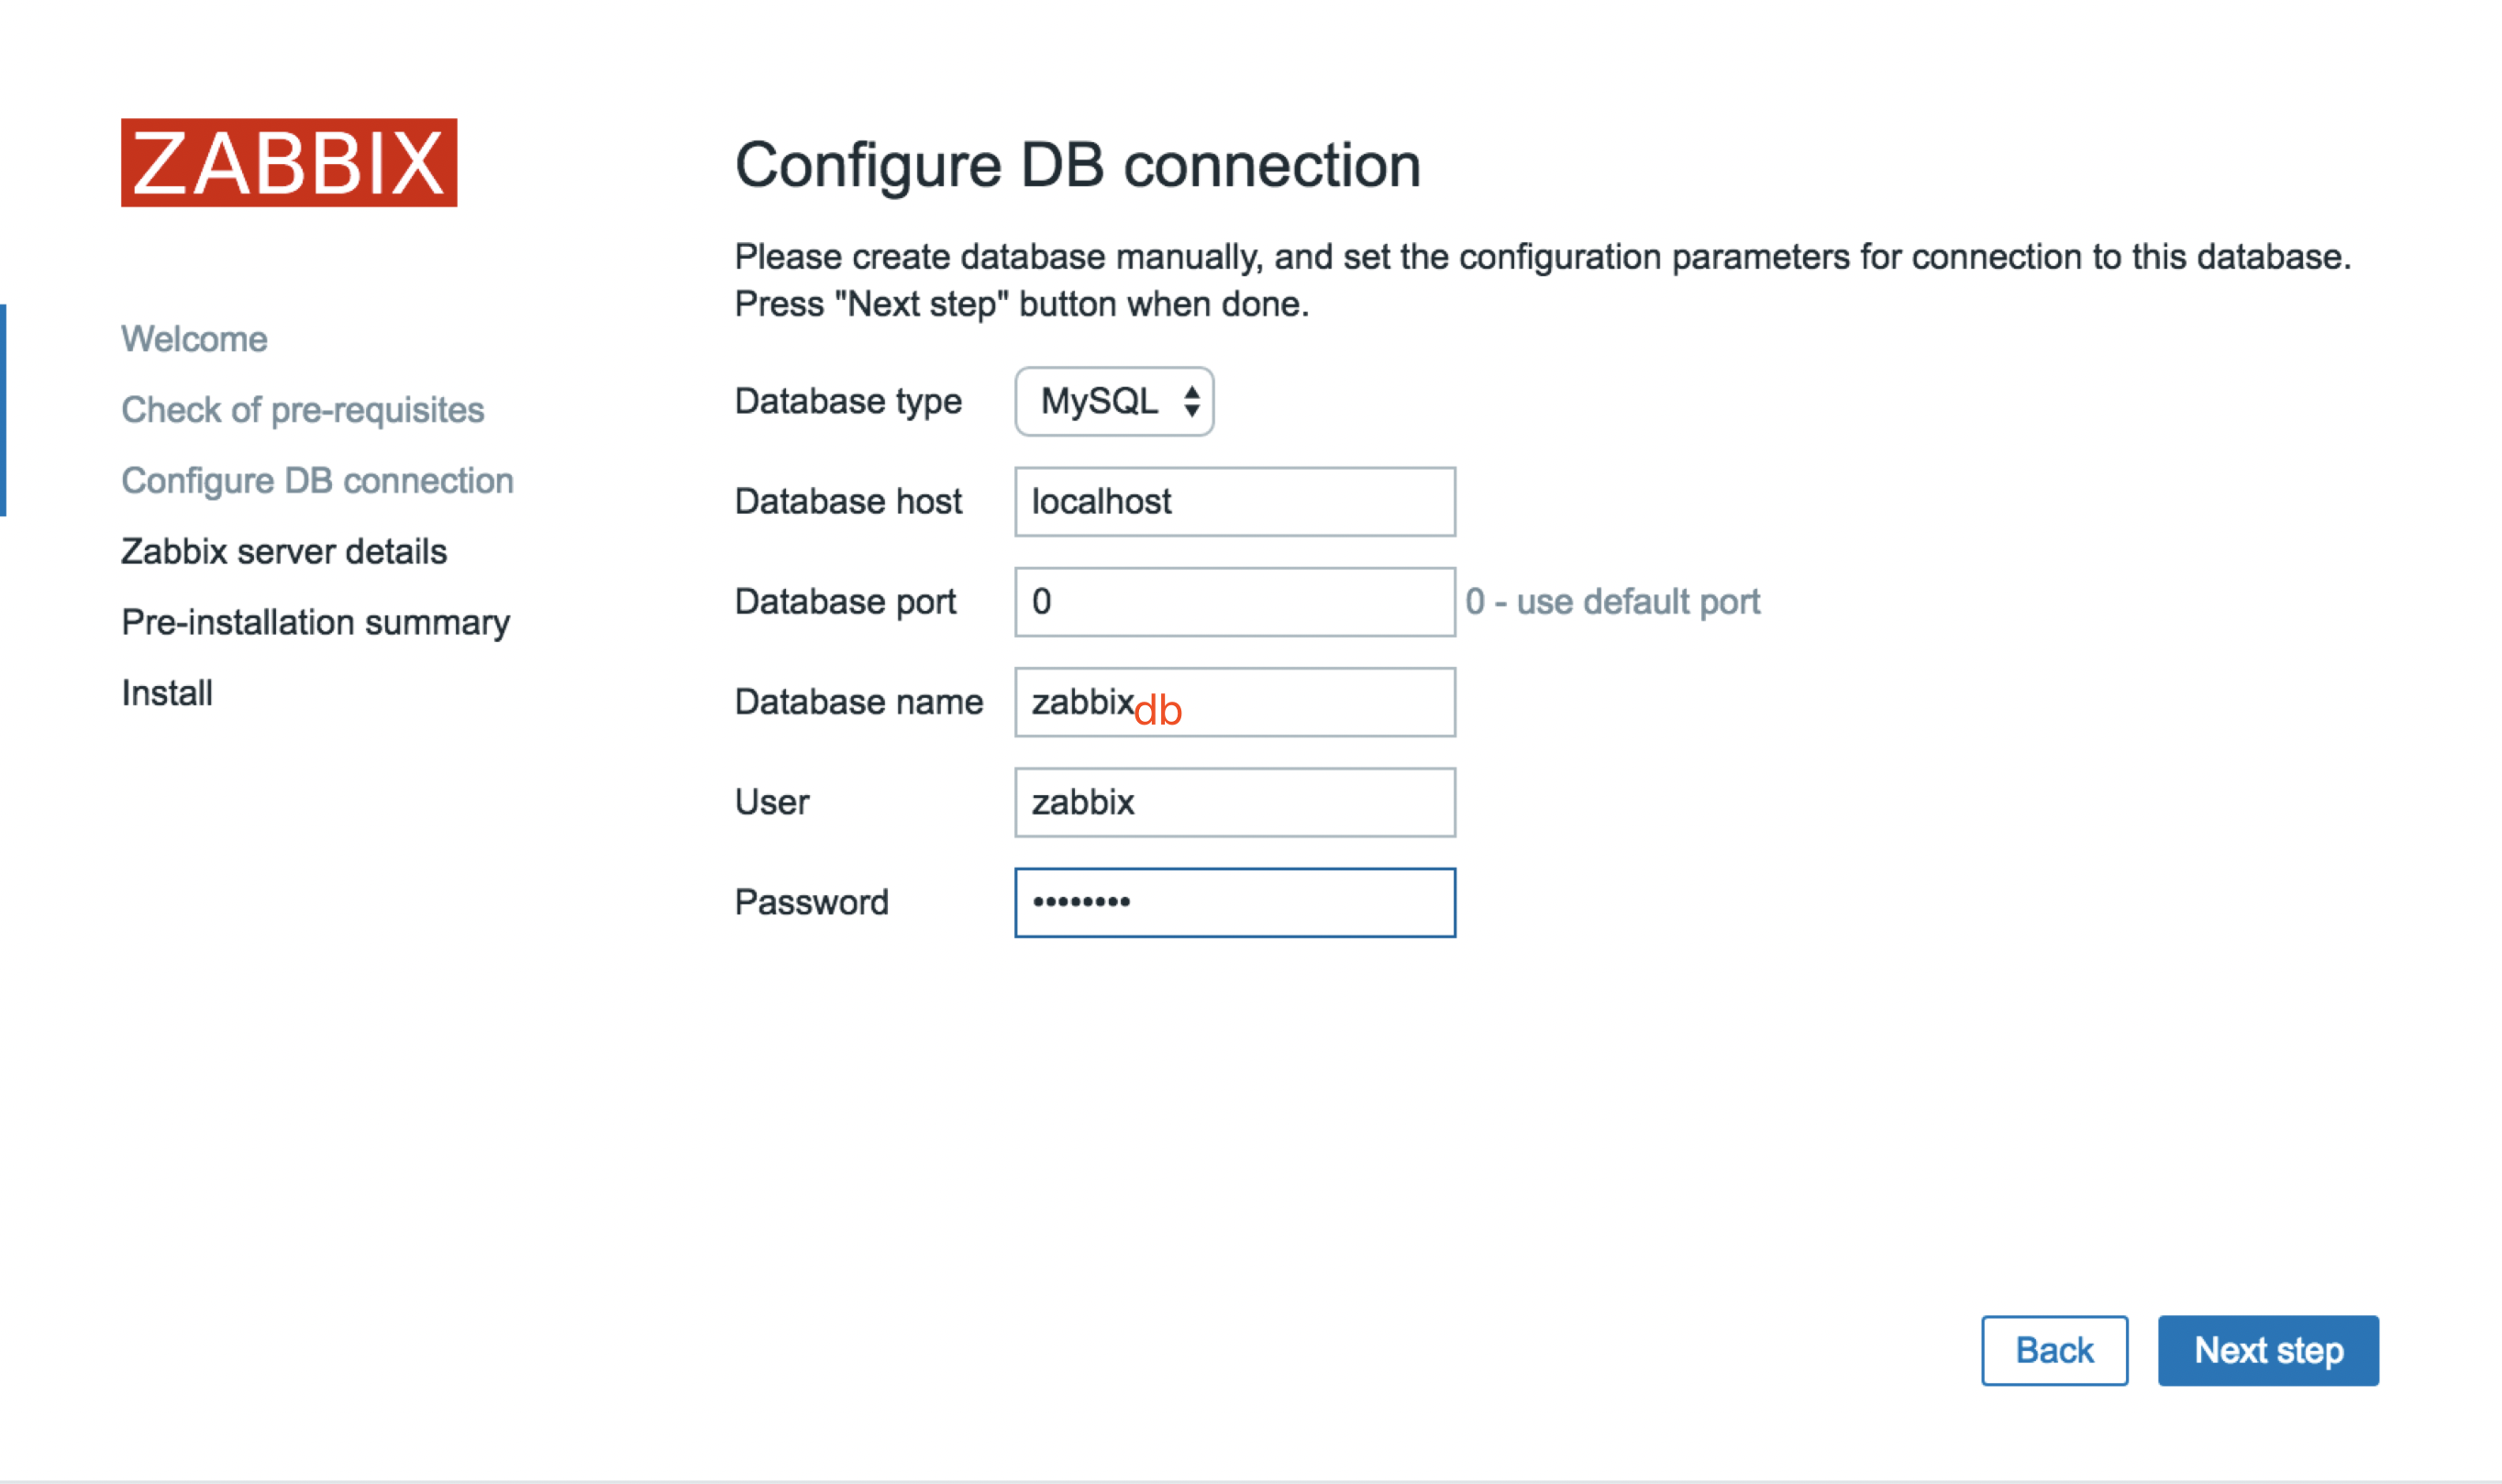
注意:这里配置的是mysql设置的信息
完成之后,默认的登陆方式为
admin/zabbix
三、优化操作
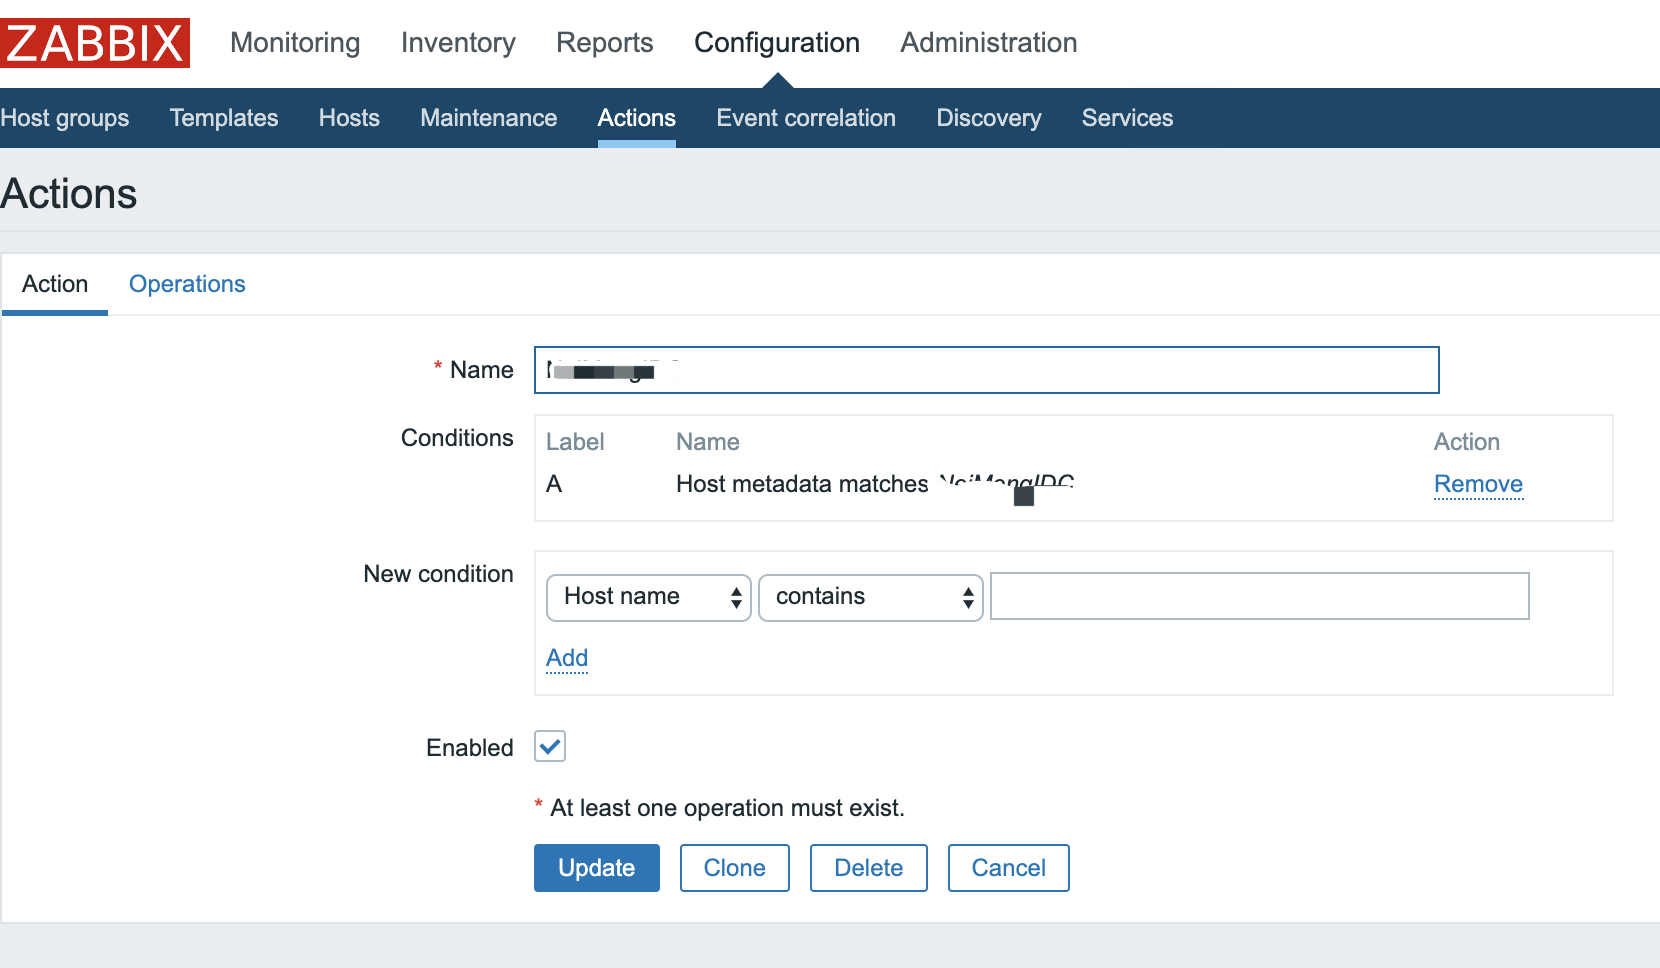
1、zabbix-agent自动注册到zabbix-server
可使用host name、host metadata或者proxy方式
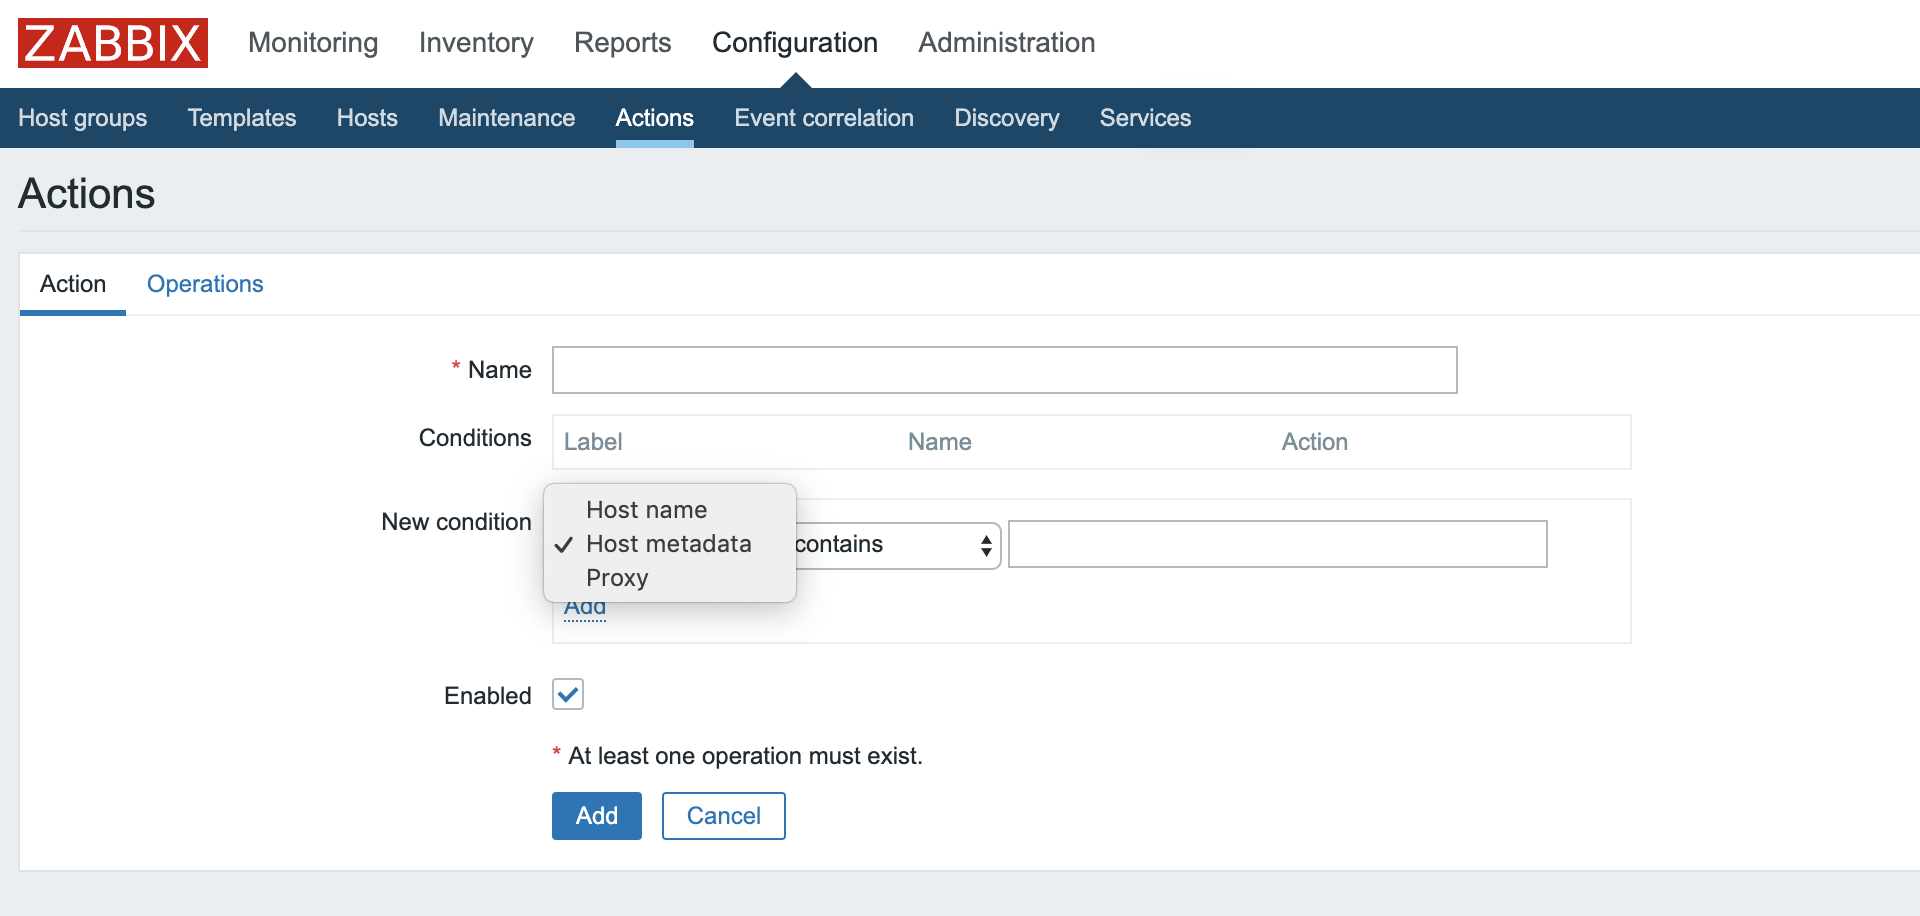

前端配置完成之后,需要在agent进行配置
四、客户端安装
1、zabbix-agent安装
1 sudo wget http://repo.zabbix.com/zabbix/4.2/ubuntu/pool/main/z/zabbix-release/zabbix-release_4.2-1%2Bxenial_all.deb
2 sudo dpkg -i zabbix-release_4.2-1+xenial_all.deb
3 sudo apt-get update
4 sudo apt-get install zabbix-agent
2、修改配置文件
2.1、修改脚本
建议使用脚本批量修改
注1:192.168.100.133是zabbix-server地址
注2:如果自动注册使用Host metadata方式,需要将# HostMetadataItem=修改为HostMetadata=(前端配置的名字,自定义)
注3:如果自动注册使用Host name方式,需要将# HostMetadataItem=修改为HostMetadataItem=system.uname(值来自key)
zabbix_agent_conf_replace.sh
#! /usr/bin/env bash
ZABBIX_HOSTNAME=$(hostname)
sed -i "s/^Hostname=Zabbix server/Hostname=$ZABBIX_HOSTNAME/g" /etc/zabbix/zabbix_agentd.conf
sed -i "s/^ServerActive=127.0.0.1/ServerActive=192.168.100.133/g" /etc/zabbix/zabbix_agentd.conf
sed -i "s/^Server=127.0.0.1/Server=192.168.100.133/g" /etc/zabbix/zabbix_agentd.conf
sed -i "s/^# UnsafeUserParameters=0/UnsafeUserParameters=1/g" /etc/zabbix/zabbix_agentd.conf
sed -i "s/^# HostMetadataItem=/HostMetadata=(前端配置的名字)/g" /etc/zabbix/zabbix_agentd.conf
systemctl restart zabbix-agent.service
systemctl enable zabbix-agent.service
2.2、上传脚本至服务器
在自己笔记本或者中控服务器上(需要跟各服务器能通)定义列表environment.list
# 集群各机器 IP 数组
export NODE_IPS=(192.168.100.111 192.168.100.112 192.168.100.114 192.168.100.119 192.168.100.119 192.168.100.124 192.168.100.115 192.168.100.113 192.168.100.120 192.168.100.126 192.168.100.127)
1 source environment.list
2 for node_ip in ${NODE_IPS[@]};   do     echo ">>> ${node_ip}";     scp ./zabbix_replace.sh ${node_ip}:/tmp;   done
3 pssh -i -h server.list "sudo su - root -c 'sh /tmp/zabbix_replace.sh'"
正常情况下,到这里就完成了部署和自动注册上线
五、遇到的问题
1、php无法解析
原因:未开启php-fpm(或者php-cgi)
解决:nginx配置文件(/etc/nginx/sites-enabled/default)里,server选项里开启php-fpm即可
server {
        listen 80 default_server;
        listen [::]:80 default_server;

        # SSL configuration
        #
        # listen 443 ssl default_server;
        # listen [::]:443 ssl default_server;
        #
        # Note: You should disable gzip for SSL traffic.
        # See: https://bugs.debian.org/773332
        #
        # Read up on ssl_ciphers to ensure a secure configuration.
        # See: https://bugs.debian.org/765782
        #
        # Self signed certs generated by the ssl-cert package
        # Don't use them in a production server!
        #
        # include snippets/snakeoil.conf;

        root /var/www/html;

        # Add index.php to the list if you are using PHP
        index index.html index.htm index.nginx-debian.html index.php;

        server_name _;

        location / {
                # First attempt to serve request as file, then
                # as directory, then fall back to displaying a 404.
                try_files $uri $uri/ =404;
        }

        # pass the PHP scripts to FastCGI server listening on 127.0.0.1:9000
        #
        location ~ \.php$ {
                include snippets/fastcgi-php.conf;

        #       # With php7.0-cgi alone:
        #       fastcgi_pass 127.0.0.1:9000;
                # With php7.0-fpm:
                fastcgi_pass unix:/run/php/php7.0-fpm.sock;
        }

        # deny access to .htaccess files, if Apache's document root
        # concurs with nginx's one
        #
        #location ~ /\.ht {
        #       deny all;
        #}
}
2、nginx 403
(directory index of "/var/www/html/zabbix/" is forbidden)
原因:nginx里未配置php的允许
解决:nginx配置文件(/etc/nginx/sites-enabled/default)里,server选项里添加index.php即可
3、附件:默认配置文件
/etc/nginx/nginx.conf
user www-data;
worker_processes auto;
pid /run/nginx.pid;

events {
    worker_connections 768;
    # multi_accept on;
}

http {

    ##
    # Basic Settings
    ##

    sendfile on;
    tcp_nopush on;
    tcp_nodelay on;
    keepalive_timeout 65;
    types_hash_max_size 2048;
    # server_tokens off;

    # server_names_hash_bucket_size 64;
    # server_name_in_redirect off;

    include /etc/nginx/mime.types;
    default_type application/octet-stream;

    ##
    # SSL Settings
    ##

    ssl_protocols TLSv1 TLSv1.1 TLSv1.2; # Dropping SSLv3, ref: POODLE
    ssl_prefer_server_ciphers on;

    ##
    # Logging Settings
    ##

    access_log /var/log/nginx/access.log;
    error_log /var/log/nginx/error.log;

    ##
    # Gzip Settings
    ##

    gzip on;
    gzip_disable "msie6";

    # gzip_vary on;
    # gzip_proxied any;
    # gzip_comp_level 6;
    # gzip_buffers 16 8k;
    # gzip_http_version 1.1;
    # gzip_types text/plain text/css application/json application/javascript text/xml application/xml application/xml+rss text/javascript;

    ##
    # Virtual Host Configs
    ##

    include /etc/nginx/conf.d/*.conf;
    include /etc/nginx/sites-enabled/*;
}


#mail {
#    # See sample authentication script at:
#    # http://wiki.nginx.org/ImapAuthenticateWithApachePhpScript
#
#    # auth_http localhost/auth.php;
#    # pop3_capabilities "TOP" "USER";
#    # imap_capabilities "IMAP4rev1" "UIDPLUS";
#
#    server {
#        listen     localhost:110;
#        protocol   pop3;
#        proxy      on;
#    }
#
#    server {
#        listen     localhost:143;
#        protocol   imap;
#        proxy      on;
#    }
#}
/etc/nginx/sites-enabled/default
##
# You should look at the following URL's in order to grasp a solid understanding
# of Nginx configuration files in order to fully unleash the power of Nginx.
# http://wiki.nginx.org/Pitfalls
# http://wiki.nginx.org/QuickStart
# http://wiki.nginx.org/Configuration
#
# Generally, you will want to move this file somewhere, and start with a clean
# file but keep this around for reference. Or just disable in sites-enabled.
#
# Please see /usr/share/doc/nginx-doc/examples/ for more detailed examples.
##

# Default server configuration
#
server {
listen 80 default_server;
listen [::]:80 default_server;

# SSL configuration
#
# listen 443 ssl default_server;
# listen [::]:443 ssl default_server;
#
# Note: You should disable gzip for SSL traffic.
# See: https://bugs.debian.org/773332
#
# Read up on ssl_ciphers to ensure a secure configuration.
# See: https://bugs.debian.org/765782
#
# Self signed certs generated by the ssl-cert package
# Don't use them in a production server!
#
# include snippets/snakeoil.conf;

root /var/www/html;

# Add index.php to the list if you are using PHP
index index.html index.htm index.nginx-debian.html index.php;

server_name _;

location / {
# First attempt to serve request as file, then
# as directory, then fall back to displaying a 404.
try_files $uri $uri/ =404;
}

# pass the PHP scripts to FastCGI server listening on 127.0.0.1:9000
#
location ~ \.php$ {
include snippets/fastcgi-php.conf;

#    # With php7.0-cgi alone:
#    fastcgi_pass 127.0.0.1:9000;
# With php7.0-fpm:
fastcgi_pass unix:/run/php/php7.0-fpm.sock;
}

# deny access to .htaccess files, if Apache's document root
# concurs with nginx's one
#
#location ~ /\.ht {
#    deny all;
#}
}


# Virtual Host configuration for example.com
#
# You can move that to a different file under sites-available/ and symlink that
# to sites-enabled/ to enable it.
#
#server {
#    listen 80;
#    listen [::]:80;
#
#    server_name example.com;
#
#    root /var/www/example.com;
#    index index.html;
#
#    location / {
#    try_files $uri $uri/ =404;
#    }
#}

 浙公网安备 33010602011771号