cocos creator基础-cc.Node(一)场景树

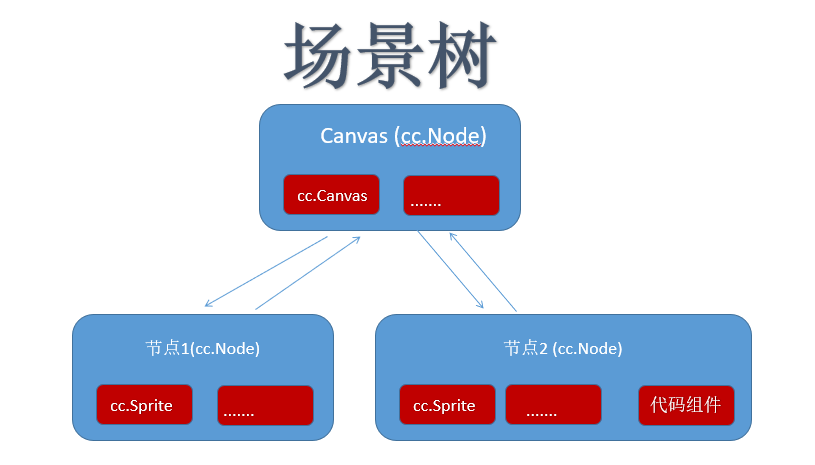
场景树
1: creator是由一个一个的游戏场景组成,通过代码逻辑来控制场景跳转;
2: creator场景是一个树形结构;
3: 父节点, 孩子节点;
4: cc.Node就是场景树中的节点对象。
5: 每个节点只要在场景里面,所以任何一个节点都是一个cc.Node;
cc.Node属性
1: name: 获取节点的名字
2: active: 设置节点的可见性;
3: position: 相对坐标,参照物是父亲节点;
4: rotation: 旋转,顺时针为正, 数学逆时针为正;
5: scale: 缩放;
6: anchor: 锚点, 左下角(0, 0), 右上角(1, 1) 可以超过这个范围可以
7: Size: 大小
8: Color: 环境颜色;
9: Opacity: 透明度,
10: Skew: 扭曲;
11: Group: 分组; 进行碰撞检测
12: parent: 父亲节点的cc.Node;
13: children/childrenCount: 孩子节点的数组;
14: tag : 节点标签;
cc.Component
1:所有的组件都扩展自cc.Component(类, 构造函数);
2:每个cc.Component组件实例都有个成员node,指向它关联节点的cc.Node;
3: name: 每一个cc.Component组件通过name属性可以获得节点的名字;
4: 组件实例入口函数:
onLoad: 在组件加载的时候调用;
start: 组件第一次激活前, 调用在第一次update之前;
update(dt): 每次游戏刷新的时候调用,
lateUpdate(dt): 在update之后调用;
enabled:组件是否被启动;
onEnable: 组件被允许的时候调用;
onDisable: 组件不被允许的时候调用;
代码组件
1:每个代码组件实例都继承自cc.Component(构造函数),所以有一个node数据成员指向cc.Node;
2: cc.Class({...}) 定义导出了一个新的类的构造函数,它继承自cc.Component;
3: 当为每个节点添加组件的时候,会实例化(new)这个组件类,生成一个组件实例;(js语法new)
4: 当组件加载运行的时候,代码函数里面的this指向这个组件的实例;
5: 代码组件在挂载的时候扩展自cc.Component, 里面有个成员node会指向节点(cc.Node);
所以在代码组件里面,可以使用this.node来访问这个组件实例说挂载的节点对象;
6: 代码里访问cc.Node总要属性;
cc.Node场景树相关方法
1: 代码中创建一个节点new cc.Node();
1: addChild; 加一个子节点
2: removeFromParent/ removeAllChildren; 从父节点删除单个 / 删除所有孩子
3: setLocalZOrder/ 绘制顺序, 在下面(值越大)的会绘制在屏幕的上面;
4: 遍历节点的子节点;
5: setPosition/getPosition,
6: getChildByName/getChildByTag, getChildByIndex, 局部查找
7: cc.find(): 方便,不通用, 消耗 全局查找
 1 cc.Class({
 2
 3     extends: cc.Component,
 4
 5     properties: {
 6         // foo: {
 7         //    default: null,      // The default value will be used only when the component attaching
 8         //                           to a node for the first time
 9         //    url: cc.Texture2D,  // optional, default is typeof default
10         //    serializable: true, // optional, default is true
11         //    visible: true,      // optional, default is true
12         //    displayName: 'Foo', // optional
13         //    readonly: false,    // optional, default is false
14         // },
15         // ...
16     },
17
18     // use this for initialization
19     // 组件实例在加载的时候运行
20     // 组件实例.onLoad(), 组件实例.start;
21     onLoad: function () {
22         // this, --> 当前组件实例
23         console.log(this);
24         console.log("this.onLoad");
25
26         // 代码里面怎么找到节点?
27         // 指向这个组件实例所挂载的节点
28         console.log("=======================");
29         console.log(this.node);
30         console.log(this.node.name);
31         console.log(this.node.active);
32         console.log(this.node.x, this.node.y, this.node.position);
33         console.log(this.node.group, this.node.groupIndex);
34         if (this.node.parent) {
35             console.log(this.node.parent.name);
36             console.log("go if @@@@@");
37         }
38         else {
39             // console.log(this.node.parent);
40             console.log("go else @@@@@");
41         }
42         console.log("========================");
43         // end
44
45
46         // 孩子
47         var children = this.node.children; // [cc.Node, cc.Node, cc.Node]
48         for(var i = 0; i < children.length; i ++) {
49             console.log(children[i].name);
50         }
51         // end
52
53         console.log("yes we have:", this.node.childrenCount,"chilren");
54
55         // 添加
56         /*var new_node = new cc.Node();
57         this.node.addChild(new_node);
58         new_node.removeFromParent();
59         this.node.removeAllChildren();*/
60         // end
61
62         // 查找,局部查找
63         var item = this.node.getChildByName("item1");
64         console.log("^^^^^^^", item.name);
65         // end
66
67         // 全局, 时间消耗,对于编写通过用的模块
68         item = cc.find("Canvas/parent/item1");
69         console.log("#######", item.name);
70         // end
71
72         var pos = item.getPosition(); // 相对位置
73         console.log("pos = ", pos);
74         pos = cc.p(100, 100); // cc.Vec,
75         item.setPosition(pos);
76
77         var item2 = this.node.getChildByName("item2");
78         item2.setLocalZOrder(100);
79         item2.active = false; //
80     },
81
82     // 组件实例
83     start: function() {
84
85     },
86
87
88     // called every frame, uncomment this function to activate update callback
89     // 组件实例.update
90     update: function (dt) {
91
92     },
93 });


