
Spring5(二)——IOC
一、入门
1、案例
代码示例:实体类
 1 public class Student {
 2
 3     private String name;
 4
 5     public Student() {
 6         System.out.println("Student()...");
 7     }
 8
 9     public String getName() {
10         return name;
11     }
12
13     public void setName(String name) {
14         this.name = name;
15         System.out.println("setName... " + name);
16     }
17
18 }
1 <!-- 配置bean -->
2 <bean id="student" class="com.lx.spring.day1.Student">
3     <property name="name" value="小猪"/>
4 </bean>
代码示例:测试类
 1 public class Main {
 2
 3     public static void main(String[] args) {
 4         // 1.原始的创建bean的方式
 5         Student student = new Student();
 6         student.setName("工匠");
 7         System.out.println(student.getName());
 8
 9         // 2.交给spring去做
10         ApplicationContext app = new ClassPathXmlApplicationContext("app1.xml");
11
12         Student bean = app.getBean(Student.class);
13         System.out.println(bean.getName());
14     }
15 }
2、IOC、DI
Spring实际上是一个容器框架,它可以接管web层,业务层,持久层,dao层的各个组件。可以配置各种bean(action/service/domain/dao),并且可以维护bean与bean之间的关系,当我们需要使用某个bean的时候,我们可以getBean(),使用即可。
IOC是什么?
答:控制反转(inverse of controll):所谓控制反转就是把创建对象(bean)和维护对象(bean)的关系的权利从程序中转移到Spring的容器中(applicationContext.xml),而程序本身不再维护。
DI是什么?
答:依赖注入(dependency injection):实际上di和ioc是同一个概念,Spring设计者认为di更能准确表示Spring核心技术。
学习框架,最重要的就是学习各个配置。
二、IOC、DI
1、什么是IOC?
控制反转。它不是什么技术,而是一种设计思想。
传统的创建对象的方法是直接通过 new 关键字,而 Spring 则是通过 IOC 容器来创建对象,也就是说我们将创建对象的控制权交给了 IOC 容器。我们可以用一句话来概括 IOC:IOC 让程序员不在关注怎么去创建对象,而是关注对象创建之后的操作,把对象的创建、初始化、销毁等工作交给Spring容器来做。
2、什么是DI依赖注入?
Spring动态的向某个对象提供它所需要的其他对象。这一点是通过DI(Dependency Injection,依赖注入)来实现的。比如对象A需要操作数据库,以前我们总是要在A中自己编写代码来获得一个Connection对象,有了 Spring我们就只需要告诉Spring,A中需要一个Connection,至于这个Connection怎么构造,何时构造,A不需要知道。在系统运行时,Spring会在适当的时候制造一个Connection,然后像打针一样,注射到A当中,这样就完成了对各个对象之间关系的控制。A需要依赖 Connection才能正常运行,而这个Connection是由Spring注入到A中的,依赖注入的名字就这么来的。那么DI是如何实现的呢?Java 1.3之后一个重要特征是反射(reflection),它允许程序在运行的时候动态的生成对象、执行对象的方法、改变对象的属性,Spring就是通过反射来实现注入的。
简单来说什么是依赖注入,就是给属性赋值(包括基本数据类型和引用数据类型)。
详情见基本装配。
3、IOC底层原理
xml解析、反射、工厂模式
4、Spring 容器创建对象的三种方式
构造器;利用静态工厂方法;实例工厂方法。
 1 # app1.xml
 2 <?xml version="1.0" encoding="UTF-8"?>
 3 <beans xmlns="http://www.springframework.org/schema/beans"
 4        xmlns:xsi="http://www.w3.org/2001/XMLSchema-instance"
 5        xsi:schemaLocation="http://www.springframework.org/schema/beans
 6        http://www.springframework.org/schema/beans/spring-beans-4.3.xsd">
 7
 8     <!--    在spring的配置文件bean中有一个属性 lazy-init="default/true/false"-->
 9     <!--    ①、如果lazy-init为"default/false"在启动spring容器时创建对象(默认情况)-->
10     <!--    ②、如果lazy-init为"true",  表示不预先加载  在context.getBean时才要创建对象-->
11
12     <!-- 方法一:构造器,配置bean -->
13     <bean id="student" class="com.lx.spring.day1.Student">
14         <property name="name" value="小猪"/>
15     </bean>
16
17     <!-- 方法二:利用静态工厂方法 -->
18     <!-- spring容器启动时,这句话等价于
19      Object helloIoc = HelloStaticFactory.getInstances(); // 这个静态的工厂方法 return new HelloIoc();
20      注意:这里 HelloStaticFactory() 构造器并没有执行。换句话说,HelloStaticFactory的bean并没有创建
21      -->
22     <bean id="helloIoc" class="com.lx.spring.day1.HelloStaticFactory" factory-method="getInstances"/>
23
24     <!-- 方法三:利用实例工厂方法 -->
25     <!--
26         factory-bean:指定当前Spring中包含工厂方法的beanID
27         factory-method:工厂方法名称
28
29         下面两句话等价于
30         HelloInstanceFactory instanceFactory = new HelloInstanceFactory();
31         Object instance = instanceFactory.getInstance(); // 这个工厂方法 return new HelloIoc();
32       -->
33     <bean id="instanceFactory" class="com.lx.spring.day1.HelloInstanceFactory"/>
34     <bean id="instance" factory-bean="instanceFactory" factory-method="getInstance"/>
35
36 </beans>
 1 // 测试类
 2 public class Main {
 3
 4     public static void main(String[] args) {
 5         // 1.原始的创建对象的方式
 6         Student student = new Student();
 7         student.setName("工匠");
 8         System.out.println(student.getName());
 9
10         // Spring 容器创建对象的三种方式
11
12         // 2.IOC
13         ApplicationContext app = new ClassPathXmlApplicationContext("app1.xml");
14         Student bean = app.getBean(Student.class);
15         System.out.println(bean.getName());
16
17         // 2.1.把ApplicationContext做成一个单例模式
18         ApplicationContext app1 = ApplicationContextUtil.getApplicationContext();
19         Student bean1 = app1.getBean(Student.class);
20         System.out.println(bean1.getName());
21
22         // 3.利用静态工厂方法
23         ApplicationContext context = new ClassPathXmlApplicationContext("app1.xml");
24         HelloIoc helloIoc = (HelloIoc) context.getBean("helloIoc");
25         helloIoc.sayHello();
26
27         // 4.利用实例工厂方法
28         ApplicationContext app = new ClassPathXmlApplicationContext("app1.xml");
29         HelloIoc staticFactory = (HelloIoc) app.getBean("instance");
30         staticFactory.sayHello();
31
32     }
33 }
三、Bean工厂和ApplicationContext的区别
1、介绍
bean工厂:最简单的容器,创建分发各种bean,提供了基础的依赖注入支持,创建各种类型的bean。配置好它们之间的协作关系,参与bean的生命周期。
应用上下文(ApplicationContext):建立在bean工厂基础之上,Spring更加高级的容器,提供系统架构服务。功能强大:提供文本信息解析工具,包括对国际化支持。提供载入文件资源的通用方法,如图片。可以向注册为监听器的bean发送事件。
在很少的情况下,使用BeanFactory,如在移动设备。
2、获取方式
1 ApplicationContext app = new ClassPathXmlApplicationContext("applicationContext.xml");
2
3 BeanFactory factory = new XmlBeanFactory(new ClassPathResource("applicationContext.xml"));
3、区别(作用域)
使用ApplicationContext,当我们去实例化applicationContext.xml,则配置的bean如果是singleton(默认scope="singleton"),不管是否使用该bean,都会被实例化(好处就是可以预先加载,缺点就是耗内存)。如果不是singleton,则不会被创建。
使用BeanFactory,则当你获取BeanFactory的时候,只是实例化该容器。bean工厂只把bean定义的信息载进来,配置的bean不会被马上实例化,只有用到的时候才实例化。(延迟加载,好处节约内存,缺点就是速度较慢)
代码示例:作用域


 1 public class Stu {
 2     private String name;
 3     private int age;
 4
 5     public Stu() {
 6         System.out.println("Stu()"); // 打印.用于查看构造函数是否调用
 7     }
 8 }
 9
10 application.xml
11 // 配置一:singleton
12 <bean id="stu" class="com.lx.acm.Stu"> // scope="singleton"
13     <property name="name" value="lu"/>
14     <property name="age" value="18"/>
15 </bean>
16
17 // 配置二:prototype
18 <bean id="stu" class="com.lx.acm.Stu" scope="prototype">
19     <property name="name" value="lu"/>
20     <property name="age" value="18"/>
21 </bean>
 1 @Test
 2 public void test() {
 3     ApplicationContext app = new ClassPathXmlApplicationContext("application.xml");
 4     Stu stu1 = (Stu) app.getBean("stu");
 5     Stu stu2 = (Stu) app.getBean("stu");
 6
 7     System.out.println(stu1 == stu2);
 8 }
 9
10 // 配置一结果:singleton
11 // 单独执行row3.构造函数被调用一次 -- > Stu()
12 // 执行完整.构造函数也只被调用一次 -- > Stu() 、 true
13
14 // 配置二结果:prototype
15 // 单独执行row3.构造函数不会被调用 -- >
16 // 执行完整.getBean()几次,就会被构造几次 -- > Stu()、Stu()、false
 1 @Test
 2 public void test() {
 3     BeanFactory factory = new XmlBeanFactory(new ClassPathResource("application.xml"));
 4     Stu stu1 = (Stu) factory.getBean("stu");
 5     Stu stu2 = (Stu) factory.getBean("stu");
 6
 7     System.out.println(stu1 == stu2);
 8 }
 9
10 // 配置一结果:singleton
11 // 单独执行row3.构造函数不会被调用 -- >
12 // 执行完整.构造函数也只被调用一次 -- > Stu() 、 true
13
14 // 配置二结果:prototype
15 // 单独执行row3.构造函数不会被调用 -- >
16 // 执行完整.getBean()几次,就会被构造几次 -- > Stu()、Stu()、false
4、结论
只要scope="singleton",不管是应用上下文,还是Bean工厂,实例都只创建一次。
从ApplicationContext里拿,配置的bean是singleton,容器会预加载,每次拿到的是同一个bean。如果是prototype,容器不会预加载,且每次都是全新的。
原型:scope="prototype",每次获取都会产生一个全新的对象。那么它就不知道创建几次了(所以就放弃预加载了)。
实际开发:一般没有特殊要求,应当使用ApplicatioContext完成(90%)。
5、bean的作用域
|
作用域
|
描述
|
|
singleton
|
在每个spring Ioc容器中一个bean定义对应一个对象实例(单例)。
|
|
prototype
|
一个bean定义对应多个对象实例(原型)。
|
|
request
|
在一次Http请求中,一个bean定义对应一个实例;即每次Http请求将会有各自的bean实例,它们依据某个bean定义创建而成。该作用域仅在基于web的spring ApplicationContext 情形下有效。
|
|
session
|
在一个Http session中,一个bean定义对应一个实例。改作用域仅在基于web的spring ApplicationContext情形下有效。
|
|
global
session
|
在一个全局Http session中,一个bean定义对应一个实例。典型情况下,仅在使用portlet context的时候有效。该作用域仅在基于web的spring ApplicationContext情形下有效。
|
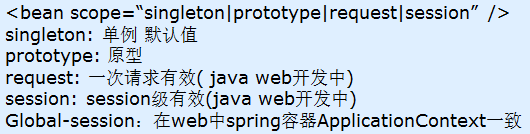
说明:
request、session、global-session是在web开发中才有意义。
singleton 与 global-session类似;prototype 与 request类似。
尽量使用scope="singleton",不要使用prototype,特别大对象,每次都获取一个全新的对我们的性能影响较大。
6、三种获取ApplicationContext的方法
ClassPathXmlApplicationContext:从类路径中加载。
FileSystemXmlApplicationContext:从文件系统加载。绝对路径。
XmlWebApplicationContext:从web应用上下文中载入。
四、Bean的生命周期
1、bean在ApplicationContext中的生命周期

- 实例化,会把我们的bean(前提是scope="singleton")实例化到内存。此时程序调用无参的构造函数。
- 调用set方法设置属性。
- 如果实现了BeanNameAware(bean名字关注)接口,则可以通过setBeanName获取bean的id号。
- 如果实现了BeanFactoryAware(bean工厂关注)接口,则可以通过setBeanFactory获取BeanFactory。
- 如果实现了ApplicationContextAware(应用上下文关注)接口,则可以通过setApplicationContext获取应用上下文。
- 如果bean和一个BeanPostProcessor(后置处理器)关联(配置了),则会自动去调用postProcessBeforeInitialization方法。
- 如果实现了InitializingBean(初始化bean)接口,则会调用afterPropertiesSet方法。
- 如果配置了<bean init-method="myInit" /> 则可以调用定制的初始化myInit方法。
- 如果bean和一个BeanPostProcessor(后置处理器)关联(配置了),则会自动去调用postProcessAfterInitialization方法。
- 如果实现了DisposableBean接口,则会调用destroy方法。
- 如果配置了<bean destroy-method="myDestroy" /> 则可以调用定制的销毁myDestroy方法。
  1 // application.xml
  2
  3 <bean id="stu" class="com.lx.acm.Stu" init-method="myInit" destroy-method="myDestroy">
  4     <property name="name" value="lu"/>
  5     <property name="age" value="18"/>
  6 </bean>
  7
  8 <!-- 配置一个bean后置处理器 -->
  9 <bean id="myBeanPostProcessor" class="com.lx.acm.MyBeanPostProcessor"/>
 10
 11 // 实例Bean
 12 public class Stu implements BeanNameAware, BeanFactoryAware, ApplicationContextAware, InitializingBean, DisposableBean {
 13     private String name;
 14     private int age;
 15
 16     public Stu() {
 17         System.out.println("1--Stu()");
 18     }
 19
 20     public void setName(String name) {
 21         System.out.println("2--setName()");
 22         this.name = name;
 23     }
 24
 25     public void setAge(int age) {
 26         System.out.println("2--setAge()");
 27         this.age = age;
 28     }
 29
 30     @Override
 31     public void setBeanName(String name) {
 32         System.out.println("3--setBeanName()" + " bean name is : " + name);
 33     }
 34
 35     @Override
 36     public void setBeanFactory(BeanFactory beanFactory) throws BeansException {
 37         System.out.println("4--setBeanFactory()");
 38     }
 39
 40     @Override
 41     public void setApplicationContext(ApplicationContext applicationContext) throws BeansException {
 42         System.out.println("5--setApplicationContext()");
 43     }
 44
 45     @Override
 46     public void afterPropertiesSet() throws Exception {
 47         System.out.println("7--afterPropertiesSet()");
 48     }
 49
 50     // @PostConstruct
 51     public void myInit() {
 52         System.out.println("8--myInit()");
 53     }
 54
 55     public void show() {
 56         System.out.println("the last method is show()");
 57     }
 58
 59     @Override
 60     public void destroy() throws Exception {
 61         // 可以关闭数据连接、文件流,释放资源
 62         System.out.println("10--destroy()");
 63     }
 64
 65     // @PreDestroy
 66     public void myDestroy() {
 67         System.out.println("11--myDestroy()");
 68     }
 69
 70     public String getName() {
 71         return name;
 72     }
 73
 74     public int getAge() {
 75         return age;
 76     }
 77
 78 }
 79
 80 // 后置处理器
 81 public class MyBeanPostProcessor implements BeanPostProcessor {
 82     @Override
 83     public Object postProcessBeforeInitialization(Object bean, String beanName) throws BeansException {
 84         System.out.println("6--postProcess-----------Before()");
 85         return bean; // 若 return null .则after不会执行
 86     }
 87
 88     @Override
 89     public Object postProcessAfterInitialization(Object bean, String beanName) throws BeansException {
 90         System.out.println("9--postProcess-----------After()");
 91         return bean;
 92     }
 93 }
 94
 95 @Test
 96 public void test() {
 97     ApplicationContext app = new ClassPathXmlApplicationContext("application.xml");
 98     Stu stu = app.getBean(Stu.class);
 99     stu.show();
100 }
101
102 // 结果
103 1--Stu()
104 2--setName()
105 2--setAge()
106 3--setBeanName() bean name is : stu
107 4--setBeanFactory()
108 5--setApplicationContext()
109 6--postProcess-----------Before()
110 7--afterPropertiesSet()
111 8--myInit()
112 9--postProcess-----------After()
113 the last method is show()
小结:关联BeanPostProcessor之后,每个bean都要过before、after方法,有点AOP思想。1—9步,都是在加载Spring容器的时候就执行了。实际开发中,往往没有用这么多的过程,常见的是:1-->2-->(4/5)-->6-->9-->10-->11
值得注意的是:定制的初始化与销毁的方法可以使用注解的方法,但注解不能与xml配置bean混着用。xml配置的话只能如上所写。
2、bean在bean工厂中的生命周期
通过BeanFactory来获取bean对象,bean的生命周期和ApplicationContext是不一样的,bean工厂中创建的bean生命周期会简单一些。

 1 // 其他相关代码与应用上下文相同
 2 @Test
 3 public void test() {
 4     BeanFactory factory = new XmlBeanFactory(new ClassPathResource("application.xml"));
 5     Stu stu = factory.getBean(Stu.class);
 6     stu.show();
 7 }
 8
 9 // 结果
10 1--Stu()
11 2--setName()
12 2--setAge()
13 3--setBeanName() bean name is : stu
14 4--setBeanFactory()
15 7--afterPropertiesSet()
16 8--myInit()
17 the last method is show()
小结:因为Bean工厂延迟加载,1—8步,都是在getBean()时才会执行。
作者:Craftsman-L
本博客所有文章仅用于学习、研究和交流目的,版权归作者所有,欢迎非商业性质转载。
如果本篇博客给您带来帮助,请作者喝杯咖啡吧!点击下面打赏,您的支持是我最大的动力!

 浙公网安备 33010602011771号