从零开始学习树莓派(二)
树莓派的型号:RaspberryPi Zero 2w
一、为树莓派系统更换源
通上一部分的配置,我们已经可以正常的通过笔记本终端SSH连接到树莓派上了,接下来需要将树莓派的源更换为国内的源,便于更快的下载软件。
但这里会遇到的问题是进度会一直卡在某个部分,出现如下的情况:

这是由于树莓派内存不够了,我们使用free -h查看系统的mem和swap,可以看到mem为417MB,而swap仅有100MB,因此可以将swap适当调大一些, sudo nano /etc/dphys-swapfile,这里将CONF_SWAPSIZE=100改为CONF_SWAPSIZE=2048,

保存文件Ctrl + O -> Enter->Ctrl + X退出,紧接着sudo reboot重启系统,然后再使用free -h就可以看到已经修改后的内存状态。

解决了内存不足的问题,接下来就可以继续进行换源操作
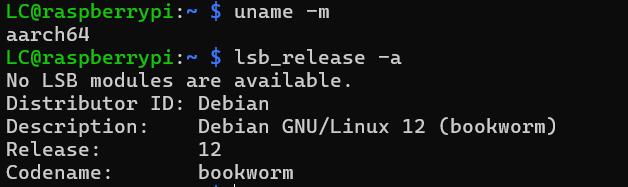
(一)查看系统版本
uname -m
| Name | Description |
|---|---|
| x86_64 | 表示 64 位的 x86 架构(通常称为 AMD64 或 x64) |
| i686 或 i386 | 表示 32 位的 x86 架构 |
| armv7l | 表示 32 位的 ARM 架构 |
| aarch64 | 表示 64 位的 ARM 架构(通常称为 ARM64) |
| ppc64le | 表示 64 位的小端序 PowerPC 架构 |
lsb_release -a命令用于显示有关操作系统发行版的信息。LSB 代表 Linux Standard Base,该命令提供有关操作系统版本、发行版等详细信息
(二)更换源
备份之前的镜像源cp /etc/apt/sources.list /etc/apt/sources.list.bak
打开文件进行设置sudo nano /etc/apt/sources.list,替换为以下的内容
# 默认注释了源码镜像以提高 apt update 速度,如有需要可自行取消注释
deb https://mirrors.tuna.tsinghua.edu.cn/debian/ bookworm main contrib non-free non-free-firmware
# deb-src https://mirrors.tuna.tsinghua.edu.cn/debian/ bookworm main contrib non-free non-free-firmware

deb https://mirrors.tuna.tsinghua.edu.cn/debian/ bookworm-updates main contrib non-free non-free-firmware
# deb-src https://mirrors.tuna.tsinghua.edu.cn/debian/ bookworm-updates main contrib non-free non-free-firmware

deb https://mirrors.tuna.tsinghua.edu.cn/debian/ bookworm-backports main contrib non-free non-free-firmware
# deb-src https://mirrors.tuna.tsinghua.edu.cn/debian/ bookworm-backports main contrib non-free non-free-firmware

# 以下安全更新软件源包含了官方源与镜像站配置,如有需要可自行修改注释切换
deb https://security.debian.org/debian-security bookworm-security main contrib non-free non-free-firmware
# deb-src https://security.debian.org/debian-security bookworm-security main contrib non-free non-free-firmware
最后一条是官方的源,如果太慢的话也可以修改为使用国内源
deb https://mirrors.tuna.tsinghua.edu.cn/debian-security bookworm-security main contrib non-free non-free-firmware
# deb-src https://mirrors.tuna.tsinghua.edu.cn/debian-security bookworm-security main contrib non-free non-free-firmware
备份软件源cp /etc/apt/sources.list.d/raspi.list /etc/apt/sources.list.d/raspi.bak
打开文件进行设置sudo nano /etc/apt/sources.list.d/raspi.list,更换为以下内容
deb http://mirror.tuna.tsinghua.edu.cn/raspberrypi/ bookworm main
最后使用命令进行更新
 sudo apt-get update
 sudo apt-get upgrade
二、在不外接显示器的情况下,如何显示树莓派的桌面屏幕
(一)笔记本的显示屏
使用HDMI线将树莓派与笔记本连接起来,但这时笔记本的屏幕上并不会显示出树莓派的桌面
原因:大部分笔记本的HDMI接口是 输出接口 ,无法输入。即,可以将笔记本的屏幕投到其他设备上,但不能被其他设备所投屏。
这里的解决办法是使用USB采集卡,将HDMI信号转化为USB信号来连接到笔记本上,即可在笔记本的看到树莓派的桌面,这里需要下载OBS,缺点是帧数较低,使用起来会比较卡顿。
(二)远程显示桌面
(1)使用VNC进行显示
在wins中下载VNC的相关软件,RealVNC、tigerVNC等等
在命令行中输入sudo raspi-config,进入系统配置界面,开启VNC服务
[Interface Options]->[VNC]->[Yes]


然后即可使用VNC软件远程连接树莓派的桌面

(2)使用windows自带的远程桌面连接
这里需要安装xrdp
sudo apt-get install xrdp
安装完成后查看一下xrdp的版本xrdp -version
xrdp 0.9.21.1
  A Remote Desktop Protocol Server.
  Copyright (C) 2004-2020 Jay Sorg, Neutrino Labs, and all contributors.
  See https://github.com/neutrinolabs/xrdp for more information.
没问题后即可使用wins自带的远程桌面连接和树莓派进行连接

输入用户名和密码

成功进入树莓派的桌面 (这里显示的是debian11系统的桌面,之前试debian12系统的时候一直无法成功连接,后面有时间再看看是哪里的问题,debian11的配置流程和12基本一致,换源时注意即可,一点小问题是第一次需要在图形界面手动开启WIFI,这时需要连接显示器,可以用之前的方法使用USB采集卡先将桌面的屏幕显示出来,开启WIFI,待连接后方能继续正常使用)
总结:
debian 11 可以正常使用两种方式连接,但debian 12似乎只能通过VNC进行连接。

 浙公网安备 33010602011771号