Map从入门到性能分析(案例篇-imooc)
Map初识
Map接口及其实现类

Map接口通用方法
V put(K key, V value) # 存入一个key-value项

V get(K key) # 根据key值返回value值

V remove(Object key) # 根据key值删除Map中的一个key-value项

boolean containsKey(Object key) # 是否包含指定的key
HashMap的使用
HashMap的构造方法
HashMap()    # 使用默认初始容量(16)和默认加载因子(0.75)构造一个空HashMap
HashMap(int initialCapacity)    # 使用指定的初始容量和默认加载因子(0.75)构造一个空HashMap
HashMap(int initialCapacity, float loadFactor)    # 使用指定初始容量和指定加载因子构造一个HashMap
HashMap的基本用法
// use the default initial capacity(16) and default loadFactor(0.75)
Map<String, Object> userMap = new HashMap<String, Object>();
// put an item(key-value) into the map
userMap.put("zs", new Integer(120));
// get an value from assigned key
userMap.get("zs")

public class GeneralUsageInMap {
	public static void main(String[] args) {
		// use the default initial capacity(16) and default loadFactor(0.75)
		Map<String, Integer> userMap = new HashMap<String, Integer>();
		userMap.put("zs01", 120);
		userMap.put("zs02", 120);
		userMap.put("zs03", 120);
		userMap.put("zs04", 120);
		userMap.put("zs05", 111);

		Integer num02 = userMap.get("zs03");
		Integer num01 = userMap.get("zs05");
		System.out.println("num02: " + num02); // num02: 120
		System.out.println("num01: " + num01); // num01: 111
	}
}
HashMap的Entry结构
Entry底层实现
static class Entry<K, V> implements Map.Entry<K, V>{
  final K key;
  V value;
  Entry<K, V> next;
  final int hash;
}
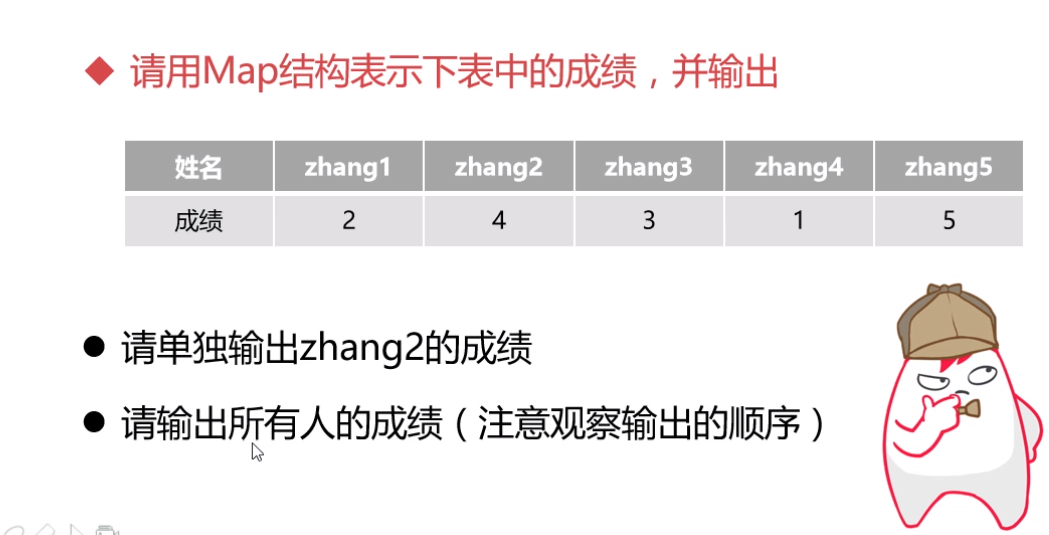
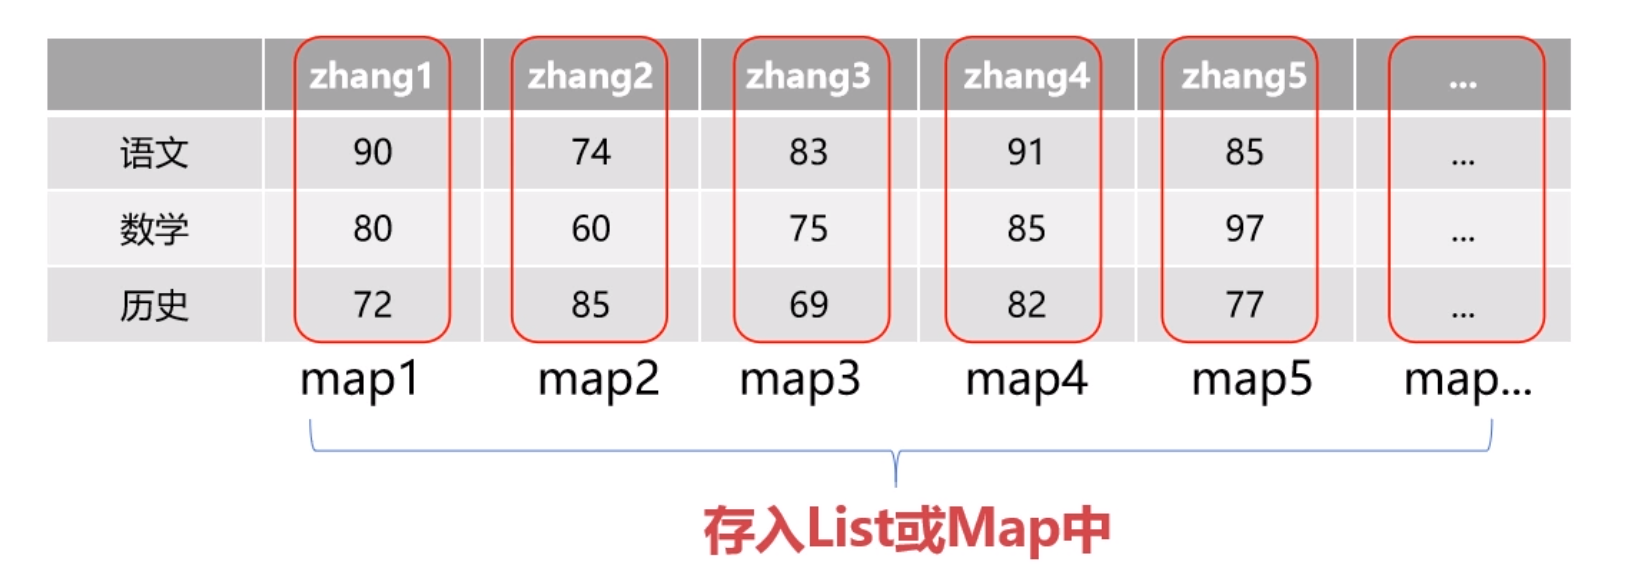
使用案例
public class GeneralUsageInMap {
	public static void main(String[] args) {
		// use the default initial capacity(16) and default loadFactor(0.75)
		Map<String, Integer> userMap = new HashMap<String, Integer>();
		userMap.put("zhang1", 2);
		userMap.put("zhang2", 4);
		userMap.put("zhang3", 3);
		userMap.put("zhang4", 1);
		userMap.put("zhang5", 5);

		// output the grades of "zhang2"
		int zhang2Grade = userMap.get("zhang2");
		System.out.println("zhang2's grade: " + zhang2Grade); // zhang2's grade: 4
		// default output the map
		System.out.println(userMap); // {zhang2=4, zhang3=3, zhang1=2, zhang4=1, zhang5=5}
		// output the content of the map according to the hash and address of each item of the map
	}
}
利用map.keySet()遍历HashMap
	private static void  outputMapWithKeySet(Map<String, Integer> userMap) {
		for(String key : userMap.keySet()) {
			System.out.println("key: " + key + " - " + "value: " + userMap.get(key));
		}
	}
//	key: zhang2 - value: 4
//	key: zhang3 - value: 3
//	key: zhang1 - value: 2
//	key: zhang4 - value: 1
//	key: zhang5 - value: 5
利用entrySet遍历HashMap
	private static void outputMapWithEntrySet(Map<String, Integer> userMap) {
		for(Map.Entry<String, Integer> entry: userMap.entrySet()) {
			System.out.println("Key: " + entry.getKey() + " - Value: " + entry.getValue());
		}
	}
//	Key: zhang2 - Value: 4
//	Key: zhang3 - Value: 3
//	Key: zhang1 - Value: 2
//	Key: zhang4 - Value: 1
//	Key: zhang5 - Value: 5
🍎利用迭代器和entrySet遍历HashMap
	private static void outputMapWithIterator(Map<String, Integer> userMap) {
		Iterator<Map.Entry<String, Integer>> ite = userMap.entrySet().iterator();
		while(ite.hasNext()) {
			Map.Entry<String, Integer> map = ite.next();
			System.out.println("Key: " + map.getKey() + " - Value: " + map.getValue());
		}
	}
//	Key: zhang2 - Value: 4
//	Key: zhang3 - Value: 3
//	Key: zhang1 - Value: 2
//	Key: zhang4 - Value: 1
//	Key: zhang5 - Value: 5
使用案例
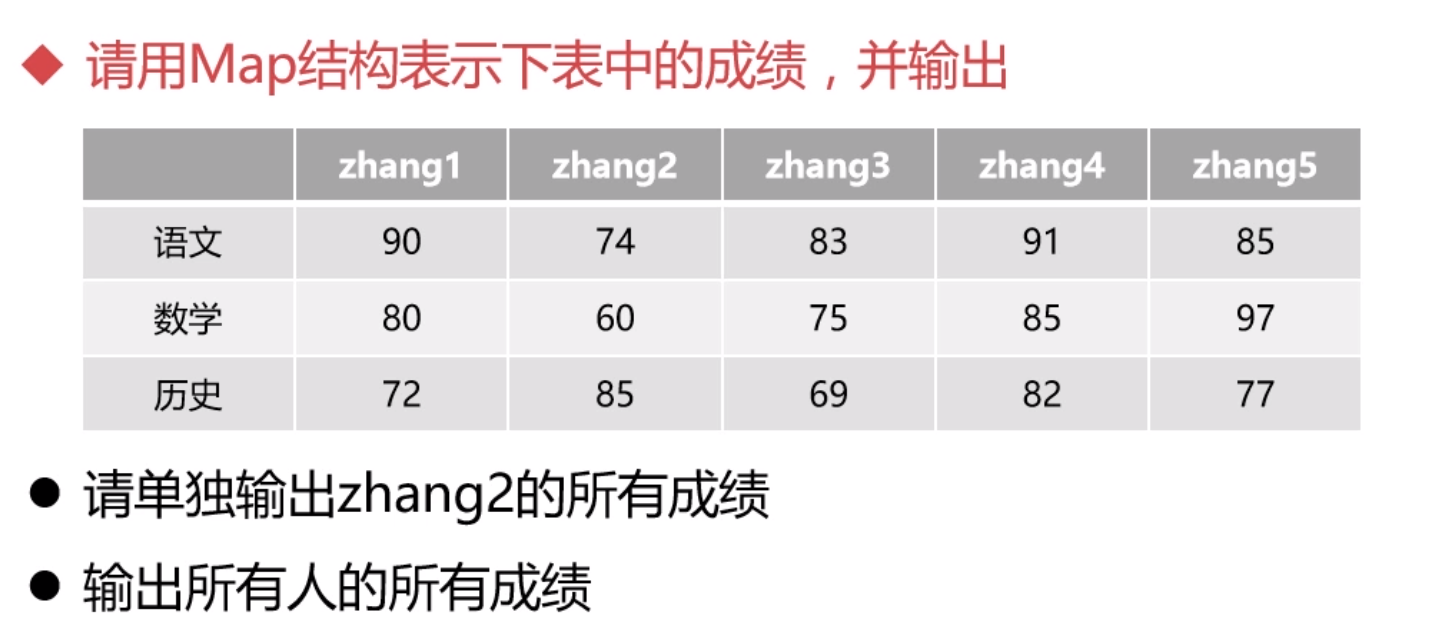
public class Grade {
	private Float chineseGrade;
	private Float mathGrade;
	private Float englishGrade;

	public Grade() {}
	public Grade(Float chineseGrade, Float mathGrade, Float englishGrade) {
		super();
		this.chineseGrade = chineseGrade;
		this.mathGrade = mathGrade;
		this.englishGrade = englishGrade;
	}
	public Float getChineseGrade() {
		return chineseGrade;
	}
	public void setChineseGrade(Float chineseGrade) {
		this.chineseGrade = chineseGrade;
	}
	public Float getMathGrade() {
		return mathGrade;
	}
	public void setMathGrade(Float mathGrade) {
		this.mathGrade = mathGrade;
	}
	public Float getEnglishGrade() {
		return englishGrade;
	}
	public void setEnglishGrade(Float englishGrade) {
		this.englishGrade = englishGrade;
	}
	@Override
	public String toString() {
		return "Grade [chineseGrade=" + chineseGrade + ", mathGrade=" + mathGrade + ", englishGrade=" + englishGrade
				+ "]";
	}
}


public class Student {
	private String studentId;
	private String name;
	private String gender;
	private Grade grade;

	public Student() {
	}
	public Student(String studentId, String name, String gender) {
		super();
		this.studentId = studentId;
		this.name = name;
		this.gender = gender;
	}
	public String getStudentId() {
		return studentId;
	}
	public void setStudentId(String studentId) {
		this.studentId = studentId;
	}
	public String getName() {
		return name;
	}
	public void setName(String name) {
		this.name = name;
	}
	public String getGender() {
		return gender;
	}
	public void setGender(String gender) {
		this.gender = gender;
	}
	public Grade getGrade() {
		return grade;
	}
	public void setGrade(Grade grade) {
		this.grade = grade;
	}
}


public class StudentManagerSystem {
	public static void main(String[] args) {
		Student stu01 = new Student("001", "Wangzz", "Male");
		Grade stu01Grade = new Grade(92.5F, 86F, 96.5F);
		stu01.setGrade(stu01Grade);
		Student stu02 = new Student("002", "Wangyt", "Female");
		Grade stu02Grade = new Grade(99.5F, 99F, 97.5F);
		stu02.setGrade(stu02Grade);
		Student stu03 = new Student("003", "Felix", "Male");
		Grade stu03Grade = new Grade(94F, 70F, 62F);
		stu03.setGrade(stu03Grade);

		Map<String, Student> studentMap = new HashMap<String, Student>();
		studentMap.put("stu01", stu01);
		studentMap.put("stu02", stu02);
		studentMap.put("stu03", stu03);

		for(Map.Entry<String, Student> entry : studentMap.entrySet()) {
			System.out.println("Key: " + entry.getKey() + " Grade " + entry.getValue().getGrade());
		}
	}
}


//Key: stu03 - Value:Grade [chineseGrade=94.0, mathGrade=70.0, englishGrade=62.0]
//Key: stu02 - Value:Grade [chineseGrade=99.5, mathGrade=99.0, englishGrade=97.5]
//Key: stu01 - Value:Grade [chineseGrade=92.5, mathGrade=86.0, englishGrade=96.5]
HashMap的原理
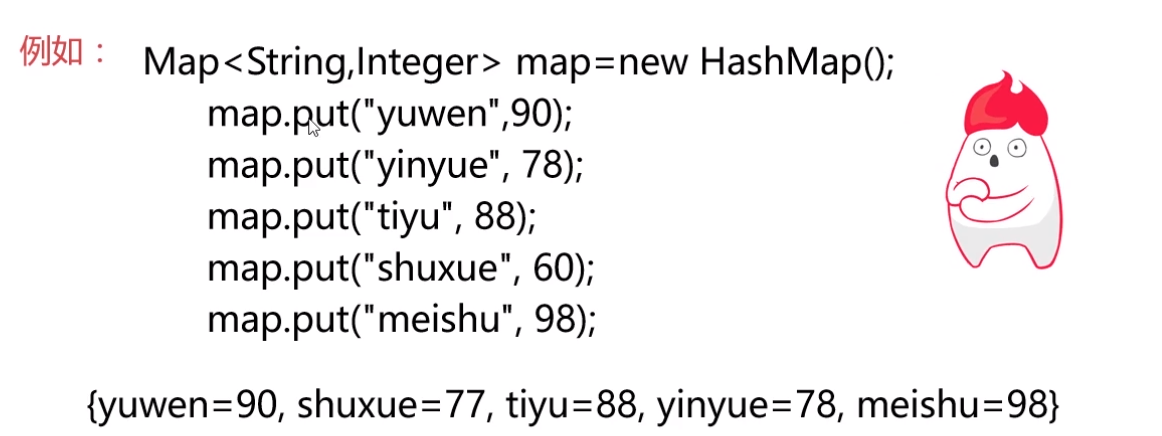
HashMap是无序的
遍历输出的顺序与put存进去的顺序无关
肯定不是随机输出的,那么是按照什么规律输出的呢?
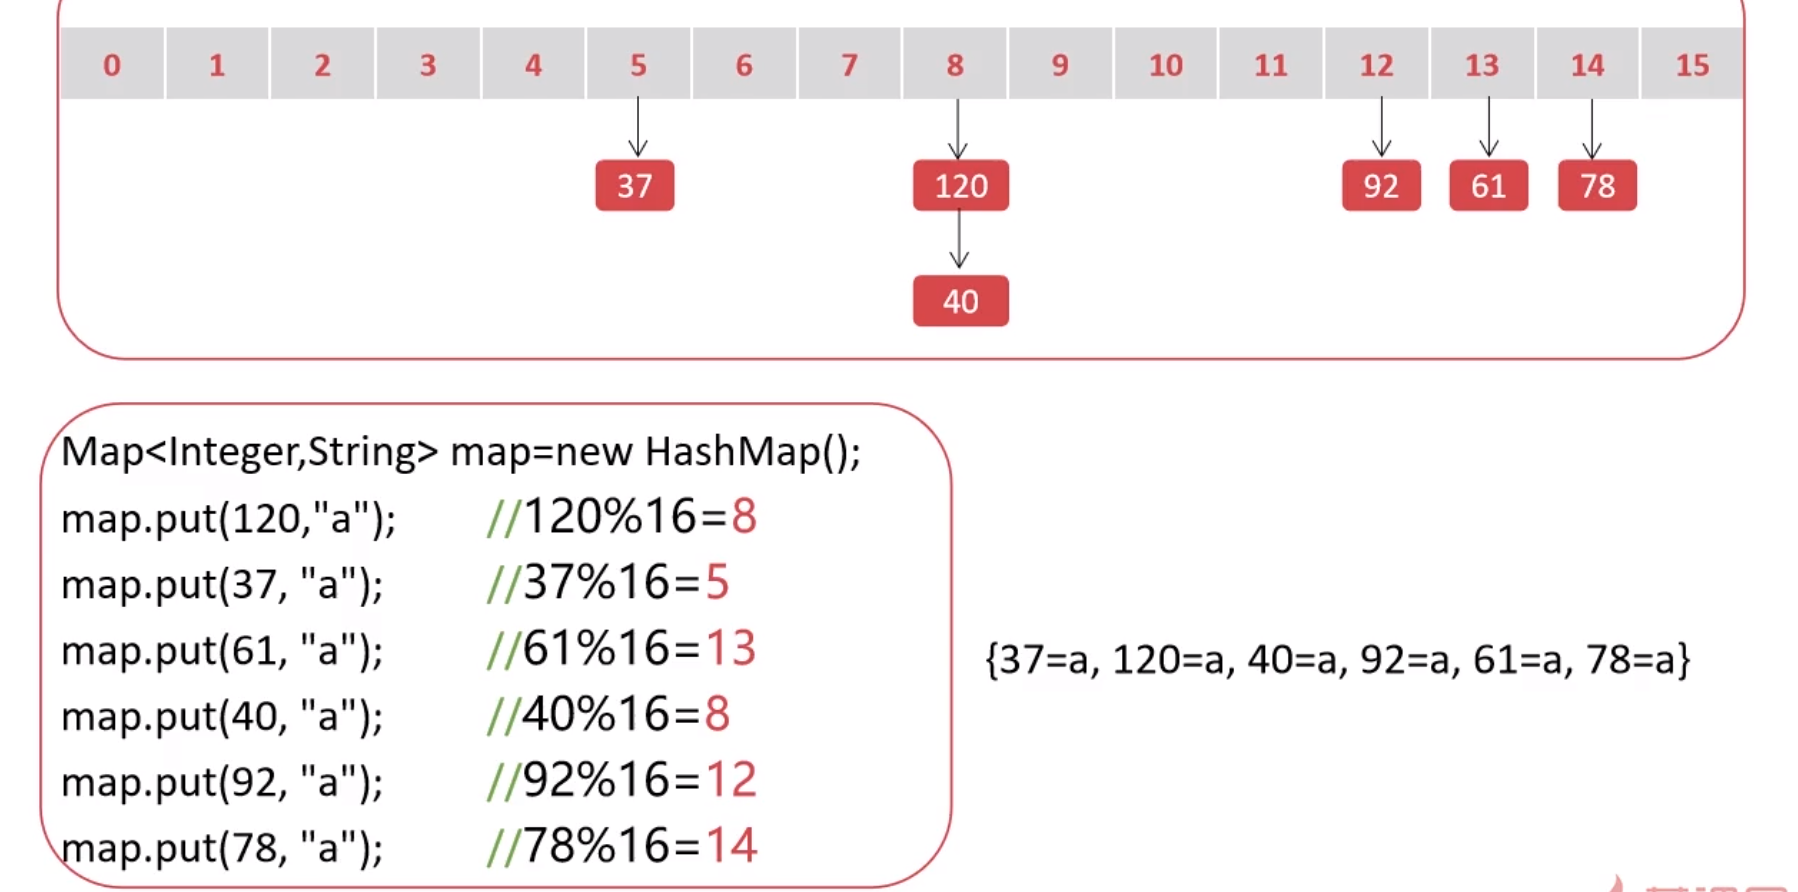
		Map<Integer, String> map = new HashMap<Integer, String>();
		map.put(120, "a");
		map.put(37, "b");
		map.put(61, "c");
		map.put(40, "d");
		map.put(92, "e");
		map.put(78, "f");
		System.out.println(map);
		// {37=b, 120=a, 40=d, 92=e, 61=c, 78=f}
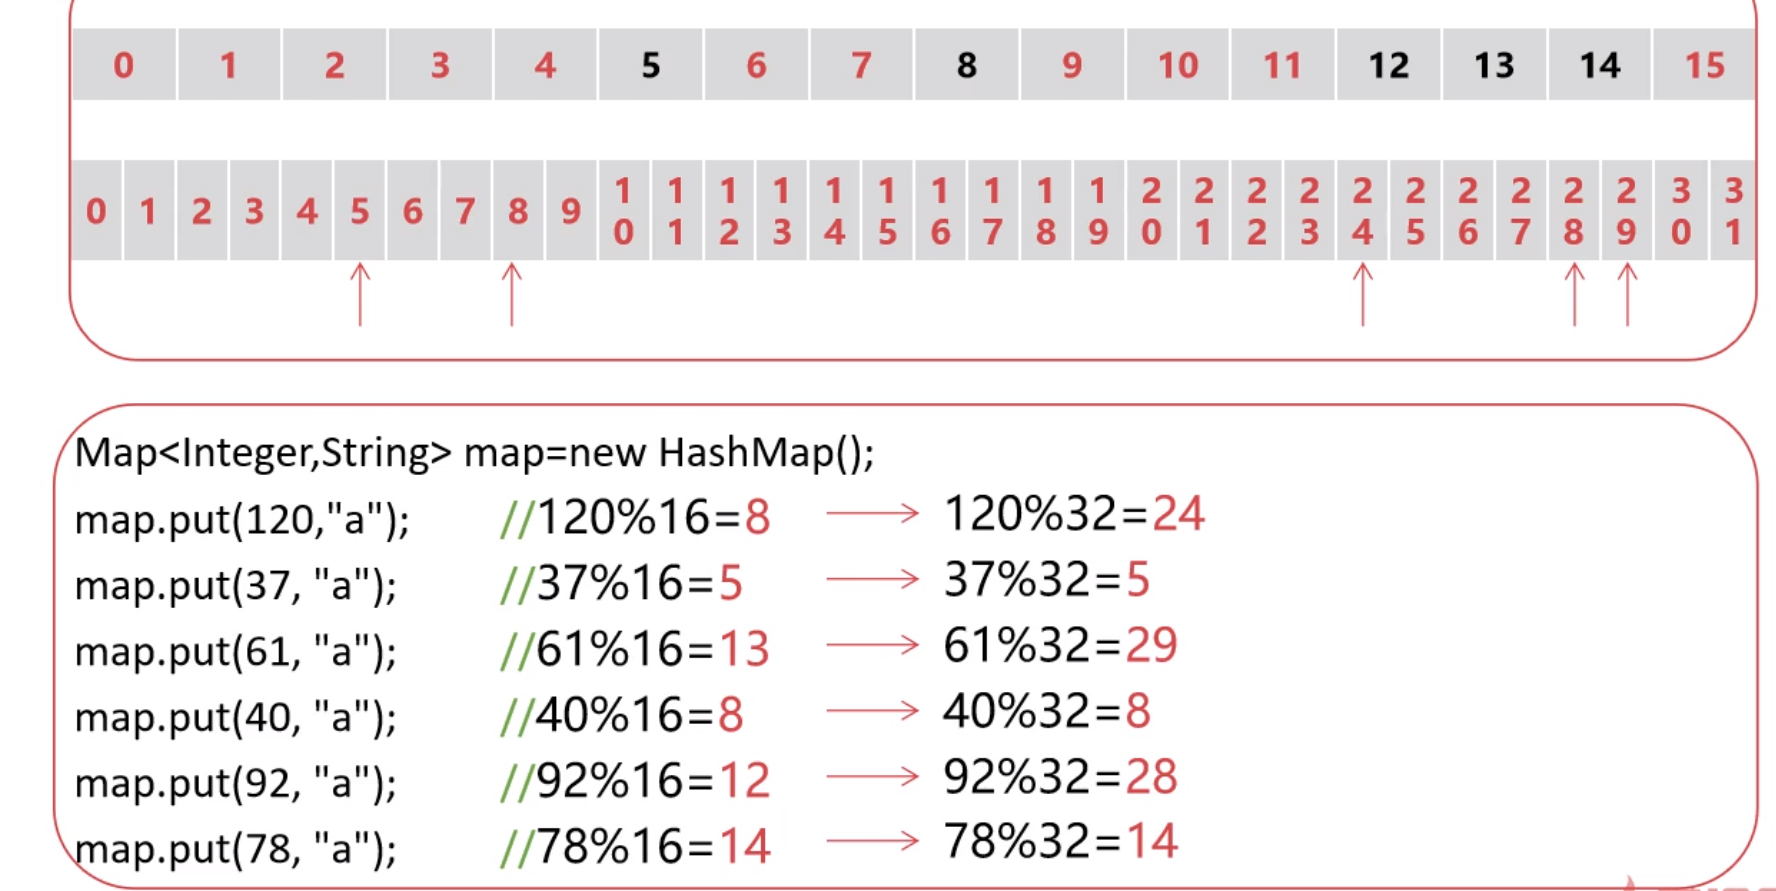
如果Key是字符类型,该怎么定位呢?
关键是两个方法
- final int hash(Object k);
用hashCode()方法将key转换成hash码后并进行优化得到优化后的hash码
例如: 将“Chinese" 这个字符串转化后的hash码是 2104457164(根据系统环境的不同,同样的字符串在不同的机器中表示的数值也不同)
- static int indexFor(int h, int length)
对优化后的hash码,进行取址,确定在HashMap中的位置
eg: 115347492在长度是16的HashMap中,取值的坐标是: 4
无参Map map = new HashMap();
默认长度: 16 负载因子: 0.75
含义: 创建一个默认容量为16的Map,负载因子的作用是当前Map的占用容量超过总容量的75%,则该Map就会扩容2的倍数即一倍为32
之后根据32再进行一次取址(用优化后的hash码 % 32 得到的余数 然后再决定位置📍)
HashMap带参的构造方法Map map = new HashMap(initialCapacity);
Map map = new HashMap(3);
// 这里不会创建一个大小为3的Map而是在Map容量为16的基础之上扩张 2^n >= initialCapacity
//(大于这个数字的最小2的n次方)即4 所以要扩容4 总容量为20
- new HashMap(5): 初始化长度是多少?
答: 20 【16 + (2^n>=5 = 4) 】
- new HashMap(10000, 0.75f) 要录入的数据有10000条,会产生扩容?
扩容大小是 大于或等于该数据的2的n次方最小值

大于或等于10000的2的n次方最小值:12288
所以总的容量: 12288 + 16
故当输入的数据容量为10000条时候该map不会进行扩容。
初始容量一定要贴合业务容量
比如说业务容量200 现在基于的初始容量要在 log2(200-16)上
HashMap中常见的方法
- 判断是否为空、删除结点、清空HashMap对象
- 判断是否有某个key、判断是否有某个value
- HashMap替换某个key的value
Map<String, String> map01 = new HashMap<String, String>();
System.out.println("isNull: " + map01.isEmpty()); // isNull: true
map01.put("x", "123");
map01.put("y", "456");
System.out.println(map01); // {x=123, y=456}
System.out.println("isNull: " + map01.isEmpty()); // isNull: false
System.out.println(map01.remove("x", "123")); // true
System.out.println(map01.remove("x", "123")); // false
System.out.println(map01); // {y=456}
System.out.println(map01.containsKey("x")); // false
System.out.println(map01.containsKey("y")); // true
System.out.println(map01.containsValue("456")); // true
map01.replace("y", "吴签"); // true
System.out.println(map01); // {y=吴签}
// putIfAbsent(K key, V value) 返回值为null则增加成功
// x不存在才会插入
System.out.println(map01.putIfAbsent("x", "testx")); // null
// y存在不会插入
System.out.println(map01.putIfAbsent("y", "testy")); // 吴签
System.out.println(map01); // {x=testx, y=吴签}
- map.forEach()
		map01.forEach((k, v)->{System.out.println("Key: " + k + " - " + "Value: " + v);});
//		Key: x - Value: 123
//		Key: y - Value: 456
LinkedHashMap
存的时候 HashMap更优
取的时候 LinkeHashMap更优
		Map<String, String> linkedMap = new LinkedHashMap<String, String>(16, 0.75f, true);
		linkedMap.put("k01", "xx");
		linkedMap.put("k02", "xx");
		linkedMap.put("k03", "xx");
		linkedMap.put("k04", "xx");
		linkedMap.put("k05", "xx");

		linkedMap.get("k01"); // 倒数第二次使用,排在倒数第二位
		linkedMap.get("k02"); // 倒数最后一次使用,排在倒数第一位
		System.out.println(linkedMap);
		// {k03=xx, k04=xx, k05=xx, k01=xx, k02=xx}
LRU将最近没有使用的删除
- LRUMap.class
public class LRUMap<K, V> extends LinkedHashMap<K, V>{
	private int maxSize;

	public LRUMap(int maxSize) {
		super(16, 0.75F, true);
		this.maxSize = maxSize;
	}

	@Override
	protected boolean removeEldestEntry(Map.Entry<K, V> eldest) {
		return size() > this.maxSize;
	}
}
- 测试
public class LinkedMapUsageDemo {
	public static void main(String[] args) {
		Map<String,String> LRU = new LRUMap<String, String>(3);
		LRU.put("x1", "00");
		LRU.put("x2", "00");
		LRU.put("x3", "00");
		LRU.put("x4", "00");
		LRU.put("x5", "00");
		// 把最近没有使用的删除了
		System.out.println(LRU); // {x3=00, x4=00, x5=00}
	}
}
TreeMap
- 对TreeMap实现增、删、遍历、排序等操作
import java.util.Comparator;
import java.util.Map;
import java.util.TreeMap;
// 升序
		Map<String, String> treeMap = new TreeMap<String, String>();
		treeMap.put("tx", "88");
		treeMap.put("ax", "88");
		treeMap.put("dx", "88");
		treeMap.put("hx", "88");
		treeMap.put("qx", "88");
		treeMap.put("wx", "88");
		treeMap.put("vx", "88");
		treeMap.put("zx", "88");
		treeMap.put("hx", "88");
		treeMap.put("px", "88");
		System.out.println(treeMap);
		// {ax=88, dx=88, hx=88, px=88, qx=88, tx=88, vx=88, wx=88, zx=88}

// 降序
		Map<String, String> treeMap = new TreeMap<String, String>(new Comparator<String>() {
			public int compare(String a, String b) {
				return b.compareTo(a);
			}
		});
		treeMap.put("tx", "88");
		treeMap.put("ax", "88");
		treeMap.put("dx", "88");
		treeMap.put("hx", "88");
		treeMap.put("qx", "88");
		treeMap.put("wx", "88");
		treeMap.put("vx", "88");
		treeMap.put("zx", "88");
		treeMap.put("hx", "88");
		treeMap.put("px", "88");
		System.out.println(treeMap);
		//{zx=88, wx=88, vx=88, tx=88, qx=88, px=88, hx=88, dx=88, ax=88}
- 存取耗时对比
HashMap 适用于插入 综合性能较高
因为HashMap正是为了快速查询而设计的(HashMap底层其实也是 采用数组来存储key-value对)
TreeMap使用顺序输出(TreeMap底层采用红黑树来管理key-value对(红黑树的每一个节点就是一个key-value键值对)。
TreeMap中的key-value总是处于有序状态,无须专门进行排序操作
LinkedMap可以LRU而且查找的效率高
学而不思则罔,思而不学则殆!

 浙公网安备 33010602011771号