FreeType in OpenCASCADE
FreeType in OpenCASCADE
Abstract. FreeType is required for text display in the 3D viewer. FreeType is a software font engine that is designed to be small, efficient, highly customizable, and portable while capable of producing high-quality output(glyph images). It can be used in graphics libraries, display servers, font conversion tools, text image generation tools, and many other products as well. The blog is focus on the FreeType usage in OpenCASCADE to convert text to BRep shape.
Key Words. FreeType, OpenCASCADE, Text, BRep
1.Introduction
FreeType 2被设计为一种占用空间小的、高效的、高度可定制的、并且可以产生可移植的高品质输出(符号图像)。可以被用在诸如图像库、展出服务器、字体转换工具、图像文字产生工具等多种其它产品上。
注意FreeType 2是一种字体服务而没有提供为实现文字布局或图形化处理这样高阶的功能使用的API(比如带色文字渲染之类的)。然而,它提供一个简单的、易用的并且统一的接口实现对多种字体文件的访问,从而大大简化了这些高级的任务。
FreeType 2的发行遵循两个开源许可:我们自己的BSD样式的FreeType License和GPL(通用公共许可证)。它可以被用在任何程序中,无论是专有与否。
在常见的图形库中,如OpenSceneGraph, OpenCASCADE, HOOPS, Qt,等涉及到文字处理的,都会用到FreeType. 在一些游戏开发中,也会用到FreeType.本文主要对FreeType的用法作简单介绍,这样对FreeType有个直观认识。然后再介绍FreeType对文字轮廓的表示方法,及如何生成三维文字。
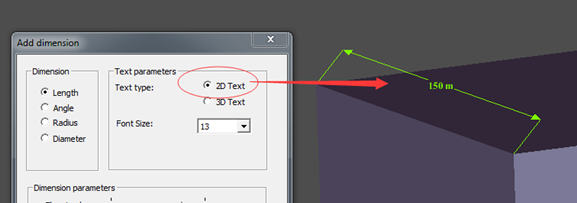
在OpenCASCADE中文字可以二维的方式显示,也可以三维的方式显示,三维方式可以有线框和渲染模式,如下图所示:
Figure 1. 2D Text in Length Dimension
Figure 2. 3D Wireframe Text in Dimension
Figure 3. 3D Shading Text in Dimension
2.FreeType Usage
在FreeType的官网上有详细的教程说明FreeType的用法,网址为:https://www.freetype.org/freetype2/docs/tutorial/index.html
主要的步骤如下:
v 包含头文件 Header Files;
v 库的初始化 Library Initialization;
v 加载字体 Loading a Font Face;
v 访问字体数据 Accessing the Face Data;
v 设置当前像素大小 Setting the Current Pixel Size;
v 加载文字 Loading a Glyph Image;
v 简单的显示 Simple Text Rendering;
下面代码是上述过程的一个实现,忽略了错误处理:
#include <ft2build.h>
#include FT_FREETYPE_H

#pragma comment(lib, "freetype.lib")

void test(void)
{
    FT_Face aFace = NULL;
    FT_Library aLibrary = NULL;

    // Library Initialization.
    FT_Init_FreeType(&aLibrary);

    // Loading a Font Face.
    FT_New_Face(aLibrary, "C:/Windows/Fonts/arial.ttf", 0, &aFace);

    // Setting the Current Pixel Size.
    FT_Set_Char_Size(
          aFace,    /* handle to face object           */
          0,       /* char_width in 1/64th of points  */
          16*64,   /* char_height in 1/64th of points */
          300,     /* horizontal device resolution    */
          300 );   /* vertical device resolution      */

    // Loading a Glyph Image
    // a. Converting a Character Code Into a Glyph Index
    FT_UInt aGlyphIndex = FT_Get_Char_Index( aFace, 'A' );

    // b. Loading a Glyph From the Face
    // Once you have a glyph index, you can load the corresponding glyph image.
    FT_Load_Glyph(
          aFace,            /* handle to face object */
          aGlyphIndex,      /* glyph index           */
          FT_LOAD_DEFAULT); /* load flags            */

    // Simple Text Rendering
    FT_GlyphSlot aGlyphSlot = aFace->glyph;
}

int main(int argc, char* argv[])
{
    test();

    return 0;
}
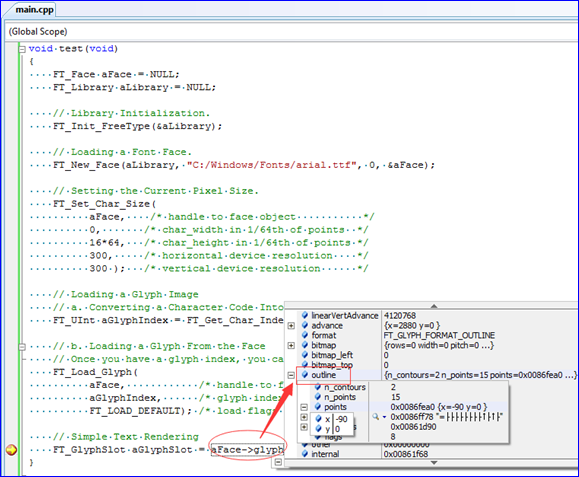
调试程序可以看出Face中已经有了一些数据。
3.FreeType Outlines
FreeType中的一个文字轮廓Outline是由二维空间闭合的线围成。每一个轮廓线是由一系列的直线段和Bezier曲线组成。根据字体文件格式的不同,他们可能是二阶或三阶多项式。二阶的通常称为quadratic或conic弧,他们用于TrueType格式。三阶的称为cubic弧,通常用于PostScript Type1, CFF, 和CFF2格式中。详细描述见:
https://www.freetype.org/freetype2/docs/glyphs/glyphs-6.html
Bezier曲线是B样条曲线的一个特例,他的特点就是曲线的阶数与控制点的个数相关,即给定控制顶点就可以确定Bezier曲线。所以OpenCASCADE中对于Bezier曲线有这样的构造函数:
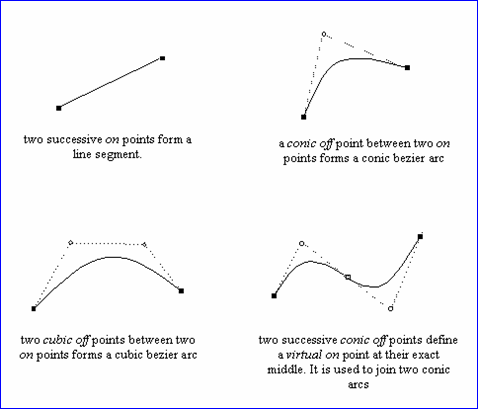
每一段曲线弧都由起点start,终点end和控制顶点control points来描述。描述轮廓线的每个点都有一个特定的标记Tag来区别是线段还是Bezier曲线。
两个连续的on点确定了线段的两个端点;
在两个on点之间的一个conic off点组成了一个conic Bezier曲线;
在两个on点之间的两个cubic off点组成了一个cubic Bezier曲线;
理解了上述内容就可以得到文字的轮廓线了。OpenCASCADE中对轮廓线的处理代码如下所示:
// =======================================================================
// function : renderGlyph
// purpose  :
// =======================================================================
Standard_Boolean Font_BRepFont::renderGlyph (const Standard_Utf32Char theChar,
                                             TopoDS_Shape&            theShape)
{
  theShape.Nullify();
  if (!loadGlyph (theChar)
   || myFTFace->glyph->format != FT_GLYPH_FORMAT_OUTLINE)
  {
    return Standard_False;
  }
  else if (myCache.Find (theChar, theShape))
  {
    return !theShape.IsNull();
  }

  FT_Outline& anOutline = myFTFace->glyph->outline;

  if (!anOutline.n_contours)
    return Standard_False;

  TopLoc_Location aLoc;
  TopoDS_Face aFaceDraft;
  myBuilder.MakeFace (aFaceDraft, mySurface, myPrecision);

  // Get orientation is useless since it doesn't retrieve any in-font information and just computes orientation.
  // Because it fails in some cases - leave this to ShapeFix.
  //const FT_Orientation anOrient = FT_Outline_Get_Orientation (&anOutline);
  for (short aContour = 0, aStartIndex = 0; aContour < anOutline.n_contours; ++aContour)
  {
    const FT_Vector* aPntList = &anOutline.points[aStartIndex];
    const char* aTags      = &anOutline.tags[aStartIndex];
    const short anEndIndex = anOutline.contours[aContour];
    const short aPntsNb    = (anEndIndex - aStartIndex) + 1;
    aStartIndex = anEndIndex + 1;
    if (aPntsNb < 3)
    {
      // closed contour can not be constructed from < 3 points
      continue;
    }

    BRepBuilderAPI_MakeWire aWireMaker;

    gp_XY aPntPrev;
    gp_XY aPntCurr = readFTVec (aPntList[aPntsNb - 1]);
    gp_XY aPntNext = readFTVec (aPntList[0]);

    Standard_Integer aLinePnts = (FT_CURVE_TAG(aTags[aPntsNb - 1]) == FT_Curve_Tag_On) ? 1 : 0;
    gp_XY aPntLine1 = aPntCurr;

    // see http://freetype.sourceforge.net/freetype2/docs/glyphs/glyphs-6.html
    // for a full description of FreeType tags.
    for (short aPntId = 0; aPntId < aPntsNb; ++aPntId)
    {
      aPntPrev = aPntCurr;
      aPntCurr = aPntNext;
      aPntNext = readFTVec (aPntList[(aPntId + 1) % aPntsNb]);

      // process tags
      if (FT_CURVE_TAG(aTags[aPntId]) == FT_Curve_Tag_On)
      {
        if (aLinePnts < 1)
        {
          aPntLine1 = aPntCurr;
          aLinePnts = 1;
          continue;
        }

        const gp_XY         aDirVec  = aPntCurr - aPntLine1;
        const Standard_Real aLen     = aDirVec.Modulus();
        if (aLen <= myPrecision)
        {
          aPntLine1 = aPntCurr;
          aLinePnts = 1;
          continue;
        }

        if (myIsCompositeCurve)
        {
          Handle(Geom2d_TrimmedCurve) aLine = GCE2d_MakeSegment (gp_Pnt2d (aPntLine1), gp_Pnt2d (aPntCurr));
          myConcatMaker.Add (aLine, myPrecision);
        }
        else
        {
          Handle(Geom_Curve)  aCurve3d;
          Handle(Geom2d_Line) aCurve2d = new Geom2d_Line (gp_Pnt2d (aPntLine1), gp_Dir2d (aDirVec));
          if (to3d (aCurve2d, GeomAbs_C1, aCurve3d))
          {
            TopoDS_Edge anEdge = BRepLib_MakeEdge (aCurve3d, 0.0, aLen);
            myBuilder.UpdateEdge (anEdge, aCurve2d, mySurface, aLoc, myPrecision);
            aWireMaker.Add (anEdge);
          }
        }
        aPntLine1 = aPntCurr;
      }
      else if (FT_CURVE_TAG(aTags[aPntId]) == FT_Curve_Tag_Conic)
      {
        aLinePnts = 0;
        gp_XY aPntPrev2 = aPntPrev;
        gp_XY aPntNext2 = aPntNext;

        // previous point is either the real previous point (an "on" point),
        // or the midpoint between the current one and the previous "conic off" point
        if (FT_CURVE_TAG(aTags[(aPntId - 1 + aPntsNb) % aPntsNb]) == FT_Curve_Tag_Conic)
        {
          aPntPrev2 = (aPntCurr + aPntPrev) * 0.5;
        }

        // next point is either the real next point or the midpoint
        if (FT_CURVE_TAG(aTags[(aPntId + 1) % aPntsNb]) == FT_Curve_Tag_Conic)
        {
          aPntNext2 = (aPntCurr + aPntNext) * 0.5;
        }

        my3Poles.SetValue (1, aPntPrev2);
        my3Poles.SetValue (2, aPntCurr);
        my3Poles.SetValue (3, aPntNext2);
        Handle(Geom2d_BezierCurve) aBezierArc = new Geom2d_BezierCurve (my3Poles);
        if (myIsCompositeCurve)
        {
          myConcatMaker.Add (aBezierArc, myPrecision);
        }
        else
        {
          Handle(Geom_Curve) aCurve3d;
          if (to3d (aBezierArc, GeomAbs_C1, aCurve3d))
          {
            TopoDS_Edge anEdge = BRepLib_MakeEdge (aCurve3d);
            myBuilder.UpdateEdge (anEdge, aBezierArc, mySurface, aLoc, myPrecision);
            aWireMaker.Add (anEdge);
          }
        }
      }
      else if (FT_CURVE_TAG(aTags[aPntId])                 == FT_Curve_Tag_Cubic
            && FT_CURVE_TAG(aTags[(aPntId + 1) % aPntsNb]) == FT_Curve_Tag_Cubic)
      {
        aLinePnts = 0;
        my4Poles.SetValue (1, aPntPrev);
        my4Poles.SetValue (2, aPntCurr);
        my4Poles.SetValue (3, aPntNext);
        my4Poles.SetValue (4, gp_Pnt2d(readFTVec (aPntList[(aPntId + 2) % aPntsNb])));
        Handle(Geom2d_BezierCurve) aBezier = new Geom2d_BezierCurve (my4Poles);
        if (myIsCompositeCurve)
        {
          myConcatMaker.Add (aBezier, myPrecision);
        }
        else
        {
          Handle(Geom_Curve) aCurve3d;
          if (to3d (aBezier, GeomAbs_C1, aCurve3d))
          {
            TopoDS_Edge anEdge = BRepLib_MakeEdge (aCurve3d);
            myBuilder.UpdateEdge (anEdge, aBezier, mySurface, aLoc, myPrecision);
            aWireMaker.Add (anEdge);
          }
        }
      }
    }

    if (myIsCompositeCurve)
    {
      Handle(Geom2d_BSplineCurve) aDraft2d = myConcatMaker.BSplineCurve();
      if (aDraft2d.IsNull())
      {
        continue;
      }

      const gp_Pnt2d aFirstPnt = aDraft2d->StartPoint();
      const gp_Pnt2d aLastPnt  = aDraft2d->EndPoint();
      if (!aFirstPnt.IsEqual (aLastPnt, myPrecision))
      {
        Handle(Geom2d_TrimmedCurve) aLine = GCE2d_MakeSegment (aLastPnt, aFirstPnt);
        myConcatMaker.Add (aLine, myPrecision);
      }

      Handle(Geom2d_BSplineCurve) aCurve2d = myConcatMaker.BSplineCurve();
      Handle(Geom_Curve)          aCurve3d;
      if (to3d (aCurve2d, GeomAbs_C0, aCurve3d))
      {
        TopoDS_Edge anEdge = BRepLib_MakeEdge (aCurve3d);
        myBuilder.UpdateEdge (anEdge, aCurve2d, mySurface, aLoc, myPrecision);
        aWireMaker.Add (anEdge);
      }
      myConcatMaker.Clear();
    }
    else
    {
      if (!aWireMaker.IsDone())
      {
        continue;
      }

      TopoDS_Vertex aFirstV, aLastV;
      TopExp::Vertices (aWireMaker.Wire(), aFirstV, aLastV);
      gp_Pnt aFirstPoint = BRep_Tool::Pnt (aFirstV);
      gp_Pnt aLastPoint  = BRep_Tool::Pnt (aLastV);
      if (!aFirstPoint.IsEqual (aLastPoint, myPrecision))
      {
        aWireMaker.Add (BRepLib_MakeEdge (aFirstV, aLastV));
      }
    }

    if (!aWireMaker.IsDone())
    {
      continue;
    }

    TopoDS_Wire aWireDraft = aWireMaker.Wire();
    //if (anOrient == FT_ORIENTATION_FILL_LEFT)
    //{
    // According to the TrueType specification, clockwise contours must be filled
    aWireDraft.Reverse();
    //}
    myBuilder.Add (aFaceDraft, aWireDraft);
  }

  myFixer.Init (aFaceDraft);
  myFixer.Perform();
  theShape = myFixer.Result();
  if (!theShape.IsNull()
  &&  theShape.ShapeType() != TopAbs_FACE)
  {
    // shape fix can not fix orientation within the single call
    TopoDS_Compound aComp;
    myBuilder.MakeCompound (aComp);
    for (TopExp_Explorer aFaceIter (theShape, TopAbs_FACE); aFaceIter.More(); aFaceIter.Next())
    {
      TopoDS_Face aFace = TopoDS::Face (aFaceIter.Current());
      myFixer.Init (aFace);
      myFixer.Perform();
      myBuilder.Add (aComp, myFixer.Result());
    }
    theShape = aComp;
  }

  myCache.Bind (theChar, theShape);
  return !theShape.IsNull();
}
4.Text 3D
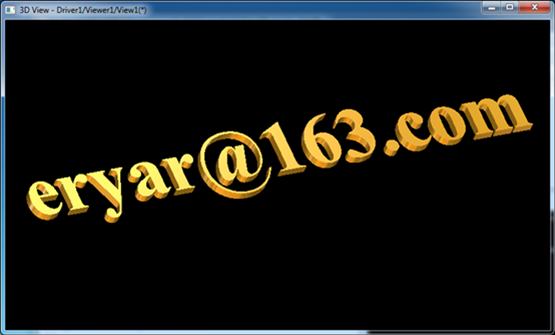
在一些图形库中都可以生成三维文字,如下图所示:
理解了FreeType的用法后,实现上述功能也是很简单的。这里简要说明实现步骤:
l 使用FreeType得到文字的轮廓线;
l 将闭合的轮廓线生成Wire->Face;
l 将轮廓线生成的Face进行拉伸得到Solid体。
在OpenCASCADE中得到文字轮廓线生成的Face的类是:Font_BRepFont。下面给出示例得到指定文字的面。
#include <BRepTools.hxx>

#include <Font_BRepFont.hxx>
#include <Font_BRepTextBuilder.hxx>

#pragma comment(lib, "TKernel.lib")
#pragma comment(lib, "TKMath.lib")

#pragma comment(lib, "TKG2d.lib")
#pragma comment(lib, "TKG3d.lib")
#pragma comment(lib, "TKGeomBase.lib")
#pragma comment(lib, "TKGeomAlgo.lib")

#pragma comment(lib, "TKBRep.lib")
#pragma comment(lib, "TKTopAlgo.lib")

#pragma comment(lib, "TKService.lib")

void text2brep()
{
    Font_BRepFont aBrepFont("C:/Windows/Fonts/arial.ttf", 3.5);
    Font_BRepTextBuilder aTextBuilder;
    TopoDS_Shape aTextShape = aTextBuilder.Perform(aBrepFont, NCollection_String("eryar@163.com"));

    BRepTools::Dump(aTextShape, std::cout);
    BRepTools::Write(aTextShape, "d:/text.brep");
}

int main(int argc, char* argv[])
{
    text2brep();

    return 0;
}
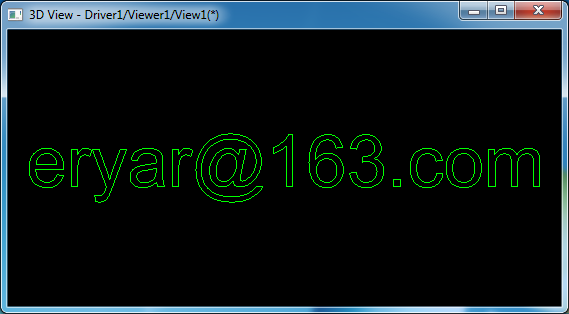
在Draw Test Harness中显示出文字的轮廓text.brep如下图所示:
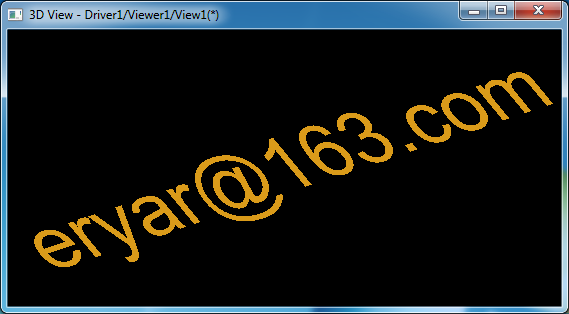
如果要显示出文字的填充效果,则需要有三角化工具将文字轮廓网格化。OpenCASCADE中将轮廓生成Wire->Face,即可以生成显示数据了:
5.Conclusion
FreeType的文字处理功能很强大,几乎所有的三维造型内核中文字的处理都是使用的FreeType。
FreeType的文字轮廓使用了线段和Bezier曲线来表达,Bezier曲线是B样条曲线的特例。理解Bezier曲线就可以自己绘制文字轮廓了。
FreeType使用简单,可以方便得到文字的轮廓数据。将轮廓数据生成Face即可以拉伸出三维文字效果。
6.References
1. https://www.freetype.org/freetype2/docs/tutorial/index.html
2. http://www.cppblog.com/eryar/archive/2014/08/17/OpenCascade_Text_Rendering.html
3. https://www.freetype.org/freetype2/docs/glyphs/glyphs-6.html
为了方便大家在移动端也能看到我的博文和讨论交流,现已注册微信公众号,欢迎大家扫描下方二维码关注。







 浙公网安备 33010602011771号