《Spring in action 4》(八)Spring和JDBC操作数据库
Spring和JDBC操作数据库
使用JNDI配置数据源
- 在Tomcat服务器的conf下的context.xml 配置数据源
<Resource
name="jdbc/mysql"
auth="Container"
type="javax.sql.DataSource"
maxActive="20"
maxIdle="5"
maxWait="10000"
username="root"
password="root"
driverClassName="com.mysql.jdbc.Driver"
url="jdbc:mysql://120.79.167.xx:3306/oms_sys_info?useUnicode=true&characterEncoding=utf-8"/>
- 使用xml或是Java类配置
配置jndi这种情况使用xml可能更加简单。
<jee:jndi-lookup id="dataSource" jndi-name="jdbc/mysql" resource-ref="true"/>
- 使用Java配置类
@Configuration
public class DataSourceConfig {

    @Bean
    public JndiObjectFactoryBean dataSource(){
        JndiObjectFactoryBean bean = new JndiObjectFactoryBean();
        bean.setJndiName("jdbc/mysql");
        bean.setResourceRef(true);
        bean.setProxyInterface(DataSource.class);
        return bean;
    }

    @Bean
    public JdbcTemplate jdbcTemplate(DataSource dataSource){
        System.out.println(dataSource);
        return new JdbcTemplate(dataSource);
    }
}
使用JDNI方式访问数据库
1. POM依赖
<?xml version="1.0" encoding="UTF-8"?>

<project xmlns="http://maven.apache.org/POM/4.0.0" xmlns:xsi="http://www.w3.org/2001/XMLSchema-instance"
         xsi:schemaLocation="http://maven.apache.org/POM/4.0.0 http://maven.apache.org/xsd/maven-4.0.0.xsd">
    <modelVersion>4.0.0</modelVersion>

    <groupId>com.ooyhao.spring</groupId>
    <artifactId>spring-in-action-10-01</artifactId>
    <version>1.0-SNAPSHOT</version>
    <packaging>war</packaging>

    <name>spring-in-action-10-01 Maven Webapp</name>
    <url>http://www.example.com</url>

    <properties>
        <project.build.sourceEncoding>UTF-8</project.build.sourceEncoding>
        <maven.compiler.source>1.7</maven.compiler.source>
        <maven.compiler.target>1.7</maven.compiler.target>
    </properties>

    <dependencies>
        <dependency>
            <groupId>junit</groupId>
            <artifactId>junit</artifactId>
            <version>4.11</version>
            <scope>test</scope>
        </dependency>

        <!--导入Servlet依赖-->
        <dependency>
            <groupId>javax.servlet</groupId>
            <artifactId>javax.servlet-api</artifactId>
            <version>4.0.1</version>
        </dependency>

        <!--导入SpringMVC依赖-->
        <dependency>
            <groupId>org.springframework</groupId>
            <artifactId>spring-webmvc</artifactId>
            <version>5.1.9.RELEASE</version>
        </dependency>

        <!--导入Jackson依赖-->
        <dependency>
            <groupId>com.fasterxml.jackson.core</groupId>
            <artifactId>jackson-databind</artifactId>
            <version>2.9.8</version>
        </dependency>

        <dependency>
            <groupId>com.fasterxml.jackson.core</groupId>
            <artifactId>jackson-annotations</artifactId>
            <version>2.9.8</version>
        </dependency>

        <!--Junit测试依赖-->
        <dependency>
            <groupId>junit</groupId>
            <artifactId>junit</artifactId>
            <version>4.11</version>
            <scope>test</scope>
        </dependency>

        <!--hibernate参数校验依赖-->
        <dependency>
            <groupId>org.hibernate.validator</groupId>
            <artifactId>hibernate-validator</artifactId>
            <version>6.1.0.Alpha3</version>
        </dependency>

        <!--整合Thymeleaf-->
        <dependency>
            <groupId>org.thymeleaf</groupId>
            <artifactId>thymeleaf</artifactId>
            <version>3.0.11.RELEASE</version>
        </dependency>

        <dependency>
            <groupId>org.thymeleaf</groupId>
            <artifactId>thymeleaf-spring5</artifactId>
            <version>3.0.9.RELEASE</version>
        </dependency>

        <!-- druid数据源 -->
        <dependency>
          <groupId>com.alibaba</groupId>
          <artifactId>druid</artifactId>
          <version>1.1.20</version>
        </dependency>

        <dependency>
            <groupId>org.springframework</groupId>
            <artifactId>spring-jdbc</artifactId>
            <version>5.1.6.RELEASE</version>
        </dependency>
        <dependency>
            <groupId>com.mchange</groupId>
            <artifactId>c3p0</artifactId>
            <version>0.9.5.2</version>
        </dependency>

        <dependency>
            <groupId>com.mchange</groupId>
            <artifactId>mchange-commons-java</artifactId>
            <version>0.2.11</version>
        </dependency>

        <dependency>
            <groupId>mysql</groupId>
            <artifactId>mysql-connector-java</artifactId>
            <version>5.1.48</version>
        </dependency>

    </dependencies>
</project>
2. Tomcat context.xml
<Resource
name="jdbc/mysql"
auth="Container"
type="javax.sql.DataSource"
maxActive="20"
maxIdle="5"
maxWait="10000"
username="root"
password="root"
driverClassName="com.mysql.jdbc.Driver"
url="jdbc:mysql://120.79.167.xx:3306/oms_sys_info?useUnicode=true&characterEncoding=utf-8"/>
我们使用JDNI来配置数据源时,我们需要在tomcat下的conf目录下的context.xml添加对应的数据源,不同的数据源所配置的信息是不一样,这里是Tomcat默认的dbcp数据源,后面有修改为c3p0的案例。
3. jdni.xml
<?xml version="1.0" encoding="UTF-8"?>
<beans xmlns="http://www.springframework.org/schema/beans"
       xmlns:xsi="http://www.w3.org/2001/XMLSchema-instance"
       xmlns:jee="http://www.springframework.org/schema/jee"
       xsi:schemaLocation="http://www.springframework.org/schema/beans
       http://www.springframework.org/schema/beans/spring-beans.xsd
       http://www.springframework.org/schema/jee
	   http://www.springframework.org/schema/jee/spring-jee-4.0.xsd">

    <jee:jndi-lookup id="dataSource" jndi-name="jdbc/mysql" resource-ref="true"/>
</beans>
jee标签,就是将tomcat的数据源引入到项目中,并且通过后面的DataSourceConfig中的@ImportResource注解将其注入到Ioc容器中。id就相当于是bean的id,而jndi-name就是对应前面到tomcat的context.xml中配置数据源的名字一致。
4. DataSourceConfig
@Configuration
@ImportResource(value = "classpath:jdni.xml")
public class DataSourceConfig {

    @Bean
    public JdbcTemplate jdbcTemplate(DataSource dataSource){
        return new JdbcTemplate(dataSource);
    }
}
这里主要是将xml配置文件引入到配置类中,因为配置jndi数据源,使用xml文件的形式更加简单一点(当然,java配置类的形式也是可以简单的实现),并且将数据源注入到JdbcTemplate,因为这一节我们简单使用Spring的JdbcTemplate来操作数据库。
5. InitWeb
public class InitWeb extends AbstractAnnotationConfigDispatcherServletInitializer {

    @Override
    protected Class<?>[] getRootConfigClasses() {
        return new Class[]{
                RootConfig.class
        };
    }

    @Override
    protected Class<?>[] getServletConfigClasses() {
        return new Class[]{
                ServletConfig.class
        };
    }

    @Override
    protected String[] getServletMappings() {
        return new String[]{
                "/"
        };
    }
}
InitWeb我们应该非常熟悉了,其实就是替代了原来的Web.xml文件的角色。
6. ServletConfig
@Configuration
@EnableWebMvc
@ComponentScan(basePackages = "com.ooyhao.spring.**.controller")
public class ServletConfig implements WebMvcConfigurer {

    @Override
    public void configureDefaultServletHandling(
      DefaultServletHandlerConfigurer configurer) {
        configurer.enable();
    }
}
ServletConfig文件就是相当于之前的SpringMVC.xml。这里开启了对静态资源的访问。
7. RootConfig
@ComponentScan(basePackages = "com.ooyhao.spring",useDefaultFilters = true,excludeFilters = {
        @ComponentScan.Filter(type = FilterType.ANNOTATION,value = Controller.class),
        @ComponentScan.Filter(type = FilterType.ANNOTATION,value = RestController.class)
})
public class RootConfig {}
RootConfig则相当于是配置文件形式下的applicationContext.xml文件。
8. TbUser
package com.ooyhao.spring.bean;

import com.fasterxml.jackson.annotation.JsonFormat;

import java.io.Serializable;
import java.util.Date;

/**
 * 描述:
 * 类【TbUser】
 *
 * @author ouYangHao
 * @create 2019-09-10 15:49
 */
public class TbUser implements Serializable {

    private Integer id;
    private String userId;
    private String username;
    private String password;
    private String email;
    private String phone;
    private Integer gender;
    @JsonFormat(pattern = "yyyy-MM-dd HH:mm:ss",timezone = "GMT+8")
    private Date birthday;
    private Integer status;
    @JsonFormat(pattern = "yyyy-MM-dd HH:mm:ss",timezone = "GMT+8")
    private Date createTime;
    private String createUser;
    @JsonFormat(pattern = "yyyy-MM-dd HH:mm:ss",timezone = "GMT+8")
    private Date modifyTime;
    private String modifyUser;


    public TbUser() {
    }

    public TbUser(Integer id, String userId, String username, String password, String email, String phone, Integer gender, Date birthday, Integer status, Date createTime, String createUser, Date modifyTime, String modifyUser) {
        this.id = id;
        this.userId = userId;
        this.username = username;
        this.password = password;
        this.email = email;
        this.phone = phone;
        this.gender = gender;
        this.birthday = birthday;
        this.status = status;
        this.createTime = createTime;
        this.createUser = createUser;
        this.modifyTime = modifyTime;
        this.modifyUser = modifyUser;
    }

    public Integer getId() {
        return id;
    }

    public void setId(Integer id) {
        this.id = id;
    }

    public String getUserId() {
        return userId;
    }

    public void setUserId(String userId) {
        this.userId = userId;
    }

    public String getUsername() {
        return username;
    }

    public void setUsername(String username) {
        this.username = username;
    }

    public String getPassword() {
        return password;
    }

    public void setPassword(String password) {
        this.password = password;
    }

    public String getEmail() {
        return email;
    }

    public void setEmail(String email) {
        this.email = email;
    }

    public String getPhone() {
        return phone;
    }

    public void setPhone(String phone) {
        this.phone = phone;
    }

    public Integer getGender() {
        return gender;
    }

    public void setGender(Integer gender) {
        this.gender = gender;
    }

    public Date getBirthday() {
        return birthday;
    }

    public void setBirthday(Date birthday) {
        this.birthday = birthday;
    }

    public Integer getStatus() {
        return status;
    }

    public void setStatus(Integer status) {
        this.status = status;
    }

    public Date getCreateTime() {
        return createTime;
    }

    public void setCreateTime(Date createTime) {
        this.createTime = createTime;
    }

    public String getCreateUser() {
        return createUser;
    }

    public void setCreateUser(String createUser) {
        this.createUser = createUser;
    }

    public Date getModifyTime() {
        return modifyTime;
    }

    public void setModifyTime(Date modifyTime) {
        this.modifyTime = modifyTime;
    }

    public String getModifyUser() {
        return modifyUser;
    }

    public void setModifyUser(String modifyUser) {
        this.modifyUser = modifyUser;
    }

    @Override
    public String toString() {
        return "TbUser{" +
                "id=" + id +
                ", userId='" + userId + '\'' +
                ", username='" + username + '\'' +
                ", password='" + password + '\'' +
                ", email='" + email + '\'' +
                ", phone='" + phone + '\'' +
                ", gender=" + gender +
                ", birthday=" + birthday +
                ", status=" + status +
                ", createTime=" + createTime +
                ", createUser='" + createUser + '\'' +
                ", modifyTime=" + modifyTime +
                ", modifyUser='" + modifyUser + '\'' +
                '}';
    }
}
9. UserService
package com.ooyhao.spring.service;

import com.ooyhao.spring.bean.TbUser;
import org.springframework.beans.factory.annotation.Autowired;
import org.springframework.jdbc.core.JdbcTemplate;
import org.springframework.jdbc.core.RowMapper;
import org.springframework.stereotype.Service;

import java.sql.Date;
import java.sql.ResultSet;
import java.sql.SQLException;

/**
 * 描述:
 * 类【UserService】
 *
 * @author ouYangHao
 * @create 2019-09-10 15:55
 */
@Service
public class UserService {

    @Autowired
    private JdbcTemplate jdbcTemplate;


    public TbUser findById(Integer id) {
        TbUser tbUser = jdbcTemplate.queryForObject("select * from tb_user where id = ? ",
                new Object[]{id},
                new RowMapper<TbUser>() {
                    @Override
                    public TbUser mapRow(ResultSet resultSet, int i) throws SQLException {
                        int id = resultSet.getInt("id");
                        String userId = resultSet.getString("user_id");
                        String username = resultSet.getString("username");
                        String password = resultSet.getString("password");
                        String email = resultSet.getString("email");
                        String phone = resultSet.getString("phone");
                        int gender = resultSet.getInt("gender");
                        Date birthday = resultSet.getDate("birthday");
                        int status = resultSet.getInt("status");
                        Date createTime = resultSet.getDate("create_time");
                        String createUser = resultSet.getString("create_user");
                        Date modifyTime = resultSet.getDate("modify_time");
                        String modifyUser = resultSet.getString("modify_user");

                        TbUser user = new TbUser();
                        user.setId(id);
                        user.setUserId(userId);
                        user.setUsername(username);
                        user.setPassword(password);
                        user.setEmail(email);
                        user.setPhone(phone);
                        user.setGender(gender);
                        user.setBirthday(birthday);
                        user.setStatus(status);
                        user.setCreateTime(createTime);
                        user.setCreateUser(createUser);
                        user.setModifyUser(modifyUser);
                        user.setModifyTime(modifyTime);
                        return user;
                    }
                });
        return tbUser;
    }
}
这里使用了Spring的JdbcTemplate来操作数据库,这里只是简单的使用了一下,如果使用,可以进一步研究。
10. UserController
package com.ooyhao.spring.controller;

import com.ooyhao.spring.bean.TbUser;
import com.ooyhao.spring.service.UserService;
import org.springframework.beans.factory.annotation.Autowired;
import org.springframework.web.bind.annotation.PathVariable;
import org.springframework.web.bind.annotation.RequestMapping;
import org.springframework.web.bind.annotation.RestController;

import javax.naming.NamingException;

/**
 * 描述:
 * 类【UserController】
 *
 * @author ouYangHao
 * @create 2019-09-10 16:01
 */
@RestController
public class UserController {

    @Autowired
    private UserService userService;

    @RequestMapping("/user/{id}")
    public TbUser findById(@PathVariable("id") Integer id) throws NamingException {
        return userService.findById(id);
    }
}
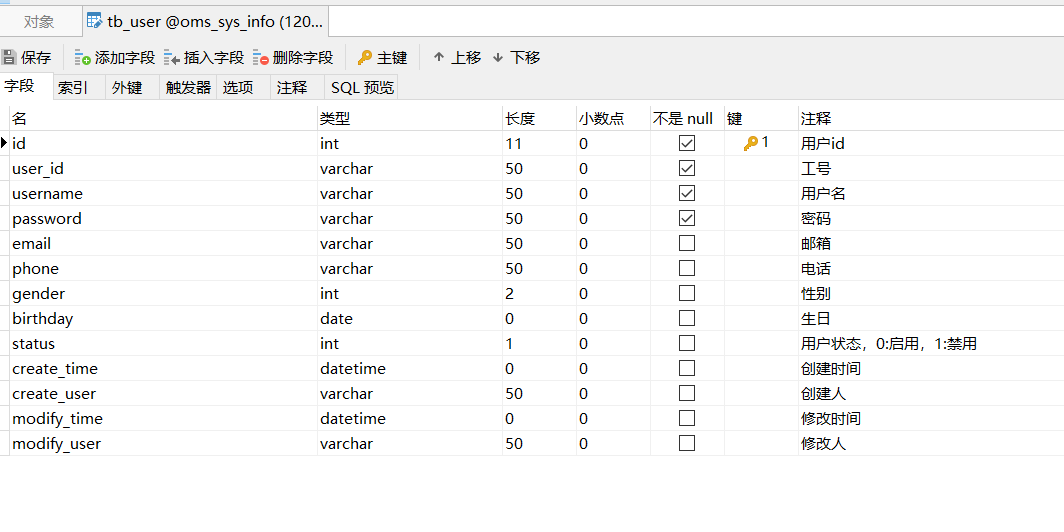
11. 数据库数据

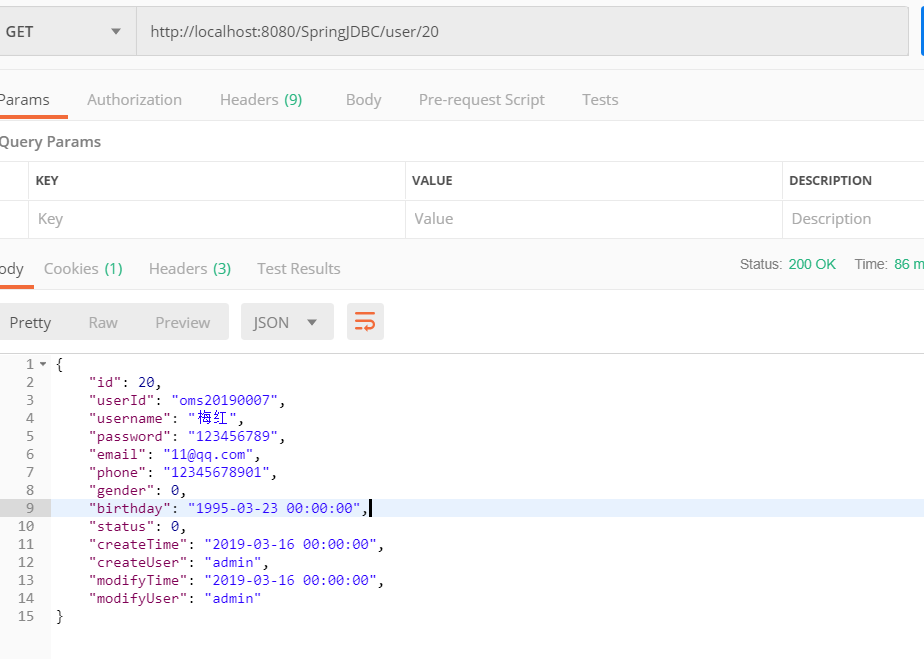
12. 测试结果

切换JDNI Tomcat默认的数据源
tomcat context.xml
<Resource
name="jdbc/mysql"
auth="Container"
factory="org.apache.naming.factory.BeanFactory"
type="com.mchange.v2.c3p0.ComboPooledDataSource"
maxPoolSize="20"
minPoolSize="5"
user="root"
password="root"
driverClass="com.mysql.jdbc.Driver"
jdbcUrl="jdbc:mysql://120.79.167.xx:3306/oms_sys_info?useUnicode=true&characterEncoding=utf-8"/>
Java配置类配置数据源
package com.ooyhao.spring.config;

import com.alibaba.druid.pool.DruidDataSource;
import com.mchange.v2.c3p0.ComboPooledDataSource;
import org.apache.commons.dbcp2.BasicDataSource;
import org.springframework.context.annotation.Bean;
import org.springframework.context.annotation.Configuration;
import org.springframework.context.annotation.Primary;
import org.springframework.jdbc.core.JdbcTemplate;

import javax.sql.DataSource;
import java.beans.PropertyVetoException;

/**
 * 描述:
 * 类【DataSourceConfig】
 *
 * @author ouYangHao
 * @create 2019-09-10 15:26
 */
@Configuration
public class DataSourceConfig {


    /*配置C3P0数据源*/
    @Bean
    @Primary
    public DataSource dataSource1() throws PropertyVetoException {
        ComboPooledDataSource dataSource = new ComboPooledDataSource();
        dataSource.setMaxPoolSize(20);
        dataSource.setMinPoolSize(5);
        dataSource.setUser("root");
        dataSource.setPassword("root");
        dataSource.setDriverClass("com.mysql.jdbc.Driver");
        dataSource.setJdbcUrl("jdbc:mysql://120.79.167.xx:3306/oms_sys_info?useUnicode=true&characterEncoding=utf-8");
        return dataSource;
    }


    /*配置Druid数据源*/
    @Bean
    public DataSource dataSource2(){
        DruidDataSource dataSource = new DruidDataSource();
        dataSource.setMaxActive(20);
        dataSource.setMaxWait(5);
        dataSource.setMinIdle(5);
        dataSource.setInitialSize(10);
        dataSource.setUrl("jdbc:mysql://120.79.167.xx:3306/oms_sys_info?useUnicode=true&characterEncoding=utf-8");
        dataSource.setUsername("root");
        dataSource.setPassword("root");
        dataSource.setDriverClassName("com.mysql.jdbc.Driver");
        return dataSource;
    }


    /*配置DBCP数据源*/
    @Bean
    public DataSource dataSource3(){
        BasicDataSource dataSource = new BasicDataSource();
        dataSource.setMaxTotal(20);
        dataSource.setMaxIdle(10);
        dataSource.setInitialSize(5);
        dataSource.setDriverClassName("com.mysql.jdbc.Driver");
        dataSource.setUrl("jdbc:mysql://120.79.167.xx:3306/oms_sys_info?useUnicode=true&characterEncoding=utf-8");
        dataSource.setMinIdle(5);
        dataSource.setUsername("root");
        dataSource.setPassword("root");
        return dataSource;
    }

    @Bean
    public JdbcTemplate jdbcTemplate(DataSource dataSource){
        System.out.println(dataSource);
        return new JdbcTemplate(dataSource);
    }
}
总结:
这一节主要是介绍如何在Spring中操作数据库,而本节只是使用了Spring中的JdbcTemplate来操作数据库。同时本节包含了操作数据库一个重要的知识点--数据源。配置数据源包括了从服务器中获取,即通过JNDI配置数据源。或是使用Java配置类的形式类配置数据源。常用的数据源包括:DruidDataSource(Alibaba Druid)、BasicDataSource(DBCP)、ComboPooledDataSource(C3P0).
源码:
https://gitee.com/ooyhao/JavaRepo_Public/tree/master/Spring-in-Action/spring-in-action-10
最后
如果觉得不错的话,那就关注一下小编哦!一起交流,一起学习


