《Spring in action 4》(三)高级装配
高级装配
莫道君行早,更有早行人
环境与Profile
在实际开发过程中,往往会将项目发布到不同的环境中,由于环境的不同,我们一般需要对在不同环境的数据和配置进行一些个性化的设定。比如,我们一般将开发到生产流程中的环境分为三种:开发(dev)、测试(test)和生产(prod)。而在这三种环境下,我们有些配置(如数据源)需要根据环境来切换。下面看看Spring中如何进行环境的个性化配置。
JavaConfig配置类
定义一个普通的User类:
public class User implements Serializable {
    private String name;
    private Integer age;
    private String sex;
    public User() {}

    public User(String name, Integer age, String sex) {
        this.name = name;
        this.age = age;
        this.sex = sex;
    }

    public String getName() {
        return name;
    }

    public void setName(String name) {
        this.name = name;
    }

    public Integer getAge() {
        return age;
    }

    public void setAge(Integer age) {
        this.age = age;
    }

    public String getSex() {
        return sex;
    }

    public void setSex(String sex) {
        this.sex = sex;
    }

    @Override
    public String toString() {
        return "User{" +
                "name='" + name + '\'' +
                ", age=" + age +
                ", sex='" + sex + '\'' +
                '}';
    }
}
BeanConfigA类:(使用@Profile 来指定环境,可以修饰在类上和方法上。此处只演示修饰在类上的,表示当前类中所有的Bean都只能在dev环境下,才能实例化到IoC容器中。当修饰在方法上,与@Bean配合使用时,将用更加细粒度的控制某一个类在某种环境下才能创建出来)
@Profile(value = "dev")
@Configuration
public class BeanConfigA {
    @Bean
    public User user(){
        return new User("张三",23,"男");
    }
}
BeanConfigB类:
@Profile(value = "prod")
@Configuration
public class BeanConfigB {
    @Bean
    public User user(){
        return new User("李四",23,"男");
    }
}
BeanConfig类:
@ComponentScan(basePackages = "com.ooyhao.spring")
public class BeanConfig {}
测试类:
@RunWith(SpringJUnit4ClassRunner.class)
@ContextConfiguration(classes = BeanConfig.class)
@ActiveProfiles(value = {"prod"})
public class BeanConfigTest {

    @Autowired
    private User user;

    @Test
    public void testProfile(){
        System.out.println(user);
    }
}
上面使用了在集成测试类上,适应@ActiveProfiles 注解来指定当前测试的环境。
Xml配置文件的方式
beanXmlConfig.xml文件:
<?xml version="1.0" encoding="UTF-8"?>
<beans xmlns="http://www.springframework.org/schema/beans"
       xmlns:xsi="http://www.w3.org/2001/XMLSchema-instance"
       xsi:schemaLocation="http://www.springframework.org/schema/beans http://www.springframework.org/schema/beans/spring-beans.xsd">

    <beans profile="dev">
        <bean class="com.ooyhao.spring.bean.User">
            <property name="name" value="ouYanghao"/>
            <property name="age" value="23"/>
            <property name="sex" value="男"/>
        </bean>
    </beans>

    <beans profile="prod">
        <bean class="com.ooyhao.spring.bean.User">
            <property name="name" value="王五"/>
            <property name="age" value="30"/>
            <property name="sex" value="女"/>
        </bean>
    </beans>
    <beans profile="test">
        <bean class="com.ooyhao.spring.bean.User">
            <constructor-arg name="name" value="翠花"/>
            <constructor-arg name="age" value="28"/>
            <constructor-arg name="sex" value="女"/>
        </bean>
    </beans>
</beans>
注意:
xml配置的方式可以看出:通过使用<beans> 标签中嵌套 <beans> 标签,并且使用 <beans> 标签的profile属性来指定环境。
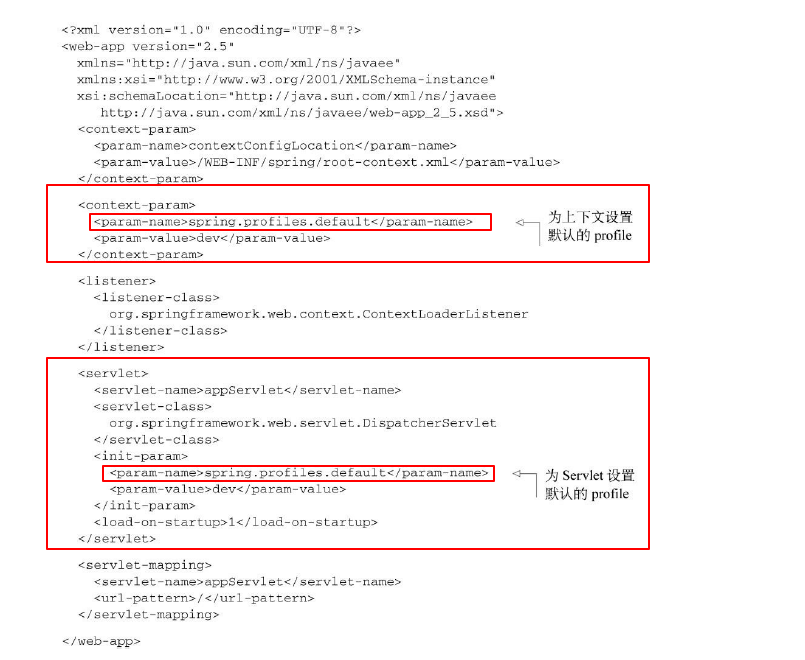
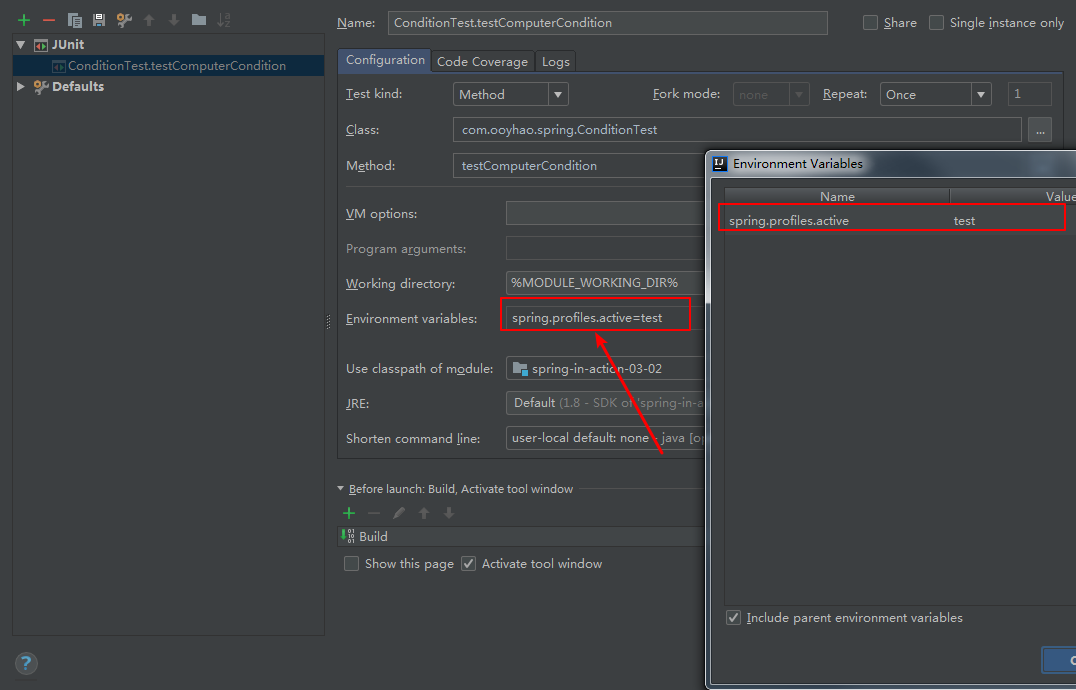
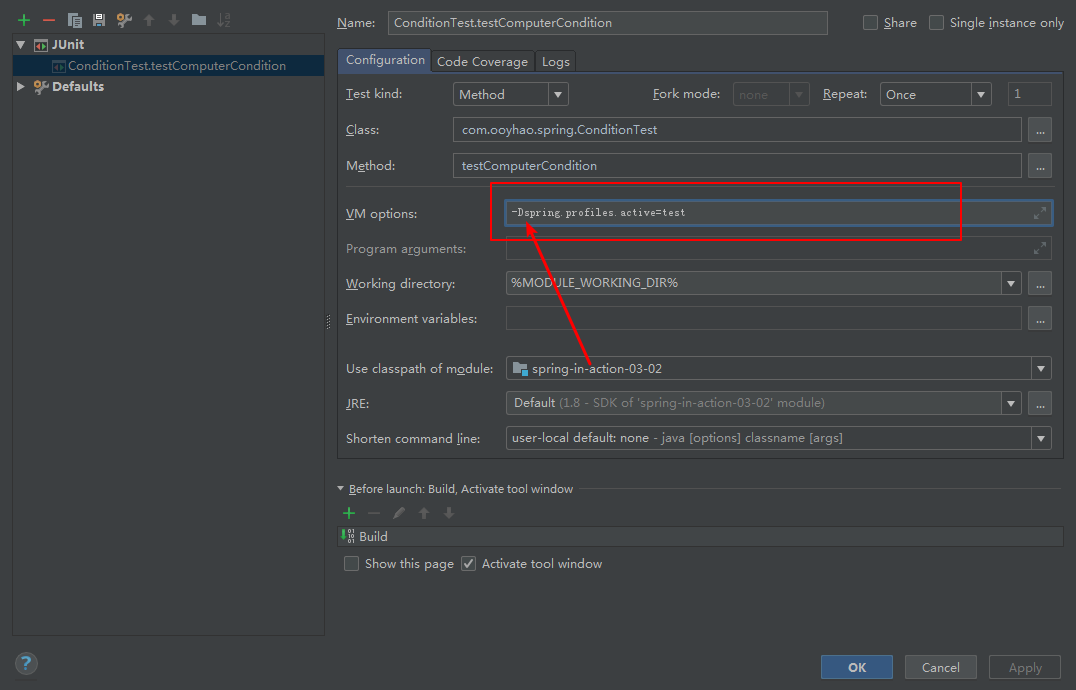
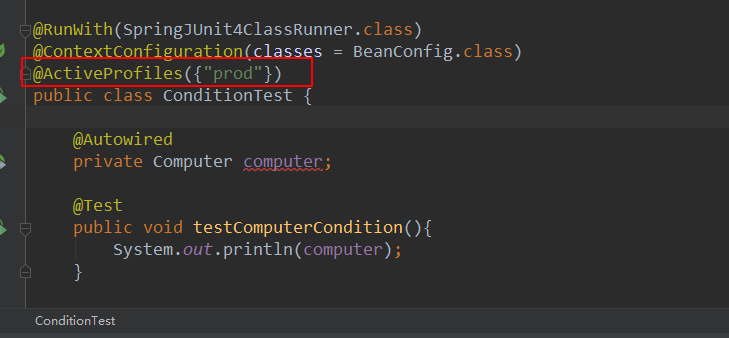
激活Profile环境的几种方式
Spring在确定哪个Profile处于激活状态时,需要依赖两个独立的属性:spring.profiles.active 和 spring.profiles.default . 如果设置了spring.profiles.active 属性的话,那么它的值就会用来确定哪个profile是激活的。但是如果没有设置spring.profiles.active的话,那spring将会查找 spring.profiles.default 的值,如果spring.profiles.default 和 spring.profiles.active 的值均没设定时,那么久无法激活profile,只有那些没有定义在任何profile中的Bean才会会创建。
有多种方式来设定这两个属性:
- 作为DispatcherServlet的初始化参数;
- 作为Web应用的上下文参数;
- 作为JNDI条目;
- 作为环境变量;
- 作为JVM的系统属性;
- 在集成测试类上,使用
@ActiveProfiles注解设置。
在Web.xml文件中设置:
Idea 中如何修改环境变量:
Idea 中如何修改JVM的系统变量:
在集成测试类上 ,使用@ActiveProfiles注解设置。
条件化的Bean
基本使用
在实际开发中,有时候需要控制某些Bean在某些特定的时候才创建,在Spring4之前很难实现这种条件化配置,但是spring4中引入了@Conditional 注解,他可以用到带有@Bean 注解的方法上,如果给定的条件计算结果为true,就会创建这个Bean,否则就会忽略这个Bean的创建。
下面我们以笔记本电脑和笔记本电池为案例,展开讲述 @Conditional 的使用,设定:笔记本创建时需要判断笔记本电池是否创建?
案例:当我们创建Computer类时,假设需要依赖于Battery类,如果当前容器中没有创建Battery实例,Computer就不创建了。
Computer 类:
public class Computer {
    private String brand;
    private String name;
    private Battery battery;

  	//noArgsConstructor
    //allArgsConstructor
  	//getter and setter
  	//toString
}
Battery 类:
public class Battery {
    private String brand;
    private String name;

  	//noArgsContructor
  	//allArgsConstrctor
  	//getter and setter
  	//toString
}
ComputerCondition类:
通过使自定义Condition类实现Spring的Condition接口,并实现matches方法,依照其返回值true和false来判断标有@Conditional(ComputerCondition.class) 的bean是否创建。
public class ComputerCondition implements Condition {
    /*判断是否某个Bean存在时,存创建指定的Bean*/
    public boolean matches(ConditionContext context, AnnotatedTypeMetadata metadata) {
        try {
            ConfigurableListableBeanFactory factory = context.getBeanFactory();
            Battery bean = factory.getBean(Battery.class);
            System.out.println(bean);
            if (bean == null) {
                return false;
            }
            return true;
        }catch (Exception e){
            return false;
        }
    }
}
配置类:
public class BeanConfig {
    //@Bean
    public Battery battery(){
        return new Battery("小米","小米笔记本电池");
    }

    @Bean
    @Conditional(ComputerCondition.class)
    public Computer computer(Battery battery){
        Computer computer = new Computer();
        computer.setBrand("小米");
        computer.setName("小米笔记本");
        computer.setBattery(battery);
        return computer;
    }
}
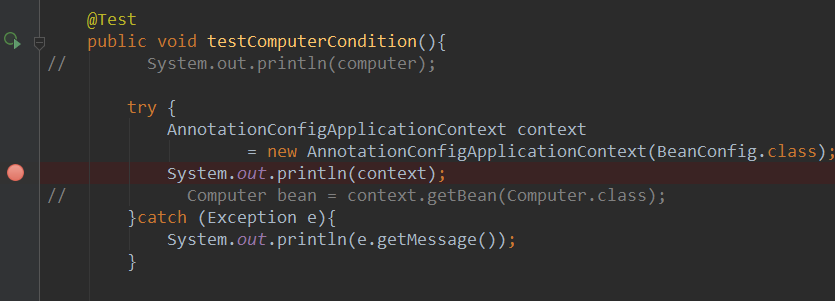
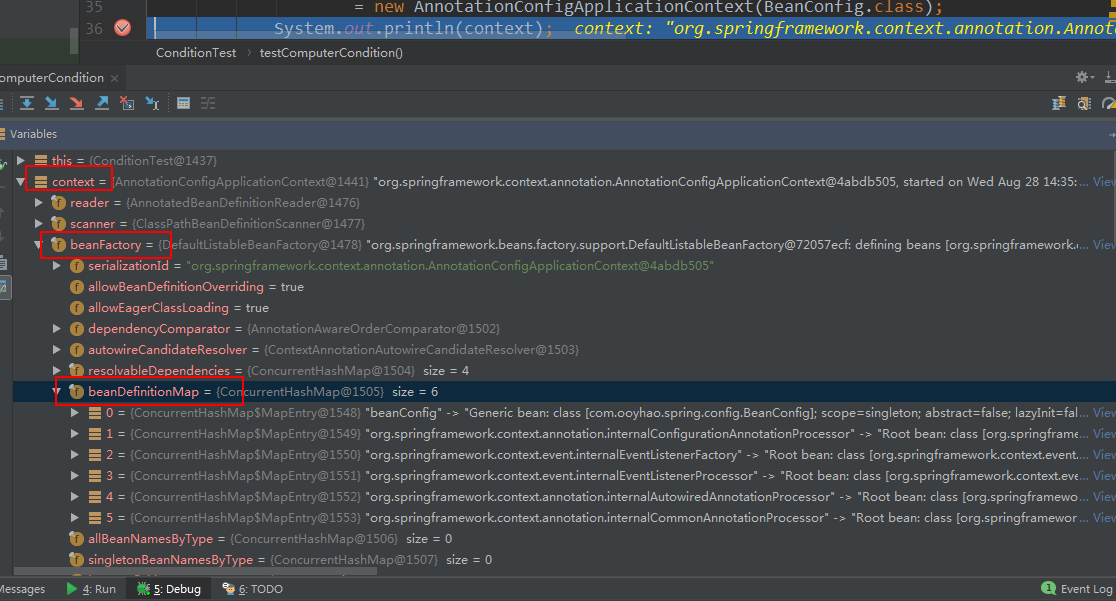
测试,将创建容器后用断点截断,查看:
测试结果可以直接查看Spring IoC容器中创建了哪些Bean。下图中的 BeanDefinitionMap 就是IoC容器存放Bean的一个地方。
而将配置类中创建电池方法的@Bean 注解注释取消之后,其结果如下图:

小案例
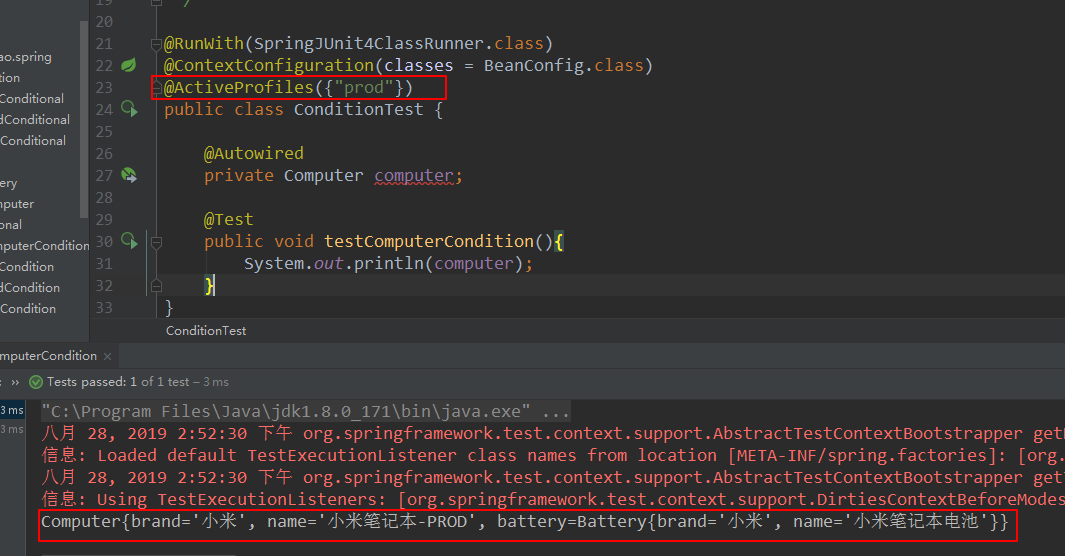
用@Conditional 注解来实现@profiles 功能,并且要求在不同的环境下 ,创建不同的Computer Bean。
DevCondition:
public class DevCondition implements Condition {
    public boolean matches(ConditionContext context, AnnotatedTypeMetadata metadata) {
        return context.getEnvironment().acceptsProfiles(new Profiles() {
            @Override
            public boolean matches(Predicate<String> activeProfiles) {
                return activeProfiles.test("dev");//
            }
        });
    }
}
TestCondition和ProdCondition只需要将上述代码中的dev改成test或是prod即可。
自定义注解,通过使用@Conditional 注解来标注,即相当于继承了@Conditional 注解,通过制定DevCondition.class. 表示当前注解条件判断是使用DevCondition中的逻辑来判断的。
@Target({ElementType.METHOD,ElementType.TYPE})
@Inherited
@Retention(RetentionPolicy.RUNTIME)
@Conditional(DevCondition.class)
public @interface DevConditional {}
@TestConditional 和 @ProdConditional 只需要修改其传入@Conditional 注解的类即可。
配置类:
public class BeanConfig {

    @Bean
    public Battery battery(){
        return new Battery("小米","小米笔记本电池");
    }

    @Bean
    @DevConditional
    public Computer devComputer(){
        Computer computer = new Computer();
        computer.setBrand("小米");
        computer.setName("小米笔记本-DEV");
        computer.setBattery(battery());
        return computer;
    }


    @Bean
    @TestConditional
    public Computer testComputer(){
        Computer computer = new Computer();
        computer.setBrand("小米");
        computer.setName("小米笔记本-TEST");
        computer.setBattery(battery());
        return computer;
    }

    @Bean
    @ProdConditional
    public Computer prodComputer(){
        Computer computer = new Computer();
        computer.setBrand("小米");
        computer.setName("小米笔记本-PROD");
        computer.setBattery(battery());
        return computer;
    }
}
测试:通过前面的几种方式可以切换环境,可以测试出能够根据环境的不同产生不同的Computer。
matches方法
上面案例和介绍可以看出,通过@Conditional 以及配合Condition接口来实现工作是很简单的,实现Condition接口只需要实现matches方法即可,接下来我们来详细看一下matches方法传入的两个参数:ConditionContext和AnnotatedTypeMetaData。
ConditionContext
ConditionContext是一个接口,源代码如下:
// @since 4.0
public interface ConditionContext {
	BeanDefinitionRegistry getRegistry();

	@Nullable
	ConfigurableListableBeanFactory getBeanFactory();

	Environment getEnvironment();

	ResourceLoader getResourceLoader();

	@Nullable
	ClassLoader getClassLoader();
}
通过ConditionContext,我们可以做到如下几点:
- 借助getRegistry()返回的BeanDefinitionRegistry检查bean定义;
- 借助getBeanFactory()返回的ConfigurableListableBeanFactory检查bean是否存在甚至探查bean的属性;
- 借助getEnvironment()返回的Environment检查环境变量是否存在以及它的值是什么;
- 读取并探查getResourceLoader()返回的ResourceLoader所加载的资源;
- 借助getClassLoader()返回的ClassLoader加载并检查类是否存在;
AnnotatedTypeMetaData
AnnotatedTypeMetaData则能够让我们检查带有@Bean 注解的方法上还有什么 注解。与ConditionContext一样,也是一个接口:
// @since 4.0
public interface AnnotatedTypeMetadata {

	boolean isAnnotated(String annotationName);

	@Nullable
	Map<String, Object> getAnnotationAttributes(String annotationName);

	@Nullable
	Map<String, Object> getAnnotationAttributes(String annotationName, boolean classValuesAsString);

	@Nullable
	MultiValueMap<String, Object> getAllAnnotationAttributes(String annotationName);

	@Nullable
	MultiValueMap<String, Object> getAllAnnotationAttributes(String annotationName, boolean classValuesAsString);

}
借助isAnntated()方法,我们能够判断带有@Bean 注解的方法是不是还有其他特定的注解。借助其他的那些方法,我们能够检查@Bean 注解的方法是不是还有其他注解。
其实@Profiles 注解也是使用了@Conditional 注解,并且引用ProfileCondition作为Condition实现,如下所示,ProfileCondition实现了Condition接口,并且在作出决策的过程中,考虑到了ConditionContext 和 AnnotatedTypeMetaData中的多个元素。
class ProfileCondition implements Condition {
	@Override
	public boolean matches(ConditionContext context, AnnotatedTypeMetadata metadata) {
		MultiValueMap<String, Object> attrs = metadata.getAllAnnotationAttributes(Profile.class.getName());
		if (attrs != null) {
			for (Object value : attrs.get("value")) {
				if (context.getEnvironment().acceptsProfiles(Profiles.of((String[]) value))) {
					return true;
				}
			}
			return false;
		}
		return true;
	}
}
处理歧义性Bean
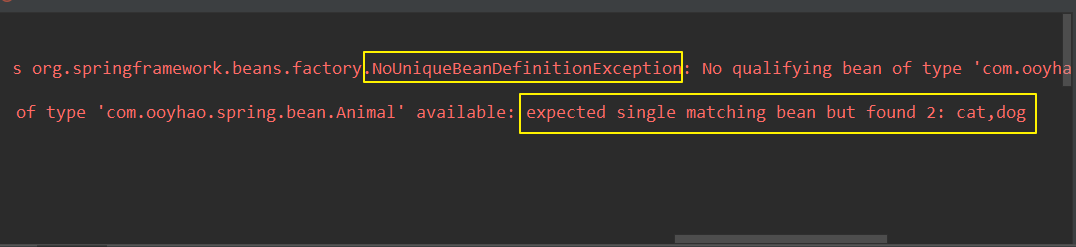
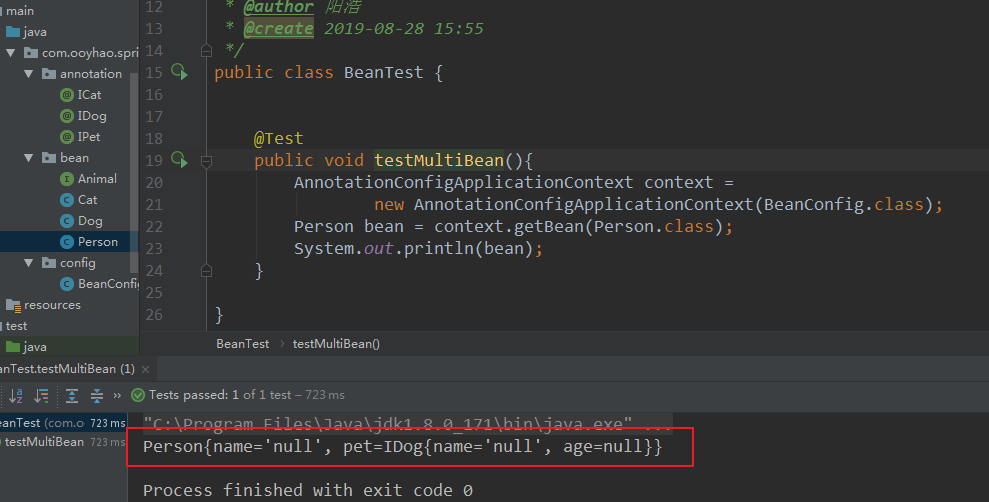
当我们在注入Bean的时候,不管是byType,还是byName,如果遇到了两个相同的Bean的时候,Spring就会包NoUniqueBeanDefinitionException 即:不唯一的Bean的定义异常。
Animal:
public interface Animal {}
Cat:(省略无参构造,全参构造,getter,setter,toString方法,后面亦如此)
public class Cat implements Animal {
    private String name;
    private Integer age;
}
Dog:
public class Dog implements Animal {
    private String name;
    private Integer age;
}
Person:
public class Person {
    private String name;
    private Animal pet;
}
BeanConfig:
public class BeanConfig {

    @Bean
    public Animal cat(){
        return new Cat("小喵",3);
    }

    @Bean
    public Animal dog(){
        return new Dog("小七",2);
    }

    /**
     * 实例化一个类,其宠物是Animal类型
     * */
    @Bean
    public Person person(Animal animal){
        return new Person("张三",animal);
    }
}
上述代码运行如下(报错:Bean定义不唯一异常,需要装配Animal,希望找到一个,但是发现了两个,cat,dog):
标注首选项
JavaConfig配置类形式
public class BeanConfig {

    @Bean
    @Primary
    public Animal cat(){
        return new Cat("小喵",3);
    }

    @Bean
    public Animal dog(){
        return new Dog("小七",2);
    }

    /**
     * 实例化一个类,其宠物是Animal类型
     * */
    @Bean
    public Person person(Animal animal){
        return new Person("张三",animal);
    }
}
XML配置形式
multiBean.xml:
<?xml version="1.0" encoding="UTF-8"?>
<beans xmlns="http://www.springframework.org/schema/beans"
       xmlns:xsi="http://www.w3.org/2001/XMLSchema-instance"
       xsi:schemaLocation="http://www.springframework.org/schema/beans
       http://www.springframework.org/schema/beans/spring-beans.xsd">

    <bean class="com.ooyhao.spring.bean.Dog" primary="true" >
        <property name="name" value="小小七"/>
        <property name="age" value="1"/>
    </bean>

    <bean class="com.ooyhao.spring.bean.Cat">
        <property name="name" value="小小喵"/>
        <property name="age" value="1"/>
    </bean>
</beans>
XmlBeanConfig配置类:
@ImportResource("classpath:multiBean.xml")
public class XmlBeanConfig {

    @Bean
    public Person person(Animal animal){
        return new Person("王五",animal);
    }
}
总结:
通过上述JavaConfig配置类或是Xml配置文件,可以发现,其实在遇到歧义性Bean的时候,可以通过标注首选项来解决,在JavaConfig配置类上使用@Primary 注解 或是在 Xml配置文件在bean标签中使用primary=true 来实现。
限制自动装配的Bean
如果在实际项目中byType注入的时候出现多个相同的Bean的时候,我们可以通过ID的形式注入。如下:
在Cat和Dog类上使用@Component 注解标注,Person类如下:
@Component
public class Person {

    private String name;

//    @Autowired
//    @Qualifier("dog")

    @Resource(name = "dog")
    private Animal pet;
}
通过使用@Autowired 和 @Qualifier 配合使用,并在Qualifier中指定Bean的ID。或者使用@Resource注解,在其name属性指定bean 的Id。
这里特别注释一下这几个注解的注入方式:
- @AutoWired 注解
默认是byType 进行装配的,如果在IoC容器中存在两个或两个以上的Bean类型一致时,Autowired会转变为byName进行装配,如果此时相同类型的Bean的ID存在0个或两个以两个以上与需要注入属性的名字一致,则会抛出 NoUniqueBeanDefinitionException 异常。如果此时需要装配Bean的ID与属性名不一致,可以配合@Qualifier 注解来标注。
- @Resource 注解
@Resource其实与@Autowired的作用是一致的,都是用来装配Bean的,但是@Resource默认是byName来装配的,@Resource有两个比较 重要的属性,一个是name,一个是type,如果指定name,其实就是使用byName进行装配,如果指定type,则是使用byType进行装配。
装配顺序如下:
- 如果同时指定了name和type,则从Spring上下文中找到唯一匹配的bean进行装配,找不到则抛出异常。
- 如果指定了name,则从上下文中查找名称(id)匹配的Bean进行装配,否则就抛出异常。
- 如果指定了type,则从上下文中查找类型匹配的唯一bean进行装配,找不到或者多个,都会抛出异常。
- 如果既没有指定name,又没有指定type,则自动按照byName方式进行装配;如果没有匹配,则回退为类型匹配,如果匹配则自动装配。
-
@Qualifier注解
不仅可以与Autowired注解配置使用标注在属性,构造方法,set方法上,还可以标注在类上,如果一个类使用@Component注解标注,通过自动扫描产生的Bean的ID是类名的首字母小写的形式,而如果使用@Qualifier注解组合标注,只需要在注入的时候,选择合适的标注信息进行标注即可。
注意:
1和2 示例中,使用@Qualifier注解只是为Dog对象打一个标注,并不是将Dog对象的ID由dog变成了pet,所以,如果在注入的时候,仅是使用2中的代码依旧会抛出异常,需要使用3中的代码,即需要在注入的时候加上这个标注。如果需要使用2中的代码,则需要将Dog的ID由dog修改为pet,即直接在@Component的value中指定为pet即可。
// ----------------------1------------------------------
@Component
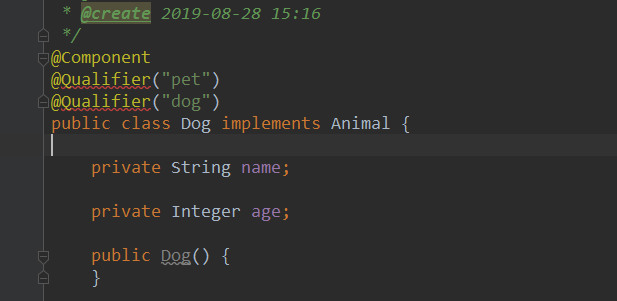
@Qualifier("pet")
public class Dog implements Animal {
private String name;
private Integer age;
}
// ----------------------2-------------------------------
@Component
public class Person {
private String name;
@Autowired
private Animal pet;
}
// ----------------------3-------------------------------
@Component
public class Person {
private String name;
@Autowired
@Qualifier("pet")
private Animal pet;
}
//------------------------4-----------------------------
@Component("pet")
//@Qualifier("pet")
public class Dog implements Animal {
private String name;
private Integer age;
}
由于@Qualifier的注解只是将Bean打上一个标注,而如果遇到两个或两个以上的Bean打了一个相同的标注,此时又无法实现装配了,有人可能会说,一个不够,那就多打几个。由图片可以看出,不支持标注多个@Qualifier的注解,否则会报编译异常。那么如何解决呢?
上述问题可以通过自定义注解来解决,自定义注解结合@Qualifier注解实现,如下:
IPet注解:
@Target({ElementType.METHOD,ElementType.TYPE,ElementType.FIELD})
@Retention(RetentionPolicy.RUNTIME)
@Qualifier
public @interface IPet {}
ICat注解:
@Target({ElementType.METHOD,ElementType.TYPE,ElementType.FIELD})
@Retention(RetentionPolicy.RUNTIME)
@Qualifier
public @interface ICat {}
IDog注解:
@Target({ElementType.METHOD,ElementType.TYPE,ElementType.FIELD})
@Retention(RetentionPolicy.RUNTIME)
@Qualifier
public @interface IDog {}
Cat类:
@Component
@IPet
@ICat
public class Cat implements Animal {
    private String name;
    private Integer age;
}
Dog类:
@Component
@IPet
@IDog
public class Dog implements Animal {
    private String name;
    private Integer age;
}
Person类使用:
@Component
public class Person {

    private String name;

    @Autowired
    @IPet
    @IDog
    private Animal pet;
}
测试结果如下:
Bean的作用域
Bean的作用域分为四种:singleton, prototype, session, request.
- singleton:单例,默认,即每次从容器中获取的对象都是同一个
- prototype:多例(原型),即每次从容器中获取的对象都是不一样的。
- session:回话,用于web环境,一次session回话是同一个对象。
- request:请求,用于web环境,一次request请求是同一个对象。
常见的作用域是singleton和prototype,下面主要是演示下面两种:
Java配置类形式
singleton作用域:
@Component
@Scope(ConfigurableBeanFactory.SCOPE_SINGLETON)
public class Cat implements Animal {
    private String name;
    private Integer age;
}
prototype作用域:
@Component
@Scope(ConfigurableBeanFactory.SCOPE_PROTOTYPE)
public class Dog implements Animal {
    private String name;
    private Integer age;
}
BeanConfig 配置类:
@ComponentScan(basePackages = "com.ooyhao.spring")
public class BeanConfig {}
测试类:
public class ScopeTest {

    @Test
    public void testScope(){
        AnnotationConfigApplicationContext context
                = new AnnotationConfigApplicationContext(BeanConfig.class);
        Cat bean1 = context.getBean(Cat.class);
        Cat bean2 = context.getBean(Cat.class);
        System.out.println(bean1 == bean2);//true

        Dog dog1 = context.getBean(Dog.class);
        Dog dog2 = context.getBean(Dog.class);

        System.out.println(dog1 == dog2);//false
    }
}
Xml配置文件形式
Bean类:
public class Computer {}
public class MobilePhone {}
scope.xml配置文件:
<?xml version="1.0" encoding="UTF-8"?>
<beans xmlns="http://www.springframework.org/schema/beans"
       xmlns:xsi="http://www.w3.org/2001/XMLSchema-instance"
       xsi:schemaLocation="http://www.springframework.org/schema/beans
       http://www.springframework.org/schema/beans/spring-beans.xsd">

    <bean class="com.ooyhao.spring.bean.Computer" scope="singleton"/>
    <bean class="com.ooyhao.spring.bean.MobilePhone" scope="prototype"/>

</beans>
测试类:
@Test
public void testXmlConfig(){
    ClassPathXmlApplicationContext context
      = new ClassPathXmlApplicationContext("scope.xml");
    Computer computer1 = context.getBean(Computer.class);
    Computer computer2 = context.getBean(Computer.class);
    System.out.println(computer1 == computer2);//true

    MobilePhone mobilePhone1 = context.getBean(MobilePhone.class);
    MobilePhone mobilePhone2 = context.getBean(MobilePhone.class);
    System.out.println(mobilePhone1 == mobilePhone2);//false
}
运行时注入值
Spring 提供了两种在运行时求的方式:
- 属性占位符(${})
- Spring表达式语言(#{})
注入外部值
在Spring中,处理外部值的最简单方式就是声明属性源并通过Spring的Environment来检索属性。
application.properties文件:
name=ooyhao
age=12
sex=男
通过使用@PropertySource注解,将指定下的文件(此例:application.properties)会被加载到Spring的Environment中,稍后可以从这里检索属性。
UserConfig配置文件:
@PropertySources(
     @PropertySource(value = "classpath:application.properties",encoding = "utf-8")
)
public class UserConfig {

    @Autowired
    private Environment environment;

    @Bean
    public User user(){
        String name = environment.getProperty("name");
        Integer age = Integer.valueOf(environment.getProperty("age"));
        String sex = environment.getProperty("sex");
        return new User(name,age,sex);
    }
}
深入学习Environment
通过打印上述代码中自动注入的Environment可以看出,注入的其实是:org.springframework.core.env.StandardEnvironment. 而它有继承自AbstractEnvironment .
AbstractEnviroment 部分方法:
public abstract class AbstractEnvironment implements ConfigurableEnvironment {

//=============================profile===============================

	// 获取所有激活的profile,返回数组
	public String[] getActiveProfiles() {}
  	// 获取所有激活的profile,返回集合
	protected Set<String> doGetActiveProfiles() {}
	// 设置多个激活的profile
	public void setActiveProfiles(String... profiles) {}
	// 添加一个激活的profile
	public void addActiveProfile(String profile) {}

	// 获取所有的默认的profile,返回数组
	public String[] getDefaultProfiles() {}
	// 获取所有的默认的profile,返回集合
	protected Set<String> doGetDefaultProfiles() {}
	// 设置多个默认的profile
	public void setDefaultProfiles(String... profiles) {}

	// 传入一个Profiles,用于判断是否符合特定的条件
	public boolean acceptsProfiles(Profiles profiles) {}
	// 判断一个profile是否为激活状态
	protected boolean isProfileActive(String profile) {}
	// 验证一个profile
	protected void validateProfile(String profile) {}

//=============================property==============================

	//获取所有的属性源PropertySource
	public MutablePropertySources getPropertySources() {}
	// 获取系统属性
  	public Map<String, Object> getSystemProperties() {}
	// 获取系统环境
	public Map<String, Object> getSystemEnvironment() {}
    // 设置一个或多个必要的属性值
	public void setRequiredProperties(String... requiredProperties) {}
	// 验证必要的属性
	public void validateRequiredProperties()
      		throws MissingRequiredPropertiesException {}
  	// 是否包含指定属性
	public boolean containsProperty(String key) {}
  	// 通过指定key,获取属性的值
	public String getProperty(String key) {}
	// 通过指定key,获取属性值,如果没有,则使用默认值
	public String getProperty(String key, String defaultValue) {}
	// 通过指定key,获取属性值,格式化为指定类型对象
	public <T> T getProperty(String key, Class<T> targetType) {}
	// 通过指定key,获取属性值,格式化为指定类型对象,如果没有,则使用默认值
	public <T> T getProperty(String key, Class<T> targetType, T defaultValue) {}
	// 获取一个必要的key所对应的属性,如果没有则抛出异常
	public String getRequiredProperty(String key) throws IllegalStateException {}
	// 获取一个必要的key所对应的属性,格式化为指定类型对象,如果没有,则抛出异常
	public <T> T getRequiredProperty(String key, Class<T> targetType)
      	throws IllegalStateException {}
}
直接从 Environment 中检索属性是十分方便的,尤其是在Java配置中装配Bean的时候。但是,Spring也提供了通过占位符装配属性的方法,这些占位符的值会来源于一个属性源。
解析属性占位符
Spring 一直支持将属性定义在外面的属性文件中,并使用占位符值将其插入到Spring Bean中。在Spring装配中,占位符的形式为使用 ${} 包装的属性名称。
//@PropertySource(value = "classpath:application.properties",encoding = "utf-8")
/*@PropertySources(
        @PropertySource(value = "classpath:application.properties",encoding = "utf-8")
)*/
public class UserConfig {

    @Bean
    public PropertySourcesPlaceholderConfigurer placeholderConfigurer(){
        PropertySourcesPlaceholderConfigurer configurer = new PropertySourcesPlaceholderConfigurer();
        Resource resource = new ClassPathResource("application.properties");
        configurer.setLocations(resource);
        return configurer;
    }

    @Value("${name}")
    private String name;

    @Value("${age}")
    private Integer age;

    @Value("${sex}")
    private String sex;

    @Bean
    public User user(){
        return new User(name,age,sex);
    }
}
上面提供了两种方式,一种是使用@PropertySources注解,一种是通过创建PropertySourcesPlaceholderConfigurer来指明属性文件的相关信息。
测试:
@Test
public void testProperties(){
  AnnotationConfigApplicationContext context = new AnnotationConfigApplicationContext(UserConfig.class);
  User bean = context.getBean(User.class);
  System.out.println(bean);
  //User{name='ooyhao', age=12, sex='男'}
}
当然也可以使用Xml文件的形式:
<?xml version="1.0" encoding="UTF-8"?>
<beans xmlns="http://www.springframework.org/schema/beans"
xmlns:xsi="http://www.w3.org/2001/XMLSchema-instance"
xmlns:context="http://www.springframework.org/schema/context"
xsi:schemaLocation="http://www.springframework.org/schema/beans
http://www.springframework.org/schema/beans/spring-beans.xsd
http://www.springframework.org/schema/context
http://www.springframework.org/schema/context/spring-context.xsd">
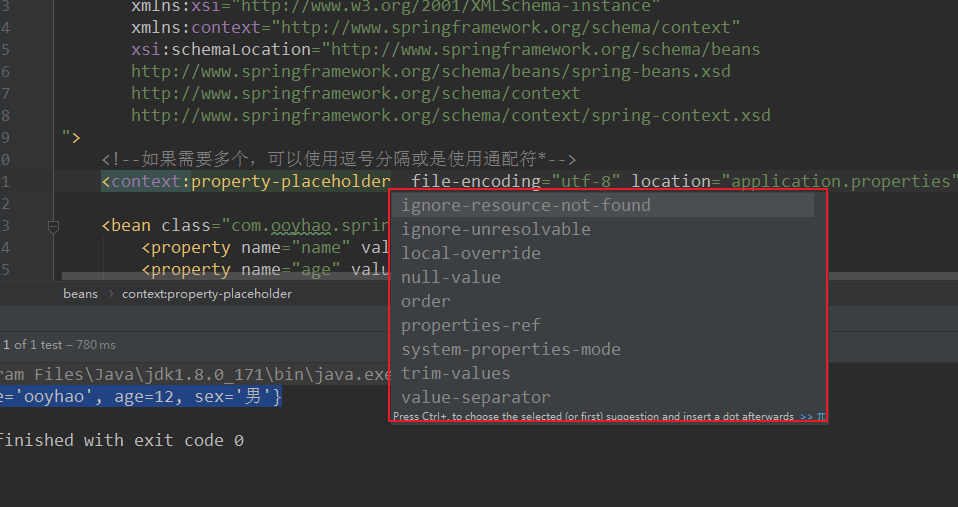
<!--如果需要多个,可以使用逗号分隔或是使用通配符*-->
<context:property-placeholder file-encoding="utf-8" location="application.properties"/>
<bean class="com.ooyhao.spring.bean.User">
<property name="name" value="${name}"/>
<property name="age" value="${age}"/>
<property name="sex" value="${sex}"/>
</bean>
</beans>
可以看出,除了上述例子中的属性,还包含更多的属性,比如ignore-resource-not-found和ignore-unresolvable 等属性。上述文件中说明了如何指定多个属性文件。
<context:property-placeholderlocation="classpath:db.properties,classpath:monitor.properties" />
<context:property-placeholderlocation="classpath:*.properties" />
属性解释:
ignore-resource-not-found //如果属性文件找不到,是否忽略,默认false,即不忽略,找不到文件并不会抛出异常。
ignore-unresolvable //是否忽略解析不到的属性,如果不忽略,找不到将抛出异常。但它设置为true的主要原因是:
Spring Expression Language
介绍
Spring Expression Language :缩写 SpEL。Spring3引入的,它能够以一种强大和简洁的方式将值装配到Bean属性和构造器参数中,在这个过程中所使用的表达式会在运行时计算得到值。使用SpEL,我们可以实现超乎想象的装配效果,这是使用其他的装配技术难以做到的。
SpEL拥有很多特性,包括:
-
使用bean的ID来引用bean。
-
调用方法和访问对象的属性。
-
对值进行算数、关系和逻辑运算。
-
正则表达式匹配。
-
集合操作。
与属性占位符不同的是,属性占位符使用的是
${}, SpEL的表达式是使用#{}。SpEL 拥有很多特性,例如:调用方法,访问属性,调用构造方法。
小试牛刀
下面的结果是:Hello World!
ExpressionParser parser = new SpelExpressionParser();
Expression expression = parser.parseExpression(" 'Hello World'.concat('!') ");
System.out.println(expression.getValue());
下面的结果是:5
ExpressionParser parser = new SpelExpressionParser();
//调用 byte[] 的 length属性
Expression expression2 = parser.parseExpression(" 'Hello'.bytes.length ");
System.out.println(expression2.getValue());//5
下面的结果:HELLO
ExpressionParser parser = new SpelExpressionParser();
Expression expression3 = parser.parseExpression(" 'hello'.toUpperCase() ");
System.out.println(expression3.getValue());//HELLO
Xml文件配置
<?xml version="1.0" encoding="UTF-8"?>
<beans xmlns="http://www.springframework.org/schema/beans"
       xmlns:xsi="http://www.w3.org/2001/XMLSchema-instance"
       xsi:schemaLocation="http://www.springframework.org/schema/beans
       http://www.springframework.org/schema/beans/spring-beans.xsd">

    <bean id="address" class="com.ooyhao.spring.bean.Address">
        <property name="id" value="#{T(java.lang.Math).random() *10 }"/>
        <property name="name" value="上海"/>
    </bean>

    <bean class="com.ooyhao.spring.bean.User">
        <property name="name" value="ooyhao"/>
        <property name="age" value="#{T(java.lang.Math).random() *100 }"/>
        <property name="addrName" value="#{address.name}"/>
    </bean>
</beans>
Java类注解配置
在属性上使用:
public class SpELConfig {

    @Value("#{T(java.lang.Math).random() * 10}")
    private Integer id;

    @Value("北京")
    private String addrName;

    @Value("#{address.name}")
    private String address;

    @Bean
    public Address address(){
        return new Address(id,addrName);
    }

    @Bean
    public User user(){
        return new User("1",23,address);
    }
}
在方法上使用 :
@Value("#{address.name}")
public void setAddrName(String addrName) {
  this.addrName = addrName;
}
在构造方法上使用:
注意:在构造方法上使用,需要与@Autowired 配合使用,并且如果需要使用,则全部都需要注入,单个注入会报编译错误。
@Component
public class User {

    @Value("#{'林黛玉'}")
    private String name;

    @Value("#{T(java.lang.Math).random() * 4 + 16}")
    private Integer age;


    private String addrName;

    public User() {}


    @Autowired
    public User(@Value("#{address.name}") String addrName){
        this.addrName = addrName;
    }

    public User(String name, Integer age,String addrName) {
        this.name = name;
        this.age = age;
        this.addrName = addrName;
    }

    public String getName() {
        return name;
    }


    public void setName(String name) {
        this.name = name;
    }

    public Integer getAge() {
        return age;
    }

    public void setAge(Integer age) {
        this.age = age;
    }

    public String getAddrName() {
        return addrName;
    }

    public void setAddrName(String addrName) {
        this.addrName = addrName;
    }

    @Override
    public String toString() {
        return "User{" +
                "name='" + name + '\'' +
                ", age=" + age +
                ", addrName='" + addrName + '\'' +
                '}';
    }
}
SpEL所支持的参考文档和文档:
https://blog.csdn.net/fanxiaobin577328725/article/details/68942967
支持:(下面仅测试部分类型,具体详细的可以查看Spring官方文档)
字面量
ExpressionParser parser = new SpelExpressionParser();

// Hello World
String helloWorld = (String) parser.parseExpression("'Hello World'").getValue();
// 6.0221415E23
double avogadrosNumber = (Double) parser.parseExpression("6.0221415E+23").getValue();
// 2147483647
int maxValue = (Integer) parser.parseExpression("0x7FFFFFFF").getValue();
// true
boolean trueValue = (Boolean) parser.parseExpression("true").getValue();
// null
Object nullValue = parser.parseExpression("null").getValue();
也可以写作:
@Value(" 'Hello World' ")
private String hello;

@Value("6.0221415E+23")
private Double num;

@Value("0x7FFFFFFF")
private Integer maxValue;

@Value("true")
private Boolean bool;

@Value("null")
private Object oNull;
对象
调用对象,对象的属性,对象的方法。 [?.] 会先判断问号左边是否为空,是则直接注入null,不在调用右边的方法。
@Value("#{user}")
private User user;

@Value("#{user.name}")
private String userName;

@Value("#{user.name.toUpperCase()}")
private String nameUp;

@Value("#{user.getAddrName().toUpperCase()}")
private String addrUp;

@Value("#{user.getName() ?.toUpperCase()}")
private String upName;//null

@Bean
public User user(){
  return new User(null,23,"shanghai");
}
类型
@Value("#{T(java.lang.Math).PI}")
private Double pi;// 3.141592653589793

@Value("#{T(java.lang.Math).random() * 100}")
private Integer randomNum;
运算符
| 运算符类型 | 运算符 |
|---|---|
| 算数运算符 | +、-、*、/、%、^ |
| 比较运算符 | <、>、==、<=、>=、lt、gt、eq、le、ge |
| 逻辑运算 | and、or、not、| |
| 条件元素符 | ?:(ternary)、?:(Elvis) |
| 正则表达式 | matches |
集合计算
@Value("#{ user.mobilePhone[1].getName() }")
private String name;// 小米手机

@Value("#{ user.mobilePhone[1].getColors()[0] }")
private String color;//Pink

/*过滤name是华为手机的MobilePhone对象到一个集合*/
@Value("#{ user.mobilePhone.?[name eq '华为手机' ] }")
private List<MobilePhone> mobilePhone;
//[MobilePhone{name='华为手机', colors=[Blue, Yellow, Green]}]

/*投影,将user对象中所有的mobilePhone的name属性投影到一个集合中*/
@Value("#{ user.mobilePhone.![name] }")
private List<String> names;//[华为手机, 小米手机, 小米手机]

/*选择user对象中所有的mobilePhone中第一个name属性为小米手机的MobilePhone*/
@Value("#{ user.mobilePhone.^[name eq '小米手机'] }")
private MobilePhone mobilePhone1;//MobilePhone{name='小米手机', colors=[Pink, Red, White]}
/*选择user对象中所有的mobilePhone中最后一个name属性为小米手机的MobilePhone*/
@Value("#{ user.mobilePhone.$[name eq '小米手机'] }")
private MobilePhone mobilePhone2;//MobilePhone{name='小米手机', colors=[black, cyan, orange]}


@Bean
public MobilePhone huaWei(){
  MobilePhone mobilePhone = new MobilePhone();
  mobilePhone.setName("华为手机");
  List<String> colors = new ArrayList<String>();
  colors.add("Blue");
  colors.add("Yellow");
  colors.add("Green");
  mobilePhone.setColors(colors);
  return mobilePhone;
}

@Bean
public MobilePhone xiaoMi(){
  MobilePhone mobilePhone = new MobilePhone();
  mobilePhone.setName("小米手机");
  List<String> colors = new ArrayList<String>();
  colors.add("Pink");
  colors.add("Red");
  colors.add("White");
  mobilePhone.setColors(colors);
  return mobilePhone;
}

@Bean
public MobilePhone xiaoO(){
  MobilePhone mobilePhone = new MobilePhone();
  mobilePhone.setName("小米手机");
  List<String> colors = new ArrayList<String>();
  colors.add("black");
  colors.add("cyan");
  colors.add("orange");
  mobilePhone.setColors(colors);
  return mobilePhone;
}
总结:
本节基于上节的基础上,进一步了解了Spring的装配特性,从上一节中如何装配Bean到这一节的条件化Bean,歧义性Bean和外部属性值,以及Spring Expression Language 的使用。至此,Spring的IoC部分的大多数知识也已经涉及到,至于高级API知识和源码分析等就不再深入,等本人达到一定水平后,在回头研究Spring或SpringBoot,这一系列主要是基于Spring-in-Action这本书所记录的笔记,系统的复习和再次深入学习一遍。
案例地址:源码地址:
https://gitee.com/ooyhao/JavaRepo_Public/tree/master/Spring-in-Action/spring-in-action-03
最后
如果觉得不错的话,那就关注一下小编哦!一起交流,一起学习


 浙公网安备 33010602011771号