
OOP 4~6总结
oop 4~6总结
前言
- 知识点
继承:第四次作业中新增的ChoiceQuestion和GapFillingQuestion继承Question类;第五次作业中Switch, SteppedSpeedController, ContinuousSpeedController, IncandescentLamp, FluorescentLamp, 和 CeilingFan 都继承Device 类,从而共享其属性和方法。
集合框架:使用List, Map等集合来存储和管理对象。以第五次作业为例,Map: CircuitSimulator 类使用 LinkedHashMap 存储设备信息,它保持插入顺序,并且提供映射功能;Iterator: 在 applyVoltage 方法中,使用迭代器遍历 devices 集合,处理每个设备的电压的输入和输出。
正则表达式:第四次大作业中我按照老师给出的设计建议新写了InputMatching类用来处理输入,在InputMatching.matchInput方法中使用正则表达式来匹配和解析用户输入。
抽象类: 第五次大作业中Device 是一个抽象类,它定义了所有设备共有的属性和方法。updateState 和 getOutput 是抽象方法,需要在子类中实现。
点击查看代码
abstract class Device {
    protected double inputVoltage; // 输入电位
    protected double outputVoltage; // 输出电位
    protected int number;//编号
    protected int type;//设备类型
    public Device() {
    }
    public Device(int number) {

        this.number = number;
    }

    public void setInputVoltage(double inputVoltage) {
        this.inputVoltage = inputVoltage;
    }

    public double getOutputVoltage() {
        return outputVoltage;
    }

    public void setOutputVoltage(double outputVoltage) {
        this.outputVoltage = outputVoltage;
    }

    public int getType() {
        return type;
    }


    public abstract void updateState(); // 更新设备状态
    public abstract void getOutput(); // 获取设备输出
}
多态: 第五次作业在 CircuitSimulator 类的 applyControlCommand 方法中,根据设备类型调用不同的方法,如 sw.setState(!sw.getState())、sc.up() 和 sc.down() 等。
点击查看代码
    void applyControlCommand(String command) {
        if (command.startsWith("#K")) {
            // 移除前缀#K
            String deviceKeySuffix = command.substring(2);
            // 假设设备编号是直接跟在#K后面的,并且后面没有其他字符或空格
            int deviceNumber;
            deviceNumber = Integer.parseInt(deviceKeySuffix); // 尝试解析设备编号
            String deviceKeyK = "K" + deviceNumber;
            Device device = devices.get(deviceKeyK);

            Switch sw = (Switch) device;
            sw.setState(!sw.getState()); // 切换开关状态

        }
        else if (command.startsWith("#F")) {
            // 移除前缀#F
            String deviceKeySuffix = command.substring(2, 3);
            String controlCommand = command.substring(3, 4);
            // 假设设备编号是直接跟在#F后面的,并且后面没有其他字符或空格
            int deviceNumber;
            deviceNumber = Integer.parseInt(deviceKeySuffix); // 尝试解析设备编号
            String deviceKeyF = "F" + deviceNumber;
            Device device = devices.get(deviceKeyF);
            SteppedSpeedController sc = (SteppedSpeedController) device;
            if (controlCommand.equals("+")) {
                sc.up();
            }
            if (controlCommand.equals("-")) {
                sc.down();
            }


        } else if (command.startsWith("#L")) {

            String deviceKeySuffix = command.substring(2, 3);
            int deviceNumber;
            deviceNumber = Integer.parseInt(deviceKeySuffix); // 尝试解析设备编号
            String deviceKeyL = "L" + deviceNumber;
            Device device = devices.get(deviceKeyL);
            ContinuousSpeedController sc = (ContinuousSpeedController) device;
            Double speed = Double.parseDouble(command.substring(4));
            sc.setSpeedLevel(speed);


        }


    }
-
题量
整体的题量不算多,但是很难,每道题目的侧重点都稍有不同。若能认真完成作业上的题目,将每道题都理解透彻,就会对个人能力的提升有特别大的帮助。
-
难度
个人认为答题判题程序写到第四题的时候是完全不会写的,特别特别的难。老师们为了学生考虑又将大作业改成了电路题目,比之前的那道简单一点点但我还是觉得很难。这就是自己的问题了,编程能力没有得到提升,今后的学习还需要态度端正认真对待。更改题目是我没有想到的,老师们是最好的老师!
设计与分析
第四次作业 答题判题程序-4
源码分析

设计思路
这道题目我是在上道题的基础上又结合了老师给出来的设计建议做了修改,新增加了部分的类。
- Question类中的
Judge方法用于判断学生答案的正确性,对于基础题目,它只进行简单的字符串比较。
点击查看代码
public String Judge(String studentAnswer) {
        if (answer.equals(studentAnswer)) {
            return "true";
        } else {
            return "false";
        }
    }
点击查看代码
    public List<String> getAnswers() {
        return Arrays.asList(this.getAnswer().split(" "));
    }

    public String  Judge(String studentAnswer) {
        if (this.getAnswers().contains(studentAnswer)&& !this.getAnswers().equals(studentAnswer)) {
            return "partially correct";
        }
        else if (this.getAnswers().equals(studentAnswer)) {
            return "true";
        }
        else
            return "false";
    }
-
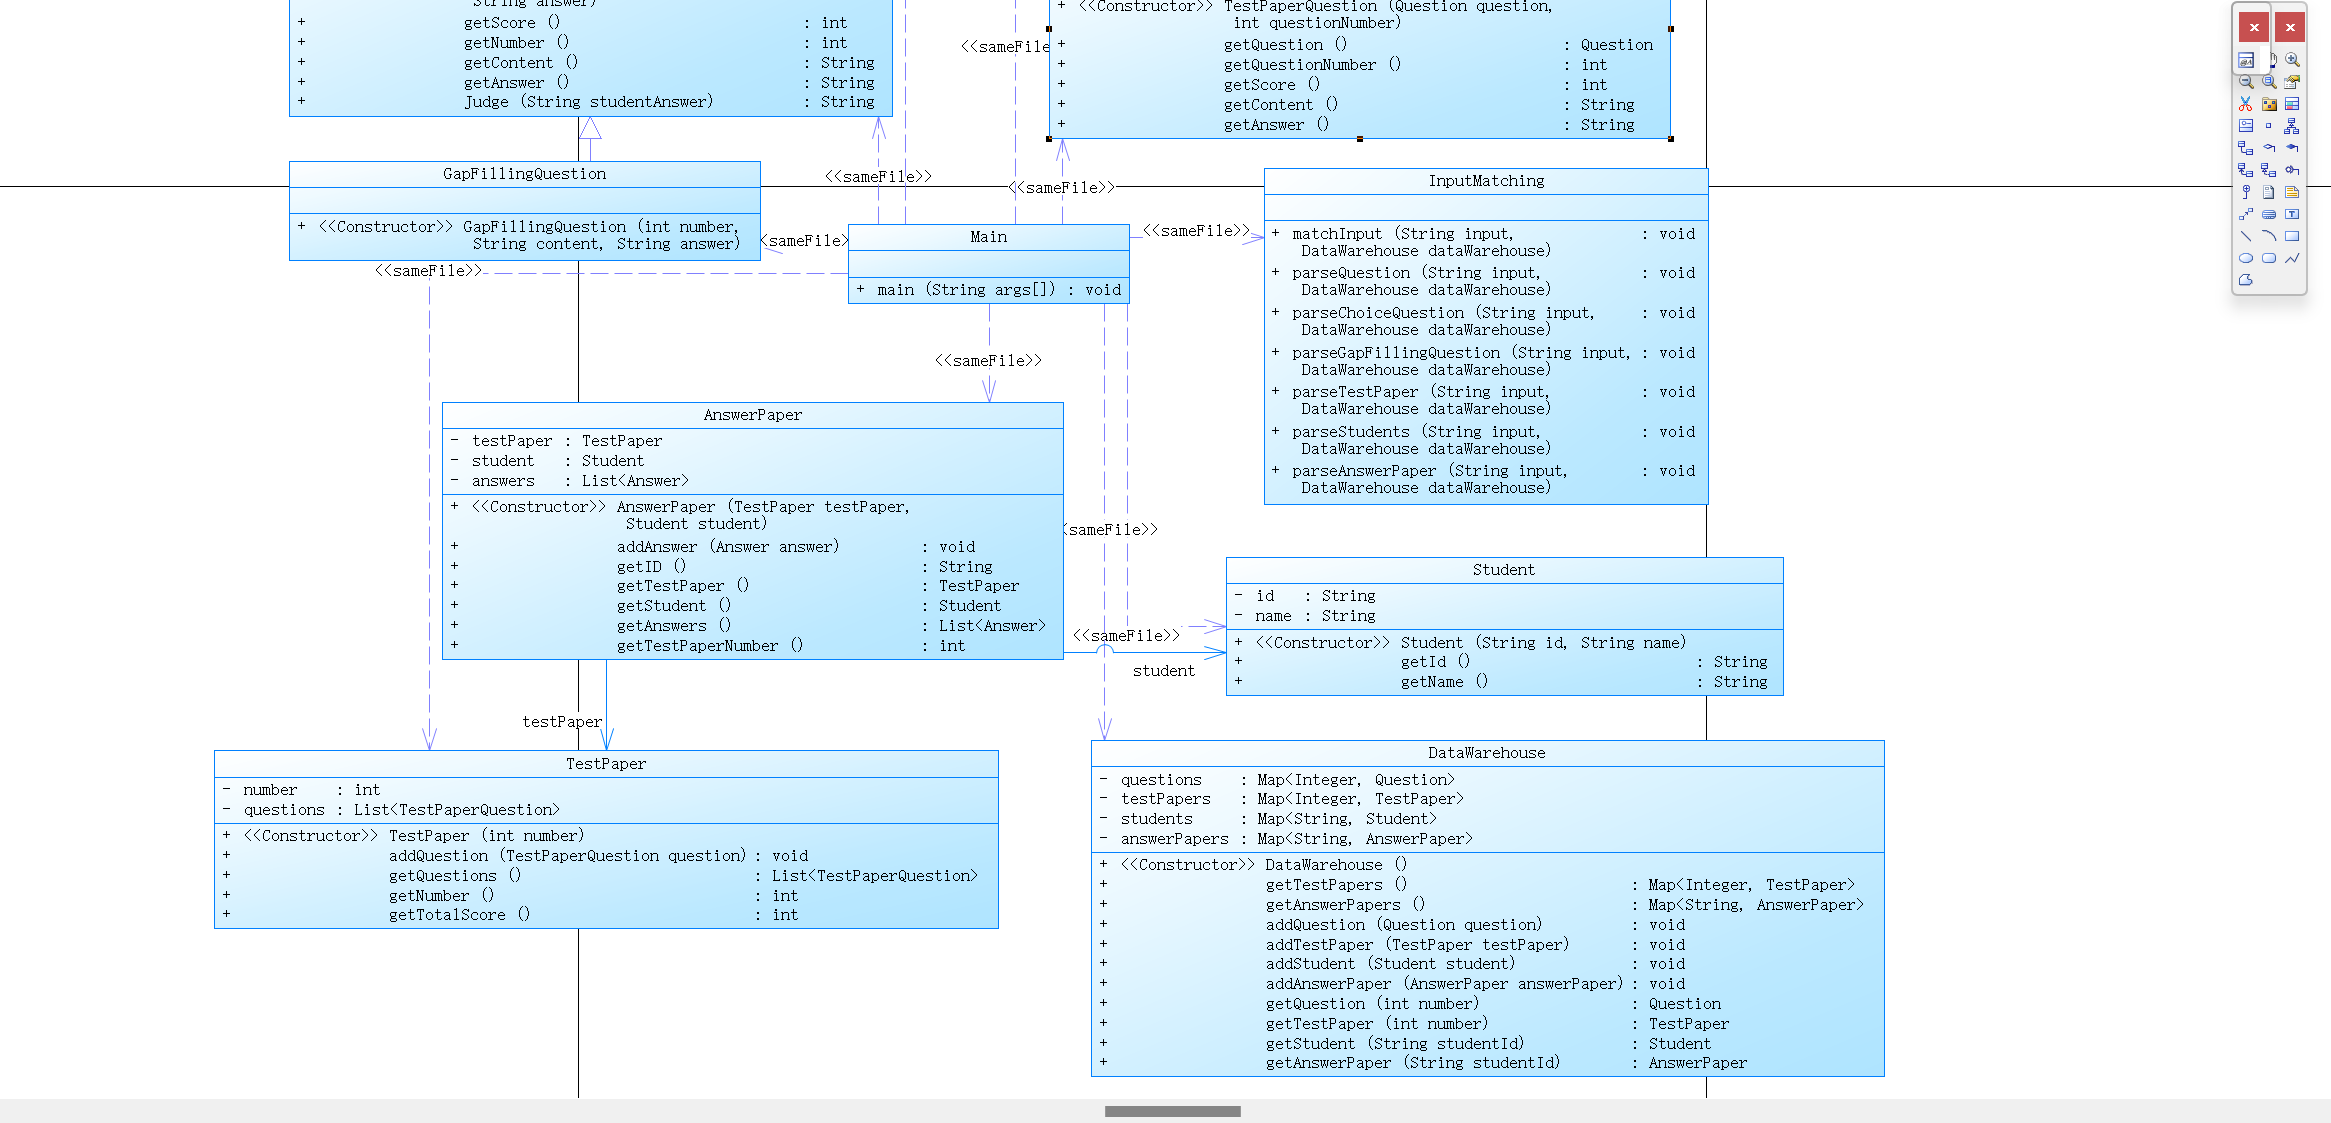
GapFillingQuestion类继承Question类,代表一个填空题。 -
DataWarehouse类作为数据仓库,用于存储题目、试卷、学生和答卷的信息。它提供了添加和管理这些内容的方法。
点击查看代码
class DataWarehouse {
    private Map<Integer, Question> questions;
    private Map<Integer, TestPaper> testPapers;
    private Map<String, Student> students;
    private Map<String, AnswerPaper> answerPapers;

    public DataWarehouse() {
        this.questions = new HashMap<>();
        this.testPapers = new HashMap<>();
        this.students = new HashMap<>();
        this.answerPapers = new HashMap<>();
    }

    public Map<Integer, TestPaper> getTestPapers() {
        return testPapers;
    }

    public Map<String, AnswerPaper> getAnswerPapers() {
        return answerPapers;
    }

    // 添加题目
    public void addQuestion(Question question) {
        questions.put(question.getNumber(), question);
    }

    // 添加试卷
    public void addTestPaper(TestPaper testPaper) {
        testPapers.put(testPaper.getNumber(), testPaper);
    }

    // 添加学生
    public void addStudent(Student student) {
        students.put(student.getId(), student);
    }

    // 添加答题卷
    public void addAnswerPaper(AnswerPaper answerPaper) {
        answerPapers.put(answerPaper.getID(), answerPaper);
    }

    // 根据编号获取题目
    public Question getQuestion(int number) {
        return questions.get(number);
    }

    // 根据编号获取试卷
    public TestPaper getTestPaper(int number) {
        return testPapers.get(number);
    }

    // 根据学生编号获取学生
    public Student getStudent(String studentId) {
        return students.get(studentId);
    }
}
心得体会
由于第三次的题目我就写的比较吃力,经过迭代后的第四次更复杂更难了,首先在心理上我就是惧怕的,再加上编程能力不够,因此不足以应对这种环环相扣的比较复杂的题目,最终写出来的仅仅是半成品,只能对多选题进行输入输出,遇到填空题就会报错。
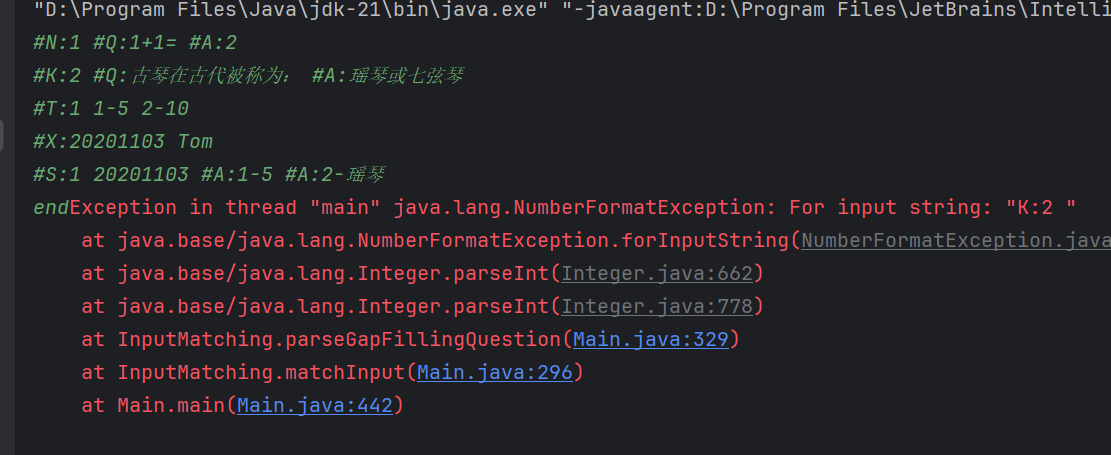
一周的时间按理来讲是足够的,但是我没有合理安排,有效的时间从一周变成了半周,时间变少,思考的时间变少,但是题目难度又没变,因此写的时候思路比较混乱。我应该合理安排时间,不能明知作业难度大还不慌不忙。
改进建议
TestPaperQuestion类在代码中未定义,但在TestPaper类中有引用,需要添加这个类。
GapFillingQuestion类没有写完,需要增加一些方法来实现更加复杂以及合理的逻辑。
ChoiceQuestion的getAnswers方法只支持单个答案,需要调整让他支持多选。
TestPaper的getTotalScore方法依赖TestPaperQuestion的getScore方法,但这个方法没有在代码中定义。
InputMatching类和DataWarehouse类写的太过混乱,每个人的设计想法都是不同的,不能将别人的类设计强加到自己的设计中。
第五次作业 家居强电电路模拟程序-1
源码分析
设计思路
-
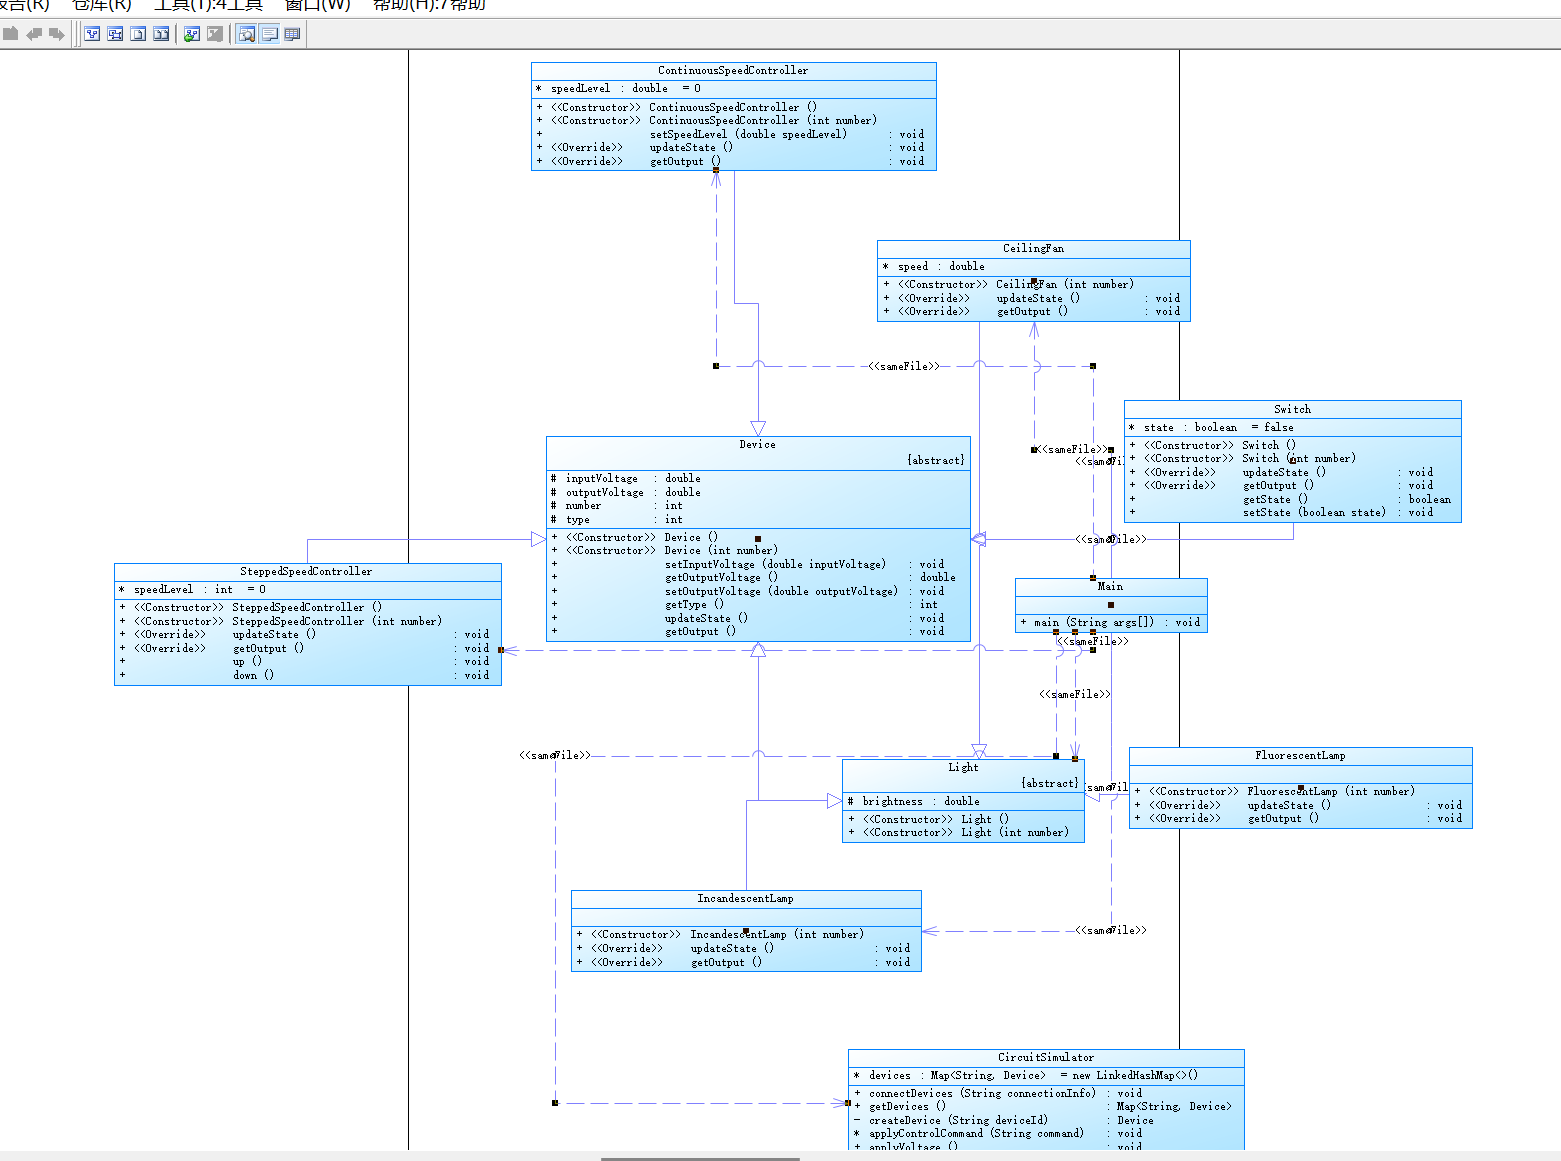
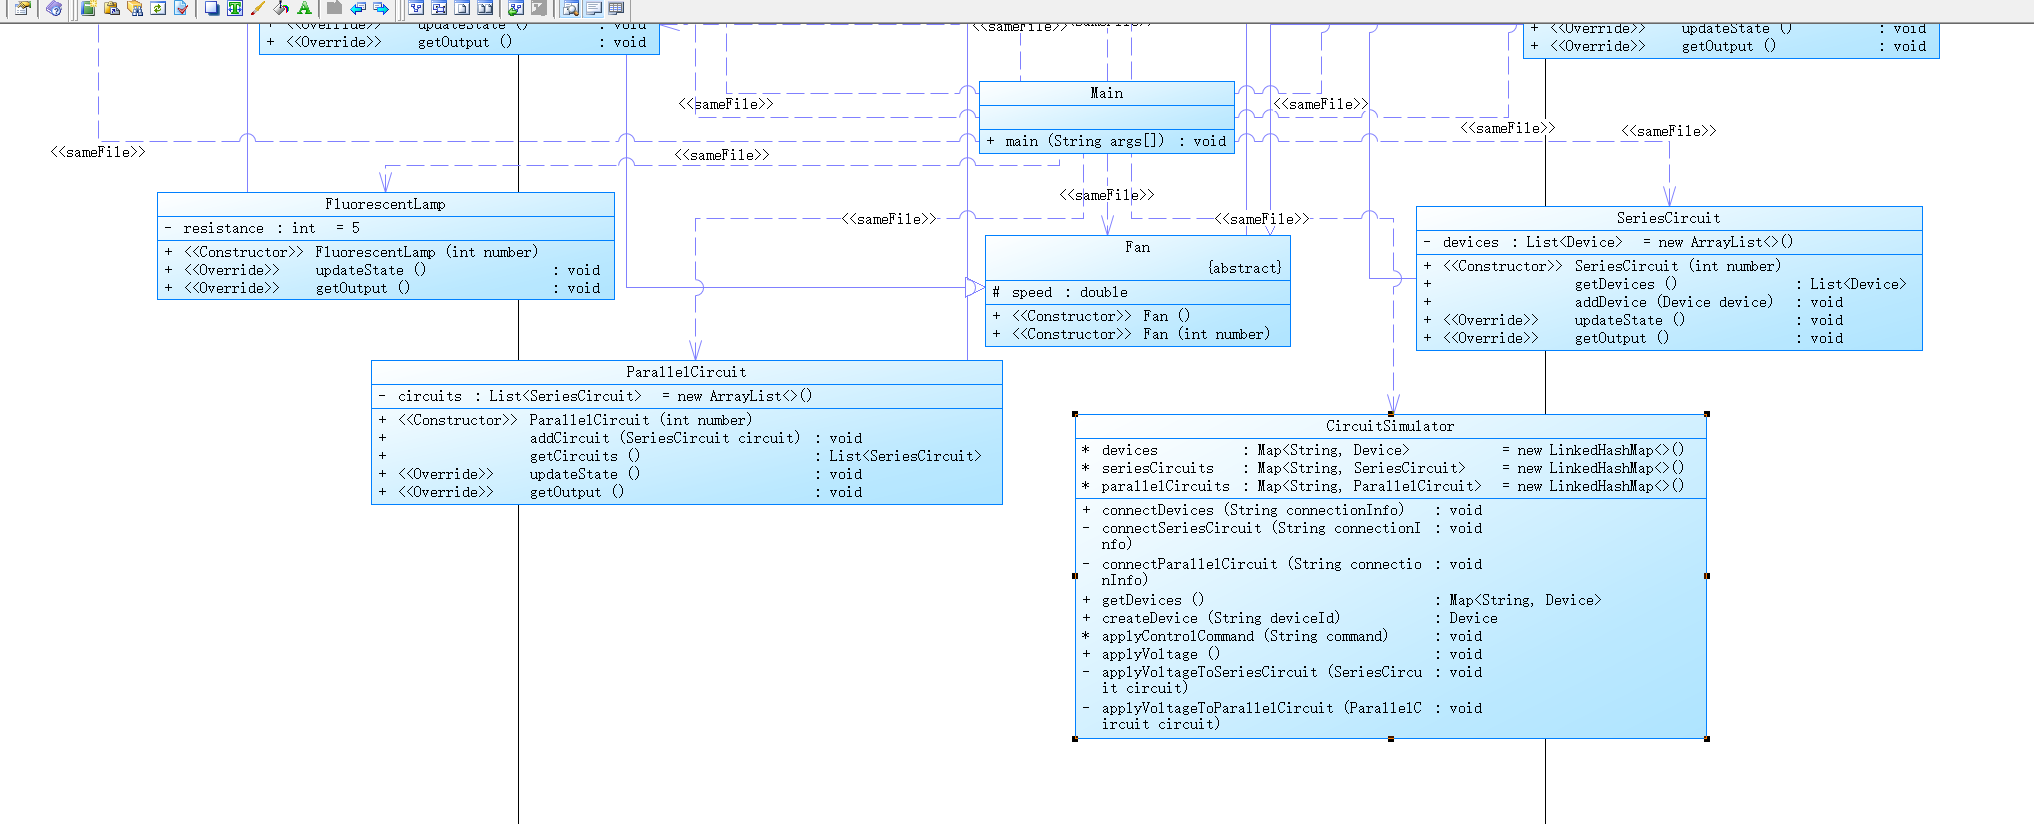
Device类是所有电器设备的父类:Device抽象类定义了设备的基本属性和行为,包括编号、类型、输入电压、输出电压以及更新状态的方法。getOutput方法用于获取设备的输出,但具体实现依赖于子类。updateState 是一个抽象方法,由子类实现,以更新设备的状态(例如输出电压)。 -
具体设备类:
控制设备
Switch、SteppedSpeedController、ContinuousSpeedController和受控设备IncandescentLamp、FluorescentLamp和CeilingFan是Device的子类,它们实现了特定设备的行为。每个子类都覆盖了updateState和getOutput方法,以反映其特定的行为。设备的行为,例如计算亮度、更新档位等,都是在updateState方法中实现的。 -
电路模拟器类 (
CircuitSimulator):CircuitSimulator类负责管理设备,包括连接设备、应用控制命令和应用电压。connectDevices方法解析用户输入的连接信息,并创建相应的设备实例。applyControlCommand方法解析用户输入的控制命令,并应用到相应的设备上。applyVoltage方法模拟电路行为,按顺序设置每个设备的输入电压,并更新它们的输出状态。
踩坑心得
1.一开始我将题目想的比较复杂,思路不够简化。这次的题目只有电路元件之间的串联,并且不考虑电阻,但是在类设计时我总是想着之后该如何扩展导致写的比较乱。后来在同学的指导下我逐渐理清思路,完成了作业。
2.在题目信息比较多的情况下我喜欢将信息以简图或者文字的形式整理在纸上,这样看着比较清晰,防止信息遗漏。
3.处理输出时,程序没有报错但一直输出不了。经过调试后我发现不能只在子类中的方法重写,我忘记在主类中调用相应的方法了。
4.这次作业的最后一个测试点没有通过,但是没有找到原因。这次是我的大作业完成的分数最高的一次,题目简单占一部分原因,另外还要感谢同学的帮助,耐心为我解答问题。
第六次作业 家居强电电路模拟程序-2
源码分析
设计思路
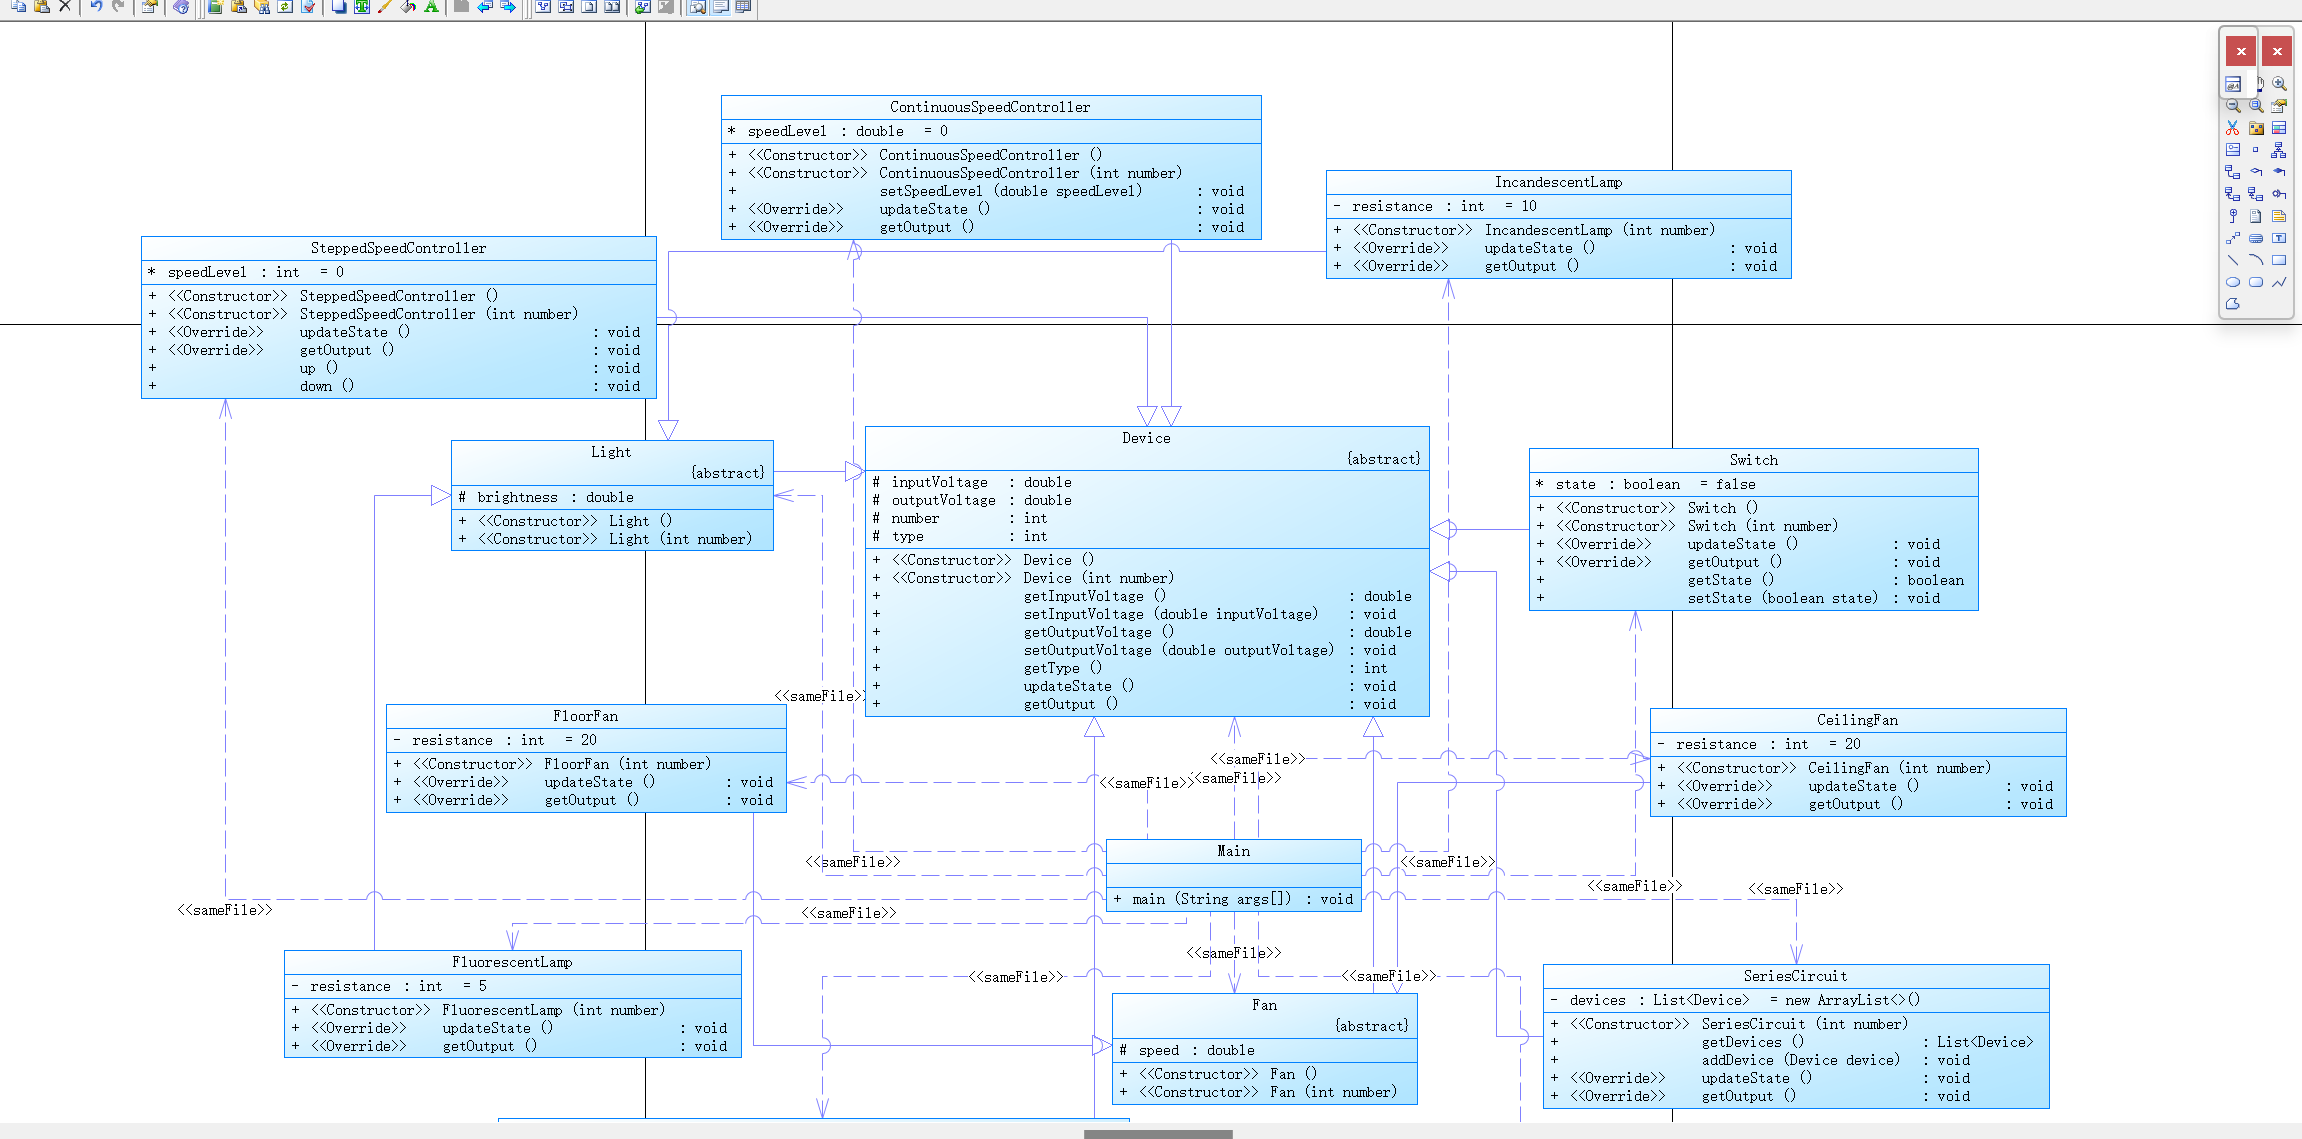
这次作业增加了一个受控设备落地扇,增加了并联的情况,还要考虑电阻。
首先要新写一个落地扇类继承风扇类。还要将串并联分开,各自写成一个类。SeriesCircuit类表示一个串联电路,包含一个设备列表,通过组合多个Device对象来模拟串联电路的行为。ParallelCircuit类表示一个并联电路,包含一个串联电路列表,通过组合多个SeriesCircuit对象来模拟并联电路的行为。
点击查看代码
class SeriesCircuit extends Device {
    private List<Device> devices = new ArrayList<>();

    public SeriesCircuit(int number) {
        super(number);
        this.type = 8;
    }

    public List<Device> getDevices() {
        return devices;
    }

    public void addDevice(Device device) {
        devices.add(device);
    }

    @Override
    public void updateState() {
        if (devices.isEmpty()) {
            return;
        }

        devices.get(0).setInputVoltage(inputVoltage);
        devices.get(0).updateState();

        for (int i = 1; i < devices.size(); i++) {
            devices.get(i).setInputVoltage(devices.get(i - 1).getOutputVoltage());
            devices.get(i).updateState();

        }

        setOutputVoltage(devices.get(devices.size() - 1).getOutputVoltage());
    }

    @Override
    public void getOutput() {
        for (Device device : devices) {
            device.getOutput();
        }
    }
}

class ParallelCircuit extends Device {
    private List<SeriesCircuit> circuits = new ArrayList<>();

    public ParallelCircuit(int number) {
        super(number);
        this.type = 9;
    }

    public void addCircuit(SeriesCircuit circuit) {
        circuits.add(circuit);
    }

    public List<SeriesCircuit> getCircuits() {
        return circuits;
    }

    @Override
    public void updateState() {
//        if (circuits.isEmpty()) {
//            return;
//        }

        for (SeriesCircuit circuit : circuits) {
            circuit.setInputVoltage(inputVoltage);
            circuit.updateState();
        }

        double totalCurrent = circuits.stream()
                .mapToDouble(c -> c.getOutputVoltage() / c.getType())
                .sum();
        setOutputVoltage(inputVoltage);
    }

    @Override
    public void getOutput() {
        for (SeriesCircuit circuit : circuits) {
            circuit.getOutput();
        }
    }


    }
改进建议
这次的作业又一次没有写完,因为我实在是做不出来。
1.处理输入时,在提取信息的问题上我就遇到了困难,不知道如何将输入的信息提取出有效的部分并存储起来。
2.我不知道怎么将串联电路和并联电路合理地结合起来,这两个类之间一定是有联系的但我不明白该如何实现。
3.我只是在设备的属性中设置了电阻的大小,但是整个电路的电阻我不知道应该以哪种方式储存并计算出来。
4.这些问题都没有得到及时的解决导致这次的作业写起来非常困难。
总结
写大作业的过程对我来说异常的煎熬,不理解,不明白,写不出来的挫败感是无法言说的。但是每有一点思路我都会尽力去写,每处理好一部分问题的喜悦心情也是形容不出来的。我想到初中体育课上的蛙跳,老师说蛙跳就是把肌肉内的组织破坏又重构的过程,只有忍受疼痛不断向前跳才能有最大的收获。
我知道我的编程能力有限,在这方面的脑子不够灵光,但是只要坚持学习,每天有一点的进步也是好的。这门课程也快要结束了,希望我可以继续坚持,提高效率,每周将实验尽快完成就能留出更多的时间写大作业。

 浙公网安备 33010602011771号