SpringBoot Ehcache 2.x缓存
Spring 3.1中开始对缓存提供支持,核心思路是对方法的缓存,当开发者调用一个方法时,将方法的参数和返回值作为key/value缓存起来,当再次调用该方法时,如果缓存中有数据,就直接从缓存中获取,否则再去执行该方法。但是,Spring中并未提供缓存的实现,而是提供了一套缓存API,开发者可以自由选择缓存的实现
由于Spring早已将缓存领域统一,因此无论使用哪种缓存实现,不同的只是缓存配置,开发者使用的缓存注解是一致的(Spring缓存注解和各种缓存实现的关系就像JDBC和各种数据库驱动的关系一样)。
Ehcache 2.x缓存
添加缓存依赖:
<dependency>
    <groupId>org.springframework.boot</groupId>
    <artifactId>spring-boot-starter-cache</artifactId>
</dependency>
<dependency>
    <groupId>net.sf.ehcache</groupId>
    <artifactId>ehcache</artifactId>
</dependency>
添加缓存配置文件:
如果Ehcache的依赖存在,并且在classpath下有一个名为ehcache.xml的Ehcache配置文件,那么EhCacheCacheManager将会自动作为缓存的实现。因此,在resources目录下创建ehcache.xml文件作为Ehcache缓存的配置文件
<ehcache>
    <diskStore path="java.io.tmpdir/cache"/>

    <defaultCache maxElementsInMemory="10000"
                  eternal="false"
                  timeToIdleSeconds="120"
                  timeToLiveSeconds="120"
                  overflowToDisk="false"
                  diskPersistent="false"
                  diskExpiryThreadIntervalSeconds="120"/>

    <cache name="book_cache"
           maxElementsInMemory="10000"
           eternal="true"
           timeToIdleSeconds="120"
           timeToLiveSeconds="120"
           overflowToDisk="true"
           diskPersistent="true"
           diskExpiryThreadIntervalSeconds="10"/>

</ehcache>
这是一个常规的Ehcache配置文件,提供了两个缓存策略,一个是默认的,另一个名为book_cache。其中,
name表示缓存名称;
maxElementsInMemory表示缓存最大个数;
eternal表示缓存对象是否永久有效,一旦设置了永久有效,timeout将不起作用;
timeToIdleSeconds表示缓存对象在失效前的允许闲置时间(单位:秒),当eternal=false对象不是永久有效时,该属性才生效;
timeToLiveSeconds表示缓存对象在失效前允许存活的时间(单位:秒),当eternal=false对象不是永久有效时,该属性才生效;
overflowToDisk表示当内存中的对象数量达到maxElementsInMemory时,Ehcache是否将对象写到磁盘中;
diskExpiryThreadIntervalSeconds表示磁盘失效线程运行时间间隔。
另外,如果开发者想自定义Ehcache配置文件的名称和位置,可以在application.properties中添加如下配置:
spring.cache.ehcache.config=classpath:ehcache2.xml
开启缓存:
在项目的入口类上添加@EnableCaching注解开启缓存
@SpringBootApplication
@EnableCaching//开启缓存
public class XcSpringbootApplication {
创建BookService:
@Service
@CacheConfig(cacheNames = "book_cache")
public class BookServiceImpl implements BookService {

    @Autowired
    MyKeyGenerator myKeyGenerator;

    // @Cacheable
    @Cacheable(keyGenerator = "myKeyGenerator")
    public Book getBookById(Integer id) {
        Book book = new Book();
        book.setId(id);
        book.setName("三国演义");
        book.setAuthor("罗贯中");
        System.out.println("getBookById:" + book);
        return book;
    }

    // @CachePut(key = "#book.id")
    @CachePut(keyGenerator = "myKeyGenerator")
    public Book updateBookById(Book book) {
        System.out.println("updateBookById");
        book.setName(book.getName());
        System.out.println("updateBookById:" + book);
        return book;
    }

    // @CacheEvict(key = "#id")
    @CacheEvict(keyGenerator = "myKeyGenerator")
    public void deleteBookById(Integer id) {
        System.out.println("deleteBookById");
    }
}
在BookDao上添加@CacheConfig注解指明使用的缓存的名字,这个配置可选,若不使用@CacheConfig注解,则直接在@Cacheable注解中指明缓存名字。
添加@Cacheable注解表示对该方法进行缓存,默认情况下,缓存的key是方法的参数,缓存的value是方法的返回值。当开发者在其他类中调用该方法时,首先会根据调用参数查看缓存中是否有相关数据,若有,则直接使用缓存数据,该方法不会执行,否则执行该方法,执行成功后将返回值缓存起来,但若是在当前类中调用该方法,则缓存不会生效。
@Cacheable注解中还有一个属性condition用来描述缓存的执行时机,例如@Cacheable(condition = "#id%2==0")表示当id对2取模为0时才进行缓存,否则不缓存。
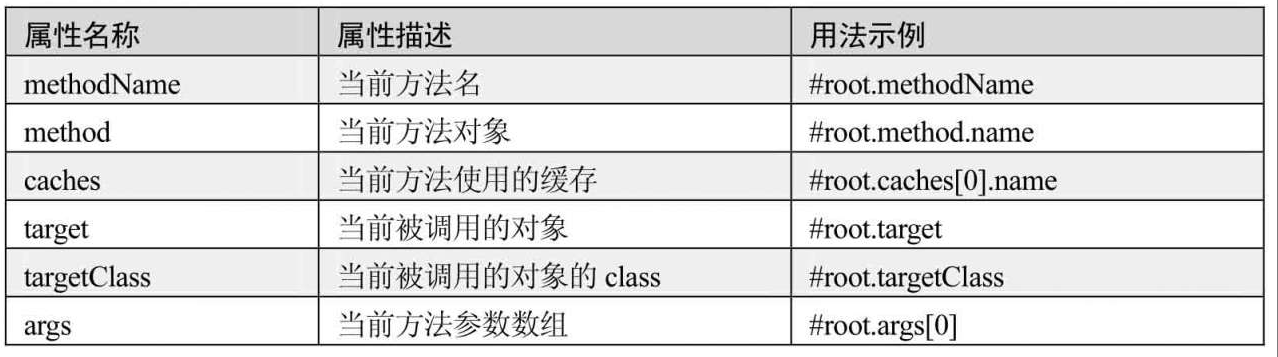
如果开发者不想使用默认的key,也可以自定义key,@CachePut(key = "#book.id")表示缓存的key为参数book对象中id的值,@CacheEvict(key = "#id")表示缓存的key为参数id。除了这种使用参数定义key的方式之外,Spring还提供了一个root对象用来生成key,如表所示。
如果这些key不能够满足开发需求,开发者也可以自定义缓存key的生成器KeyGenerator
@Component
public class MyKeyGenerator implements KeyGenerator {
    @Override
    public Object generate(Object target, Method method, Object... params) {
        return Arrays.toString(params);
    }
}
自定义MyKeyGenerator实现KeyGenerator接口,然后实现该接口中的generate方法,该方法的三个参数分别是当前对象、当前请求的方法以及方法的参数,开发者可根据这些信息组成一个新的key返回,返回值就是缓存的key。
@CachePut注解一般用于数据更新方法上,与@Cacheable注解不同,添加了@CachePut注解的方法每次在执行时都不去检查缓存中是否有数据,而是直接执行方法,然后将方法的执行结果缓存起来,如果该key对应的数据已经被缓存起来了,就会覆盖之前的数据,这样可以避免再次加载数据时获取到脏数据。
@CacheEvict注解一般用于删除方法上,表示移除一个key对应的缓存。@CacheEvict注解有两个特殊的属性:allEntries和beforeInvocation,其中allEntries表示是否将所有的缓存数据都移除,默认为false,beforeInvocation表示是否在方法执行之前移除缓存中的数据,默认为false,即在方法执行之后移除缓存中的数据。
创建测试类:
@RunWith(SpringRunner.class)
@SpringBootTest
public class CacheApplicationTests {

    @Autowired
    BookService bookServiceImpl;

    @Test
    public void contextLoads() {
        bookServiceImpl.getBookById(1);
        bookServiceImpl.getBookById(1);
        bookServiceImpl.deleteBookById(1);
        bookServiceImpl.getBookById(1);
        Book b = new Book();
        b.setName("三国演义2");
        b.setId(1);
        bookServiceImpl.updateBookById(b);
        bookServiceImpl.getBookById(1);
    }

}
文章来源: Spring Boot+Vue全栈开发实战 - 9.1 Ehcache 2.x缓存

 浙公网安备 33010602011771号