Spring Cloud 如何使用Eureka注册服务 4.2.2
要使用Eureka实现服务发现,需要项目中包含Eureka的服务端发现组件以及客户端发现组件。
搭建Maven父工程
创建一个Maven父工程xcservice-springcloud,并在工程的pom.xml中添加Spring Cloud的版本依赖等信息,如文件4-1所示。
文件4-1 pom.xml
文件4-1 pom.xml
<project xmlns="http://maven.apache.org/POM/4.0.0" xmlns:xsi="http://www.w3.org/2001/XMLSchema-instance"
        xsi:schemaLocation="http://maven.apache.org/POM/4.0.0
        http://maven.apache.org/xsd/maven-4.0.0.xsd">
    <modelVersion>4.0.0</modelVersion>
    <groupId>com.xc</groupId>
    <artifactId>xcservice-springcloud</artifactId>
    <version>0.0.1-SNAPSHOT</version>
    <packaging>pom</packaging>

    <parent>
        <groupId>org.springframework.boot</groupId>
        <artifactId>spring-boot-starter-parent</artifactId>
        <version>1.5.6.RELEASE</version>
        <relativePath/>
    </parent>

    <properties>
        <project.build.sourceEncoding>UTF-8</project.build.sourceEncoding>
        <project.reporting.outputEncoding>UTF-8</project.reporting.outputEncoding>
        <java.version>1.8</java.version>
    </properties>

    <dependencyManagement>
        <dependencies>
            <dependency>
                <groupId>org.springframework.cloud</groupId>
                <artifactId>spring-cloud-dependencies</artifactId>
                <version>Dalston.SR3</version>
                <type>pom</type>
                <scope>import</scope>
            </dependency>
        </dependencies>
    </dependencyManagement>

    <build>
        <plugins>
            <!--Spring Boot的编译插件 -->
            <plugin>
                <groupId>org.springframework.boot</groupId>
                <artifactId>spring-boot-maven-plugin</artifactId>
            </plugin>
        </plugins>
    </build>

</project>
搭建服务端工程
在父工程xcservice-springcloud中,创建Maven子模块xcservice-eureka-server作为服务端工程,该模块是一个基础的Spring Boot工程,其主要文件代码的实现过程如下。
(1)添加依赖。
在pom.xml中添加Eureka Server的依赖,如文件4-2所示。
文件4-2 pom.xml
在配置文件中增加端口号等配置信息,如文件4-3所示。
文件4-3 application.yml
(3)修改服务端Java代码。
在项目的引导类上添加注解@EnableEurekaServer,该注解用于声明标注类是一个EurekaServer,如文件4-4所示。
文件4-4 EurekaApplication.java
完成上述配置后,启动应用程序并在浏览器中访问地址http://localhost:8761/即可看到Eureka的信息面板。
(1)添加依赖。
在pom.xml中添加Eureka Server的依赖,如文件4-2所示。
文件4-2 pom.xml
<?xml version="1.0" encoding="UTF-8"?>
<project xmlns="http://maven.apache.org/POM/4.0.0" xmlns:xsi="http://www.w3.org/2001/XMLSchema-instance"
         xsi:schemaLocation="http://maven.apache.org/POM/4.0.0 http://maven.apache.org/xsd/maven-4.0.0.xsd">
    <modelVersion>4.0.0</modelVersion>
    <parent>
        <groupId>com.xc</groupId>
        <artifactId>xcservice-springcloud</artifactId>
        <version>0.0.1-SNAPSHOT</version>
    </parent>
    <groupId>com.xc</groupId>
    <artifactId>xcservice-eureka-server</artifactId>
    <version>0.0.1-SNAPSHOT</version>
    <name>xcservice-eureka-server</name>
    <description>服务端工程</description>

    <dependencies>
        <dependency>
            <groupId>org.springframework.cloud</groupId>
            <artifactId>spring-cloud-starter-eureka-server</artifactId>
        </dependency>

        <dependency>
            <groupId>org.springframework.boot</groupId>
            <artifactId>spring-boot-starter-test</artifactId>
            <scope>test</scope>
        </dependency>
    </dependencies>

    <build>
        <plugins>
            <plugin>
                <groupId>org.springframework.boot</groupId>
                <artifactId>spring-boot-maven-plugin</artifactId>
            </plugin>
        </plugins>
    </build>

</project>
(2)编写配置文件。
在配置文件中增加端口号等配置信息,如文件4-3所示。
文件4-3 application.yml
server:
  port: 8761

eureka:
  instance:
    hostname: localhost
  client:
    register-with-eureka: false
    fetch-registry: false
    service-url:
      defaultZone: http://${eureka.instance.hostname}:${server.port}/eureka/
  #server:
    #enable-self-preservation: false #关闭保护机制,以确保注册中心可以将不可用的实例正确删除
上述代码中,首先配置了端口号为8761,所有服务的实例都需要向此端口注册。接下来配置了实例名为localhost。由于本项目是一个注册中心,是不需要向自己注册和检索服务的,所以register-with-eureka和fetch-registry都需要设置为false。最后defaultZone中的地址是注册中心的地址。
(3)修改服务端Java代码。
在项目的引导类上添加注解@EnableEurekaServer,该注解用于声明标注类是一个EurekaServer,如文件4-4所示。
文件4-4 EurekaApplication.java
package com.xc.xcserviceeurekaserver;

import org.springframework.boot.SpringApplication;
import org.springframework.boot.autoconfigure.SpringBootApplication;
import org.springframework.cloud.netflix.eureka.server.EnableEurekaServer;

/**
 * http://localhost:8761/
 */
@SpringBootApplication
@EnableEurekaServer
public class XcserviceEurekaServerApplication {

    public static void main(String[] args) {
        SpringApplication.run(XcserviceEurekaServerApplication.class, args);
    }

}
(4)启动应用,查看信息。
完成上述配置后,启动应用程序并在浏览器中访问地址http://localhost:8761/即可看到Eureka的信息面板。

搭建客户端工程
在父工程xcservice-springcloud中,创建Maven子模块xcservice-eureka-user作为客户端工程,该模块也是一个基础的Spring Boot工程,其主要文件代码的实现过程如下。
(1)添加依赖。在pom.xml中添加Eureka依赖,如文件4-5所示。
文件4-5 pom.xml
文件4-6 application.yml
在项目的引导类上添加注解@EnableEurekaClient,该注解用于声明标注类是一个Eureka客户端组件,如文件4-7所示。
文件4-7 Application.java
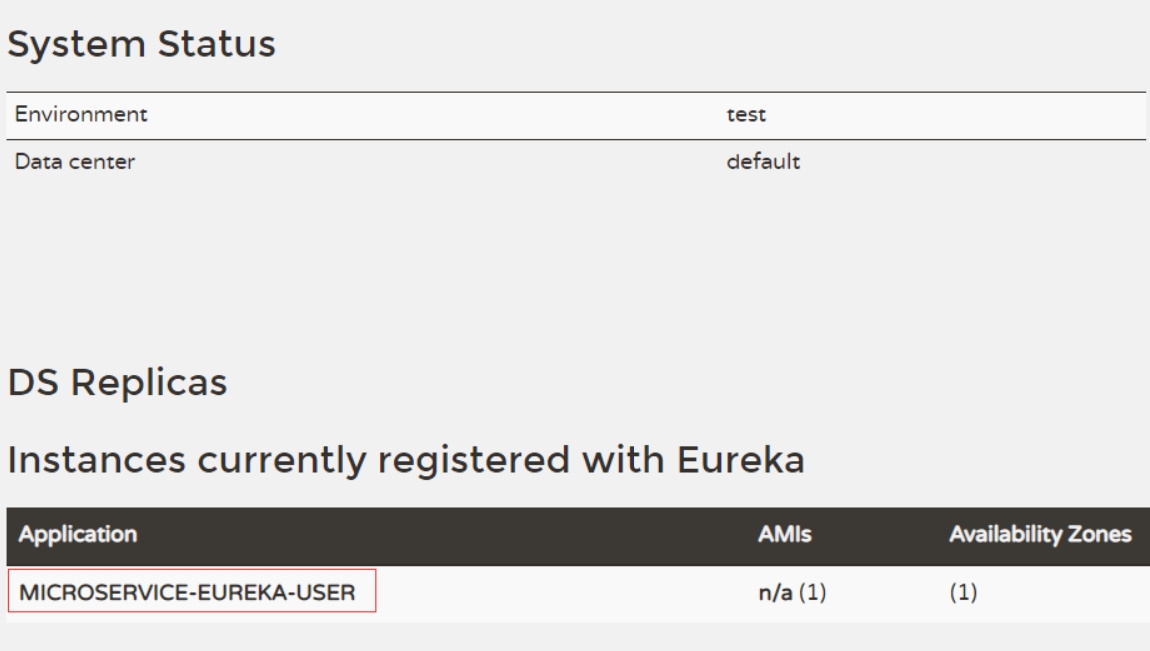
完成上述配置后,分别启动服务器工程和客户端工程,在浏览器中访问地址http://local-host:8761/后,我们可以从Eureka的信息面板中看到注册的服务信息,如图4-5所示。
![]()
![]()
从图4-5中可以看出,服务已经成功注册到了注册中心,注册后的服务就可以直接被其他服务调用了。
(1)添加依赖。在pom.xml中添加Eureka依赖,如文件4-5所示。
文件4-5 pom.xml
<?xml version="1.0" encoding="UTF-8"?>
<project xmlns="http://maven.apache.org/POM/4.0.0" xmlns:xsi="http://www.w3.org/2001/XMLSchema-instance"
         xsi:schemaLocation="http://maven.apache.org/POM/4.0.0 http://maven.apache.org/xsd/maven-4.0.0.xsd">
    <modelVersion>4.0.0</modelVersion>
    <parent>
        <groupId>com.xc</groupId>
        <artifactId>xcservice-springcloud</artifactId>
        <version>0.0.1-SNAPSHOT</version>
    </parent>
    <groupId>com.xc</groupId>
    <artifactId>xcservice-eureka-user</artifactId>
    <version>0.0.1-SNAPSHOT</version>
    <name>xcservice-eureka-user</name>
    <description>客户端工程</description>

    <dependencies>
        <dependency>
            <groupId>org.springframework.cloud</groupId>
            <artifactId>spring-cloud-starter-eureka</artifactId>
        </dependency>

        <dependency>
            <groupId>org.springframework.boot</groupId>
            <artifactId>spring-boot-starter-test</artifactId>
            <scope>test</scope>
        </dependency>
    </dependencies>

    <build>
        <plugins>
            <plugin>
                <groupId>org.springframework.boot</groupId>
                <artifactId>spring-boot-maven-plugin</artifactId>
            </plugin>
        </plugins>
    </build>

</project>
(2)编写配置文件。在配置文件中添加Eureka服务实例的端口号、服务端地址等信息,如文件4-6所示。
文件4-6 application.yml
server:
  port:8000 # 指定该Eureka实例的端口号

eureka:
  instance:
    prefer-ip-address: true  # 是否显示主机的IP
    #instance-id: ${spring.cloud.client.ipAddress}:${server.port} #将Status中的显示内容也以“IP:端口号”的形式显示
  client:
    service-url:
      defaultZone: http://localhost:8761/eureka/ # 指定Eureka服务端地址

spring:
  application:
    name: microservice-eureka-user # 指定应用名称
(3)修改客户端Java代码。
在项目的引导类上添加注解@EnableEurekaClient,该注解用于声明标注类是一个Eureka客户端组件,如文件4-7所示。
文件4-7 Application.java
package com.xc.xcserviceeurekauser;

import org.springframework.boot.SpringApplication;
import org.springframework.boot.autoconfigure.SpringBootApplication;
import org.springframework.cloud.netflix.eureka.EnableEurekaClient;
import org.springframework.web.bind.annotation.RequestMapping;
import org.springframework.web.bind.annotation.RestController;

@SpringBootApplication
@EnableEurekaClient
@RestController
public class XcserviceEurekaUserApplication {

    @RequestMapping("/hello")
    public String home() {
        return "hello world!";
    }

    public static void main(String[] args) {
        SpringApplication.run(XcserviceEurekaUserApplication.class, args);
    }

}
(4)启动应用,查看信息。
完成上述配置后,分别启动服务器工程和客户端工程,在浏览器中访问地址http://local-host:8761/后,我们可以从Eureka的信息面板中看到注册的服务信息,如图4-5所示。
从图4-5中可以看出,服务已经成功注册到了注册中心,注册后的服务就可以直接被其他服务调用了。

 浙公网安备 33010602011771号