Cesium DrawCommand [1] 不谈地球 画个三角形
0. 前言
Primitive API 是公开的 API 的最底层了,它面向的场景是高性能、可自定义材质着色器(Appearance API + FabricMaterial Specification)、静态三维物体。
尽管如此,Primitive API 仍然封装了大量几何体类、材质类、WebWorker,而且目前开放自定义着色器 API 的只有三维模型类的新架构,还没下放到 Primitive API。
如果 API 包袱不想那么重,又希望可以使用自己的模型格式(必须是三角面),那么私有的 DrawCommand + VertexArray 接口就非常合适了,它的风格已经是最接近 CesiumJS WebGL 底层的一类 API 了。
DrawCommand,是 Cesium 封装 WebGL 的一个优秀设计,它把绘图数据(VertexArray)和绘图行为(ShaderProgram)作为一个对象,待时机合适,也就是 Scene 执行 executeCommand 函数时,帧状态对象上所有的指令对象就会使用 WebGL 函数执行,要什么就 bind 什么,做到了在绘图时的用法一致,上层应用接口只需生成指令对象。
0.1. 源码中的 DrawCommand
譬如在 Primitive.js 模块中的 createCommands 函数,它就是负责把 Primitive 对象的参数化数据或 WebWorker 计算来的数据合并生成 DrawCommand 的地方:
function createCommands(/* 参数省略 */) {
  // ...
  const length = colorCommands.length;
  let vaIndex = 0;
  for (let i = 0; i < length; ++i) {
    let colorCommand;

    // ...

    colorCommand = colorCommands[i];
    if (!defined(colorCommand)) {
      colorCommand = colorCommands[i] = new DrawCommand({
        owner: primitive, // 入参,即 Primitive 对象
        primitiveType: primitive._primitiveType,
      });
    }
    colorCommand.vertexArray = primitive._va[vaIndex]; // VertexArray
    colorCommand.renderState = primitive._frontFaceRS; // 渲染状态
    colorCommand.shaderProgram = primitive._sp; // ShaderProgram
    colorCommand.uniformMap = uniforms; // 统一值
    colorCommand.pass = pass; // 该指令的通道顺序
  }
  // ...
}
1. 创建
1.1. 构成要素 - VertexArray
Cesium 把 WebGL 的顶点缓冲和索引缓冲包装成了 Buffer,然后为了方便,将这些顶点相关的缓冲绑定在了一个对象里,叫做 VertexArray,内部会启用 WebGL 的 VAO 功能。
最快速创建 VertexArray 的办法,就是调用其静态方法 VertexArray.fromGeometry(),但是这需要 Geometry API 来帮忙。
这里想直接使用 Buffer 来说明,那么就得先创建 Buffer:
const positionBuffer = Buffer.createVertexBuffer({
  context: context,
  sizeInBytes: 12,
  usage: BufferUsage.STATIC_DRAW,
  typedArray: new Float32Array([/* ... */])
})
const attributes = [
  {
    index: 0,
    enabled: true,
    vertexBuffer: positionBuffer,
    componentsPerAttribute: 3,
    componentDatatype: ComponentDatatype.FLOAT,
    normalize: false,
    offsetInBytes: 0,
    strideInBytes: 0, // 紧密组合在一起,没有 byteStride
    instanceDivisor: 0 // 不实例化绘制
  }
]
调用 Buffer 私有类的静态方法 createVertexBuffer(),即可创建内置了 WebGLBuffer 的顶点缓冲对象 positionBuffer,然后使用普通的对象数组创建出 顶点属性 attributes,每个对象就描述了一个顶点属性。接下来就可以拿这些简单的材料创建 VertexArray 了:
const va = new VertexArray({
  context: context,
  attributes: attributes
})
Context 封装了 WebGL 的各种函数调用,你可以从 Scene 中或直接从 FrameState 上获取到。
这一步创建的
Buffer,顶点坐标是直角坐标系下的,是最原始的坐标值,除非在着色器里做矩阵变换,或者这些直角坐标就在世界坐标系的地表附近。它是一堆没有具体语义的、纯粹数学几何的坐标,与渲染管线无关。所以,对于地表某处的坐标点,通常要配合 ENU 转换矩阵 + 内置的 MVP 转换矩阵来使用,见 1.6 的例子。
这里还有一个例子,使用了两个顶点属性(VertexAttribute):
const positionBuffer = Buffer.createVertexBuffer({
  context: context,
  sizeInBytes: 12,
  usage: BufferUsage.STATIC_DRAW
})
const normalBuffer = Buffer.createVertexBuffer({
  context: context,
  sizeInBytes: 12,
  usage: BufferUsage.STATIC_DRAW
})
const attributes = [
  {
    index: 0,
    vertexBuffer: positionBuffer,
    componentsPerAttribute: 3,
    componentDatatype: ComponentDatatype.FLOAT
  },
  {
    index: 1,
    vertexBuffer: normalBuffer,
    componentsPerAttribute: 3,
    componentDatatype: ComponentDatatype.FLOAT
  }
]
const va = new VertexArray({
  context: context,
  attributes: attributes
})
这里把坐标缓冲和法线缓冲分开存到两个对象里了,其实 WebGL 可以用字节交错的格式,把全部顶点属性的缓冲都合并成一个的方式的,就不具体讲了,读者可以自行查阅 WebGL 中 WebGLBuffer 的用法。
1.2. 构成要素 - ShaderProgram
WebGL 的着色器也被 CesiumJS 封装了,自带缓存机制,并使用大量正则等手段做了着色器源码匹配、解析、管理。
着色器代码由 ShaderSource 管理,ShaderProgram 则管理起多个着色器源码,也就是着色器本身。使用 ShaderCache 作为着色器程序的缓存容器。它们的层级关系如下:
Context
  ┖ ShaderCache
    ┖ ShaderProgram
      ┖ ShaderSource
你可以自己创建 ShaderSource、ShaderProgram,并通过 Context 添加到 ShaderCache 中。
举例:
new ShaderSource({
  sources : [GlobeFS]
})

new ShaderProgram({
  gl: context._gl,
  logShaderCompilation: context.logShaderCompilation,
  debugShaders: context.debugShaders,
  vertexShaderSource: vertexShaderSource,
  vertexShaderText: vertexShaderText,
  fragmentShaderSource: fragmentShaderSource,
  fragmentShaderText: fragmentShaderText,
  attributeLocations: attributeLocations,
})
但是通常会选择更直接的方式:
const vertexShaderText = `attribute vec3 position;
void main() {
  gl_Position = czm_projection * czm_modelView * vec4(position, 1.0);
}`
const fragmentShaderText = `uniform vec3 color;
void main() {
  gl_FragColor=vec4( color , 1. );
}`

const program = ShaderProgram.fromCache({
  context: context,
  vertexShaderSource: vertexShaderText,
  fragmentShaderSource: fragmentShaderText,
  attributeLocations: attributeLocations
})
使用 ShaderProgram.fromCache 静态方法会自动帮你把着色器缓存到 ShaderCache 容器中。
着色器代码可以直接使用内置的常量和自动统一值,这是默认会加上去的。
attributeLocation 是什么?它是一个很普通的 JavaScript 对象:
{
  "position": 0,
  "normal": 1,
  "st": 2,
  "bitangent": 3,
  "tangent": 4,
  "color": 5
}
它指示顶点属性在着色器中的位置。
1.3. 构成要素 - WebGL 的统一值
这个比较简单:
const uniforms = {
  color() {
    return Cesium.Color.HONEYDEW
  }
}
使用一个 JavaScript 对象即可,每个成员必须得是 方法,返回的值符合 Uniform 的要求即可:
Cesium.Matrix2/3/4→mat2/3/4Cesium.Cartesian2/3/4→vec2/3/4Cesium.Number→floatCesium.Color→vec4Cesium.Texture→sampler2D- ...
请查阅 Renderer/createUniform.js 中的代码,例如 UniformFloatVec3 就可以对应 Color 和 Cartesian4 等等。
这个 uniforms 对象最终会在 Context 执行绘制时,与系统的自动统一值(AutomaticUniforms)合并。
Context.prototype.draw = function (/*...*/) {
  // ...
  continueDraw(this, drawCommand, shaderProgram, uniformMap);
  // ...
}
1.4. 渲染状态对象 - RenderState
渲染状态对象是必须传递给 DrawCommand 的。渲染状态对象类型是 RenderState,它与 ShaderProgram 类似,都提供了静态方法来“缓存式”创建:
const renderState = RenderState.fromCache({
  depthTest: {
    enabled: true
  }
})
哪怕什么都不传递:RenderState.fromCache(),内部也会返回一个渲染状态。
它传递渲染数据之外一切参与 WebGL 渲染的状态值,在 RenderState 中有详细的默认列表参考,上述代码显式指定要进行深度测试。
1.5. 其它构成因子
创建绘图指令除了 1.1 ~ 1.3 成分之外,还有其它可选项。
① 绘制的通道类型 - Pass
CesiumJS 不是粗暴地把帧状态对象上的 Command 遍历一遍就绘制了的,在 Scene 的渲染过程中,除了生成三大 Command,还有一步要对 Command 进行通道排序。
通道,是一个枚举类型,保存在 Pass.js 模块中。不同通道有不同的优先级,譬如在 1.6 中指定的通道是 Cesium.Pass.OPAQUE,即不透明通道。在 1.93 版本,通道的顺序为枚举值:
const Pass = {
  ENVIRONMENT: 0,
  COMPUTE: 1,
  GLOBE: 2,
  TERRAIN_CLASSIFICATION: 3,
  CESIUM_3D_TILE: 4,
  CESIUM_3D_TILE_CLASSIFICATION: 5,
  CESIUM_3D_TILE_CLASSIFICATION_IGNORE_SHOW: 6,
  OPAQUE: 7,
  TRANSLUCENT: 8,
  OVERLAY: 9,
  NUMBER_OF_PASSES: 10,
}
可见,OPAQUE (不透明通道)的优先级比 TRANSLUCENT(透明通道)高。
这个通道与其它图形 API 的通道可能略不一样,因为你只能使用这个值去指定顺序,而不是自己写一个通道来合成渲染(例如 ThreeJS 或 WebGPU)。
② 绘制的图元类型 - WebGL 绘制常数
即指定 VertexArray 中顶点的拓扑格式,在 WebGL 中是通过 drawArrays 指定的:
gl.drawArrays(gl.TRIANGLES, 0, 3)
这个 gl.TRIANGLES 就是图元类型,是一个常数。Cesium 全部封装在 PrimitiveType.js 模块导出的枚举中了:
console.log(PrimitiveType.TRIANGLES) // 4
默认就是 PrimitiveType.TRIANGLES,所以在 1.6 代码中我们并不需要传递。
③ 离屏绘制容器 - Framebuffer
CesiumJS 支持把结果画到 Renderbuffer,也就是 RTR(Render to RenderBuffer) 离屏绘制。绘制到渲染缓冲,是需要帧缓冲容器的,CesiumJS 把 WebGL 1/2 中帧缓冲相关的 API 都封装好了(严格来说,把 WebGL 中的 API 基本都封装了一遍)。
本文只简单提一提,关于帧缓冲离屏绘制,以后有机会再介绍,法克鸡丝的博客有比较系统的介绍(虽然比较旧,不过思路还是在的)。
④ 模型坐标变换矩阵 - Matrix4
将 Matrix4 类型的变量在创建 DrawCommand 时传递进去,它最终会传递到 CesiumJS 的内部统一值:czm_model(模型矩阵)上,而无需你在 uniform 中指定,你可以在顶点着色器中使用它来对 VertexArray 中的顶点进行模型矩阵变换。见 1.6 中的顶点着色器经典的 MVP 相乘。
⑤ 其它
- cull/occlude: 视锥剔除 + 地平线剔除组合技,Boolean
- orientedBoundingBox/boundingVolume: 范围框
- count: number,WebGL 绘制时要画多少个点
- offset: number,WebGL 绘制时从多少偏移量开始用顶点数据
- instanceCount: number,实例绘制有关
- castShadows/receiveShadows: Boolean,阴影相关
- pickId: string,若没定义,在 Pick 通道的绘制中将使用深度数据;若定义了将在 GLSL 中转化为 pick id
- ...
这些都可以在 DrawCommand 中找到对应的字段,按需设置即可。
1.6. 我们来实践一发纯色三角形
万事俱备,直接硬搓一个能产生三角形绘制指令的 StaticTrianglePrimitive,为了便于在官方沙盒中使用,我给官方 API 加上了命名空间:
const modelCenter = Cesium.Cartesian3.fromDegrees(112, 23, 0)
const modelMatrix = Cesium.Transforms.eastNorthUpToFixedFrame(modelCenter)

const vertexShaderText = `attribute vec3 position;
void main() {
  gl_Position = czm_projection * czm_view * czm_model * vec4(position, 1.0);
}`
const fragmentShaderText = `uniform vec3 u_color;
void main(){
  gl_FragColor = vec4(u_color, 1.0);
}`

const createCommand = (frameState, matrix) => {
  const attributeLocations = {
    "position": 0,
  }
  const uniformMap = {
    u_color() {
      return Cesium.Color.HONEYDEW
    },
  }
  const positionBuffer = Cesium.Buffer.createVertexBuffer({
    usage: Cesium.BufferUsage.STATIC_DRAW,
    typedArray: new Float32Array([
      10000, 50000, 5000,
      -20000, -10000, 5000,
      50000, -30000, 5000,
    ]),
    context: frameState.context,
  })
  const vertexArray = new Cesium.VertexArray({
    context: frameState.context,
    attributes: [{
      index: 0, // 等于 attributeLocations['position']
      vertexBuffer: positionBuffer,
      componentsPerAttribute: 3,
      componentDatatype: Cesium.ComponentDatatype.FLOAT
    }]
  })
  const program = Cesium.ShaderProgram.fromCache({
    context: frameState.context,
    vertexShaderSource: vertexShaderText,
    fragmentShaderSource: fragmentShaderText,
    attributeLocations: attributeLocations,
  })
  const renderState = Cesium.RenderState.fromCache({
    depthTest: {
      enabled: true
    }
  })
  return new Cesium.DrawCommand({
    modelMatrix: matrix,
    vertexArray: vertexArray,
    shaderProgram: program,
    uniformMap: uniformMap,
    renderState: renderState,
    pass: Cesium.Pass.OPAQUE,
  })
}

/* ----- See Here ↓ ------ */

class StaticTrianglePrimitive {
  /**
   * @param {Matrix4} modelMatrix matrix to WorldCoordinateSystem
   */
  constructor(modelMatrix) {
    this._modelMatrix = modelMatrix
  }

  /**
   * @param {FrameState} frameState
   */
  update(frameState) {
    const command = createCommand(frameState, this._modelMatrix)
    frameState.commandList.push(command)
  }
}

// try!
const viewer = new Cesium.Viewer('cesiumContainer', {
  contextOptions: {
    requestWebgl2: true
  }
})
viewer.scene.globe.depthTestAgainstTerrain = true
viewer.scene.primitives.add(new StaticTrianglePrimitive(modelMatrix))
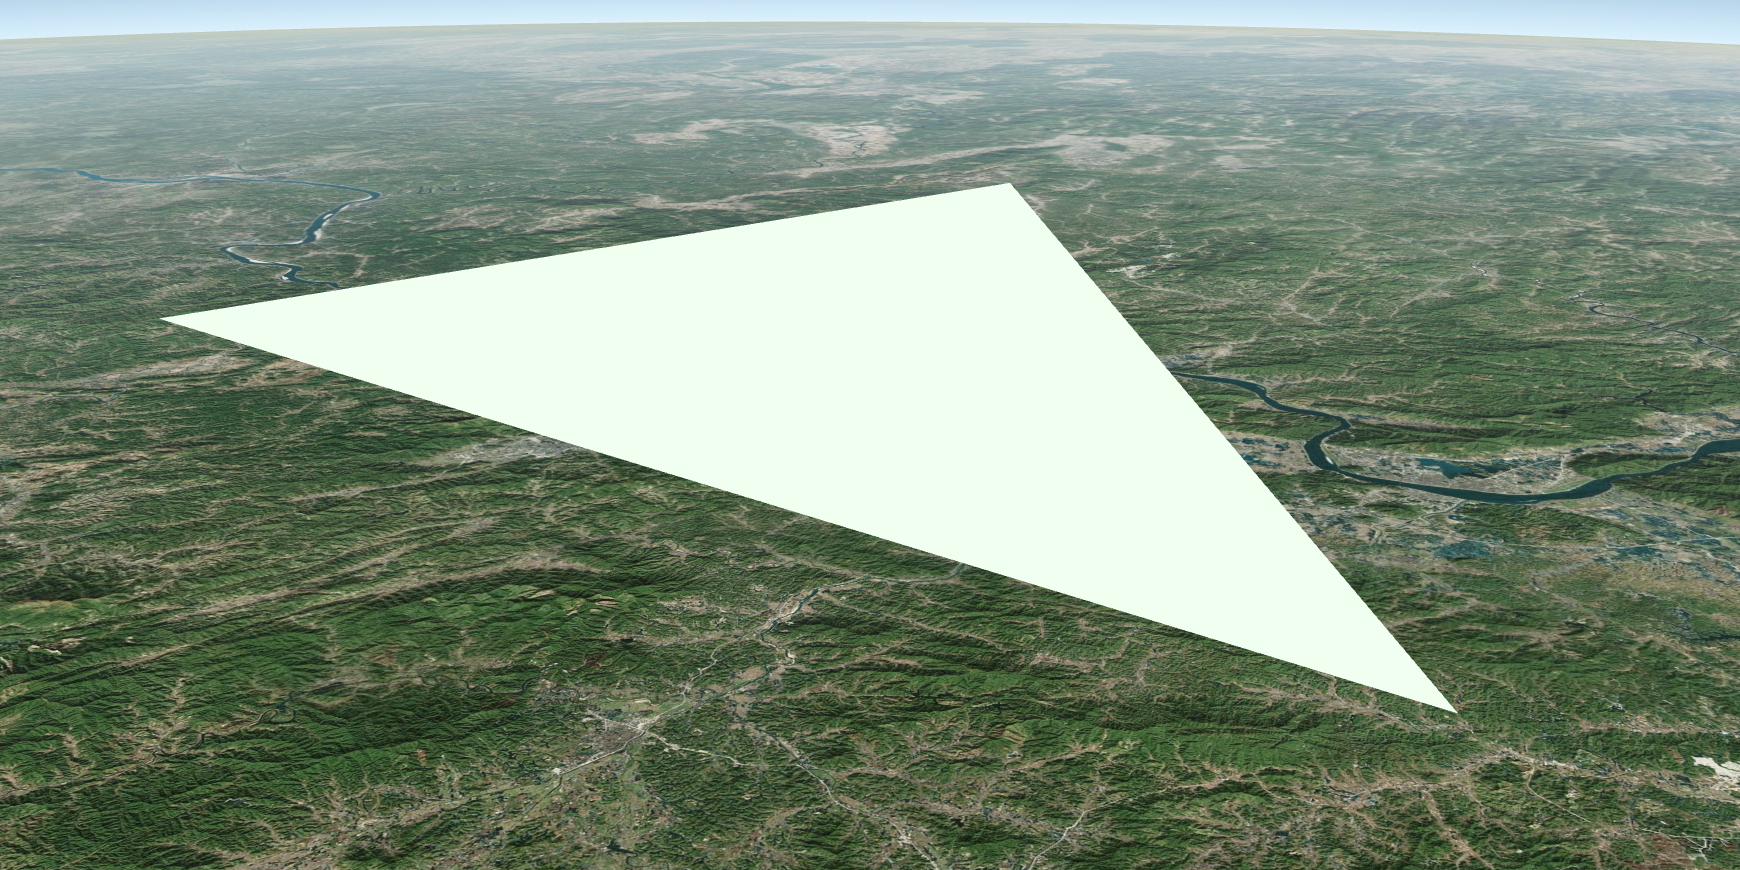
显示出来的效果就是一个白绿色的三角形:

图中为大湾区,因为我设的 ENU 坐标中心就是大湾区附近。三角形的高度被我设为了 5000 米。
2. 意义 - 自定义 Primitive(PrimitiveLike)
如果有一个对象或者一个函数,返回的是可绘制的 DrawCommand,那么只需把返回的指令对象传递给 FrameState 就可以在这一帧把上面的数据和绘图逻辑展示出来。
仔细想想,具备创建 DrawCommand 的对象其实不少。有 Primitive、BillboardCollection、SkyAtmosphere、SkyBox、Sun、Model 等(3DTiles 瓦片上的模型是通过 Model 绘制的)。
我这里就直接给结论了:
- 具备创建
DrawCommand功能的,无论是函数,还是对象,都可以直接参与 Cesium 最底层的绘图; - 原型链上具备
update方法的类,且update方法接受一个FrameState对象,并在执行过程中向这个帧状态对象添加DrawCommand的,就能添加至scene.primitives这个PrimitiveCollection中。
前一种有具体的 API,即 Globe 下的 GlobeSurfaceTileProvider(由 QuadtreePrimitive 使用)创建 DrawCommand;后面的就多了。
能精确控制 DrawCommand,就可以在 Cesium 场景中做你想做的绘图。
点到为止
DrawCommand 是 CesiumJS 渲染器之前的最后一道数据封装,后面就是对这些指令对象上的资源进行分发、绑定、执行。读者有兴趣的话,还可以自行研究 ClearCommand 和 ComputeCommand,也许以后会写写,不过本篇点到为止~


 浙公网安备 33010602011771号