Android 本地tomcat服务器接收处理手机上传的数据之案例演示
本篇基于上一篇搭建的服务器端环境,具体介绍Android真机上传数据到tomcat服务器的交互过程
场景:Android客户端上传用户名和密码到tomcat服务端,tomcat服务器自动接收Android客户端上传的数据,并打印出结果
一、tomcat服务器端实现
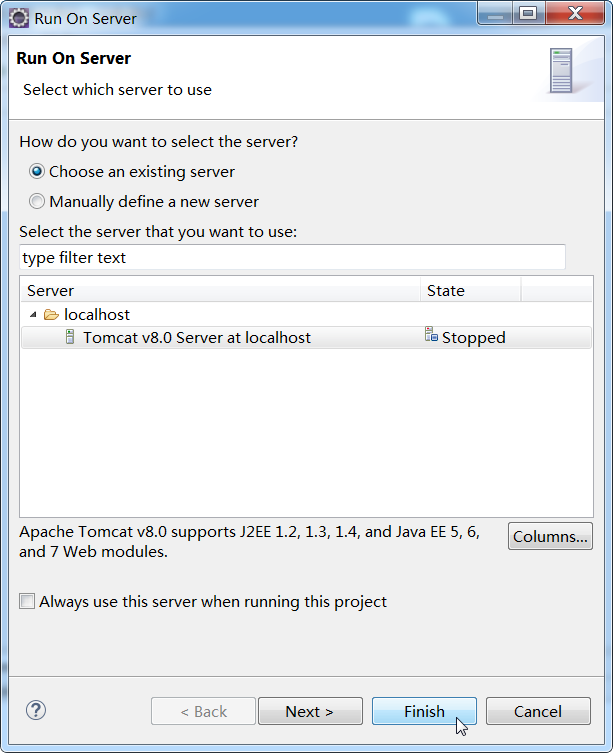
1.首先启动tomcat服务器


直接点击“finish”即可,启动后效果如下:

2. 编写servlet实现:ServletDemo1.java
package com.servlet.demo;
import java.io.IOException;
import java.io.PrintWriter;
import javax.servlet.ServletException;
import javax.servlet.annotation.WebServlet;
import javax.servlet.http.HttpServlet;
import javax.servlet.http.HttpServletRequest;
import javax.servlet.http.HttpServletResponse;
/**
* Servlet implementation class ServletDemo1
*/
@WebServlet(asyncSupported = true, urlPatterns = { "/ServletDemo1" })
public class ServletDemo1 extends HttpServlet {
private static final long serialVersionUID = 1L;
private static Log Log = LogFactory.getLog(ServletDemo1.class);
/**
* The doGet method of the servlet. <br>
*
* This method is called when a form has its tag value method equals to get.
*
* @param request
* the request send by the client to the server
* @param response
* the response send by the server to the client
* @throws ServletException
* if an error occurred
* @throws IOException
* if an error occurred
*/
public void doGet(HttpServletRequest request, HttpServletResponse response) throws ServletException, IOException {
response.setContentType("text/html");
PrintWriter out = response.getWriter();
out.println("<!DOCTYPE HTML PUBLIC \"-//W3C//DTD HTML 4.01 Transitional//EN\">");
out.println("<HTML>");
out.println(" <HEAD><TITLE>A Servlet</TITLE></HEAD>");
out.println(" <BODY>");
out.print(" This is ");
out.print(this.getClass());
out.println(", using the GET method");
out.println(" </BODY>");
out.println("</HTML>");
out.flush();
out.close();
// 获取请求的数据,并向控制台输出
String username = request.getParameter("username");
String password = request.getParameter("password");
System.out.println("-----> doGet username:" + username + " password:" + password);
}
/**
* The doPost method of the servlet. <br>
*
* This method is called when a form has its tag value method equals to
* post.
*
* @param request
* the request send by the client to the server
* @param response
* the response send by the server to the client
* @throws ServletException
* if an error occurred
* @throws IOException
* if an error occurred
*/
public void doPost(HttpServletRequest request, HttpServletResponse response) throws ServletException, IOException {
response.setContentType("text/html");
PrintWriter out = response.getWriter();
out.println("<!DOCTYPE HTML PUBLIC \"-//W3C//DTD HTML 4.01 Transitional//EN\">");
out.println("<HTML>");
out.println(" <HEAD><TITLE>A Servlet</TITLE></HEAD>");
out.println(" <BODY>");
out.print(" This is ");
out.print(this.getClass());
out.println(", using the POST method");
out.println(" </BODY>");
out.println("</HTML>");
out.flush();
out.close();
// 获取请求的数据,并向控制台输出
String username = request.getParameter("username");
String password = request.getParameter("password");
System.out.println("-----> doPost username:" + username + " password:" + password);
}
}
3.运行Servlet

运行成功:

二、Android客户端实现
1. 主页 MainActivity
package com.example.client;
import android.app.Activity;
import android.os.Bundle;
import android.view.View;
import android.widget.Button;
import android.widget.EditText;
public class MainActivity extends Activity {
private EditText username;
private EditText password;
private Button signup;
@Override
protected void onCreate(Bundle savedInstanceState) {
super.onCreate(savedInstanceState);
setContentView(R.layout.activity_main);
username = (EditText) findViewById(R.id.account);
password = (EditText) findViewById(R.id.password);
signup = (Button) findViewById(R.id.btnSign);
signup.setOnClickListener(new View.OnClickListener() {
@Override
public void onClick(View v) {
onLogin();
}
});
}
// 发起HTTP请求
public void onLogin() {
String url = "http://192.168.191.1:8080/First/test/ServletDemo1";
new HttpTread(url, username.getText().toString(), password.getText().toString()).start();
}
}
说明:
1. 上述 "http://192.168.191.1:8080/First/test/ServletDemo1",其中ip地址的确定方法,请查看《Android 本地搭建Tomcat服务器供真机测试》介绍
2. First:是web工程名
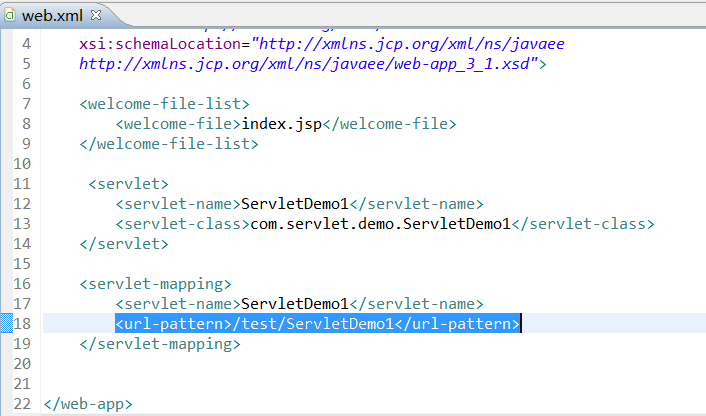
3. test/ServletDemo1:是如下高亮部分映射的名称

2. 线程HttpTread
package com.example.client;
import java.io.BufferedReader;
import java.io.IOException;
import java.io.InputStreamReader;
import java.net.HttpURLConnection;
import java.net.URL;
public class HttpTread extends Thread {
String url;
String username;
String password;
public HttpTread(String url, String username, String password) {
this.url = url;
this.username = username;
this.password = password;
}
private void send() throws IOException {
// 将username和password传给Tomcat服务器
url = url + "?username=" + username + "&password=" + password;
try {
URL httpUrl = new URL(url);
// 获取网络连接
HttpURLConnection conn = (HttpURLConnection) httpUrl.openConnection();
// 设置请求方法为GET方法
conn.setRequestMethod("GET"); // 或 "POST"
// 设置访问超时时间
conn.setReadTimeout(5000);
BufferedReader reader = new BufferedReader(new InputStreamReader(conn.getInputStream()));
String str;
StringBuffer sb = new StringBuffer();
// 读取服务器返回的信息
while ((str = reader.readLine()) != null) {
sb.append(str);
}
// 把服务端返回的数据打印出来
System.out.println("HttpTreadResult:" + sb.toString());
} catch (MalformedURLException e) {
}
}
@Override
public void run() {
super.run();
try {
send();
} catch (IOException e) {
e.printStackTrace();
}
}
}
3. AndroidManifest.xml
<?xml version="1.0" encoding="utf-8"?>
<manifest xmlns:android="http://schemas.android.com/apk/res/android"
package="com.example.client"
android:versionCode="1"
android:versionName="1.0" >
<uses-sdk
android:minSdkVersion="25"
android:targetSdkVersion="25" />
<uses-permission android:name="android.permission.INTERNET" />
<application
android:allowBackup="true"
android:icon="@drawable/ic_launcher"
android:label="@string/app_name"
android:theme="@style/AppTheme" >
<activity
android:name=".MainActivity"
android:label="@string/app_name" >
<intent-filter>
<action android:name="android.intent.action.MAIN" />
<category android:name="android.intent.category.LAUNCHER" />
</intent-filter>
</activity>
</application>
</manifest>
说明:
需要声明权限:<uses-permission android:name="android.permission.INTERNET" />
编码结束。
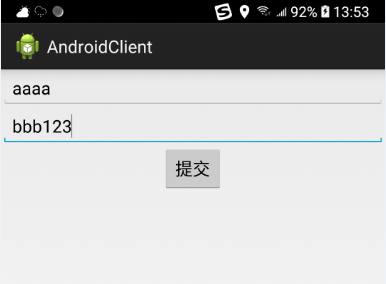
4. Android 客户端主页面:

填写用户名和密码,例如:用户名:aaaa 密码:bbb123

点击“提交”按钮。切换到Eclipse中,可以看到Tomcat自动打印出所提交的数据:

完成。


 浙公网安备 33010602011771号