网络文件共享服务
1什么是NFS?
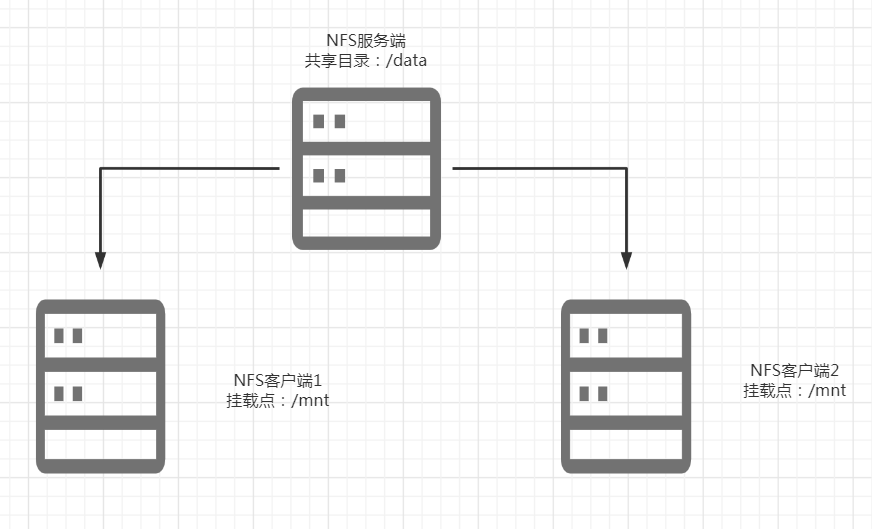
NFS--网络文件系统,主要的功能就是通过网络(一般是局域网)让不同的主机系统之间可以共享文件或目录。NFS客户端(一般为应用服务器,例如web)可以通过挂载(mount)的方式将NFS服务器端共享的数据目录挂载到NFS客户端本地系统中(就是某一个挂载点下)。

2什么是RPC?
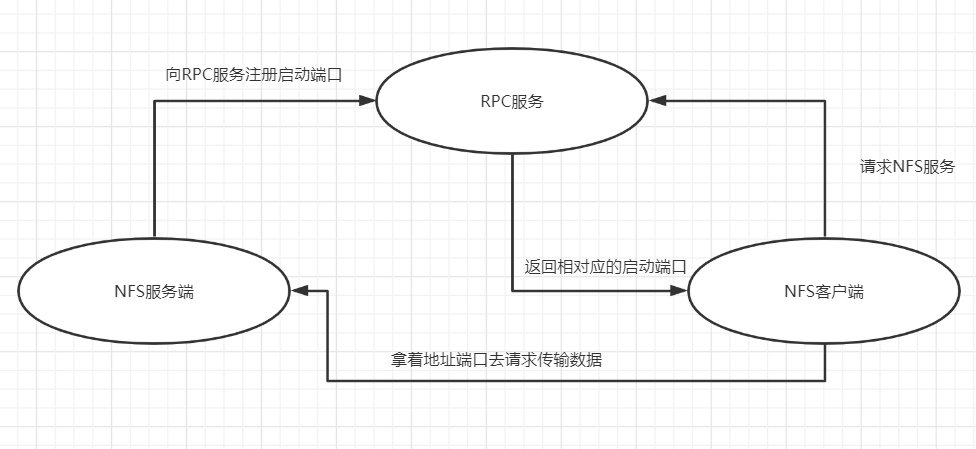
因为NFS支持的功能相当多,而不同的功能会使用不同程序来启动相对应的端口来传输数据,从而导致NFS的功能所对应的端口无法固定,所以rpc出现了。
首先服务端先启动rpc服务,接着启动nfs服务,nfs服务会向rpc发起请求注册端口,当客户端向rpc发起请求时rpc服务会将客户端所需的端口传过去,客户端拿着
相对应的端口去向NFS服务端请求传输数据。

3服务部署
NFS服务端--nfs:172.16.1.31
NFS客户端--backup:172.16.1.41
服务端部署:
第一里程:查询软件服务是否安装
[root@nfs01 data]# rpm -qa nfs-utils rpcbind
第二里程:安装软件服务
[root@nfs01 ~]# yum install -y nfs-utils rpcbind
第三里程:编写配置文件
vim /etc/exports
/data/ 172.16.1.0/24(rw,sync)
1 2 3
①:指定存储数据目录
②: 指定允许存储数据白名单信息
③:配置存储服务参数信息
第四里程:创建存储目录
mkdir /data/ && chown nfsnobody.nfsnobody /data/
第五里程:启动服务程序
systemctl start rpcbind
systemctl start nfs
客户端部署:
第一里程:查询nfs服务是否安装
[root@backup ~ 14:31:10]]# rpm -qa nfs-utils
nfs-utils-1.3.0-0.68.el7.x86_64
第二里程:安装nfs服务
[root@backup ~ 14:38:58]]# yum install -y nfs-utils
第三里程:进行挂载
mount -t nfs 172.16.1.31:/data /mnt
第四里程:查看是否挂载成功
[root@backup ~ 14:45:13]]# df -h
Filesystem Size Used Avail Use% Mounted on
devtmpfs 476M 0 476M 0% /dev
tmpfs 487M 0 487M 0% /dev/shm
tmpfs 487M 7.8M 479M 2% /run
tmpfs 487M 0 487M 0% /sys/fs/cgroup
/dev/sda5 7.0G 2.3G 4.8G 32% /
/dev/sda3 4.0G 33M 4.0G 1% /home
/dev/sda1 1014M 187M 828M 19% /boot
tmpfs 98M 0 98M 0% /run/user/0
172.16.1.31:/data 7.0G 2.2G 4.9G 32% /mnt
4存储配置参数
rw --- 表示存储目录具有读写权限
ro --- 表示存储目录只有只读权限
async --- 表示异步传输数据 先将数据存储到缓冲区中去,速度快,但是服务器宕机容易造成信息丢失
sync --- 表示同步传输数据 请求数据时同步到硬盘中,保证了数据的安全但是性能会差很多
root_squash --- 确认将root用户做映射处理
no_root_squash --- 确认不要让root用户做映射处理
all_squash --- 确认将普通用户做映射处理
no_all_squash --- 确认将普通用户不做映射处理
运维人员操作时:rw,sync,root_squash,no_all_squash
PS: 日后用户访问网站,也无法实现数据存储
第一个步骤:修改存储目录属主属组信息
chown oldboy.oldboy /data --- 设置为指定用户信息
第二个步骤:管理员需要管理用户数据
anonuid anongid --- 指定映射用户信息 默认参数为65534
# cat /etc/exports
/data/ 172.16.1.0/24(rw,sync,root_squash,no_all_squash,anonuid=1000,anongid=1000)
查看nfs存储默认设置
cat /var/lib/nfs/etab
/data 172.16.1.0/24(rw,sync,wdelay,hide,nocrossmnt,secure,root_squash,no_all_squash,no_subtree_check,secure_locks,acl,no_pnfs,anonuid=65534,anongid=65534,sec=sys,rw,secure,root_squash,no_all_squash)
权限问题导致无法正常存储数据:
1)服务端配置文件权限参数设置不正确 exports -- rw
2)服务端存储目录本身权限设置不正确 /data -- 755
3)服务端存储目录会有继承影响权限 exports -- 尽量共享目录不要有继承关系
4)客户端挂载操作时设置参数为只读 mount -o ro
补充:存储目录无法正常挂载操作时,如何排查问题:
1) 确认服务是否正常启动
rpcinfo -p 172.16.1.31
2) 确认共享目录是否正常
showmount -e 172.16.1.31
3) 在本地存储服务器上进行挂载测试
[root@nfs01 ~]# mount -t nfs 172.16.1.31:/data/ /mnt/
5存储挂载配置
方法1:手动挂载
mount -t nfs 172.16.1.31:/data/ /mnt/
方法2:自动挂载
1-vim /etc/rc.local
mount -t nfs 172.16.1.31:/data/ /mnt/ #不介意使用
2-[root@backup ~ 14:58:39]]# vim /etc/fstab
172.16.1.31:/data/r/ /mnt nfs defaults 0 0 #介意使用
补充:
1如果文件配置完后还是无法挂载则重新加载 remote-fs.target
systemctl restart remote-fs.target
2在生产中如果需要重启nfs介意平滑重启
systemctl reload nfs 或exportfs -r
挂载参数信息:
soft --- 在指定时间内无法实现挂载 会终端网络挂载连接
hard --- 在指定时间内无法实现挂载 会一直进行网络连接 尝试重新挂载
rsize --- 增加缓存容量信息
wsize --- 增加缓冲容量信息
atime --- 每一次访问数据信息都会修改文件访问时间 修改磁盘inode --> 磁盘 消耗IO
noatime --- 每一次访问数据信息不会修改文件访问时间 不会修改磁盘inode --> 不会消耗IO
remount --- mount -o remount,rw / 实现根目录重新挂载,可以解决文件系统损坏问题
实时同步方法
1利用脚本实现
第一个里程:部署软件环境
监控数据变化环境:inotify-tools
yum install -y inotify-tools
/usr/bin/inotifywait 实现监控目录信息变化
/usr/bin/inotifywatch 实现监控数据统计功能
inotifywait 命令使用说明:
--exclude <pattern> Exclude all events on files matching the extended regular expression <pattern>.
排除指定文件信息不做监控处理
--excludei <pattern> Like --exclude but case insensitive.
排除指定文件名称信息时不区分大小写
-m|--monitor Keep listening for events forever.
保持对指定目录一直监控状态
Without this option, inotifywait will exit after one event is received.
在没有这个参数时,在监控发现一次数据变化之后,将会退出监控状态
-r|--recursive Watch directories recursively.
实现目录层级递归监控
-q|--quiet Print less (only print events).
减少无用信息输出产生
--format <fmt> Print using a specified printf-like format string; read the man page for more details.
定义监控输出信息格式 显示时间信息 只显示文件名称 产生了什么变化
--timefmt <fmt> strftime-compatible format string for use with %T in --format string.
时间格式显示
-e|--event <event1> Listen for specific event(s). If omitted, all events are listened for.
指定监听的事件信息(可能产生数据变化操作)
常见的事件信息:
modify file or directory contents were written
文件或目录内容没写入时
close_write file or directory closed, after being opened in writeable mode
文件数据内容被写入编辑时
move file or directory moved to or from watched directory
文件或目录移出或移入到指定监控目录中
create file or directory created within watched directory
创建文件或目录信息
delete file or directory deleted within watched directory
删除文件或目录信息
命令实践使用过程:
inotifywait -mrq /data --- 实现目录默认监控方法
inotifywait -mrq --timefmt "%F_%A %T" --format "%T %w%f %e" /data --- 按照信息和时间格式显示监控内容
实现监控命令信息:
inotifywait -mrq --format "%w%f" -e "modify,close_write,move,create,delete" /data
================================================================
补充知识:软件安装后检查方法:针对yum和rpm安装软件
rpm -qa 软件包名 --- 确认软件是否安装成功
rpm -ql 软件包名 --- 确认软件都安装哪些数据信息
rpm -qf 命令名称和路径 --- 已知命令信息获取所属软件大礼包
rpm -qc 软件包名 --- 获取软件包中配置文件路径信息
================================================================
第二个里程:编写脚本信息 (监控+备份)
1)如何将两个命令进行整合
2)命令操作过程必须是反复
3)命令操作必须一直是运行
while 循环 只要条件不满足就会一直循环 for num in {1..10000}
while read line
do
echo $line
done < /oldboy.txt
inotifywait -mrq --format "%w%f" -e "modify,close_write,move,create,delete" /data|while read line \
rsync -avz /data/ --delete rsync_backup@172.15.1.41::backup --password-file=/etc/rsync.password
done
nohup sh inotify.sh & 让指定脚本文件运行方式采用守护进程方式
第三个里程:进行实时同步测试
[root@nfs01 data]# touch 1.txt
[root@nfs01 data]# touch 2.txt
[root@nfs01 data]# rm -rf *
[root@nfs01 data]# ll
总用量 0
[root@backup backup 09:45:10]]# ll
total 0
-rw-r--r-- 1 rsync rsync 0 Mar 12 09:44 1.txt
[root@backup backup 09:45:13]]# ll
total 0
-rw-r--r-- 1 rsync rsync 0 Mar 12 09:44 1.txt
-rw-r--r-- 1 rsync rsync 0 Mar 12 09:45 2.txt
[root@backup backup 09:45:32]]# ll
total 0
利用程序软件实现同步 sersync
第一个里程:下载安装部署软件
yum install -y inotify-tools
备份服务环境部署好
https://github.com/wsgzao/sersync
wget https://github.com/wsgzao/sersync/archive/master.zip 下载
unzip sersync_installdir_64bit.zip 解压
mv sersync_installdir_64bit/sersync/ /usr/local/ 移动
=================================================================
二进制包软件部署过程
第二个里程:编写软件配置文件
编写配置文件:
<localpath watch="/data">
<remote ip="172.16.1.41" name="backup"/>
<!--<remote ip="192.168.8.39" name="tongbu"/>-->
<!--<remote ip="192.168.8.40" name="tongbu"/>-->
</localpath>
<rsync>
<commonParams params="-az"/>
<auth start="true" users="rsync_backup" passwordfile="/etc/rsync.password"/>
<userDefinedPort start="false" port="874"/><!-- port=874 -->
<timeout start="false" time="100"/><!-- timeout=100 -->
<ssh start="false"/>
</rsync>
第三个里程:启动实时同步服务
/usr/local/sersync/sersync2 -dro /usr/local/sersync/confxml.xml
参数-d:启用守护进程模式
参数-r:在监控前,将监控目录与远程主机用rsync命令推送一遍
c参数-n: 指定开启守护线程的数量,默认为10个
参数-o:指定配置文件,默认使用confxml.xml文件
参数-m:单独启用其他模块,使用 -m refreshCDN 开启刷新CDN模块
参数-m:单独启用其他模块,使用 -m socket 开启socket模块
参数-m:单独启用其他模块,使用 -m http 开启http模块
不加-m参数,则默认执行同步程序
第四个里程:进行实时同步测试


