springcloud netflix 整合 seata 使用 euraka 做注册中心,数据库 oracle,以及处理 xid 传递问题
前景
公司划分微服务后,选择使用了springcloud netflix,没有使用 springlcoud alibaba 所以这边没有通过阿里巴巴整合,
seata 使用 AT 模式
注册中心 euraka
服务调用 openfeign
项目环境
springboot 2.1.3.RELEASE
springcloud Greenwich.SR1
seata 1.3
oracle 11g
准备工作
1、先下载 seata
下载地址:https://seata.io/zh-cn/blog/download.html
2、seata 对应的 sql 脚本
下载 seata 源码后,在源码目录./seata-1.3.0/script/db/oracle.sql
undo_log脚本 ./seata/script/client/at/db/oracle.sql
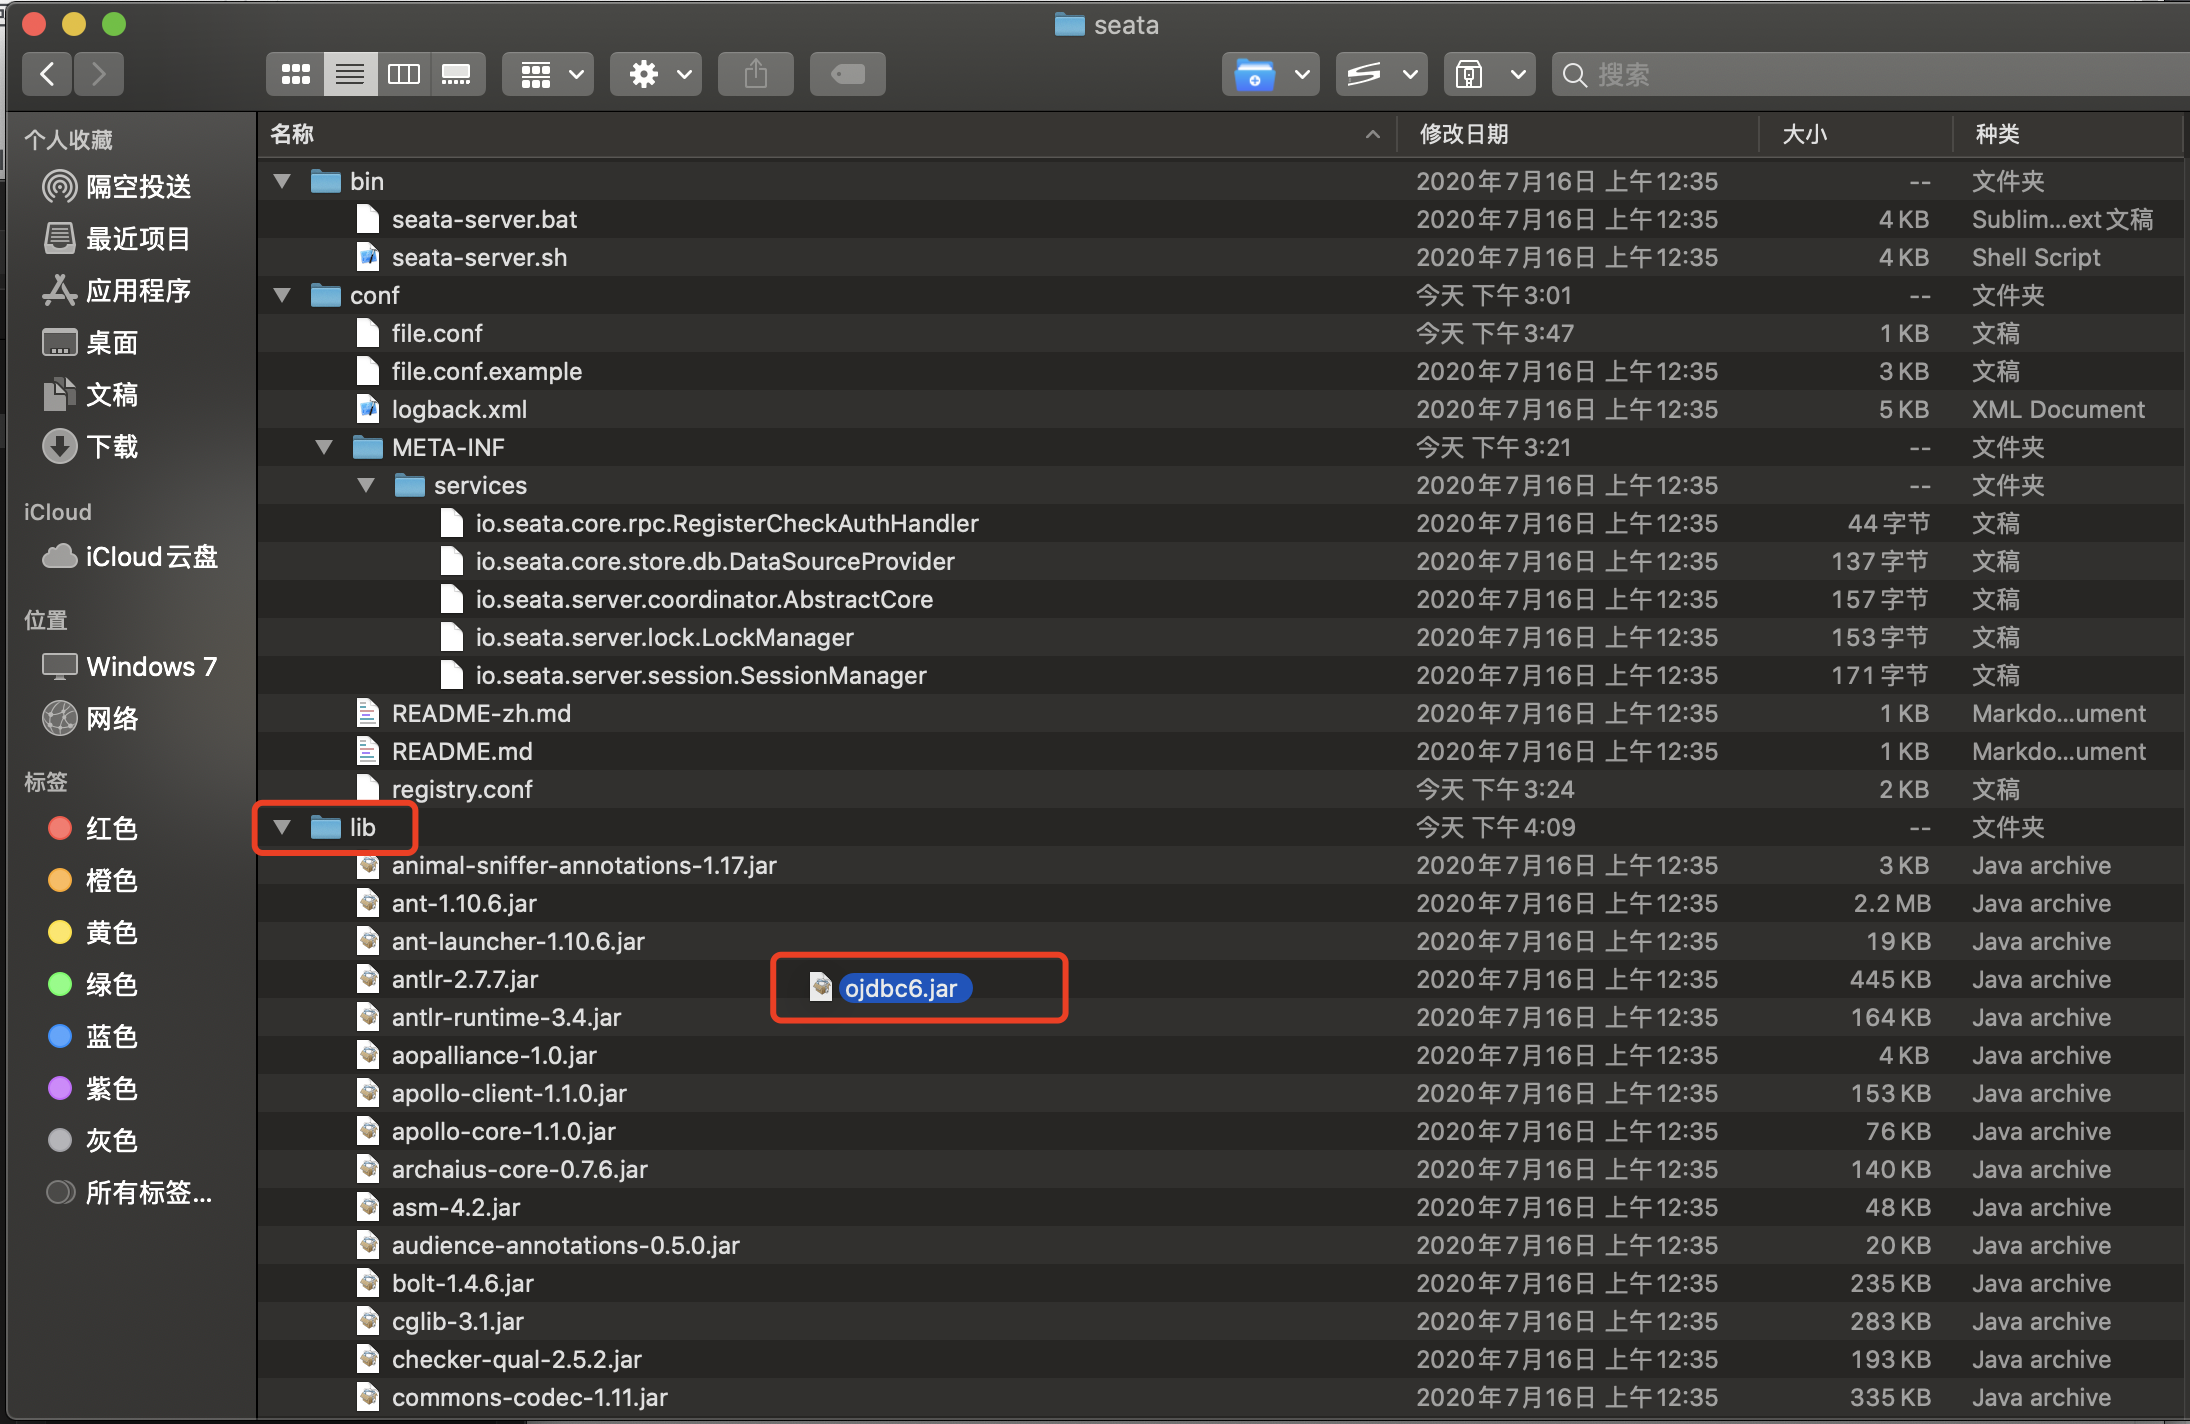
3、oracle6驱动jar包,用于连接 oracle11g
下载地址:https://github.com/oldboyooxx/resource/tree/main/oracle
开始搭建
1、将下载后oracle 驱动包移到 lib 目录下
2、修改 seata 配置
修改 registry.conf 文件(红色为修改的地方)
registry {
  # file 、nacos 、eureka、redis、zk、consul、etcd3、sofa
  type = "eureka"

  nacos {
    application = "seata-server"
    serverAddr = "127.0.0.1:8848"
    group = "SEATA_GROUP"
    namespace = ""
    cluster = "default"
    username = ""
    password = ""
  }
  eureka {
    serviceUrl = "http://127.0.0.1:8761/eureka"
    application = "middle-service-seata"
    weight = "1"
  }
  redis {
    serverAddr = "localhost:6379"
    db = 0
    password = ""
    cluster = "default"
    timeout = 0
  }
  zk {
    cluster = "default"
    serverAddr = "127.0.0.1:2181"
    sessionTimeout = 6000
    connectTimeout = 2000
    username = ""
    password = ""
  }
  consul {
    cluster = "default"
    serverAddr = "127.0.0.1:8500"
  }
  etcd3 {
    cluster = "default"
    serverAddr = "http://localhost:2379"
  }
  sofa {
    serverAddr = "127.0.0.1:9603"
    application = "default"
    region = "DEFAULT_ZONE"
    datacenter = "DefaultDataCenter"
    cluster = "default"
    group = "SEATA_GROUP"
    addressWaitTime = "3000"
  }
  file {
    name = "file.conf"
  }
}

config {
  # file、nacos 、apollo、zk、consul、etcd3
  type = "file"

  nacos {
    serverAddr = "127.0.0.1:8848"
    namespace = ""
    group = "SEATA_GROUP"
    username = ""
    password = ""
  }
  consul {
    serverAddr = "127.0.0.1:8500"
  }
  apollo {
    appId = "seata-server"
    apolloMeta = "http://192.168.1.204:8801"
    namespace = "application"
  }
  zk {
    serverAddr = "127.0.0.1:2181"
    sessionTimeout = 6000
    connectTimeout = 2000
    username = ""
    password = ""
  }
  etcd3 {
    serverAddr = "http://localhost:2379"
  }
  file {
    name = "file.conf"
  }
}
修改 file.conf 文件 (红色为修改的地方)
## transaction log store, only used in seata-server
store {
  ## store mode: file、db、redis
  mode = "db"

  ## file store property
  file {
    ## store location dir
    dir = "sessionStore"
    # branch session size , if exceeded first try compress lockkey, still exceeded throws exceptions
    maxBranchSessionSize = 16384
    # globe session size , if exceeded throws exceptions
    maxGlobalSessionSize = 512
    # file buffer size , if exceeded allocate new buffer
    fileWriteBufferCacheSize = 16384
    # when recover batch read size
    sessionReloadReadSize = 100
    # async, sync
    flushDiskMode = async
  }

  ## database store property
  db {
    ## the implement of javax.sql.DataSource, such as DruidDataSource(druid)/BasicDataSource(dbcp)/HikariDataSource(hikari) etc.
    datasource = "druid"
    ## mysql/oracle/postgresql/h2/oceanbase etc.
    dbType = "oracle"
    driverClassName = "oracle.jdbc.driver.OracleDriver"
    url = "jdbc:oracle:thin:@172.***.***.***:1521:****"
    user = "******"
    password = "*******"
    minConn = 5
    maxConn = 30
    globalTable = "SEATA_GLOBAL_TABLE"
    branchTable = "SEATA_BRANCH_TABLE"
    lockTable = "SEATA_LOCK_TABLE"
    queryLimit = 100
    maxWait = 5000
  }

  ## redis store property
  redis {
    host = "127.0.0.1"
    port = "6379"
    password = ""
    database = "0"
    minConn = 1
    maxConn = 10
    queryLimit = 100
  }

}
创建 seata 需要的数据库表
-- -------------------------------- The script used when storeMode is 'db' --------------------------------
-- the table to store GlobalSession data
CREATE TABLE global_table
(
    xid                       VARCHAR2(128) NOT NULL,
    transaction_id            NUMBER(19),
    status                    NUMBER(3)     NOT NULL,
    application_id            VARCHAR2(32),
    transaction_service_group VARCHAR2(32),
    transaction_name          VARCHAR2(128),
    timeout                   NUMBER(10),
    begin_time                NUMBER(19),
    application_data          VARCHAR2(2000),
    gmt_create                TIMESTAMP(0),
    gmt_modified              TIMESTAMP(0),
    PRIMARY KEY (xid)
);

CREATE INDEX idx_gmt_modified_status ON global_table (gmt_modified, status);
CREATE INDEX idx_transaction_id ON global_table (transaction_id);

-- the table to store BranchSession data
CREATE TABLE branch_table
(
    branch_id         NUMBER(19)    NOT NULL,
    xid               VARCHAR2(128) NOT NULL,
    transaction_id    NUMBER(19),
    resource_group_id VARCHAR2(32),
    resource_id       VARCHAR2(256),
    branch_type       VARCHAR2(8),
    status            NUMBER(3),
    client_id         VARCHAR2(64),
    application_data  VARCHAR2(2000),
    gmt_create        TIMESTAMP(6),
    gmt_modified      TIMESTAMP(6),
    PRIMARY KEY (branch_id)
);

CREATE INDEX idx_xid ON branch_table (xid);

-- the table to store lock data
CREATE TABLE lock_table
(
    row_key        VARCHAR2(128) NOT NULL,
    xid            VARCHAR2(96),
    transaction_id NUMBER(19),
    branch_id      NUMBER(19)    NOT NULL,
    resource_id    VARCHAR2(256),
    table_name     VARCHAR2(32),
    pk             VARCHAR2(36),
    gmt_create     TIMESTAMP(0),
    gmt_modified   TIMESTAMP(0),
    PRIMARY KEY (row_key)
);

CREATE INDEX idx_branch_id ON lock_table (branch_id);
这边用的是 AT 模式,所以需要添加 undo_log 表
-- for AT mode you must to init this sql for you business database. the seata server not need it.
CREATE TABLE undo_log
(
    id            NUMBER(19)    NOT NULL,
    branch_id     NUMBER(19)    NOT NULL,
    xid           VARCHAR2(128) NOT NULL,
    context       VARCHAR2(128) NOT NULL,
    rollback_info BLOB          NOT NULL,
    log_status    NUMBER(10)    NOT NULL,
    log_created   TIMESTAMP(0)  NOT NULL,
    log_modified  TIMESTAMP(0)  NOT NULL,
    PRIMARY KEY (id),
    CONSTRAINT ux_undo_log UNIQUE (xid, branch_id)
);

COMMENT ON TABLE undo_log IS 'AT transaction mode undo table';

-- Generate ID using sequence and trigger
CREATE SEQUENCE UNDO_LOG_SEQ START WITH 1 INCREMENT BY 1;
3、启动服务
全部修改后运行seata-server.sh脚本启动,到eureka 中查看是否注册成功
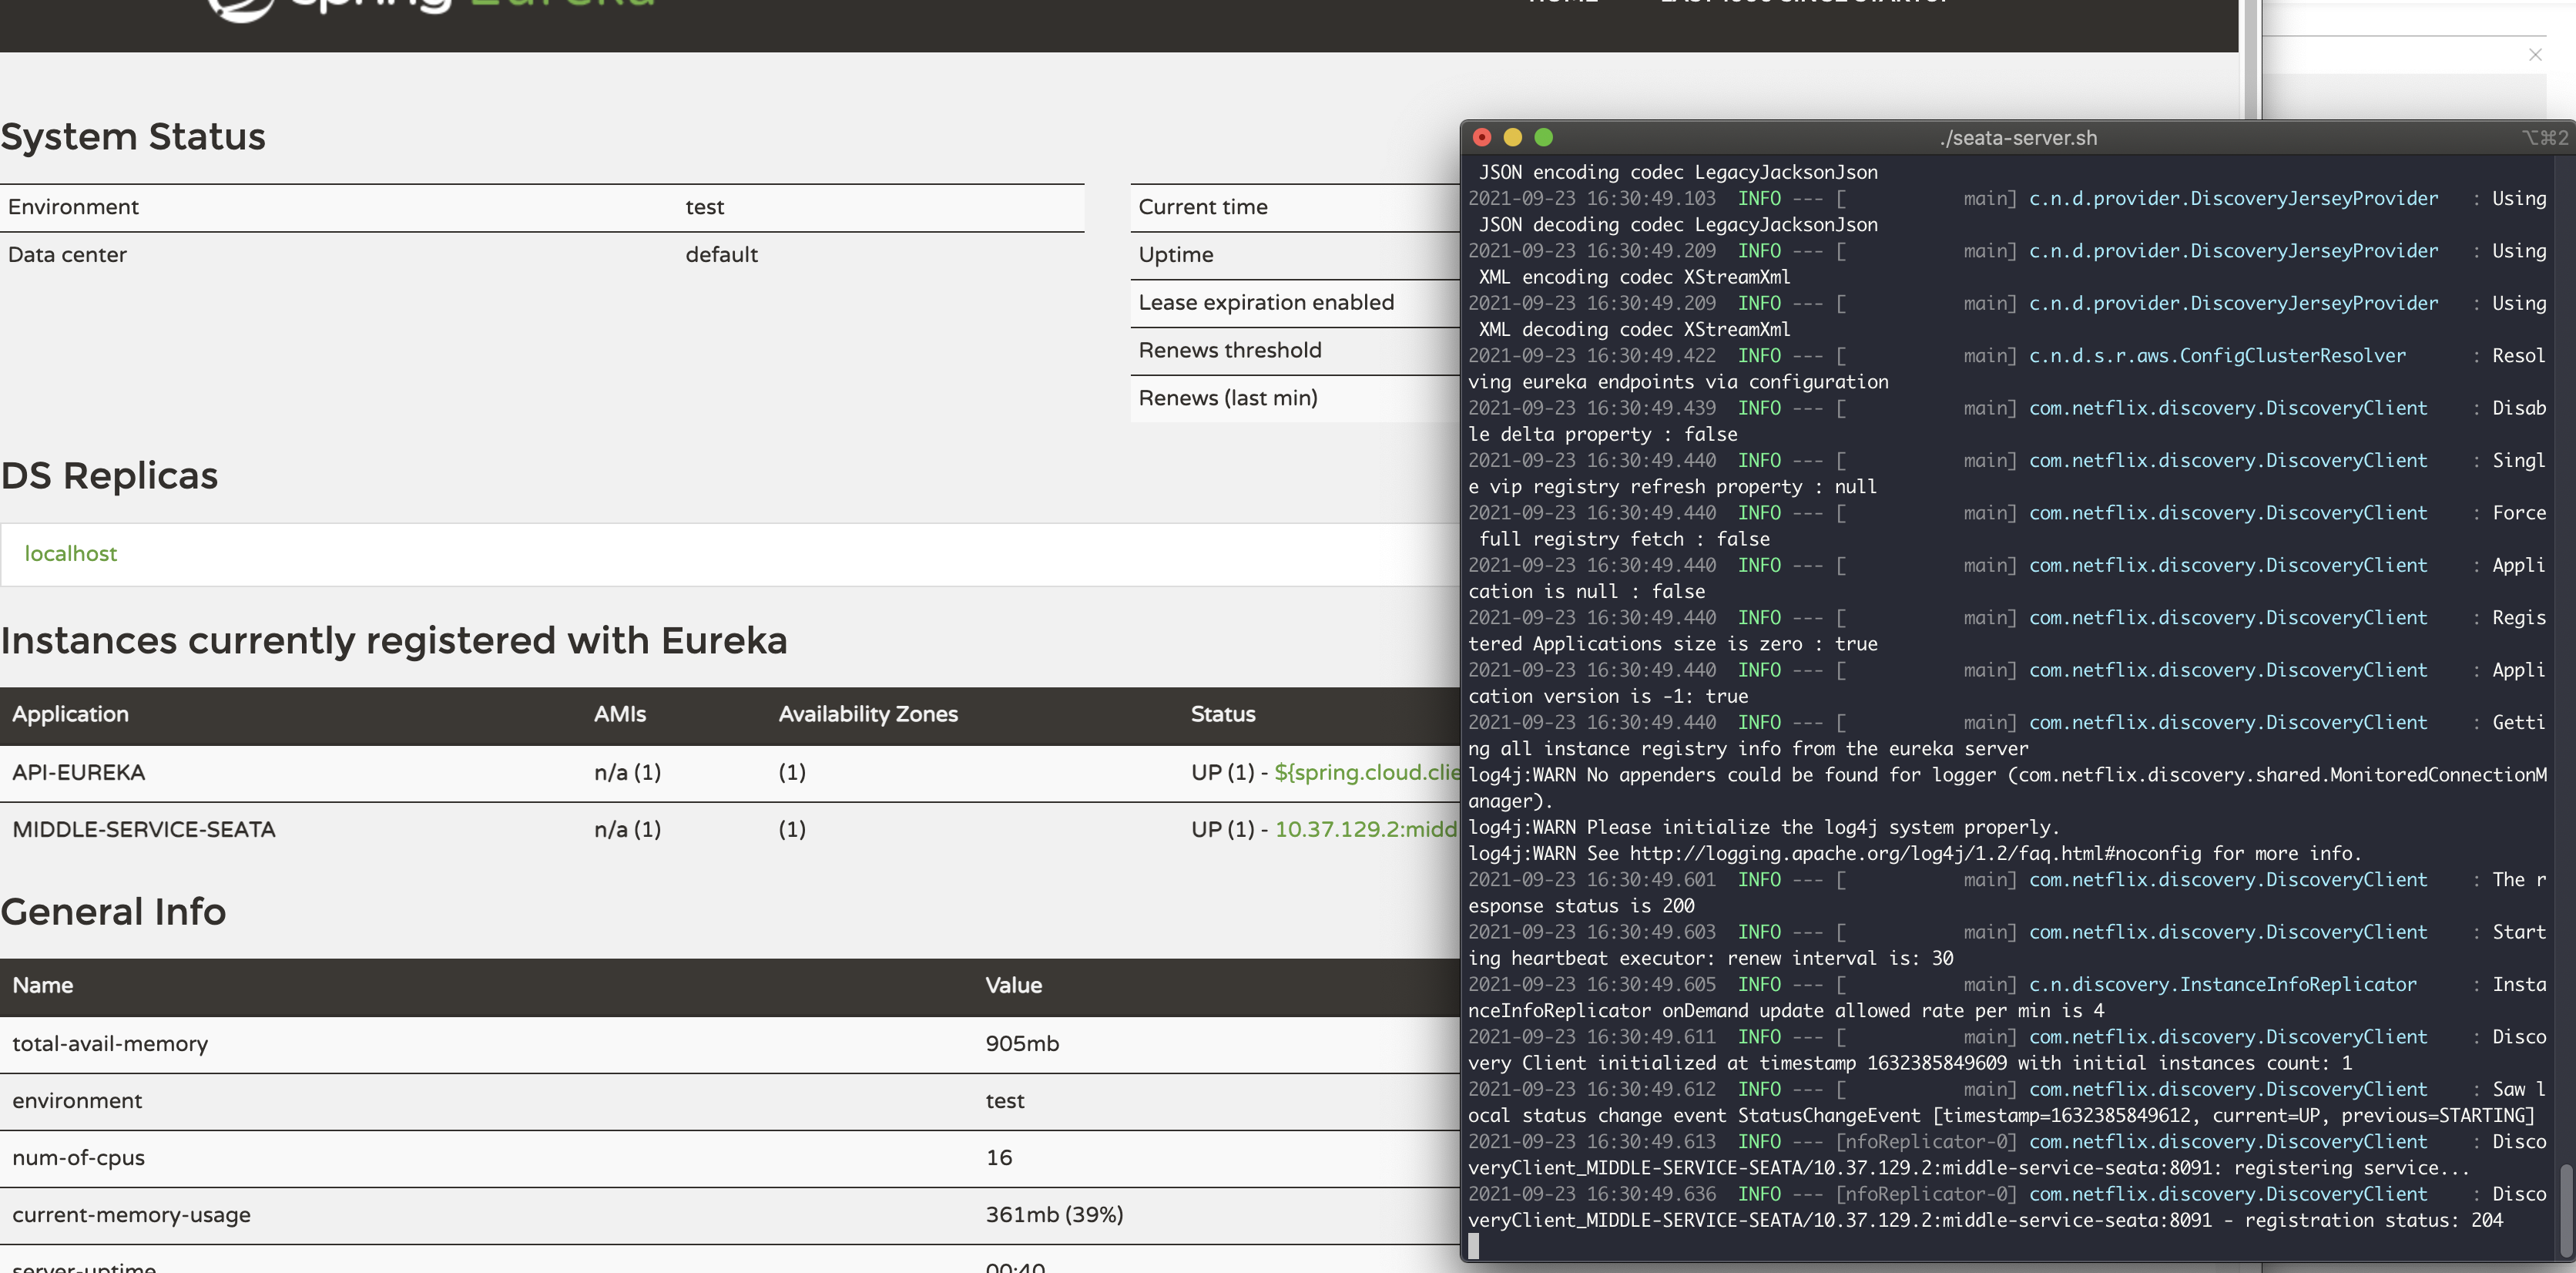
在项目中引用 seata
1、对应的模块 pom 添加依赖
<dependency>
    <groupId>io.seata</groupId>
    <artifactId>seata-spring-boot-starter</artifactId>
    <version>1.4.0</version>
</dependency>
2、修改启动的 application.yml
添加以下配置注意红色部分
seata:
  enabled: true
  application-id: **-seata-***-server #服务名
  tx-service-group: default # default是自定义的事务分组名称
  enable-auto-data-source-proxy: true # 启用自动数据源代理
  use-jdk-proxy: false
  #    excludes-for-auto-proxying:
  #    client:
  #        rm:
  #            async-commit-buffer-limit: 1000
  #            report-retry-count: 5
  #            table-meta-check-enable: false
  #            report-success-enable: false
  #            saga-branch-register-enable: false
  #            lock:
  #                retry-interval: 10
  #                retry-times: 30
  #                retry-policy-branch-rollback-on-conflict: true
  #        tm:
  #            commit-retry-count: 5
  #            rollback-retry-count: 5
  #        undo:
  #            data-validation: true
  #            log-serialization: jackson
  #            log-table: undo_log
  #        log:
  #            exceptionRate: 100
  service:
    vgroup-mapping:
      default: middle-service-seata # default是自定义的事务分组名称,seata-server是tc注册到注册中心的服务名称
    #        grouplist:
    #            default: 127.0.0.1:8091 #     仅注册中心为file时使用
    enable-degrade: false # 是否启用降级
    disable-global-transaction: false # 是否禁用全局事务
  #    transport:
  #        shutdown:
  #            wait: 3
  #        thread-factory:
  #            boss-thread-prefix: NettyBoss
  #            worker-thread-prefix: NettyServerNIOWorker
  #            server-executor-thread-prefix: NettyServerBizHandler
  #            share-boss-worker: false
  #            client-selector-thread-prefix: NettyClientSelector
  #            client-selector-thread-size: 1
  #            client-worker-thread-prefix: NettyClientWorkerThread
  #            worker-thread-size: default
  #            boss-thread-size: 1
  #        type: TCP
  #        server: NIO
  #        heartbeat: true
  #        serialization: seata
  #        compressor: none
  #        enable-client-batch-send-request: true
  config:
    type: file # 配置中心为file模式
  #        consul:
  #            server-addr: 127.0.0.1:8500
  #        apollo:
  #            apollo-meta: http://192.168.1.204:8801
  #            app-id: seata-server
  #            namespace: application
  #        etcd3:
  #            server-addr: http://localhost:2379
  #        nacos:
  #            namespace:
  #            serverAddr: localhost
  #            group: SEATA_GROUP
  #            userName: ""
  #            password: ""
  #        zk:
  #            server-addr: 127.0.0.1:2181
  #            session-timeout: 6000
  #            connect-timeout: 2000
  #            username: ""
  #            password: ""
  registry:
    type: eureka # 注册中心为eureka
    eureka:
      weight: 1
      service-url: http://127.0.0.1:8761/eureka # 注册中心地址
#        consul:
#            server-addr: 127.0.0.1:8500
#        etcd3:
#            serverAddr: http://localhost:2379
#        nacos:
#            application: seata-server
#            server-addr: localhost
#            namespace:
#            userName: ""
#            password: ""
#        redis:
#            server-addr: localhost:6379
#            db: 0
#            password:
#            timeout: 0
#        sofa:
#            server-addr: 127.0.0.1:9603
#            region: DEFAULT_ZONE
#            datacenter: DefaultDataCenter
#            group: SEATA_GROUP
#            addressWaitTime: 3000
#            application: default
#        zk:
#            server-addr: 127.0.0.1:2181
#            session-timeout: 6000
#            connect-timeout: 2000
#            username: ""
#            password: ""

# -----------seata--------------
3、其它服务配置重复上面的步骤既可,注意红色部分
4、最后启动项目
可以在 seata 控制台中看到注册信息表示注册成功,然后就可以再代码中使用@GlobalTransactional注解了
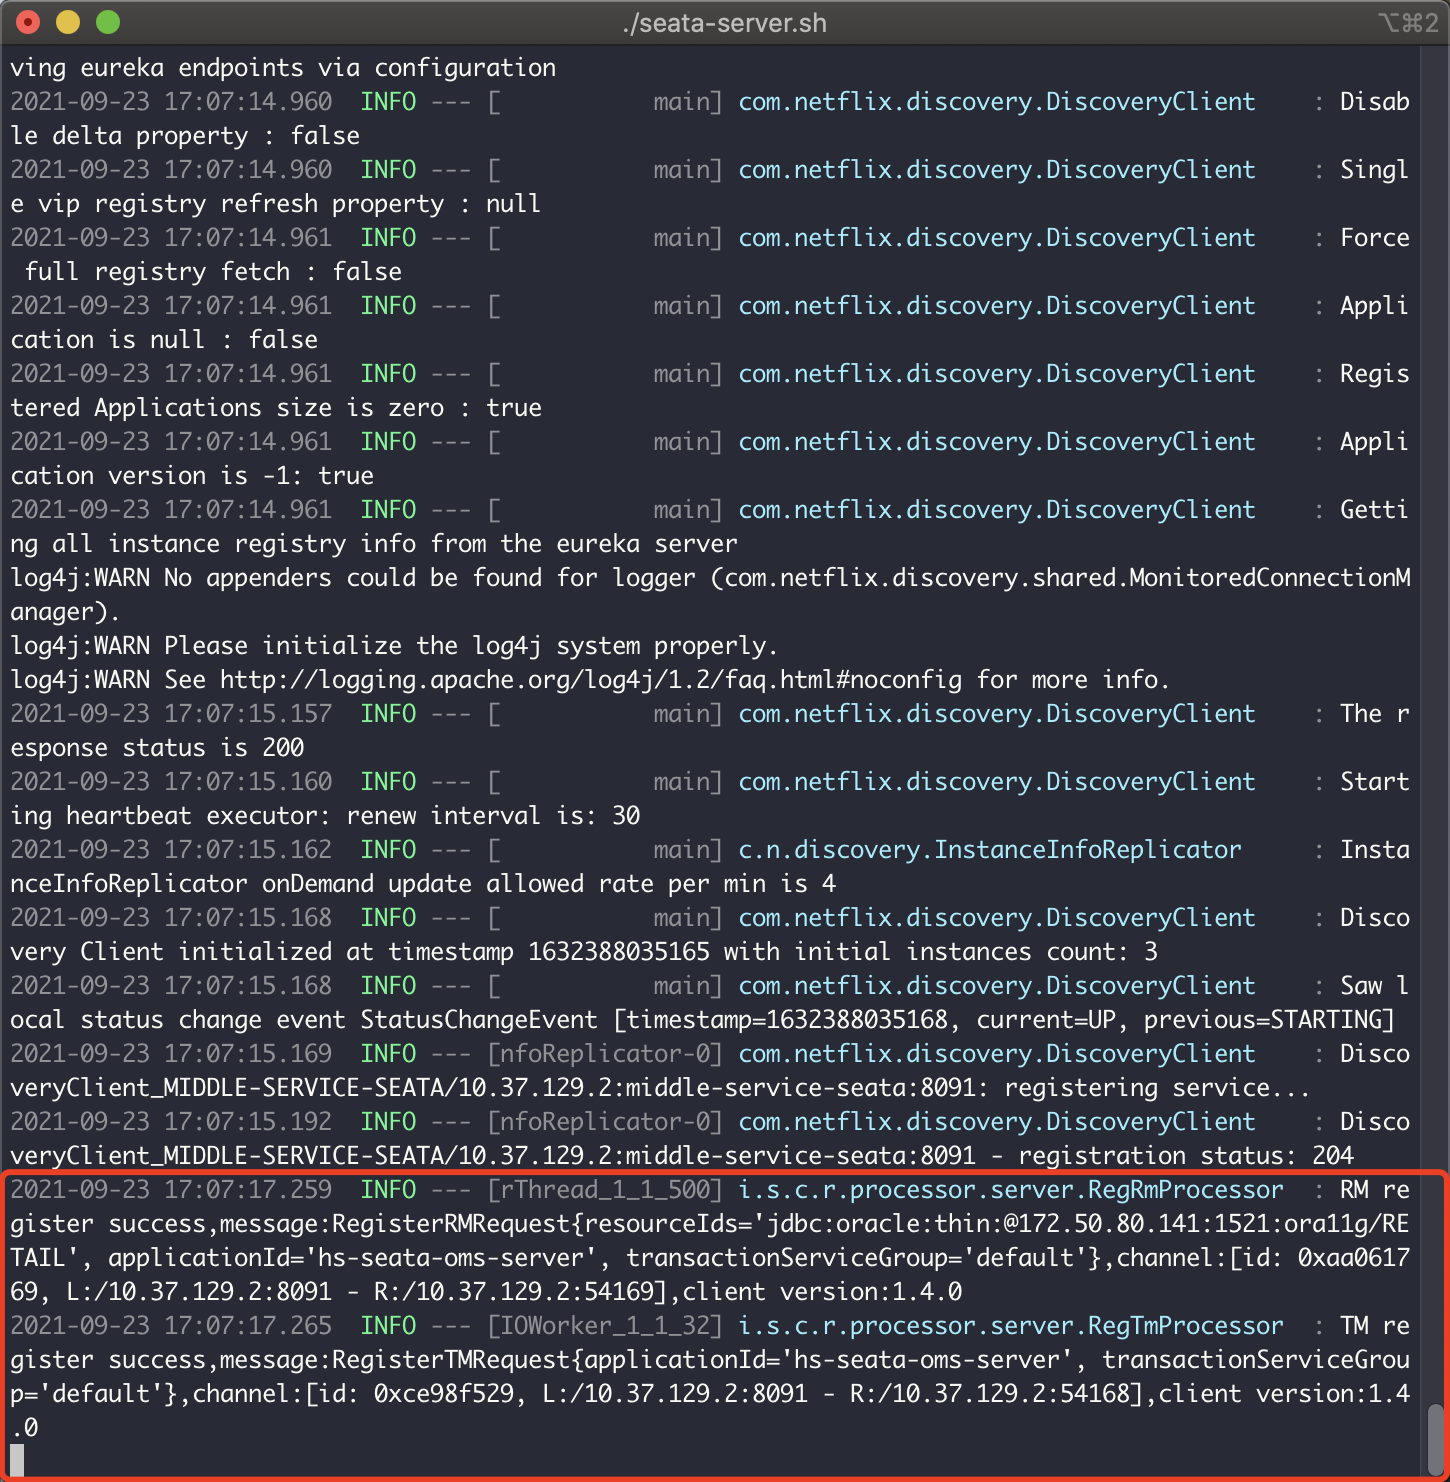
处理 xid 跨传递以及全局异常捕获的问题
xid 无法传递的话会出现跨服务事务 id 不一样的问题,导致无法全局回滚,
原理就是
服务 A 调用 -- > 服务 B
服务 A将 xid 放入 header 中,服务 B使用拦截器将 xid 放到上下文
注意,springcloud alibaba 那套才有自带处理 xid 传递的方案,其它架构参考源码处理,下面贴一下我的处理办法吧,仅供参考

feign 拦截器添加xid 判断,如果存在将 xid 放入到header 中
import com.icsshs.xxxx.common.pojo.NonRequestAttributes;
import feign.RequestInterceptor;
import feign.RequestTemplate;
import io.seata.core.context.RootContext;
import org.apache.commons.lang3.StringUtils;
import org.springframework.context.annotation.Configuration;
import org.springframework.web.context.request.RequestAttributes;
import org.springframework.web.context.request.RequestContextHolder;
import org.springframework.web.context.request.ServletRequestAttributes;

import javax.servlet.http.HttpServletRequest;
import java.util.Enumeration;
import java.util.LinkedHashMap;
import java.util.Map;

/**
 * feign 拦截器
 * 1、传递 request
 * 2、seata xid 传递
 *
 * @author zhongzm
 */
@Configuration
public class FeignInterceptor implements RequestInterceptor {

    private final String AUTHORIZATION_HEADER = "Authorization";

    private final String BEARER_TOKEN_TYPE = "Bearer";

    @Override
    public void apply(RequestTemplate requestTemplate) {
        RequestAttributes requestAttributes = RequestContextHolder.getRequestAttributes();
        if (requestAttributes != null) {
            if (requestAttributes instanceof ServletRequestAttributes) {
                HttpServletRequest request = ((ServletRequestAttributes) requestAttributes).getRequest();
                Map<String, String> headers = getHeaders(request);
                for (String headerName : headers.keySet()) {
                    requestTemplate.header(headerName, getHeaders(request).get(headerName));
                }
            } else if (requestAttributes instanceof NonRequestAttributes) {
                String authorization = String.valueOf(requestAttributes.getAttribute(AUTHORIZATION_HEADER, 0));
                requestTemplate.header(AUTHORIZATION_HEADER, authorization);
            }
        }
    }

    private Map<String, String> getHeaders(HttpServletRequest request) {
        Map<String, String> map = new LinkedHashMap<>();
        Enumeration<String> enumeration = request.getHeaderNames();
        while (enumeration.hasMoreElements()) {
            String key = enumeration.nextElement();
            String value = request.getHeader(key);
            map.put(key, value);
        }
        //全局事务判断是否存在 xid,通过 header 传递
        String xid = RootContext.getXID();
        if (StringUtils.isNotEmpty(xid)) {
            map.put(RootContext.KEY_XID, xid);
        }
        return map;
    }

}
添加 mvc 适配器,将 seata 源码的TransactionPropagationIntercepter添加到拦截器中
import io.seata.integration.http.TransactionPropagationIntercepter;
import org.springframework.context.annotation.Configuration;
import org.springframework.web.servlet.config.annotation.InterceptorRegistry;
import org.springframework.web.servlet.config.annotation.WebMvcConfigurer;

/**
 * Springmvc Intercepter.
 *
 * @author pgy
 * @date 2021/9/29 5:54 下午
 **/
@Configuration
public class MvcConfigurer implements WebMvcConfigurer {

    /**
     * 添加拦截器
     *
     * @param registry
     */
    @Override
    public void addInterceptors(InterceptorRegistry registry) {
        //seata事务传递拦截器
        registry.addInterceptor(new TransactionPropagationIntercepter());
    }

}
然后seata 和全局异常也有冲突,不清楚是我配置的问题还是官方就有这个问题,我这边的处理方案是再全局异常的地方手动添加回滚,
可以参考官方的异常处理方案 io.seata.integration.http.HttpHandlerExceptionResolver
下面是我们的处理方案,这边我是手动回滚
 /**
     * 捕获运行时异常
     *
     * @param req
     * @param e
     * @return
     * @throws Exception
     */
    @ExceptionHandler(value = RuntimeException.class)
    @ResponseBody
    public HsResponse runtimeExceptionHandler(HttpServletRequest req,
                                              Exception e) throws Exception {
        String errorMsg = e.getMessage();
        //RuntimeException判断是否开启全局事务,然后手动回滚
        if (RootContext.inGlobalTransaction()) {
            GlobalTransactionContext.reload(RootContext.getXID()).rollback();
            XidResource.cleanXid(RootContext.getXID());
        }
        logger.error(ExceptionUtils.getFullStackTrace(e));
        return new HsResponse().error(errorMsg);
    }
最后如果是公共模块记得再项目启动的时候导入配置
@EnableEurekaClient
@EnableFeignClients
@ImportAutoConfiguration(value = {
        com.icsshs.xxxx.common.config.GlobalExceptionHandler.class,
        com.icsshs.xxxx.common.config.MvcConfigurer.class,})
@SpringBootApplication
public class XxxxxxxxxxApplication {

    public static void main(String[] args) {
        SpringApplication.run(XxxxxxxxxxxxApplication.class, args);
    }

}

 浙公网安备 33010602011771号