SpringBoot | 第三十章:Spring-data-jpa的集成和使用
前言
在前面的第九章:Mybatis-plus的集成和使用章节中,介绍了使用
ORM框架mybatis-plus进行数据库的访问。今天,我们来简单学习下如何使用spring-data-jpa进行数据库的访问。由于本人未使用过jpa,也是趁着写博文的机会查阅了相关资料下,有错误的地方还望指出!
一点知识
何为JPA
JPA是Java Persistence API的简写,是Sun官方提出的一种ORM规范!
对于Sun官网而言,
一是想简化现有Java EE和Java SE应用开发工作。
二是想整合ORM技术,实现天下归一。
对于JPA规范,都在包路径:javax.persistence.*下,像一些常用的如:@Entity、@Id及@Transient都在此路径下。这些也是一些现在市面上常用的ORM一些约定俗成的注解了。
简单来说,JPA是一套规范。所以使用Jpa的一个好处是,可以更换实现而不必改动太多代码。
何为Sping-data-jpa
Spring Data JPA是Spring基于Hibernate开发的一个JPA框架。可以极大的简化JPA的写法,可以在几乎不用写具体代码的情况下,实现对数据的访问和操作。除了CRUD外,还包括如分页、排序等一些常用的功能。
Spring Data JPA提供的接口,也是Spring Data JPA的核心概念:
Repository:最顶层的接口,是一个空的接口,目的是为了统一所有Repository的类型,且能让组件扫描的时候自动识别。CrudRepository:是Repository的子接口,提供CRUD的功能PagingAndSortingRepository:是CrudRepository的子接口,添加分页和排序的功能JpaRepository:是PagingAndSortingRepository的子接口,增加了一些实用的功能,比如:批量操3作等。JpaSpecificationExecutor:用来做负责查询的接口Specification:是Spring Data JPA提供的一个查询规范,要做复杂的查询,只需围绕这个规范来设置查询条件即可。
题外话:刚开始,其实我看mybatis提供的都差不多,最让我觉得神奇的是:可以通过方法命名规则进行相关数据库操作,这个确实可以减少很多代码的编写。原本使用Mybatis-plus新增一个自定义方法,需要使用通用查询模版EntityWrapper进行相应的操作的
其中,相关命名规范如下:
| 关键字 | 方法命名 | sql where字句 |
|---|---|---|
| And | findByNameAndPwd | where name= ? and pwd =? |
| Or | findByNameOrSex | where name= ? or sex=? |
| Is,Equals | findById,findByIdEquals | where id= ? |
| Between | findByIdBetween | where id between ? and ? |
| LessThan | findByIdLessThan | where id < ? |
| LessThanEquals | findByIdLessThanEquals | where id <= ? |
| GreaterThan | findByIdGreaterThan | where id > ? |
| GreaterThanEquals | findByIdGreaterThanEquals | where id > = ? |
| After | findByIdAfter | where id > ? |
| Before | findByIdBefore | where id < ? |
| IsNull | findByNameIsNull | where name is null |
| isNotNull,NotNull | findByNameNotNull | where name is not null |
| Like | findByNameLike | where name like ? |
| NotLike | findByNameNotLike | where name not like ? |
| StartingWith | findByNameStartingWith | where name like '?%' |
| EndingWith | findByNameEndingWith | where name like '%?' |
| Containing | findByNameContaining | where name like '%?%' |
| OrderBy | findByIdOrderByXDesc | where id=? order by x desc |
| Not | findByNameNot | where name <> ? |
| In | findByIdIn(Collection<?> c) | where id in (?) |
| NotIn | findByIdNotIn(Collection<?> c) | where id not in (?) |
| True | findByAaaTue | where aaa = true |
| False | findByAaaFalse | where aaa = false |
| IgnoreCase | findByNameIgnoreCase | where UPPER(name)=UPPER(?) |
这个确实,够强大!但查询添加一多,是不是这个方法名就也很长了,(┬_┬)
SpringBoot集成Spring-data-jpa
本示例,使用druid(连接池)+mysql进行演示。同时以User表举例:
CREATE TABLE `user` (
  `id` bigint(20) unsigned NOT NULL AUTO_INCREMENT COMMENT '唯一标示',
  `code` varchar(20) DEFAULT NULL COMMENT '编码',
  `name` varchar(64) DEFAULT NULL COMMENT '名称',
  `status` char(1) DEFAULT '1' COMMENT '状态 1启用 0 停用',
  `gmt_create` datetime DEFAULT CURRENT_TIMESTAMP COMMENT '创建时间',
  `gmt_modified` datetime DEFAULT CURRENT_TIMESTAMP ON UPDATE CURRENT_TIMESTAMP COMMENT '修改时间'
) ENGINE=InnoDB DEFAULT CHARSET=utf8;
题外话:虽然也提供了自动根据实体创建表的功能,但一般上开发应该不会这么创建吧。因为表结构一般都需要经过评审的,评审后就创建好了。。
0.引入pom依赖
 <!-- 引入jpa依赖 -->
        <dependency>
            <groupId>org.springframework.boot</groupId>
            <artifactId>spring-boot-starter-data-jpa</artifactId>
        </dependency>
        <!--druid -->
        <dependency>
           <groupId>com.alibaba</groupId>
           <artifactId>druid-spring-boot-starter</artifactId>
           <version>1.1.10</version>
        </dependency>
       <!-- mysql驱动 -->
        <dependency>
            <groupId>mysql</groupId>
            <artifactId>mysql-connector-java</artifactId>
        </dependency>
        <dependency>
            <groupId>org.springframework.boot</groupId>
            <artifactId>spring-boot-starter-web</artifactId>
        </dependency>
1.编写User的实体类。
/**
 * 用户实体
 * @author oKong
 *
 */
@Entity
@Data
@Builder
@NoArgsConstructor
@AllArgsConstructor
@EntityListeners(AuditingEntityListener.class)
//@Table(name="CUSTOM_USER")//自定义表名
public class User implements Serializable{
     /**
     *
     */
    private static final long serialVersionUID = -3752294262021766827L;
    /**
     * 唯一标示
     */
    @Id
    @GeneratedValue(strategy = GenerationType.IDENTITY)
    private Long id;
    /**
     * 编码
     */
    private String code;
    /**
     * 名称
     */
    private String name;

    /**
     * 创建时间
     */
    @CreatedDate //自动创建
    private Date gmtCreate;
    /**
     * 修改时间
     */
    @LastModifiedDate //有修改时 会自动时间
    private Date gmtModified;
}
这里需要注意,在使用mybatis-plus时,在《Mybatis-Plus使用全解》时,介绍过可如何设置公共字段自动填充功能,比如创建时间和修改时间,创建人和修改人等等,都是可以统一进行赋值的。而在spring-data-jap中,是使用@CreatedDate和@LastModifiedDate标记的,同时,需要在实体类上,加入@EntityListeners(AuditingEntityListener.class),然后在启动类上加入注解@EnableJpaAuditing,这样就实现了类似公共字段自动填充功能了。
2.创建资源类,这里习惯了命名为dao了,所以还是以Dao进行结尾。
/**
 * 资源类
 * @author oKong
 *
 */
public interface UserDao extends PagingAndSortingRepository<User,Long>{

	List<User> findById(Long id);

	//使用自动命名规则进行查询服务
	List<User> findByCodeAndName(String code,String name);

	//使用@Query进行 自定义sql编写
	//nativeQuery=true,正常的sql语法
	//负责是hsql语法
	@Query(value="select * from user where code = ?1",nativeQuery=true)
	List<User> queryByCode(String code);

	//分页
	Page<User> findByCode(String code,Pageable pageable);
}
注意:这里直接继承了PagingAndSortingRepository,其本身实现了分页功能,还可以按需要继承CrudRepository或者JpaRepository等。而且,占位符为:?+具体的参数索引值
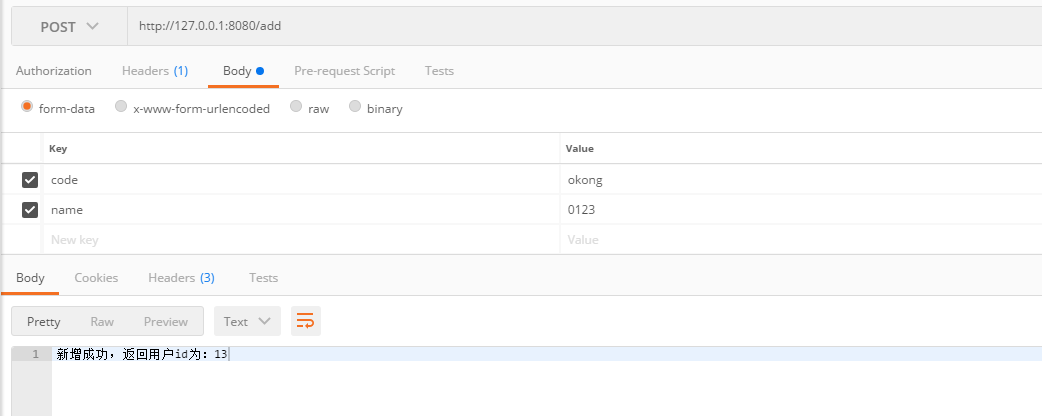
3.创建控制层,引入资源类。示例了一些常用的操作,包括分页,查询、删除、新增等等。
/**
 * 测试类
 * @author oKong
 *
 */
@RestController
@Slf4j
public class DemoController {

    @Autowired
    UserDao userDao;

    @PostMapping("/add")
    public String addUser(User user) {
        log.info("新增用户:{}", user);
        user = userDao.save(user);
        return "新增成功,返回用户id为:" + user.getId();
    }

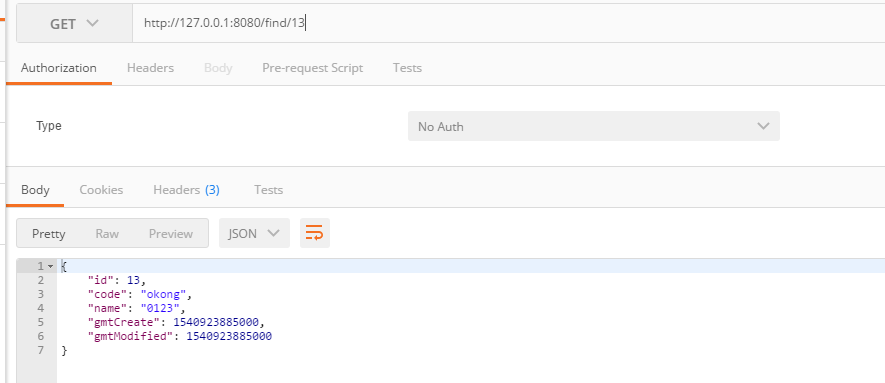
    @GetMapping("/find/{id}")
    public User findUser(@PathVariable Long id) {
        log.info("查找用户ID:{}", id);
        return userDao.findOne(id);
    }

    @PostMapping("/del/{id}")
    public String delUser(Long id) {
        log.info("删除用户ID:{}", id);
        userDao.delete(id);
        return "用户id为:" + id + ",已被删除!";
    }

    @GetMapping("/find/{code}/{name}")
    public List<User> findUserByCodeAndName(@PathVariable("code") String code, @PathVariable("name")String name) {
        log.info("命名规则方式,查找用户:编码:{},名称:{}", code, name);
        return userDao.findByCodeAndName(code, name);
    }

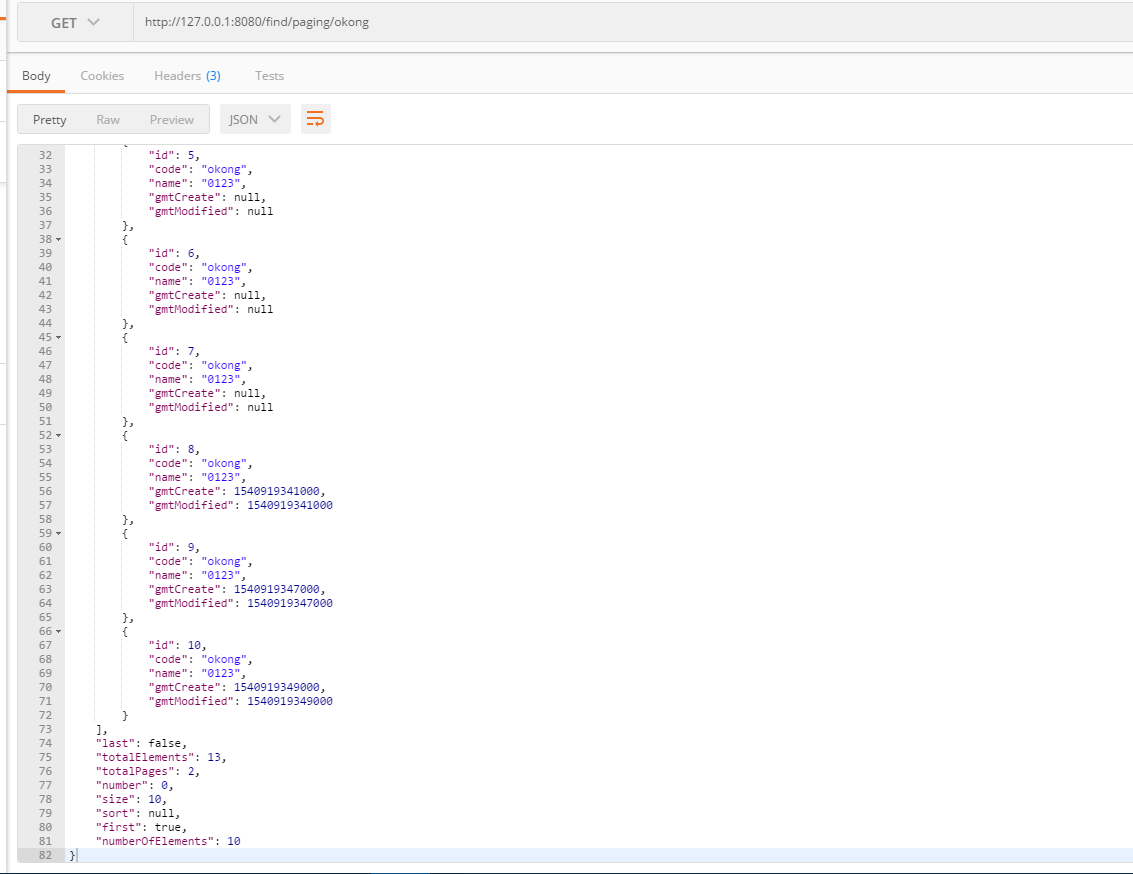
    @GetMapping("/find/paging/{code}")
    public Page<User> findUserByCodePagin(@PathVariable("code") String code){
        log.info("分页模式,查找用户:编码:{}", code);
        //这里注意 page是从0开始的
        return userDao.findByCode(code, new PageRequest(0,10));
    }

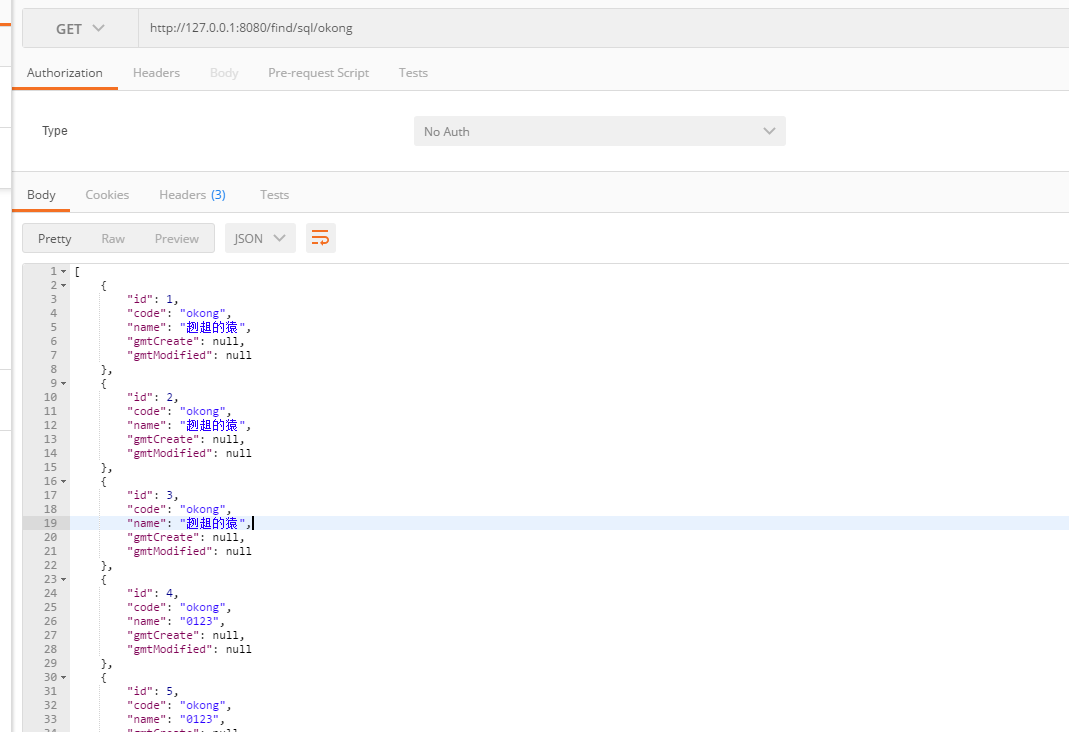
    @GetMapping("/find/sql/{code}")
    public List<User> findUserByQuerySql(@PathVariable("code") String code){
        log.info("自定义sql方式,查找用户:编码:{}", code);

        return userDao.queryByCode(code);
    }
}
4.配置文件添加相关数据源及jpa相关信息。这里使用druid作为数据连接池。
#数据源设置
spring.datasource.url=jdbc:mysql://127.0.0.1:3306/learning?useUnicode=true&characterEncoding=UTF-8
spring.datasource.username=root
spring.datasource.password=123456
#以上为必须的
#选填
spring.datasource.druid.initial-size=5
# maxPoolSize
spring.datasource.druid.max-active=20
# minPoolSize
spring.datasource.druid.min-idle=5

#配置获取连接等待超时的时间
spring.datasource.druid.max-wait=60000
# 校验
spring.datasource.druid.validation-query=SELECT 'x'

spring.datasource.druid.test-on-borrow=false
spring.datasource.druid.test-on-return=false
spring.datasource.druid.test-while-idle=true
#配置间隔多久才进行一次检测,检测需要关闭的空闲连接,单位是毫秒
spring.datasource.druid.time-between-eviction-runs-millis=60000
#配置一个连接在池中最小生存的时间,单位是毫秒
spring.datasource.druid.min-evictable-idle-time-millis=300000

#jpa相关配置
# 显示sql 但不会显示具体的操作值 可以替换成log4jdbc
spring.jpa.show-sql=true
5.编写启动类。
/**
 * jpa集成
 *
 * @author oKong
 *
 */
@SpringBootApplication
@EnableJpaAuditing
@Slf4j
public class JpaApplication {

    public static void main(String[] args) throws Exception {
        SpringApplication.run(JpaApplication.class, args);
        log.info("spring-boot-jpa-chapter30启动!");
    }

}
6.启动服务。然后使用postman进行访问(关于postman相关用法,可以查看:第十五章:基于Postman的RESTful接口测试)。


会返回相关信息,如总记录数,总页码数等等。
控制台输出:
Hibernate: select user0_.id as id1_0_, user0_.code as code2_0_, user0_.gmt_create as gmt_crea3_0_, user0_.gmt_modified as gmt_modi4_0_, user0_.name as name5_0_ from user user0_ where user0_.code=? limit ?
Hibernate: select count(user0_.id) as col_0_0_ from user user0_ where user0_.code=?
- 自定义sql查找:http://127.0.0.1:8080/find/sql/okong

控制台输出:
Hibernate: select * from user where code = ?
参考资料
总结
本章节主要介绍了
Spring-data-jpa的集成和简单的使用。并未深入了解,想了解更多细节,比如排序、@Param使用等等,可去官网查阅下。待有机会深入学习后,再写一篇关于JPA的提高篇吧使用起来其实也蛮简单的,就是可能更开始接触,不是很习惯到时真的,有机会一些小的项目或者demo项目,到时可以使用下,切身体验下
最后
目前互联网上很多大佬都有
SpringBoot系列教程,如有雷同,请多多包涵了。原创不易,码字不易,还希望大家多多支持。若文中有所错误之处,还望提出,谢谢。
老生常谈
- 个人QQ:
499452441 - 微信公众号:
lqdevOps

个人博客:http://blog.lqdev.cn
完整示例:https://github.com/xie19900123/spring-boot-learning/tree/master/chapter-30
作者:oKong | 趔趄的猿
出处:blog.lqdev.cn
本文版权归作者和博客园共有,欢迎转载,但未经作者同意必须保留此段声明,且在文章页面明显位置给出原文连接,否则保留追究法律责任的权利。
本文如对您有帮助,还请多帮 【推荐】 下此文。
如果喜欢我的文章,请关注我的公众号


 浙公网安备 33010602011771号