neo4j实现疾病知识图谱实战
1. neo4j安装
linux下安装,直接创建脚本Neo4j_setup.sh安装脚本,执行安装即可,安装完成后,打开浏览器http:// localhost:7474,默认用户名/密码为neo4j/neo4j,首次登录需要修改密码
#!/bin/bash

#neo4j 安装

#1)设置hosts绑定

IP=`ifconfig|sed -n 2p|awk '{print $2}'|cut -d ":" -f2`

echo "$IP neo4j" >>/etc/hosts

#2)下载安装neo4j

cd /home/tools

wget -c https://neo4j.com/artifact.php?name=neo4j-community-3.4.14-unix.tar.gz

tar zxvf artifact.php\?name\=neo4j-community-3.4.14-unix.tar.gz -C /usr/local/

ln -s /usr/local/neo4j-community-3.4.14 /usr/local/neo4j-community

#3)配置环境变量

cat >/etc/profile.d/neo4j <<EOF

export NEO4J_HOME=/usr/local/neo4j

export PATH=\$PATH:\$NEO4J_HOME/bin

EOF

source /etc/profile.d/neo4j

#4) 配置资源

sed -i 's/#dbms.memory.heap.initial_size=512m/dbms.memory.heap.initial_size=2048m/g' /usr/local/neo4j-community/conf/neo4j.conf

sed -i 's/#dbms.memory.heap.max_size=512m/dbms.memory.heap.max_size=2048m/g' /usr/local/neo4j-community/conf/neo4j.conf

sed -i 's/#dbms.connectors.default_listen_address=0.0.0.0/dbms.connectors.default_listen_address=neo4j/g' /usr/local/neo4j-community/conf/neo4j.conf

#5) 配置neo4j启动脚本

cat >/etc/init.d/neo4j <<EOF

#!/bin/bash

### BEGIN REDHAT INFO

# chkconfig: 2345 99 20

# description: Neo4j Graph Database server

SCRIPTNAME=\$0

NEO4J_CONF=/usr/local/neo4j-community/conf

NEO4J_HOME=/usr/local/neo4j-community

NEO_USER=root

NEO4J_ULIMIT_NOFILE=60000

PATH=/sbin:/usr/sbin:/bin:/usr/bin

NAME=neo4j

DAEMON=\${NEO4J_HOME}/bin/\${NAME}

PIDDIR=\${NEO4J_HOME}/run

PIDFILE=\${PIDDIR}/neo4j.pid

SCRIPTNAME=/etc/init.d/\${NAME}

SYSTEMCTL_SKIP_REDIRECT=1

[ -x "\$DAEMON" ] || exit 0

#[ -r \${NEO4J_CONF}/\${NAME}.conf ] && . \${NEO4J_CONF}/\${NAME}.conf

[ -n "\${NEO_USER}" ] || NEO_USER=\${NAME}

# Debian distros and SUSE

has_lsb_init()

{

  test -f "/lib/lsb/init-functions"

}

# RedHat/Centos distros

has_init()

{

  test -f "/etc/init.d/functions"

}

if has_lsb_init ; then

  . /lib/lsb/init-functions

elif has_init ; then

  . /etc/init.d/functions

else

  echo "Error: your platform is not supported by \${NAME}" >&2

  exit 1

fi

do_start()

{

  do_ulimit

  [ -d "\${PIDDIR}" ] || mkdir -p "\${PIDDIR}"

  chown "\${NEO_USER}:" "\${PIDDIR}"

  if has_lsb_init ; then

    start-stop-daemon --chuid \${NEO_USER} --start --quiet --oknodo --pidfile \${PIDFILE} --exec \${DAEMON} -- start

  else

    daemon --user="\${NEO_USER}" --pidfile="\${PIDFILE}" "\${DAEMON} start > /dev/null 2>&1 &"

  fi

}

do_stop()

{

  \${DAEMON} stop

}

do_status()

{

  if has_lsb_init ; then

    status_of_proc -p "\${PIDFILE}" "\${DAEMON}" "\${NAME}"

  else

    status -p "\${PIDFILE}" "\${NAME}"

  fi

}

do_ulimit()

{

  if [ -n "\${NEO4J_ULIMIT_NOFILE}" ]; then

    ulimit -n "\${NEO4J_ULIMIT_NOFILE}"

  fi

}

case "\$1" in

  start)

    do_start

    ;;

  stop)

    do_stop

    ;;

  status)

    do_status

    ;;

  restart|force-reload)

    do_stop && do_start

    ;;

  *)

    echo "Usage: \$SCRIPTNAME {start|stop|status|restart|force-reload}" >&2

    exit 3

    ;;

esac

EOF

#6) 设置权限

chmod +x /etc/init.d/neo4j

#7) 启动neo4j

service neo4j start

#8) 配置开机自启动

chkconfig neo4j on

echo 'Neo4j install done'
2. neo4j图数据库简介
Neo4j是一款是由java语言实现的图数据库,图形数据库将数据以图的数据结构进行存储和管理,并且能够以高度可问的方式优雅地表示任何种类的数据,而Neo4j是基于属性图模型(Property Graph Model)的数据库
在属性图中存在如下元素:
1、 实体(Entity)
a) 节点(Node)
b) 关系(Relationship)
2、 边/路径(Path)
3、 记号(Token)
a) 标签(Label)
b) 关系类型(Relationship Type)
c) 属性key(Property Key)
4、 属性(Property)
参考https://www.cnblogs.com/jpfss/p/11268835.html
3. neo4j基本语法
3.1 Cypher
neo4j的查询语言为Cypher,是一个描述性的图形查询语言
说明:()内代表节点,[]代表关系,->关系方向,{}代表属性,:后面跟记号如节点的标签、关系的类型
节点:(Variable:Lable{Key1:Value1,Key2,Value2,...})
关系:[Variable:RelationshipType{Key1:Value1,Key2:Value2,...}]
3.2 语法
l 新节点、新关系、无属性
create ()-[]->()
l 新节点、新关系、有属性
create (:{})-[:{}]->(:{})
l 已有节点、新关系、无属性
MATCH (:),(:) create ()-[:]->()
先用match找到两个节点,再给节点添加关系(如果不用match,则会新建节点)
另外,同时执行时(一个分号内),前面节点会在新建关系时被识别(不用match),否则,会认为是新的节点
新节点可以与已有节点名称、标签、属性都相同(如同年同月同日生同名同性别的人),但是会自动生成唯一标识id以区分
l merge
merge(:{})
可以看成是match和create的合体,找不到则创建节点,找到则更新节点
l 同时匹配两标签
match (n) where any(label in labels(n) WHERE label in ['label1', 'label2']) return n
4. 实战应用
4.1 诊断归一知识图谱
create (disease1:顶级节点:diagnosis{name:'疾病名称'})

create (disease2:顶级节点:diagnosis{name:'呼吸系统疾病名称'})

create (disease2)-[:belong_to]->(disease1)


create (standard01:标准词:diagnosis{name:'间质性肺疾病'})

create (standard02:标准词:diagnosis{name:'矽肺'})

create (standard1:标准词:diagnosis{name:'矽肺[硅肺]壹期'})

create (standard2:标准词:diagnosis{name:'矽肺[硅肺]贰期'})

create (standard3:标准词:diagnosis{name:'矽肺[硅肺]叁期'})

create (standard01)-[:belong_to]->(disease2)

create (standard02)-[:belong_to]->(standard01)

create (standard1)-[:belong_to]->(standard02)

create (standard2)-[:belong_to]->(standard02)

create (standard3)-[:belong_to]->(standard02)


create (origin1:原始词:diagnosis{name:'硅肺'})

create (origin2:原始词:diagnosis{name:'硅沉着肺'})

create (origin3:原始词:diagnosis{name:'矽肺[硅沉着病]'})

create (origin4:原始词:diagnosis{name:'矽肺(硅沉着病)'})

create (origin5:原始词:diagnosis{name:'矽肺(硅肺)'})

create (origin6:原始词:diagnosis{name:'矽肺Ⅰ期'})

create (origin7:原始词:diagnosis{name:'矽肺(硅肺)I期'})

create (origin8:原始词:diagnosis{name:'矽肺(I期)'})

create (origin9:原始词:diagnosis{name:'矽肺(II期)'})

create (origin10:原始词:diagnosis{name:'矽肺(硅肺)Ⅱ期'})

create (origin11:原始词:diagnosis{name:'矽肺(硅肺)Ⅲ期'})

create (origin1)-[:standardized]->(standard02)

create (origin2)-[:standardized]->(standard02)

create (origin3)-[:standardized]->(standard02)

create (origin4)-[:standardized]->(standard02)

create (origin5)-[:standardized]->(standard02)

create (origin6)-[:standardized]->(standard1)

create (origin7)-[:standardized]->(standard1)

create (origin8)-[:standardized]->(standard1)

create (origin9)-[:standardized]->(standard2)

create (origin10)-[:standardized]->(standard2)

create (origin11)-[:standardized]->(standard3)
4.2 图形效果

5. Python实现输入与查询
5.1 Python环境
Anaconda官网下载安装即可,Anaconda包含了conda、Python在内的超过180个科学包及其依赖项,内置spyder、jupyter调试工具
5.2 读取csv/excel
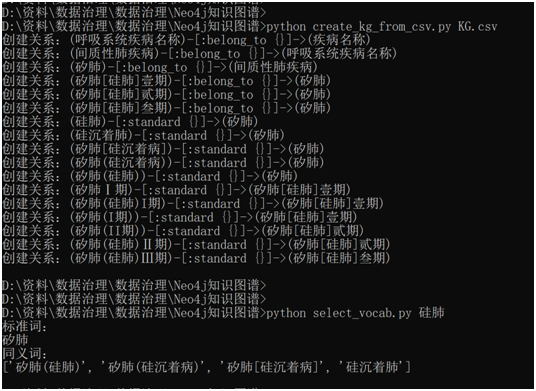
# -*- coding: utf-8 -*-

"""

Created on Wed Sep 30 10:29:49 2020

@author:Quentin

"""


from py2neo import Graph, Node, Relationship,NodeMatcher

import pandas as pd

import re

import os

import sys


class CreateGraph:

    def __init__(self,csv_name):

        #当前目录

        cur_dir = '/'.join(os.path.abspath('__file__').split('/')[:-1])

        self.data_path = os.path.join(cur_dir, csv_name)

        self.graph = Graph("http://192.168.31.240:7474", username="neo4j", password="123456")


    def read_file(self):

        all_data = pd.read_csv(self.data_path, encoding='utf-8').loc[:, :].values

        return all_data


    def create_graph(self):

        all_data = self.read_file()

        top_node = 'undefined'

        matcher = NodeMatcher(self.graph)

        if (all_data[0][1] == '顶级节点'):

            top_node = all_data[0][0]


        #创建节点

        for row_data in all_data:

            #判断node是否存在

            node_match =  matcher.match(row_data[1],name = row_data[0],topNode = top_node).first()

            if node_match is None:

                node = Node(row_data[1],name = row_data[0],topNode = top_node)

                self.graph.create(node)

                print('创建新节点:' + str(node).encode('utf-8').decode('unicode_escape'))


        #创建关系

        for row_data in all_data:

            if len(str(row_data[2])) > 0 and str(row_data[2]) != 'nan':

                node1 = matcher.match(row_data[1],name = row_data[0],topNode = top_node).first()

                node2 = self.node_std_or_top(matcher,row_data[2],top_node)

                if  node1 is not None and node2 is not None:

                    if str(row_data[1]) == '原始词':

                        relation = Relationship(node1,'standard',node2)

                    else:

                        relation = Relationship(node1,'belong_to',node2)

                    self.graph.create(relation)

                    print('创建关系:' + str(relation))


    def node_std_or_top(self,matcher,name,topNode):

        node = matcher.match('标准词',name = name,topNode = topNode).first()

        if  node is  None :

            node = matcher.match('顶级节点',name = name,topNode = topNode).first()

        return node


if __name__ == "__main__":

    str_csv = sys.argv[1]

    handler = CreateGraph(str_csv)

    handler.create_graph()
5.3 词表查找
# -*- coding: utf-8 -*-

"""

Created on Wed Sep 30 10:29:49 2020

@author: Quentin

"""


from py2neo import Graph, Node, Relationship,NodeMatcher

import pandas as pd

import re

import os

import sys


class SelectStandard:

    def __init__(self):

        self.graph = Graph("http://192.168.31.240:7474", username="neo4j", password="123456")


    #查询上级词(标准词)

    def select_upper_vocab(self,orig,top_node='',label='原始词'):

        """

        查找输入词的上级节点

        Parameters

        ----------

        orig : 输入词

             原始词、标准词都可

        top_node : 顶级节点, optional

             The default is ''.

        label : label类型,原始词、标准词, optional

             The default is '原始词'.


        Returns

        -------

        返回上级节点,字符型

        """

        if top_node == '':

            query = "match(n:%s)-[r]->(m) where n.name = '%s' return m.name" %(label,orig)

            result = self.graph.run(query).to_ndarray()

        else:

            query = "match(n:%s)-[r]->(m) where n.name = '%s' and n.topNode = '%s' return m.name" %(label,orig,top_node)

            result = self.graph.run(query).to_ndarray()

        if len(result) > 0:

            return result[0][0]

        else:

            return '无'


    #查询同级词(原始词)

    def select_equal_vocab(self,orig,top_node='',label='原始词'):

        """

        查找输入词的同级节点


        Parameters

        ----------

        orig : 输入词

            原始词、标准词都可

        top_node : 顶级节点, optional

             The default is ''.

        label : label类型,原始词、标准词, optional

             The default is '原始词'.


        Returns

        -------

        返回同级节点,数组


        """

        if top_node == '':

            query = "match(n1:%s)-[r1]->(m1) where n1.name ='%s' match(n2:%s)-[r2]->(m1) where n2.name <> '%s'  return n2.name" %(label,orig,label,orig)

            result = self.graph.run(query).to_ndarray()

        else:

            query = "match(n1:%s)-[r1]->(m1) where n1.name ='%s' and n1.topNode = '%s' match(n2:%s)-[r2]->(m1) where n2.name <> '%s' and n2.topNode = '%s' return n2.name" %(label,orig,top_node,label,orig,top_node)

            result = self.graph.run(query).to_ndarray()

        if len(result) > 0:

            rs_arr = []

            for rs in result:

                rs_arr.append(rs[0])

            return rs_arr

        else:

            return '无'


if __name__ == "__main__":

    #输入参数

    str_vocab = sys.argv

    upper_vocab_param = ['','','原始词']

    equal_vocab_param = ['','','原始词']

    for i in range(0,min(3,len(str_vocab)-1)):

        upper_vocab_param[i] = str_vocab[i+1]

        equal_vocab_param[i] = str_vocab[i+1]

    #输出结果

    handler = SelectStandard()

    upper_vocab = handler.select_upper_vocab(upper_vocab_param[0],upper_vocab_param[1],upper_vocab_param[2])

    print("标准词:")

    print(upper_vocab)

    equal_vocab = handler.select_equal_vocab(equal_vocab_param[0],equal_vocab_param[1],equal_vocab_param[2])

    print("同义词:")

    print(equal_vocab)
5.4 输出结果