
Spring第3天
学习目标
一、银行转账功能实现【理解】
转账功能实现
需求描述
- zs给ls转账100,使用事务保证转账业务的功能正常
- 本功能的目的,是为了说明AOP的作用和原理
功能分析
实现流程
实现步骤
-
准备工作:
创建Maven项目,导入依赖
-
准备事务管理的工具类
-
准备dao、Service层代码
- 在测试类中,调用Service的转账方法
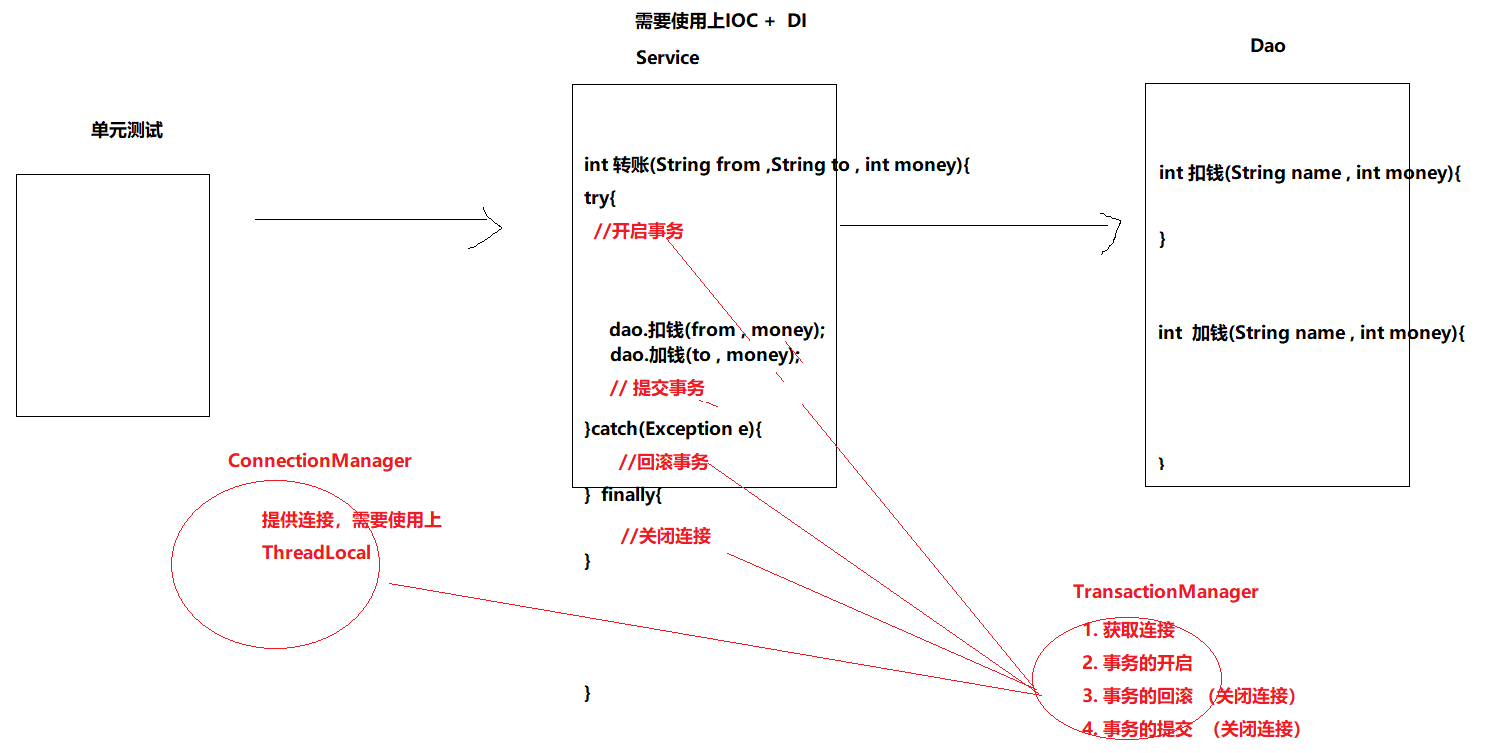
transfer(付款人,收款人,转账金额) - 在Service中:
public void transfer(付款人, 收款人 , 金额){ try{ 开启事务 dao.扣钱(付款人 , 金额); dao.加钱(收款人 , 金额); 提交事务 }catch(Exception e){ 有异常就回滚事务 } }- 在dao中:执行SQL语句所使用的连接对象
Connection,必须是Service中开启事务的连接
public void kouqian(付款人 , 金额){ runner(连接对象 , sql , ...); } public void jiaqian(付款人 , 金额){ runner(连接对象 , sql , ...); } - 在测试类中,调用Service的转账方法
-
提供Spring的配置文件
-
功能测试
需求实现
1. 准备工作
创建Maven项目,导入依赖
<dependencies>
    <!--MySql驱动-->
    <dependency>
        <groupId>mysql</groupId>
        <artifactId>mysql-connector-java</artifactId>
        <version>5.1.47</version>
    </dependency>
    <!--c3p0-->
    <dependency>
        <groupId>com.mchange</groupId>
        <artifactId>c3p0</artifactId>
        <version>0.9.5.4</version>
    </dependency>
    <!--dbutils-->
    <dependency>
        <groupId>commons-dbutils</groupId>
        <artifactId>commons-dbutils</artifactId>
        <version>1.7</version>
    </dependency>
    <!--spring-->
    <dependency>
        <groupId>org.springframework</groupId>
        <artifactId>spring-context</artifactId>
        <version>5.1.2.RELEASE</version>
    </dependency>
    <!--spring-test-->
    <dependency>
        <groupId>org.springframework</groupId>
        <artifactId>spring-test</artifactId>
        <version>5.1.2.RELEASE</version>
    </dependency>
    <!--junit-->
    <dependency>
        <groupId>junit</groupId>
        <artifactId>junit</artifactId>
        <version>4.12</version>
    </dependency>
</dependencies>
2. 准备事务管理的工具类
TransactionManager:事务管理的工具类,提供了开启事务、提交事务、回滚事务等方法- 注意:需要给这个工具类注入连接池对象dataSource,不要忘记提供一个连接池对象
- 分析:
-
- 这个事务管理的工具类,它需要提供的功能有: 获取连接,关闭连接,开启事务,提交事务,回滚事务
- 以上的这些操作都跟连接对象有关,连接一般是从连接池里面拿的。
- 连接池对象(DataSource) 现在不归咱们管理,由Spring管理
- 在这个事务管理的工具类里面,需要让Spring注入进来连接池对象(DataSource)
- 这个事务管理的工具类还要具备以前的ConnectionManager的功能,所以还需要配合上ThreadLocal,这个主要是为了保证Service层和Dao层使用的是同一个连接。
- 这个事务管理的工具类,需要交给Spring来管理(托管),以便在service层和dao层里面能够直接注入进来。那这样在service层里面就可以开启事务,提交事务、回滚事务,在dao层里面就可以操作数据库了。
-
package com.itheima.util;

import org.springframework.beans.factory.annotation.Autowired;
import org.springframework.stereotype.Component;

import javax.sql.DataSource;
import java.sql.Connection;
import java.sql.SQLException;

/*
    这是包含了事务管理和处理连接的工具类
    事务管理:
        1. 开启事务
        2. 提交事务
        3. 回滚事务
    处理连接:
        1. 获取连接
        2. 关闭连接

    步骤:
        1. 这个类所有的功能都需要用到连接对象,连接对象是从连接池(DataSource)里面拿到的。
        2. 连接池现在是由spring管理着,所以需要让spring把连接池对象(DataSource)给注入进来!
            @Autowired
            private DataSource dataSource;
        3. 要想让spring给这个类注入DataSource对象,那么必须也要把这个类奉献出去,交给spring管理
            同时交给spring管理也是有好处的,未来我们在service层想要开启事务,可以直接问spring要这个类的对象
            想要在dao层使用连接去操作数据库,也可以问spring要这个类的对象。
        4. 为了确保service和dao使用的连接对象是同一个,那么此时就必须要引入ThreadLocal。
            ThreadLocal其实就是一个容器,它可以在同一个线程里面共享数据。
                以下的4个方法调用,没有谁开启子线程,那么可以认为这4个方法调用都是在同一个线程里面执行的!
                为了把A方法产生的一份数据,交到D方法手上,可以传参!一直往下传。
                在A方法,就把这份数据保存到ThreadLocal里面去,然后再D方法里面取出来!
                A ------------->B ---------------->C ----------------->D
 */
@Component
public class TransactionManager {

    private ThreadLocal<Connection> threadLocal = new ThreadLocal<Connection>();


    //让spring把连接池注入进来
    @Autowired
    private DataSource dataSource;

    //======================1. 处理连接===========================

    /**
     * 对外提供连接
     * @return
     */
    public Connection getConn() throws SQLException {
        //1. 从ThreadLocal里面拿连接
        Connection conn = threadLocal.get();

        //2. 判断连接是否有
        if(conn == null){
            //3. 如果ThreadLocal里面没有连接,就从连接池里面拿连接出来
            conn = dataSource.getConnection();

            //4. 把连接对象保存到ThreadLocal里面去
            threadLocal.set(conn);
        }
        //5. 返回连接
        return conn;
    }

    /**
     * 关闭连接
     * @throws SQLException
     */
    public void close() throws SQLException {
        getConn().close();
    }

    //==============================2. 事务管理========================

    /**
     * 开启事务
     * @throws SQLException
     */
    public void startTransaction() throws SQLException {
        getConn().setAutoCommit(false);
    }

    /**
     * 提交事务
     * @throws SQLException
     */
    public void commit() throws SQLException {
        getConn().commit();
    }

    /**
     * 回滚事务
     * @throws SQLException
     */
    public void rollback() throws SQLException {
        getConn().rollback();
    }
}
3. 准备dao、Service层代码
dao层需要注入
QueryRunner和TransactionManagerservice层需要注入
AccountDao和TransactionManager
AccountDao和AccountDaoImpl
package com.itheima.dao;

import java.sql.SQLException;

public interface AccountDao {

    /**
     * 扣钱
     * @param from
     * @param money
     * @return
     */
    int kouqian(String from, int money ) throws SQLException;

    /**
     * 加钱
     * @param to
     * @param money
     * @return
     */
    int jiaqian(String to, int money ) throws SQLException;


}
package com.itheima.dao.impl;

import com.itheima.dao.AccountDao;
import com.itheima.util.TransactionManager;
import org.apache.commons.dbutils.QueryRunner;
import org.springframework.beans.factory.annotation.Autowired;
import org.springframework.stereotype.Repository;

import java.sql.SQLException;

/*
    需求: 操作数据库,完成扣钱和加钱的功能
    步骤:
        1. 需要让spring注入进来QueryRunner对象
            1.1 让spring创建QueryRunner的时候,必须要走无参构造方式创建
                QueryRunner runner  =new QueryRunner()
            1.2 在执行具体的update | query操作的时候,可以在参数里面传递连接
        2. 需要让spring注入进来 TransactionManager,这样就可以得到连接对象了。
        3. 要把这个类交给spring管理
 */
@Repository
public class AccountDaoImpl implements AccountDao {

    //注入进来QueryRunner
    @Autowired
    private QueryRunner runner;

    @Autowired
    private TransactionManager tm;

    /**
     * 扣钱
     * @param from
     * @param money
     */
    public void kouqian(String from, int money) throws SQLException {
        String sql = "update t_account set money = money - ? where name = ?";
        runner.update(tm.getConn() , sql , money  , from);
    }

    /**
     * 加钱
     * @param to
     * @param money
     */
    public void jiaqian(String to, int money) throws SQLException {
        String sql = "update t_account set money = money + ? where name = ?";
        runner.update(tm.getConn() , sql , money  , to);
    }
}
AccountService和AccountServiceImpl
package com.itheima.service;

import java.sql.SQLException;

public interface AccountService {

    /**
     * 转账
     * @param from
     * @param to
     * @param money
     */
    void transfer(String from , String to , int money) throws SQLException;
}
package com.itheima.service.impl;

import com.itheima.dao.AccountDao;
import com.itheima.service.AccountService;
import com.itheima.util.TransactionManager;
import org.springframework.beans.factory.annotation.Autowired;
import org.springframework.stereotype.Service;

import java.sql.SQLException;

/*
    需求: 要调用dao, 使用事务来包裹转账的功能

    步骤:
        1. 要注入进来dao对象 ,才可以调用dao的方法
        2. 要注入TransactionManager对象,才可以使用事务的功能
        3. 要把这个service类交给spring管理

 */

@Service
public class AccountServiceImpl implements AccountService {


    @Autowired
    private AccountDao dao;

    @Autowired
    private TransactionManager tm;

    /**
     * 转账业务
     * @param from
     * @param to
     * @param money
     */
    public void transfer(String from, String to, int money) {

        try {
            //开启事务
            tm.startTransaction();

            //扣钱
            dao.kouqian(from , money);

            int a = 1 / 0 ;

            //加钱
            dao.jiaqian(to , money);

            //提交事务
            tm.commit();
        } catch (SQLException throwables) {
            throwables.printStackTrace();
            try {
                //回滚事务
                tm.rollback();
            } catch (SQLException e) {
                e.printStackTrace();
            }
        }finally {
            try {
                tm.close();
            } catch (SQLException throwables) {
                throwables.printStackTrace();
            }
        }
    }
}
4. 提供Spring的配置文件
- db.properties
driverClass=com.mysql.jdbc.Driver
jdbcUrl=jdbc:mysql://localhost:3306/day41_spring
user=root
password=root
applicationContext.xml
<?xml version="1.0" encoding="UTF-8"?>
<beans xmlns="http://www.springframework.org/schema/beans"
       xmlns:xsi="http://www.w3.org/2001/XMLSchema-instance"
       xmlns:context="http://www.springframework.org/schema/context"
       xsi:schemaLocation="http://www.springframework.org/schema/beans http://www.springframework.org/schema/beans/spring-beans.xsd http://www.springframework.org/schema/context http://www.springframework.org/schema/context/spring-context.xsd">

    <!--1. 打开扫描的开关-->
    <context:component-scan base-package="com.itheima"/>


    <!--2. 托管QueryRunner,以便给Dao层注入-->
    <bean id="runner" class="org.apache.commons.dbutils.QueryRunner"/>


    <!--3. 托管DataSource,以便给TransactionManager注入-->
    <context:property-placeholder location="db.properties"/>
    <bean id="ds" class="com.mchange.v2.c3p0.ComboPooledDataSource">
        <property name="driverClass" value="${driverClass}"/>
        <property name="jdbcUrl" value="${jdbcUrl}"/>
        <property name="user" value="${user}"/>
        <property name="password" value="${password}"/>
    </bean>

</beans>
5. 功能测试
package com.itheima.test;

import com.itheima.service.AccountService;
import org.junit.Test;
import org.junit.runner.RunWith;
import org.springframework.beans.factory.annotation.Autowired;
import org.springframework.test.context.ContextConfiguration;
import org.springframework.test.context.junit4.SpringJUnit4ClassRunner;

import java.sql.SQLException;

@RunWith(SpringJUnit4ClassRunner.class)
@ContextConfiguration("classpath:applicationContext.xml")
public class TestAccountServiceImpl {

    @Autowired
    private AccountService accountServiceImpl;

    @Test
    public void testTransfer() throws SQLException {
        accountServiceImpl.transfer("zs" , "ls" , 100);
    }

}
存在的问题
- 事务管理的代码,和Service层的业务功能代码耦合到了一起,不易维护
- 如果有很多方法都需要事务,就需要对代码进行大量修改
- 要达到的目标:
- service层,只要负责业务功能的实现,不要在Service层出现非业务功能相关的代码
- 在service层源码不变的情况下,要对Service层的功能进行增强:增加事务管理的功能
使用动态代理优化转账功能
需求描述
- 实现银行转账,并且事务管理代码 和 转账功能代码解耦
- 不修改银行转账的功能代码,又增加事务管理的功能
需求分析
功能分析
-
AccountServiceImpl.transfer()方法中,只保留银行转账的业务功能代码 -
获取一个
AccountServiceImpl的代理对象通过动态代理的方式,对
AccountServiceImpl.transfer方法的功能进行增强:增加事务控制的代码 -
测试类中调用代理对象,实现转账+事务控制
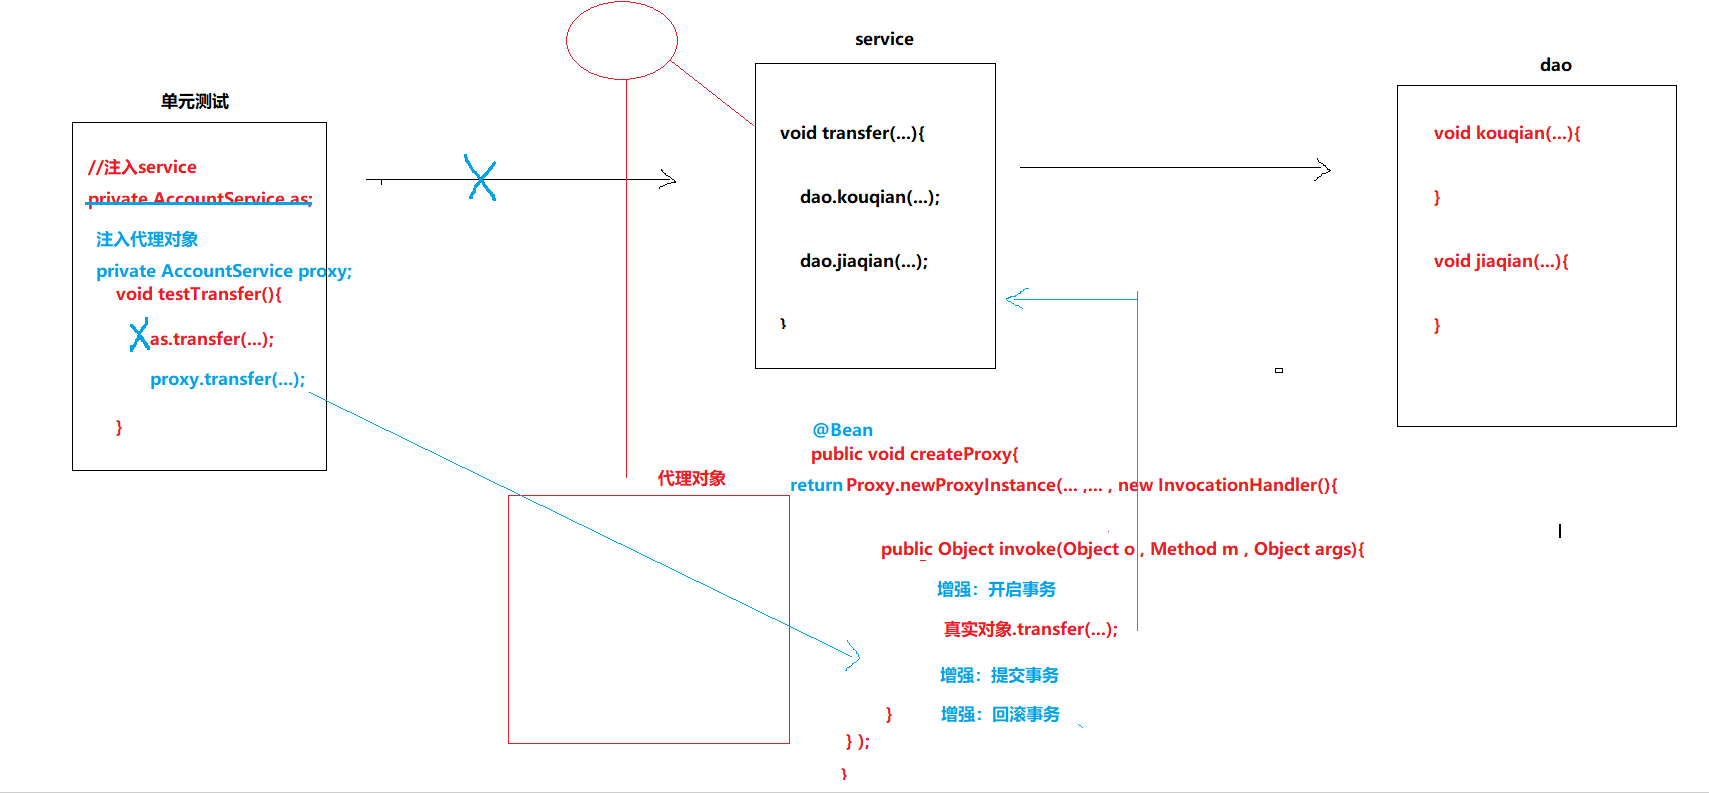
实现步骤
-
修改
AccountServiceImpl去掉所有事务管理相关的代码
-
要手动创建出来代理对象,并且把代理对象交给spring来管理
-
测试类中,注入代理对象进行转账
需求实现
1. 修改AccountServiceImpl
- 去掉所有事务管理相关的代码
@Service
public class AccountServiceImpl implements AccountService {

    //注入dao
    @Autowired
    private AccountDao dao;


    /**
     * 转账功能
     * @param from
     * @param to
     * @param money
     * @throws SQLException
     */
    public void transfer(String from, String to, int money) throws SQLException {
        //扣钱
        dao.kouqian(from, money);

        //模拟出错!
        int a = 1 / 0 ;

        //加钱
        dao.jiaqian(to, money);
    }

}
2. 创建代理工厂类AccountServiceProxyFactory
- 用于生产
AccountServiceImpl的代理对象,在代理对象中增加事务控制的代码 - 分析
-
- 定义一个工厂类AccountServiceProxyFactory
-
- 工厂类里面有一个方法 proxyService
-
- 这个方法里面会创建出来一个代理对象,然后交给spring托管。
- 方法里面创建出来的对象是代理对象, 不是真实对象!
-
package com.itheima.util;

/*
    这是一个专门用来创建AccountServiceImpl代理对象的工厂类

    1. 定义一个方法:proxyService, 在里面使用Proxy.newProxyInstance 创建代理对象
    2. 创建出来的代理对象必须要交给spring管理,这样才能在单元测试里面注入。这就要求在方法上打上注解: @Bean
    3. 代理对象在外面做任何事情,必然会调用创建代理的invoke方法,在invoke方法里面必然要调用真实对象的方法
        所以这里必须要让spring把真实对象给注入进来!
    4. 代理对象是要给转账业务做增强,增强的是事务的功能,事务的功能定义在TransactionManager里面,这就要求
        spring把TransactionManager给注入到这里来!
    5. 为了让spring注入进来真实对象和TransactionManager 对象,那么必须要把自己交给spring管理!
 */

import com.itheima.service.AccountService;
import org.springframework.beans.factory.annotation.Autowired;
import org.springframework.context.annotation.Bean;
import org.springframework.stereotype.Component;

import java.lang.reflect.InvocationHandler;
import java.lang.reflect.InvocationTargetException;
import java.lang.reflect.Method;
import java.lang.reflect.Proxy;
import java.sql.SQLException;

@Component
public class AccountServiceProxyFactory {

    //注入真实对象
    @Autowired
    private AccountService accountServiceImpl;

    //注入TransactionManager
    @Autowired
    private TransactionManager tm;

    /**
     * 创建代理!
     * @return
     */
    @Bean
    public AccountService proxyService(){
        return (AccountService) Proxy.newProxyInstance(accountServiceImpl.getClass().getClassLoader(), accountServiceImpl.getClass().getInterfaces(), new InvocationHandler() {
            public Object invoke(Object proxy, Method method, Object[] args) throws Throwable {

                Object result = null;
                if("transfer".equals(method.getName())){
                    try {

                        System.out.println("来到代理里面增强:事务的功能~" +  method.getName());

                        //增强:开启事务
                        tm.startTransaction();

                        //调用真实对象的转账方法
                        result = method.invoke(accountServiceImpl , args);

                        //增强: 提交事务
                        tm.commit();
                    } catch (Exception e) {
                        e.printStackTrace();

                        tm.rollback();
                    } finally {
                        tm.close();
                    }
                }else{
                    //调用真实对象的方法
                    result = method.invoke(accountServiceImpl , args);
                }

                return result;
            }
        });
    }

}
4. 功能测试
package com.itheima.test;

import com.itheima.service.AccountService;
import org.junit.Test;
import org.junit.runner.RunWith;
import org.springframework.beans.factory.annotation.Autowired;
import org.springframework.test.context.ContextConfiguration;
import org.springframework.test.context.junit4.SpringJUnit4ClassRunner;

import java.sql.SQLException;

@RunWith(SpringJUnit4ClassRunner.class)
@ContextConfiguration("classpath:applicationContext.xml")
public class TestAccountServiceImpl02 {

    @Autowired
    private AccountService proxyService;

    @Test
    public void testTransfer() throws SQLException {
        proxyService.transfer("zs" , "ls" , 100);
    }

}
总结
-
达到了目标:
- 对银行转账方法进行了增强:事务控制
- 方法功能增强了,但是没有修改转账功能源码
-
其中:
- 被增强的目标对象:
AccountServiceImpl - 被增强的目标方法:
transfer - 功能增强的类:
TransactionManager
- 被增强的目标对象:
-
如何增强的:使用了动态代理技术
- 实际使用的是目标对象的代理对象,在代理对象里进行了功能增强
-
存在的问题:
- 我们还需要自己编写代码,生成代理对象
-
问题的解决:
- 使用Spring的AOP思想:Spring会帮我们生成代理对象
- 我们只要进行配置:对哪些方法,进行哪些增强
二、AOP简介
什么是AOP
- AOP:Aspect Oriented Programming,面向切面编程。是通过预编译方式(aspectj)或者运行期动态代理(Spring)实现程序功能的统一维护的技术。
- AOP是OOP(面向对象编程)的技术延续,是软件开发中的一个热点,也是Spring中的一个重要内容。利用AOP可以实现对业务逻辑各个部分之间的隔离,从而使得业务逻辑各部分之间的耦合性降低,提高程序的可重用性,同时提高了开发效率。
AOP的作用
- 作用:不修改源码的情况下,进行功能增强,通过动态代理实现的
- 优势:减少重复代码,提高开发效率,方便维护
- 比如:给功能增加日志输出, 事务管理的功能
10个方法: 想给10个方法都增加一种打印日志的功能,但是又不想(不能)改源码,此时可以给它使用AOP增强。
AOP的底层实现
实际上,Spring的AOP,底层是通过动态代理实现的。在运行期间,通过代理技术动态生成代理对象,代理对象方法执行时进行功能的增强介入,再去调用目标方法,从而完成功能增强。
-
常用的动态代理技术有:
- JDK的动态代理:基于接口实现的
- cglib的动态代理:基于子类实现的
-
Spring的AOP采用了哪种代理方式?
- 如果目标对象有接口,就采用JDK的动态代理技术
- 如果目标对象没有接口,就采用cglib技术
小结
- AOP是:在不修改源码的情况下,进行功能增强
- AOP的本质是:动态代理
三、Spring的AOP【重点】
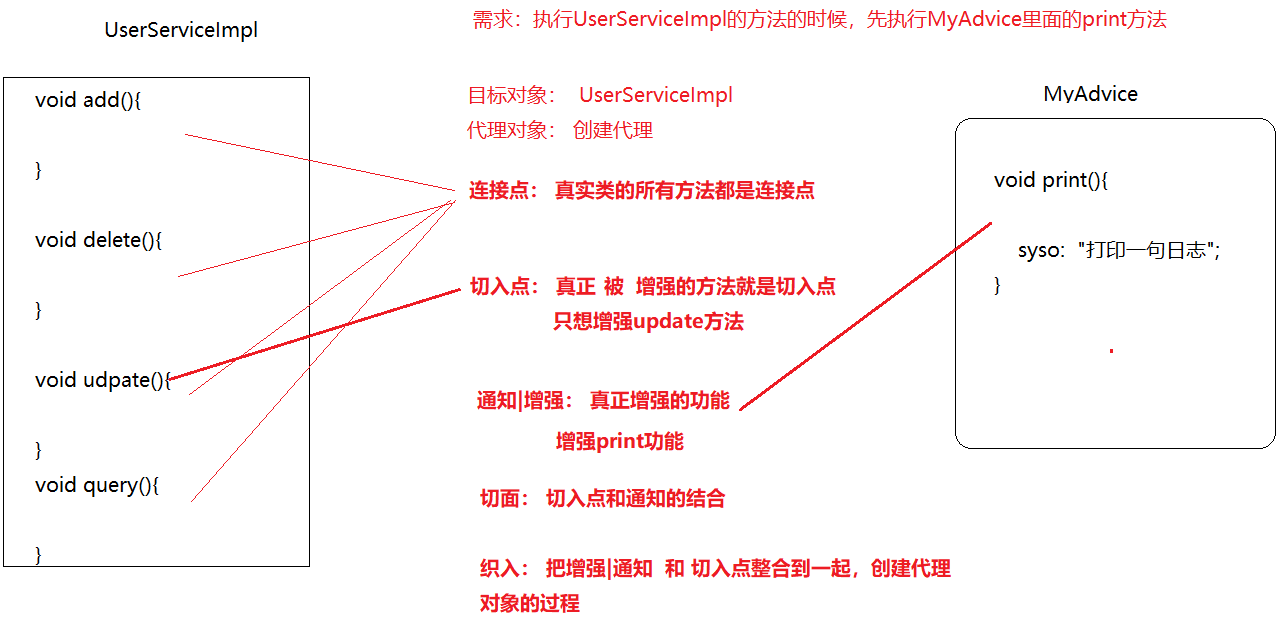
AOP相关的概念
AOP相关概念
-
目标对象(Target):要代理的/要增强的目标对象。
-
代理对象(Proxy):目标对象被AOP织入增强后,就得到一个代理对象
-
连接点(JoinPoint):能够被拦截到的点,在Spring里指的是方法
目标类里,所有能够进行增强的方法,都是连接点
-
切入点(PointCut):要对哪些连接点进行拦截的定义
已经增强的连接点,叫切入点
-
通知/增强(Advice):拦截到连接点之后要做的事情
对目标对象的方法,进行功能增强的代码
-
切面(Aspect):是切入点和通知的结合
-
织入(Weaving):把增强/通知 应用到 目标对象来创建代理对象的过程。Spring采用动态代理技术织入,而AspectJ采用编译期织入和装载期织入
AOP开发前要明确的事项
我们要做的事情:
- 编写核心业务代码(Target目标类的目标方法)
- 编写通知类,通知类中有通知方法(Advice增强功能方法)
- 在配置文件中,配置织入关系,即将哪些通知与哪些切入点 结合,形成切面
Spring的AOP做的事情:
- 生成动态代理的过程(把通知织入到切入点的过程),是由Spring来实现的
- Spring会监控切入点方法的执行,一旦发现切入点方法执行,使用代理机制动态创建目标对象的代理对象,根据通知类别,在代理对象的对应位置,将通知对应的功能织入,完成完整的代码逻辑运行。
小结
- AOP相关的概念/术语
- 目标类Target:要对哪个类进行增强
- 代理对象Proxy:对目标类增强后的那个代理对象
- 连接点JoinPoint:目标类里可增强的方法
- 切入点PointCut:要增强的方法
- 通知Advice:要增强的功能方法
- 切面Aspect:切入点 + 通知
- 织入Weaving:把切入点 和 通知 进行结合,生成代理对象的过程
- 使用AOP,我们要做的事情:
- 编写目标类,自己的业务代码
- 编写通知类
- 配置切面
- 使用AOP,Spring做的事情
- 根据我们配置的切面,进行织入生成代理对象
基于XML的AOP【重点】
快速入门
1) 需求描述
- 有目标类
UserServiceImpl,有通知类或增强类MyAdvice - 使用XML方式AOP,对目标类
UserServiceImpl的方法进行增强
2) 步骤分析
- 创建maven项目,导入AOP相关的依赖坐标
- 创建目标类(被增强的类,内部有切入点(要有方法)),创建通知类(内部有增强的方法代码)
- 修改配置文件:
- 把目标类和通知类都配置成为bean对象
- 配置切入点和通知方法(增强方法)的织入关系:配置切面
- 测试代码
3) 入门实现
1. 创建maven项目,导入坐标
<dependencies>
        <!--Spring上下文核心包-->
        <dependency>
            <groupId>org.springframework</groupId>
            <artifactId>spring-context</artifactId>
            <version>5.0.2.RELEASE</version>
        </dependency>
        <!--AOP的实现包-->
        <dependency>
            <groupId>org.aspectj</groupId>
            <artifactId>aspectjweaver</artifactId>
            <version>1.9.4</version>
        </dependency>
        <!--Spring和单元测试集成-->
        <dependency>
            <groupId>org.springframework</groupId>
            <artifactId>spring-test</artifactId>
            <version>5.0.2.RELEASE</version>
        </dependency>
        <!--单元测试-->
        <dependency>
            <groupId>junit</groupId>
            <artifactId>junit</artifactId>
            <version>4.12</version>
        </dependency>
    </dependencies>
2. 创建目标类和通知类
- 目标类:
com.itheima.aop.UserServiceImpl
package com.itheima.service;

public interface UserService {
    void add();

    void update();
}
package com.itheima.service.impl;

import com.itheima.service.UserService;

public class UserServiceImpl implements UserService {
    public void add() {
        System.out.println("调用了UserServiceImpl的add方法~!");
        //int a = 1 / 0 ;
    }

    public void update() {
        System.out.println("调用了UserServiceImpl的update方法~!");
    }
}
- 通知类|增强:
com.itheima.aop.MyAdvice
package com.itheima.advice;

import org.aspectj.lang.ProceedingJoinPoint;

public class MyAdvice {

    public void print(){
        System.out.println("打印日志~!");
    }

}
3. 修改配置文件
- 把目标类和通知类都配置到Spring配置文件中
- 配置切入和通知方法(增强方法)的织入关系
<?xml version="1.0" encoding="UTF-8"?>
<beans xmlns="http://www.springframework.org/schema/beans"
       xmlns:xsi="http://www.w3.org/2001/XMLSchema-instance" xmlns:aop="http://www.springframework.org/schema/aop"
       xsi:schemaLocation="http://www.springframework.org/schema/beans http://www.springframework.org/schema/beans/spring-beans.xsd http://www.springframework.org/schema/aop http://www.springframework.org/schema/aop/spring-aop.xsd">


    <!--1. 把userServiceImpl和MyAdvice 这两个类都交给spring管理-->
    <bean id="us" class="com.itheima.service.impl.UserServiceImpl"/>
    <bean id="myAdvice" class="com.itheima.advice.MyAdvice"/>

    <!--
        2. 下面要做AOP的配置:就是告诉spring,把MyAdvice的print方法,增强到UserServiceImpl里面的add方法
       aop:config : 用来做AOP配置的
          aop:aspect :用来配置切面
               ref : 表示用哪个类来做增强  这里表示使用myAdvice类来做增强
             aop:before :表示要做前置增强(在执行目标代码之前,先执行增强的代码)
                 method: 表示用增强类中的哪个方法来增强。
                 pointcut : 切入点, 打算对什么方法做增强。
    -->
    <aop:config>
        <aop:aspect ref="myAdvice">
            <aop:before method="print" pointcut="execution(* com.itheima.service.impl.UserServiceImpl.add())"/>
        </aop:aspect>
    </aop:config>


</beans>
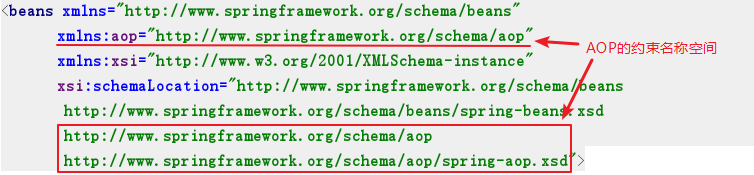
注意:在xml中增加了aop的名称空间如下:
4. 测试代码
package com.itheima.test;

import com.itheima.service.UserService;
import org.junit.Test;
import org.junit.runner.RunWith;
import org.springframework.beans.factory.annotation.Autowired;
import org.springframework.test.context.ContextConfiguration;
import org.springframework.test.context.junit4.SpringJUnit4ClassRunner;

@RunWith(SpringJUnit4ClassRunner.class)
@ContextConfiguration("classpath:applicationContext.xml")
public class TestUserServiceImpl {

    @Autowired
    private UserService us;

    @Test
    public void testAdd(){
        us.add();
    }

    @Test
    public void testUpdate(){
        us.update();
    }
}
4) 步骤小结
- 导入jar包:
spring-context, aspectjweaver - 编写目标类、编写通知类
- 配置切面
<aop:config>
	<aop:aspect ref="通知对象">
        <aop:before method="通知对象里的通知方法" pointcut="切入点表达式"/>
    </aop:aspect>
</aop:config>
AOP详解
1) 切点表达式的写法
语法:
execution([权限修饰符] 返回值类型 包名.类名.方法名(参数列表))
- 修饰符:可以省略
- 返回值类型:
- 可以指定类型。比如
String(如果类型有歧义,就写全限定类名,比如:java.util.Date) *,表示任意字符。比如Str*,或者*
- 可以指定类型。比如
- 包名:
- 可以写
.:表示当前包下的类或者子包。比如com.itheima.service - 可以写
..:表示当前包里所有后代类、后代包。比如com..service *:表示任意字符。比如:com.it*,com.*
- 可以写
- 类名:
- 可以指定类名。比如:
UserServiceImpl *表示任意字符。比如:*ServiceImpl,*
- 可以指定类名。比如:
- 方法名:
- 可以指定方法名
*表示任意字符。比如:save*,*
- 参数列表:
- 可以指定类型。比如:
String,Integer表示第一个参数是String,第二个参数是Integer类型 *表示任意字符。比如:String, *表示第一个参数是String,第二个参数是任意类型Str*, Integer表示第一个参数类型Str开头,第二个参数是Integer类型
- 可以使用
..表示任意个数、任意类型的参数
- 可以指定类型。比如:
示例
execution(public void com.itheima.dao.impl.UserDao.save())
execution(void com.itheima.dao.impl.UserDao.*(..))
execution(* com.itheima.dao.impl.*.*(..))
execution(* com.itheima.dao..*.*(..))
execution(* *..*.*(..)) --不建议使用
       <!--
        2. 下面要做AOP的配置:就是告诉spring,把MyAdvice的print方法,增强到UserServiceImpl里面的add方法
       aop:config : 用来做AOP配置的
          aop:aspect :用来配置切面
               ref : 表示用哪个类来做增强  这里表示使用myAdvice类来做增强
             aop:before :表示要做前置增强(在执行目标代码之前,先执行增强的代码)
                 method: 表示用增强类中的哪个方法来增强。
                 pointcut : 切入点, 打算对什么方法做增强。
    -->
    <aop:config>
        <aop:aspect ref="myAdvice">
            <!--<aop:before method="print" pointcut="execution(* com.itheima.service.impl.UserServiceImpl.add())"/>-->

            <!--最完整-->
            <!--<aop:before method="print" pointcut="execution(public void com.itheima.service.impl.UserServiceImpl.add())"/>-->
            <!--<aop:before method="print" pointcut="execution(void com.itheima.service.impl.UserServiceImpl.add())"/>-->
            <!--<aop:before method="print" pointcut="execution(* com.itheima.service.impl.UserServiceImpl.add())"/>-->
            <!--<aop:before method="print" pointcut="execution(* com.itheima.service.impl.UserServiceImpl.add())"/>-->
            <!--<aop:before method="print" pointcut="execution(* com..UserServiceImpl.add())"/>-->
            <!--<aop:before method="print" pointcut="execution(* com..*.add())"/>-->
            <!--<aop:before method="print" pointcut="execution(* com..*.*())"/>-->
            <!--<aop:before method="print" pointcut="execution(* com..*.*(..))"/>-->

            <!--最简单的写法: 一般很少写成这样,因为涉及的范围太广!-->
            <!--<aop:before method="print" pointcut="execution(* *..*.*(..))"/>-->

            <!--一般写成这样,表示给我们自己包下的所有类都增强-->
            <aop:before method="print" pointcut="execution(* com.itheima..*.*(..))"/>
        </aop:aspect>
    </aop:config>
2) 通知的种类
通知的语法
<aop:通知类型 method="通知中的方法" pointcut="切点表达式"></aop:通知类型>
通知的类型
| 名称 | 标签 | 说明 |
|---|---|---|
| 前置通知 | <aop:before> |
通知方法在切入点方法之前执行 |
| 后置通知 | <aop:after-returning> |
在切入点方法正常执行之后,执行通知方法 |
| 异常通知 | <aop:after-throwing> |
在切入点方法抛出异常时,执行通知方法 |
| 最终通知 | <aop:after> |
无论切入点方法是否有异常,最终都执行通知方法 |
| 环绕通知 | <aop:around> |
通知方法在切入点方法之前、之后都执行 |
通知示例
注意:通知方法的名称随意,我们这里是为了方便理解,才起名称为:before, after等等
-
前置通知
- 通知方法定义
MyAdvice的before方法:
public void before(){ System.out.println("前置通知"); }- xml配置
<aop:before method="before" pointcut="execution(* com.itheima.service..*.*())"/> - 通知方法定义
-
后置通知
- 通知方法定义
public void afterReturning(){ System.out.println("后置通知"); }- xml配置
<aop:after-returning method="afterReturning" pointcut="execution(* com.itheima.service..*.*())"/> -
环绕通知
- 通知方法定义
/* 环绕增强比较特殊一些,它需要我们在增强的方法里面手动调用目标方法。 */ public void around(ProceedingJoinPoint joinPoint) throws Throwable { //System.out.println("环绕:打印日志~!"); before(); //调用目标方法 //joinPoint.proceed(); //目标方法没有参数的调用 joinPoint.proceed(joinPoint.getArgs()); //目标方法有参的方式调用 afterReturning(); }- xml配置
<aop:around method="around" pointcut="execution(* com.itheima.service..*.*())"/> -
异常抛出通知
- 通知方法定义
public void afterThrowing(){ System.out.println("抛出异常通知"); }- xml配置
<aop:after-throwing method="afterThrowing" pointcut="execution(* com.itheima.service..*.*())"/> -
最终通知
- 通知方法定义
public void after(){ System.out.println("最终通知"); }- xml配置
<aop:after method="after"
           pointcut="execution(* com.itheima.service..*.*())/>
3) 切点表达式的抽取
-
当多个切面的切入点表达式相同时,可以将切入点表达式进行抽取;在增强中使用pointcut-ref代替pointcut,来引入切入点表达式。
-
示例:
    <!--
        2. 下面要做AOP的配置:就是告诉spring,把MyAdvice的print方法,增强到UserServiceImpl里面的add方法
       aop:config : 用来做AOP配置的
          aop:aspect :用来配置切面
               ref : 表示用哪个类来做增强  这里表示使用myAdvice类来做增强
             aop:before :表示要做前置增强(在执行目标代码之前,先执行增强的代码)
                 method: 表示用增强类中的哪个方法来增强。
                 pointcut : 切入点, 打算对什么方法做增强。
    -->
    <aop:config>
        <aop:aspect ref="myAdvice">

            <!--抽取切点表达式-->
            <aop:pointcut id="pointCut01" expression="execution(* com.itheima..*.*(..))"/>


            <!--前置增强:在目标方法之前执行增强的代码-->
            <!--<aop:before method="before" pointcut="execution(* com.itheima..*.*(..))"/>-->
            <aop:before method="before" pointcut-ref="pointCut01"/>

            <!--后置增强:在目标方法之后执行增强的代码-->
             <!--<aop:after-returning method="afterReturning" pointcut="execution(* com.itheima..*.*(..))"/>-->
             <aop:after-returning method="afterReturning" pointcut-ref="pointCut01"/>

            <!--异常增强:目标方法出现异常,才增强-->
           <!-- <aop:after-throwing method="afterThrowing" pointcut="execution(* com.itheima..*.*(..))"/>-->

            <!--最终增强:不管目标方法有没有异常,都增强-->
            <!--<aop:after method="after" pointcut="execution(* com.itheima..*.*(..))"/>-->

            <!--环绕增强:包含前置和后置-->
           <!-- <aop:around method="around" pointcut="execution(* com.itheima..*.*(..))"/>-->
        </aop:aspect>
    </aop:config>
4) 小结
- 需要我们编写的内容:
- 编写目标类,编写通知(增强)类
- 配置切面
<aop:config>
	<aop:pointcut id="xxx" expression="切入点表达式"/>
    <aop:aspect ref="通知对象">
        <aop:before method="通知对象里的通知方法" pointcut-ref="xxx"/>
        <aop:after-returning method="通知对象里的通知方法" pointcut-ref="xxx"/>
        <aop:after-throwing method="通知对象里的通知方法" pointcut-ref="xxx"/>
        <aop:after method="通知对象里的通知方法" pointcut-ref="xxx"/>

        <aop:around method="通知对象里的通知方法" pointcut-ref="xxx"/>
    </aop:aspect>
</aop:config>
- 注意环绕通知的方法
public Object aroundMethod(ProceedingJoinPoint pjp){
	Object reuslt = null;

    try{
        //写前置通知代码

        //调用目标对象的方法
    	result = pjp.proceed(pjp.getArgs());

        //写后置通知代码
    }catch(Throwable t){
        //写异常通知代码
    }finally{
        //写最终通知代码
    }
}
基于注解的AOP【重点】
快速入门
1) 需求描述
- 有目标类
UserServiceImpl,有通知类MyAdvice - 使用注解方式的AOP对目标类
UserServiceImpl的方法进行增强
2) 步骤分析
- 创建maven项目,导入AOP需要的依赖坐标
- 创建目标类,创建通知类
- 使用注解
@Component标注两个类,配置成为bean对象 - 在增强类身上,需要打上注解 @Aspect ,让其成为增强类|对象
- 在增强类的方法上,打注解@Before | @AfterReturing | ... 表示想要增强谁。
- 使用注解
- 在配置文件中,开启组件扫描和AOP的自动代理(自动装配)
- 测试
3) 入门实现
1. 创建maven项目,导入坐标
- 注意:需要增加AOP的实现包:
aspectjweaver
<dependencies>
        <!--Spring上下文核心包-->
        <dependency>
            <groupId>org.springframework</groupId>
            <artifactId>spring-context</artifactId>
            <version>5.0.2.RELEASE</version>
        </dependency>
        <!--AOP的实现包-->
        <dependency>
            <groupId>org.aspectj</groupId>
            <artifactId>aspectjweaver</artifactId>
            <version>1.9.4</version>
        </dependency>
        <!--Spring和单元测试集成-->
        <dependency>
            <groupId>org.springframework</groupId>
            <artifactId>spring-test</artifactId>
            <version>5.0.2.RELEASE</version>
        </dependency>
        <!--单元测试-->
        <dependency>
            <groupId>junit</groupId>
            <artifactId>junit</artifactId>
            <version>4.12</version>
        </dependency>
    </dependencies>
2. 创建目标类,创建通知类
-
使用注解标注两个类,配置成为bean对象
- 实际开发中,使用
@Repository,@Service,@Controller注解,按照分层进行配置
- 实际开发中,使用
-
在通知类中,使用注解配置织入关系
- 目标类
com.itheima.aop.Target
package com.itheima.service;

public interface UserService {

    void add();
    void update();
}
package com.itheima.service.impl; import com.itheima.service.UserService; import org.springframework.stereotype.Service; @Service public class UserServiceImpl implements UserService { public void add() { System.out.println("调用了UserServiceImpl的add方法~!~"); //int a = 1 / 0 ; } public void update() { System.out.println("调用了UserServiceImpl的update方法~!~"); } }- 通知类
com.itheima.aop.MyAdvice
package com.itheima.advice; import org.aspectj.lang.ProceedingJoinPoint; import org.aspectj.lang.annotation.AfterReturning; import org.aspectj.lang.annotation.Aspect; import org.aspectj.lang.annotation.Before; import org.aspectj.lang.annotation.Pointcut; import org.springframework.stereotype.Component; /* MyAdvice是增强类,它需要做: 1. 把自己交给spring管理 , 打上注解@Component 2. 表示这个类是切面增强类,专门用来做增强的,打注解 @Aspect 3. 把什么方法用来做什么增强(增强谁),就在这个方法上面打注解 前置增强 === @Before 后置增强 === @AfterReturning */ @Component @Aspect public class MyAdvice { @Before("execution(* com.itheima..*.*(..))") public void print(){ System.out.println("打印日志~"); } ... } - 目标类
4. 开启组件扫描和AOP自动代理
- 在
applicationContext.xml中
<?xml version="1.0" encoding="UTF-8"?>
<beans xmlns="http://www.springframework.org/schema/beans"
       xmlns:xsi="http://www.w3.org/2001/XMLSchema-instance"
       xmlns:context="http://www.springframework.org/schema/context"
       xmlns:aop="http://www.springframework.org/schema/aop"
       xsi:schemaLocation="http://www.springframework.org/schema/beans http://www.springframework.org/schema/beans/spring-beans.xsd http://www.springframework.org/schema/context http://www.springframework.org/schema/context/spring-context.xsd http://www.springframework.org/schema/aop http://www.springframework.org/schema/aop/spring-aop.xsd">

    <!--1. IOC的开关-->
    <context:component-scan base-package="com.itheima"/>

    <!--2. AOP的开关-->
    <aop:aspectj-autoproxy/>
</beans>
5. 测试
package com.itheima.test;

import com.itheima.service.UserService;
import org.junit.Test;
import org.junit.runner.RunWith;
import org.springframework.beans.factory.annotation.Autowired;
import org.springframework.test.context.ContextConfiguration;
import org.springframework.test.context.junit4.SpringJUnit4ClassRunner;

@RunWith(SpringJUnit4ClassRunner.class)
@ContextConfiguration("classpath:applicationContext.xml")
public class TestUserServiceImpl {

    @Autowired
    private UserService us;

    @Test
    public void testAdd(){
        us.add();

    }
}
4) 步骤小结
-
创建功能类UserServiceImpl
-
创建增强类MyAdvice
-
给他们都打上注解
1. UserServiceImpl : @Service 2. MyAdvice : @Component @Aspect 1. 方法上面打上前置或者后置的注解- 在applicationContext.xml中打开开关
    <!--1. 打开IOC扫描包开关-->
    <context:component-scan base-package="com.itheima"/>

    <!--2. 打开AOP的开关-->
    <aop:aspectj-autoproxy/>
AOP详解
1) 通知的种类
通知的语法
@通知注解("切入点表达式")
通知的类型
| 名称 | 注解 | 说明 |
|---|---|---|
| 前置通知 | @Before |
通知方法在切入点方法之前执行 |
| 后置通知 | @AfterRuturning |
通知方法在切入点方法之后执行 |
| 异常通知 | @AfterThrowing |
通知方法在抛出异常时执行 |
| 最终通知 | @After |
通知方法无论是否有异常,最终都执行 |
| 环绕通知 | @Around |
通知方法在切入点方法之前、之后都执行 |
- 注意:
- 注解方式配置的通知,执行顺序是:
前置->最终->后置/异常 - 如果想要指定执行的顺序,就使用环绕通知 , 因为环绕增强是由我们手动控制的。
- 注解方式配置的通知,执行顺序是:
2) 切点表达式的抽取
- 同xml的AOP一样,当多个切面的切入点表达式相同时,可以将切入点表达式进行抽取;
- 抽取方法是:
- 在增强类(切面类,即被
@Aspect标的类)上增加一个额外的方法,在方法上使用@Pointcut注解定义切入点表达式, - 在增强注解中引用切入点表达式所在的方法
- 在增强类(切面类,即被
- 示例:
package com.itheima.advice;

import org.aspectj.lang.ProceedingJoinPoint;
import org.aspectj.lang.annotation.*;
import org.springframework.stereotype.Component;

/*
    MyAdvice是增强类,它需要做:
        1. 把自己交给spring管理 , 打上注解@Component
        2. 表示这个类是切面增强类,专门用来做增强的,打注解 @Aspect
        3. 把什么方法用来做什么增强(增强谁),就在这个方法上面打注解
            前置增强 === @Before
            后置增强 === @AfterReturning
 */

@Aspect
@Component
public class MyAdvice {

    //@Before("execution(* com.itheima..*.*(..))")
    public void print(){
        System.out.println("打印日志~!");
    }

    //===============================================================

    //这个abc方法的作用就是为了抽取切点表达式! ,并且这个abc方法不会被调用!
    @Pointcut("execution(* com.itheima..*.*(..))")
    public void abc(){
        System.out.println("调用abc方法了~!");
    }


    //@Before("execution(* com.itheima..*.*(..))")
    @Before("abc()")
    public void before(){
        System.out.println("前置:打印日志~!");
    }

    //@AfterReturning("execution(* com.itheima..*.*(..))")
    @AfterReturning("abc()")
    public void afterReturning(){
        System.out.println("后置:打印日志~!");
    }

    //@AfterThrowing("execution(* com.itheima..*.*(..))")
    public void afterThrowing(){
        System.out.println("异常:打印日志~!");
    }

    //@After("execution(* com.itheima..*.*(..))")
    public void after(){
        System.out.println("最终:打印日志~!");
    }

    /*
        环绕增强比较特殊一些,它需要我们在增强的方法里面手动调用目标方法。
     */
    //@Around("execution(* com.itheima..*.*(..))")
    public void around(ProceedingJoinPoint joinPoint) throws Throwable {
        //System.out.println("环绕:打印日志~!");

        before();

        //调用目标方法
        //joinPoint.proceed(); //目标方法没有参数的调用
        joinPoint.proceed(joinPoint.getArgs()); //目标方法有参的方式调用

        afterReturning();
    }
}
3) 小结
- 在通知类上加注解
@Aspect,声明成一个切面 - 在通知类里方法上加注解
@Before/@AfterReturning/@AfterThrowing/@After/@Around,配置切入点表达式 - 在xml里开启aop的自动代理:
<aop:aspectj-autoproxy/>
纯注解的AOP
- 主要是把XML的配置,放到核心配置类上
使用 @EnableAspectJAutoProxy 来允许AOP的自动配置
- 核心配置类
package com.itheima.config;

import org.springframework.context.annotation.ComponentScan;
import org.springframework.context.annotation.Configuration;
import org.springframework.context.annotation.EnableAspectJAutoProxy;

@Configuration
@ComponentScan("com.itheima")
@EnableAspectJAutoProxy
public class AppConfig {
}
- 增强类 : MyAdvice
package com.itheima.aop;

import org.aspectj.lang.annotation.Aspect;
import org.aspectj.lang.annotation.Before;
import org.springframework.stereotype.Component;

@Component
@Aspect
public class MyAdvice {

    @Before("execution(* com.itheima..*.*(..))")
    public void print(){
        System.out.println("打印日志~");
    }
}
- UserService接口
package com.itheima.service;

public interface UserService {

    void add();

    void update();
}
- UserServiceImpl实现类
package com.itheima.service.impl;

import com.itheima.service.UserService;
import org.springframework.stereotype.Service;

@Service
public class UserServiceImpl implements UserService {
    public void add() {
        System.out.println("调用了UserServiceImpl的add方法~!~");
    }

    public void update() {
        System.out.println("调用了UserServiceImpl的update方法~!~");
    }
}
- 单元测试
package com.itheima.test;

import com.itheima.config.AppConfig;
import com.itheima.service.UserService;
import org.junit.Test;
import org.junit.runner.RunWith;
import org.springframework.beans.factory.annotation.Autowired;
import org.springframework.test.context.ContextConfiguration;
import org.springframework.test.context.junit4.SpringJUnit4ClassRunner;

@RunWith(SpringJUnit4ClassRunner.class)
@ContextConfiguration(classes = AppConfig.class)
public class TestUserServiceImpl02 {

    @Autowired
    private UserService us;

    @Test
    public void testAdd(){
        us.add();

    }
}
四、配置第三方连接池【了解】
准备环境
- 创建Maven项目,导入jar依赖
<dependencies>
    <!--MySql驱动-->
    <dependency>
        <groupId>mysql</groupId>
        <artifactId>mysql-connector-java</artifactId>
        <version>5.1.47</version>
    </dependency>
    <!--c3p0连接池-->
    <dependency>
        <groupId>c3p0</groupId>
        <artifactId>c3p0</artifactId>
        <version>0.9.1.2</version>
    </dependency>
    <!--druid连接池-->
    <dependency>
        <groupId>com.alibaba</groupId>
        <artifactId>druid</artifactId>
        <version>1.1.19</version>
    </dependency>
    <!--Spring的jdbc支持-->
    <dependency>
        <groupId>org.springframework</groupId>
        <artifactId>spring-jdbc</artifactId>
        <version>5.0.2.RELEASE</version>
    </dependency>

    <!--Spring-context-->
    <dependency>
        <groupId>org.springframework</groupId>
        <artifactId>spring-context</artifactId>
        <version>5.0.2.RELEASE</version>
    </dependency>
    <!--Spring整合Junit-->
    <dependency>
        <groupId>org.springframework</groupId>
        <artifactId>spring-test</artifactId>
        <version>5.0.2.RELEASE</version>
    </dependency>
    <!--单元测试Junit-->
    <dependency>
        <groupId>junit</groupId>
        <artifactId>junit</artifactId>
        <version>4.12</version>
    </dependency>
</dependencies>
配置连接池
- 创建
applicationContext.xml,配置连接池
<?xml version="1.0" encoding="UTF-8"?>
<beans xmlns="http://www.springframework.org/schema/beans"
       xmlns:xsi="http://www.w3.org/2001/XMLSchema-instance"
       xsi:schemaLocation="http://www.springframework.org/schema/beans http://www.springframework.org/schema/beans/spring-beans.xsd">

    <!--1. c3p0-->
    <bean id="c3p0" class="com.mchange.v2.c3p0.ComboPooledDataSource">
        <property name="driverClass" value="com.mysql.jdbc.Driver"/>
        <property name="jdbcUrl" value="jdbc:mysql://localhost:3306/day41_spring"/>
        <property name="user" value="root"/>
        <property name="password" value="root"/>
    </bean>

    <!--2. druid-->
    <bean id="druid" class="com.alibaba.druid.pool.DruidDataSource">
        <property name="driverClassName" value="com.mysql.jdbc.Driver"/>
        <property name="url" value="jdbc:mysql://localhost:3306/day41_spring"/>
        <property name="username" value="root"/>
        <property name="password" value="root"/>
    </bean>

    <!--3. spring提供的jdbc封装的一个连接对象-->
    <bean id="spring" class="org.springframework.jdbc.datasource.DriverManagerDataSource">
        <property name="driverClassName" value="com.mysql.jdbc.Driver"/>
        <property name="url" value="jdbc:mysql://localhost:3306/day41_spring"/>
        <property name="username" value="root"/>
        <property name="password" value="root"/>
    </bean>
</beans>
功能测试
- 创建单元测试类
package com.itheima.test;

import org.junit.Test;
import org.junit.runner.RunWith;
import org.springframework.beans.factory.annotation.Autowired;
import org.springframework.test.context.ContextConfiguration;
import org.springframework.test.context.junit4.SpringJUnit4ClassRunner;

import javax.sql.DataSource;

@RunWith(SpringJUnit4ClassRunner.class)
@ContextConfiguration("classpath:applicationContext.xml")
public class TestDataSource {

    @Autowired
    private DataSource c3p0;

    @Autowired
    private DataSource druid;

    @Autowired
    private DataSource spring;

    @Test
    public void test01(){
        System.out.println("c3p0 = " + c3p0);
        System.out.println("druid = " + druid);
        System.out.println("spring = " + spring);
    }
}
五、JdbcTemplate【了解】
1. 在Spring里使用JdbcTemplate
JdbcTemplate介绍
JdbcTemplate简介
JdbcTemplate是Spring提供的dao层技术,它对JDBC进行了薄薄的封装,用于简化JDBC操作的步骤- 和DBUtils的作用一样的
- Spring通过
JdbcTemplate,实现了声明式事务管理 - JdbcTemplate需要导入jar包
JdbcTemplate的API
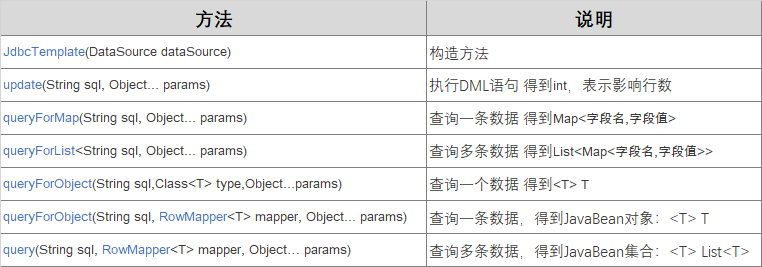
JdbcTemplate的API
在Spring里配置JdbcTemplate
- 在pom.xml里添加依赖
<dependencies>
        <!--MySql驱动-->
        <dependency>
            <groupId>mysql</groupId>
            <artifactId>mysql-connector-java</artifactId>
            <version>5.1.47</version>
        </dependency>
        <!--c3p0连接池-->
        <dependency>
            <groupId>c3p0</groupId>
            <artifactId>c3p0</artifactId>
            <version>0.9.1.2</version>
        </dependency>
        <!--druid连接池-->
        <dependency>
            <groupId>com.alibaba</groupId>
            <artifactId>druid</artifactId>
            <version>1.1.19</version>
        </dependency>
        <!--Spring的jdbc支持-->
        <dependency>
            <groupId>org.springframework</groupId>
            <artifactId>spring-jdbc</artifactId>
            <version>5.0.2.RELEASE</version>
        </dependency>

        <!--Spring-context-->
        <dependency>
            <groupId>org.springframework</groupId>
            <artifactId>spring-context</artifactId>
            <version>5.0.2.RELEASE</version>
        </dependency>
        <!--Spring整合Junit-->
        <dependency>
            <groupId>org.springframework</groupId>
            <artifactId>spring-test</artifactId>
            <version>5.0.2.RELEASE</version>
        </dependency>
        <!--单元测试Junit-->
        <dependency>
            <groupId>junit</groupId>
            <artifactId>junit</artifactId>
            <version>4.12</version>
        </dependency>
        <dependency>
            <groupId>org.projectlombok</groupId>
            <artifactId>lombok</artifactId>
            <version>1.18.18</version>
        </dependency>
    </dependencies>
- 在
applicationContext.xml里配置JdbcTemplate
<?xml version="1.0" encoding="UTF-8"?>
<beans xmlns="http://www.springframework.org/schema/beans"
       xmlns:xsi="http://www.w3.org/2001/XMLSchema-instance"
       xmlns:context="http://www.springframework.org/schema/context"
       xsi:schemaLocation="http://www.springframework.org/schema/beans http://www.springframework.org/schema/beans/spring-beans.xsd http://www.springframework.org/schema/context http://www.springframework.org/schema/context/spring-context.xsd">

    <!--1. 定义连接池-->
    <bean id="dataSource" class="com.mchange.v2.c3p0.ComboPooledDataSource">
        <property name="driverClass" value="com.mysql.jdbc.Driver"/>
        <property name="jdbcUrl" value="jdbc:mysql://localhost:3306/day41_spring"/>
        <property name="user" value="root"/>
        <property name="password" value="root"/>
    </bean>


    <!--2. 定义Jdbctemplate-->
    <bean id="jdbctemplate" class="org.springframework.jdbc.core.JdbcTemplate">
        <constructor-arg name="dataSource" ref="dataSource"/>
    </bean>

</beans>
使用示例
package com.itheima.test;

import com.itheima.bean.Account;
import org.junit.Test;
import org.junit.runner.RunWith;
import org.springframework.beans.factory.annotation.Autowired;
import org.springframework.jdbc.core.BeanPropertyRowMapper;
import org.springframework.jdbc.core.JdbcTemplate;
import org.springframework.jdbc.core.RowMapper;
import org.springframework.test.context.ContextConfiguration;
import org.springframework.test.context.junit4.SpringJUnit4ClassRunner;

import java.util.List;
import java.util.Map;

@RunWith(SpringJUnit4ClassRunner.class)
@ContextConfiguration("classpath:applicationContext.xml")
public class TestJdbcTemplate {

    @Autowired
    private JdbcTemplate template;

    @Test
    public void testAdd(){
        String sql = "insert into t_account values (null , ? , ? )";
        template.update(sql , "张三" ,10);
    }

    @Test
    public void testDelete(){
        String sql = "delete from t_account where id = ? ";
        template.update(sql , 7);
    }
    @Test
    public void testUpdate(){
        String sql = "update t_account set money  = ? where id = ? ";
        template.update(sql , 500 , 1);
    }

    //使用map来封装一条记录
    @Test
    public void testQueryForMap(){
        String sql = "select * from t_account where id = ?";
        Map<String, Object> map = template.queryForMap(sql, 1);
        System.out.println("map = " + map);
    }

    //使用List<Map> 来封装多条记录
    @Test
    public void testQueryForList(){
        String sql = "select * from t_account ";
        List<Map<String, Object>> list = template.queryForList(sql);
        System.out.println("list = " + list);
    }

    //查询得到一个数据
    @Test
    public void testQueryForObject(){
        String sql = "select count(*) from t_account ";
        long result = template.queryForObject(sql, long.class);
        System.out.println("result = " + result);
    }

    //用JavaBean来封装一条记录
    @Test
    public void testQueryForObject2(){
        String sql = "select * from t_account where id = ? ";
        Account a = template.queryForObject(sql, new BeanPropertyRowMapper<Account>(Account.class), 1);
        System.out.println("a = " + a);
    }
    //用JavaBean来封装多条记录  List<Account>
    @Test
    public void testQuery(){
        String sql = "select * from t_account";
        List<Account> list = template.query(sql, new BeanPropertyRowMapper<Account>(Account.class));
        System.out.println("list = " + list);
    }
}
小结
2. 在dao中使用JdbcTemplate
- 有dao接口如下:
package com.itheima.dao;

import com.itheima.bean.Account;

import java.util.List;

public interface AccountDao {

    List<Account> findAll();
}
AccountDaoImpl类
package com.itheima.dao.impl;

import com.itheima.bean.Account;
import com.itheima.dao.AccountDao;
import org.springframework.beans.factory.annotation.Autowired;
import org.springframework.jdbc.core.BeanPropertyRowMapper;
import org.springframework.jdbc.core.JdbcTemplate;
import org.springframework.stereotype.Repository;

import java.util.List;

/*
    1. 把这个dao类交给spring管理
    2. 让spring把jdbctemplate对象给注入进来
 */
@Repository
public class AccountDaoImpl implements AccountDao {

    @Autowired
    private JdbcTemplate template;

    public List<Account> findAll() {
        return template.query("select * from t_account"  , new BeanPropertyRowMapper<Account>(Account.class));
    }
}
- applicationContext.xml
<?xml version="1.0" encoding="UTF-8"?>
<beans xmlns="http://www.springframework.org/schema/beans"
       xmlns:xsi="http://www.w3.org/2001/XMLSchema-instance"
       xmlns:context="http://www.springframework.org/schema/context"
       xsi:schemaLocation="http://www.springframework.org/schema/beans http://www.springframework.org/schema/beans/spring-beans.xsd http://www.springframework.org/schema/context http://www.springframework.org/schema/context/spring-context.xsd">

    <!--1. 定义连接池-->
    <bean id="dataSource" class="com.mchange.v2.c3p0.ComboPooledDataSource">
        <property name="driverClass" value="com.mysql.jdbc.Driver"/>
        <property name="jdbcUrl" value="jdbc:mysql://localhost:3306/day41_spring"/>
        <property name="user" value="root"/>
        <property name="password" value="root"/>
    </bean>


    <!--2. 定义Jdbctemplate-->
    <bean id="jdbctemplate" class="org.springframework.jdbc.core.JdbcTemplate">
        <constructor-arg name="dataSource" ref="dataSource"/>
    </bean>

    <context:component-scan base-package="com.itheima"/>
</beans>
- 单元测试
package com.itheima.test;

import com.itheima.dao.AccountDao;
import org.junit.Test;
import org.junit.runner.RunWith;
import org.springframework.beans.factory.annotation.Autowired;
import org.springframework.test.context.ContextConfiguration;
import org.springframework.test.context.junit4.SpringJUnit4ClassRunner;

@RunWith(SpringJUnit4ClassRunner.class)
@ContextConfiguration("classpath:applicationContext.xml")
public class TestAccountDaoImpl {

    @Autowired
    private AccountDao dao;


    @Test
    public void testFindAll(){
        System.out.println(dao.findAll());
    }
}
六、Spring的事务管理【重点】
1. 编程式事务管理【了解】
- 所谓事务管理,即:按照给定的事务规则,来执行提交或回滚操作。其中:
- "给定的事务规则":用
TransactionDefinition表示 - "按照..来执行提交或回滚操作":用
PlatformTransactionManager来完成 TransactionStatus用于表示一个运行着的事务的状态
- "给定的事务规则":用
关于编程式事务的说明
-
编程式事务管理:通过编写代码的方式实现事务管理
-
编程式事务管理,因事务管理与业务功能耦合性太强,不方便维护,目前已经基本不用
spring 2.0 就已经提供了 xml配置的声明式事务管理的支持
-
如果想要了解Spring的编程式事务,可参考《资料/spring02_transaction_program》
-
-
以下API仅做介绍了解,用于了解Spring事务相关的API,并回顾事务相关的概念
PlatformTransactionManager
- 是Spring提供的事务管理器接口,它提供了我们常用的操作事务的方法:开启事务、提交事务等
- 注意:
PlatformTransactionManager是接口类型,不同的dao层技术有不同的实现,例如:- dao层是jdbcTemplate或Mybatis时,实现类是:
DataSourceTransactionManager - dao层是Hibernate时,实现类是:
HibernateTransactionManager
- dao层是jdbcTemplate或Mybatis时,实现类是:
| 方法 | 返回值 | 说明 |
|---|---|---|
getTransaction(TransactionDefinition td) |
TransactionStatus |
开启事务,并得到事务状态 |
commit(TransactionStatus status) |
提交事务 | |
rollback(TransactionStatus status) |
回滚事务 |
TransactionDefinition
- 事务的定义信息对象,提供了以下常用方法:
| 方法 | 参数 | 返回值 | 说明 |
|---|---|---|---|
getIsolationLevel() |
int |
获取事务的隔离级别 | |
getPropogationBehavior() |
int |
获取事务的传播行为 | |
getTimeout() |
int |
获取超时时间 | |
isReadOnly() |
boolean |
是否只读的事务 |
事务的隔离级别:
ISOLATION_DEFAULT:默认事务隔离级别- MySql默认隔离级别:
repeatable read - Oracle默认隔离级别:
read committed
- MySql默认隔离级别:
ISOLATION_READ_UNCOMMITTED:读未提交--存在脏读、不可重复读、幻读ISOLATION_READ_COMMITTED:读已提交--存在不可重复读、幻读ISOLATION_REPEATABLE_READ:重复读--存在幻读ISOLATION_SERIALIZABLE:串行化--没有并发问题
事务的传播行为:
用于解决业务方法调用业务方法时,事务的统一性问题的
比如: A方法开启事务了之后,就调用了B方法,那么B方法是否也会被纳入事务管理的范畴呢?
以下三个,是要当前事务的
PROPAGATION_REQUIRED:需要有事务。默认- 如果有事务,就使用这个事务
- 如果没有事务,就创建事务。
PROPAGATION_SUPPORTS:支持事务- 如果有事务,就使用当前事务,
- 如果没有事务,就以非事务方式执行(没有事务)
PROPAGATION_MANDATORY:强制的- 如果有事务,就使用当前事务
- 如果没有事务,就抛异常
以下三个,是不要当前事务的
PROPAGATION_REQUIRES_NEW:新建的- 如果有事务,就把事务挂起,再新建事务
- 如果没有事务,新建事务
PROPAGATION_NOT_SUPPORTED:不支持的- 如果有事务,就把事务挂起,以非事务方式执行
- 如果没有事务,就以非事务方式执行
PROPAGATION_NEVER:非事务的- 如果有事务,就抛异常
- 如果没有事务,就以非事务方式执行
最后一个,是特殊的
PROPAGATION_NESTED:嵌套的- 如果有事务,就在事务里再嵌套一个事务执行
- 如果没有事务,就是类似
REQUIRED的操作
事务运行的超时时间:
超时后事务自动回滚
- 默认值-1,表示没有超时限制
- 如果有,可以以秒为单位进行设置
是否只读:
- 如果设置为只读,那么方法只能查询,不能增删改
- 通常是查询方法设置为只读
TransactionStatus
- 提供了查询事务具体运行状态的方法,常用方法如下:
| 方法 | 返回值 | 说明 |
|---|---|---|
hasSavePoint() |
boolean |
事务是否有回滚点 |
isCompleted() |
boolean |
事务是否已经完成 |
isNewTransaction() |
boolean |
是否是新事务 |
isRollbackOnly() |
boolean |
事务是否是 要回滚的状态 |
小结
- PlatformTransactionManager接口:
- 如果dao层用的是Mybatis、JdbcTemplate:用DataSourceTransactionManager
- 如果dao层用的是Hibernate:用HibernateTransactionManager
- 事务定义信息:
- 事务的隔离级别:通常使用默认
ISOLATION_DEFAULT - 事务的传播行为:通常使用默认
PROPAGATION_REQUIRED - 事务的超时时间:如果事务执行超时,会回滚。单位是秒。值为-1表示永不超时
- 事务是否是只读:如果只读,事务里只能执行查询操作,不能增删改
- 事务的隔离级别:通常使用默认
2. 声明式事务管理【重点】
转账功能的环境准备
- zs给ls转账,不带事务的功能实现,为后边的事务控制做准备
1) 创建Maven项目,导入依赖坐标
- **dao层技术要使用
JdbcTemplate,不能使用dbutils**
<dependencies>
        <!--MySql驱动-->
        <dependency>
            <groupId>mysql</groupId>
            <artifactId>mysql-connector-java</artifactId>
            <version>5.1.47</version>
        </dependency>
        <!--c3p0连接池-->
        <dependency>
            <groupId>c3p0</groupId>
            <artifactId>c3p0</artifactId>
            <version>0.9.1.2</version>
        </dependency>
        <!--Spring上下文-->
        <dependency>
            <groupId>org.springframework</groupId>
            <artifactId>spring-context</artifactId>
            <version>5.0.2.RELEASE</version>
        </dependency>
        <!--Spring的JDBC和事务支持-->
        <dependency>
            <groupId>org.springframework</groupId>
            <artifactId>spring-jdbc</artifactId>
            <version>5.0.2.RELEASE</version>
        </dependency>
        <!--Aspect-->
        <dependency>
            <groupId>org.aspectj</groupId>
            <artifactId>aspectjweaver</artifactId>
            <version>1.9.4</version>
        </dependency>
        <!--Spring整合Junit-->
        <dependency>
            <groupId>org.springframework</groupId>
            <artifactId>spring-test</artifactId>
            <version>5.0.2.RELEASE</version>
        </dependency>
        <!--Junit-->
        <dependency>
            <groupId>junit</groupId>
            <artifactId>junit</artifactId>
            <version>4.12</version>
        </dependency>

        <dependency>
            <groupId>org.projectlombok</groupId>
            <artifactId>lombok</artifactId>
            <version>1.18.18</version>
        </dependency>

    </dependencies>
2) 创建dao,Service:
AccountDao和AccountDaoImpl:
package com.itheima.dao;

public interface AccountDao {

    void kouqian(String from , int moeny);
    void jiaqian(String to , int moeny);
}
package com.itheima.dao.impl;

import com.itheima.dao.AccountDao;
import org.springframework.beans.factory.annotation.Autowired;
import org.springframework.jdbc.core.JdbcTemplate;
import org.springframework.stereotype.Repository;

/*
    1. 把自己交给spring管理
    2. 让spring注入进来jdbctemplate
 */

@Repository
public class AccountDaoImpl implements AccountDao {

    @Autowired
    private JdbcTemplate template;

    public void kouqian(String from, int money) {
        String sql="update t_account set money = money - ? where name = ? ";
        template.update(sql , money , from);
    }

    public void jiaqian(String to, int money) {
        String sql="update t_account set money = money + ? where name = ? ";
        template.update(sql , money , to);
    }
}
AccountService和AccountServiceImpl
package com.itheima.service;

public interface AccountService {
    void transfer(String from ,String to , int money);
}
package com.itheima.service.impl;

import com.itheima.dao.AccountDao;
import com.itheima.service.AccountService;
import org.springframework.beans.factory.annotation.Autowired;
import org.springframework.stereotype.Service;

/*
    1. 把这个类交给spring管理
    2. 注入进来dao的对象!
 */

@Service
public class AccountServiceImpl implements AccountService {

    @Autowired
    private AccountDao dao;

    /**
     * 转账
     * @param from
     * @param to
     * @param money
     */
    public void transfer(String from, String to, int money) {

        //扣钱
        dao.kouqian(from ,money);

        //加钱
        dao.jiaqian(to , money);
    }
}
3) 配置bean和依赖注入
applicationContext.xml
<?xml version="1.0" encoding="UTF-8"?>
<beans xmlns="http://www.springframework.org/schema/beans"
       xmlns:xsi="http://www.w3.org/2001/XMLSchema-instance"
       xmlns:context="http://www.springframework.org/schema/context" xmlns:tx="http://www.springframework.org/schema/tx"
       xmlns:aop="http://www.springframework.org/schema/aop"
       xsi:schemaLocation="http://www.springframework.org/schema/beans http://www.springframework.org/schema/beans/spring-beans.xsd http://www.springframework.org/schema/context http://www.springframework.org/schema/context/spring-context.xsd http://www.springframework.org/schema/tx http://www.springframework.org/schema/tx/spring-tx.xsd http://www.springframework.org/schema/aop http://www.springframework.org/schema/aop/spring-aop.xsd">


    <!--1. 打开扫描-->
    <context:component-scan base-package="com.itheima"/>

    <!--2. 由于dao层需要用到jdbctemplate, 所以需要把这类交给spring管理-->
    <bean id="jdbcTemplate" class="org.springframework.jdbc.core.JdbcTemplate">
        <constructor-arg name="dataSource" ref="dataSource"/>
    </bean>

    <!--3.由于jdbctemplate 需要用到dataSource 所以要把DataSource交给spring管理-->
    <context:property-placeholder location="db.properties"/>
    <bean id="dataSource" class="com.mchange.v2.c3p0.ComboPooledDataSource">
        <property name="driverClass" value="${driverClass}"/>
        <property name="jdbcUrl" value="${jdbcUrl}"/>
        <property name="user" value="${user}"/>
        <property name="password" value="${password}"/>
    </bean>


</beans>
4) 功能测试
package com.itheima.test;

import com.itheima.service.AccountService;
import org.junit.Test;
import org.junit.runner.RunWith;
import org.springframework.beans.factory.annotation.Autowired;
import org.springframework.test.context.ContextConfiguration;
import org.springframework.test.context.junit4.SpringJUnit4ClassRunner;

@RunWith(SpringJUnit4ClassRunner.class)
@ContextConfiguration("classpath:applicationContext.xml")
public class TestAccountServiceImpl {

    @Autowired
    private AccountService as;

    @Test
    public void testTransfer(){
        as.transfer("zs", "ls" , 100);
    }
}
什么是声明式事务控制
- 介绍:
- 声明式事务控制,是采用声明的方式进行事务管理。所谓的声明,指的就是在配置文件中进行配置。
- 通过声明式(配置)的方式来处理事务,代替编码式事务控制
- 作用:
- 事务管理不入侵开发的组件,松耦合
- 业务逻辑代码中,没有事务的代码,甚至不会意识到正在事务当中。
- 事实上也应该如此,业务逻辑代码只处理业务功能,事务控制是属于系统层面的服务;如果想要更改事务,只需要在配置文件中重新配置即可
- 能以模板的方式使用
- Spring的声明式事务以AOP为基础,但是几乎是固定的配置模板,即使不懂AOP,也可以配置实现事务管理
- 易维护。
- 在不需要事务管理的时候,只需要在配置文件中进行修改,即可把事务管理移除掉,而不需要修改源码,方便维护
- 事务管理不入侵开发的组件,松耦合
- 注意:Spring的声明式事务,底层就是AOP
基于XML的声明式事务控制
1) 需要明确的事项
- 谁是目标类?(哪个类想用事务) AccountserviceImpl
- 谁是切入点?(哪个方法想用事务 ) transfer
- 谁是通知(增强)?(给上面的方法增强什么功能) 事务管理
- dao层技术是JdbcTemplate,事务的管理员使用DataSourceTransactionManager
2) 快速入门
需求描述
- 通过Spring的xml配置,对银行转账功能,进行事务控制
实现步骤
- 只需要修改
applicationContext.xml即可:- 在配置文件中增加aop和tx的名称空间
- 配置事务的通知(增强)
- 配置切面,把事务通知织入到转账方法中
功能实现
<?xml version="1.0" encoding="UTF-8"?>
<beans xmlns="http://www.springframework.org/schema/beans"
       xmlns:xsi="http://www.w3.org/2001/XMLSchema-instance"
       xmlns:context="http://www.springframework.org/schema/context" xmlns:tx="http://www.springframework.org/schema/tx"
       xmlns:aop="http://www.springframework.org/schema/aop"
       xsi:schemaLocation="http://www.springframework.org/schema/beans http://www.springframework.org/schema/beans/spring-beans.xsd http://www.springframework.org/schema/context http://www.springframework.org/schema/context/spring-context.xsd http://www.springframework.org/schema/tx http://www.springframework.org/schema/tx/spring-tx.xsd http://www.springframework.org/schema/aop http://www.springframework.org/schema/aop/spring-aop.xsd">


    <!--1. 打开扫描-->
    <context:component-scan base-package="com.itheima"/>

    <!--2. 由于dao层需要用到jdbctemplate, 所以需要把这类交给spring管理-->
    <bean id="jdbcTemplate" class="org.springframework.jdbc.core.JdbcTemplate">
        <constructor-arg name="dataSource" ref="dataSource"/>
    </bean>

    <!--3.由于jdbctemplate 需要用到dataSource 所以要把DataSource交给spring管理-->
    <context:property-placeholder location="db.properties"/>
    <bean id="dataSource" class="com.mchange.v2.c3p0.ComboPooledDataSource">
        <property name="driverClass" value="${driverClass}"/>
        <property name="jdbcUrl" value="${jdbcUrl}"/>
        <property name="user" value="${user}"/>
        <property name="password" value="${password}"/>
    </bean>

    <!--========================以下代码属于配置事务的范畴==========================-->


    <!--
    1. 定义事务的管理员
        1.1 spring 管理事务,一定是由管理员来完成事务的操作: 开启事务、提交事务、回滚事务
        1.2 根据dao层用到的技术不同,使用的管理员也不同
            jdbctempalte | mybatis  ============= DataSourceTransactionManager
            hibernate =========== HibernateTransactionManager
        1.3 事务管理员去操作事务的时候,需要用到连接对象,所以要给它注入DataSource
   -->
    <bean id="transactionManager" class="org.springframework.jdbc.datasource.DataSourceTransactionManager">
        <property name="dataSource" ref="dataSource"/>
    </bean>

    <!--
        2. 定义事务的规则
            tx:advice : 用来定义事务的规则
                id : 唯一标识 ,方便一会能找到这个规则
                transaction-manager : 要用哪个管理员来管理事务
             tx:attributes : 用来配置事务的规则,里面可以配置很多的事务规则,可以针对不同的方法配置不同的事务规则
                tx:method : 给具体的某一个方法 或者是 所有的方法配置事务的规则,这个标签可以写很多个!
    -->
    <tx:advice id="txAdvice" transaction-manager="transactionManager">
        <tx:attributes>
            <!--下面的切点表达式找到的所有方法,都给他们应用上事务,并且事务的规则都是默认的那一套-->
            <!--<tx:method name="*"/>-->
            <tx:method name="*" isolation="DEFAULT" propagation="REQUIRED" read-only="false" timeout="-1"/>


            <!-- save开头的方法,隔离级别是数据库默认的,事务传播特性是required,非只读 -->
            <tx:method name="save*" isolation="DEFAULT" propagation="REQUIRED" read-only="false"/>

            <!-- edit开头的方法,隔离级别是数据库默认的,事务传播特性是required,非只读 -->
            <tx:method name="edit*" isolation="DEFAULT" propagation="REQUIRED" read-only="false"/>

            <!-- delete开头的方法,隔离级别是数据库默认的,事务传播特性是required,非只读 -->
            <tx:method name="delete*" isolation="DEFAULT" propagation="REQUIRED" read-only="false"/>

            <!-- query开头的方法,隔离级别是数据库默认的,事务传播特性是required,非只读 -->
            <tx:method name="query*" isolation="DEFAULT" propagation="REQUIRED" read-only="true"/>

            <!-- find开头的方法,隔离级别是数据库默认的,事务传播特性是required,非只读 -->
            <tx:method name="find*" isolation="DEFAULT" propagation="REQUIRED" read-only="true"/>
        </tx:attributes>
    </tx:advice>

    <!--
        3. 定义切面:也就是表示哪个方法想用事务!
        aop:config :用于配置切面
            aop:advisor :专门是用来匹配|衔接上面的事务的规则
                advice-ref : 事务的规则 id写下来
                pointcut : 切入点,表示要去找方法!
     -->
    <aop:config>
        <aop:advisor advice-ref="txAdvice" pointcut="execution(* com.itheima..*.*(..))"/>
    </aop:config>

</beans>
3) 配置详解
aop:config:切面配置
这个标签的配置,就是为了找到方法,然后给这些方法应用上事务。
<aop:config>
    <aop:advisor advice-ref="txAdvice"
                 pointcut="execution(* com.itheima.service.impl..*.*(..))"/>
</aop:config>
aop:config:aop提供的用于配置切面的标签aop:advisor:Spring提供的专门用于配置事务的,作用类似于aop:aspectadvice-ref:要引入的通知配置,必须要引用<tx:advice>所配置的事务通知pointcut:切入点表达式
tx:advice:事务通知配置
-
tx:advice:-
id属性:唯一标识 -
transaction-manager属性:配置一个事务管理器,即PlatformTransactionManager的实现类对象类似于我们的自己编写的事务管理器,里边提供了事务管理的方法,例如:提交、回滚事务的方法等等
-
-
tx:attributes:在标签内部设置事务的属性信息(事务定义信息,TransactionDefinition) -
tx:method:要进行事务控制的方法配置,表示 要对哪些方法,进行什么样的事务控制name属性:要进行事务控制方法名称,可以使用通配符*isolation属性:事务的隔离级别设置propagation属性:事务传播特性read-only属性:是否只读timeout属性:超时时间。默认-1表示不限制,如果设置的话,单位是秒
<tx:advice id="txAdvice" transaction-manager="txManager">
    <tx:attributes>
        <!-- transfer方法:隔离级别是repeatable-read,事务传播特性是required,非只读 -->
        <tx:method name="transfer" isolation="REPEATABLE_READ" propagation="REQUIRED" read-only="false"/>

        <!-- save开头的方法,隔离级别是数据库默认的,事务传播特性是required,非只读 -->
        <tx:method name="save*" isolation="DEFAULT" propagation="REQUIRED" read-only="false"/>

        <!-- edit开头的方法,隔离级别是数据库默认的,事务传播特性是required,非只读 -->
        <tx:method name="edit*" isolation="DEFAULT" propagation="REQUIRED" read-only="false"/>

        <!-- delete开头的方法,隔离级别是数据库默认的,事务传播特性是required,非只读 -->
        <tx:method name="delete*" isolation="DEFAULT" propagation="REQUIRED" read-only="false"/>

        <!-- query开头的方法,隔离级别是数据库默认的,事务传播特性是required,非只读 -->
        <tx:method name="query*" isolation="DEFAULT" propagation="REQUIRED" read-only="true"/>

        <!-- find开头的方法,隔离级别是数据库默认的,事务传播特性是required,非只读 -->
        <tx:method name="find*" isolation="DEFAULT" propagation="REQUIRED" read-only="true"/>
    </tx:attributes>
</tx:advice>
4) 小结
- service里的方法,不需要有任何事务管理相关的代码
- 只需要在xml里配置即可
<!-- 配置事务管理器 -->
<bean id="txManager" class="DataSourceTransactionManager全限定类名">
	<property name="dataSource" ref="连接池"/>
</bean>

<!-- 配置事务通知 -->
<tx:advice id="txAdvice" transaction-manager="txManager">
	<tx:attributes>
    	<tx:method name="*"/>
    </tx:attributes>
</tx:advice>

<!-- 配置事务切面 -->
<aop:config>
	<aop:advisor advice-ref="txAdvice" pointcut="切入点表达式"/>
</aop:config>
基于注解的声明式事务控制
1) 快速入门
需求描述
- 通过Spring的注解配置,对银行转账功能,进行事务控制
实现步骤
- 在需要事务控制的方法/类上增加注解
@Transactional
@Transactional //类里面的所有方法都有事务
@Service
public class AccountServiceImpl implements AccountService {
}
- 在配置文件
applicationContext.xml中修改配置
- 配置事务管理器
- 开启事务的注解驱动
 <!--打开事务的开关-->
    <tx:annotation-driven transaction-manager="tm"/>
功能实现
- 修改银行转账的Service类:
AccountServiceImpl
package com.itheima.service.impl;

import com.itheima.dao.AccountDao;
import com.itheima.service.AccountService;
import org.springframework.beans.factory.annotation.Autowired;
import org.springframework.stereotype.Service;
import org.springframework.transaction.annotation.Isolation;
import org.springframework.transaction.annotation.Propagation;
import org.springframework.transaction.annotation.Transactional;

/*
    注解事务的配置:
        1. 在类上或者方法上打注解 @Transactional
            1.1 在类身上打,即表示该类中的所有方法都会应用上事务
            1.2 在方法身上打,即表示只有这个方法会应用上事务。

        2. 在xml里面打开注解的开关
            <tx:annotation-driven transaction-manager="transactionManager"/>
 */

//@Transactional  //1. 类上打注解
@Service
public class AccountServiceImpl implements AccountService {

    @Autowired
    private AccountDao dao;


    /**
     * 转账
     * @param from
     * @param to
     * @param money
     */
    @Transactional(isolation = Isolation.DEFAULT , propagation = Propagation.REQUIRED , readOnly = false , timeout = -1)
//    @Transactional
    public void transfer(String from, String to, int money) {

        //扣钱
        dao.kouqian(from ,money);

        //int a = 1 / 0 ;

        //加钱
        dao.jiaqian(to , money);
    }
}
- 修改配置文件
applicationContext.xml
<?xml version="1.0" encoding="UTF-8"?>
<beans xmlns="http://www.springframework.org/schema/beans"
       xmlns:xsi="http://www.w3.org/2001/XMLSchema-instance"
       xmlns:context="http://www.springframework.org/schema/context" xmlns:tx="http://www.springframework.org/schema/tx"
       xmlns:aop="http://www.springframework.org/schema/aop"
       xsi:schemaLocation="http://www.springframework.org/schema/beans http://www.springframework.org/schema/beans/spring-beans.xsd http://www.springframework.org/schema/context http://www.springframework.org/schema/context/spring-context.xsd http://www.springframework.org/schema/tx http://www.springframework.org/schema/tx/spring-tx.xsd http://www.springframework.org/schema/aop http://www.springframework.org/schema/aop/spring-aop.xsd">


    <!--1. 打开扫描-->
    <context:component-scan base-package="com.itheima"/>

    <!--2. 由于dao层需要用到jdbctemplate, 所以需要把这类交给spring管理-->
    <bean id="jdbcTemplate" class="org.springframework.jdbc.core.JdbcTemplate">
        <constructor-arg name="dataSource" ref="dataSource"/>
    </bean>

    <!--3.由于jdbctemplate 需要用到dataSource 所以要把DataSource交给spring管理-->
    <context:property-placeholder location="db.properties"/>
    <bean id="dataSource" class="com.mchange.v2.c3p0.ComboPooledDataSource">
        <property name="driverClass" value="${driverClass}"/>
        <property name="jdbcUrl" value="${jdbcUrl}"/>
        <property name="user" value="${user}"/>
        <property name="password" value="${password}"/>
    </bean>

    <!--========================以下代码属于配置事务的范畴==========================-->

    <!--
    1. 定义事务的管理员
        1.1 spring 管理事务,一定是由管理员来完成事务的操作: 开启事务、提交事务、回滚事务
        1.2 根据dao层用到的技术不同,使用的管理员也不同
            jdbctempalte | mybatis  ============= DataSourceTransactionManager
            hibernate =========== HibernateTransactionManager
        1.3 事务管理员去操作事务的时候,需要用到连接对象,所以要给它注入DataSource
   -->
    <bean id="transactionManager" class="org.springframework.jdbc.datasource.DataSourceTransactionManager">
        <property name="dataSource" ref="dataSource"/>
    </bean>


    <!--2. 打开注解事务的开关-->
    <!--<tx:annotation-driven transaction-manager="transactionManager"/>-->

    <!--如果事务的管理员的id名字正好是: transactionManager 那么可以省略掉 transaction-manager 属性不赋值!-->
    <tx:annotation-driven />
</beans>
2) 配置详解
注解@Transactional
- 加在 需要进行事务控制的方法/类上,用于代替xml配置中的
tx:advice和事务切面的aop:config isolation属性:设置事务的隔离级别,从枚举Isolation中取值propagation属性:设置事务的传播特性,从枚举Propagation中取值readOnly属性:设置是否是只读的timeout属性:设置超时时间,单位秒。-1表示不限制
开启事务的注解驱动
XML方式
- 使用注解进行事务管理,必须要在
applicationContext.xml中开启 事务的注解驱动,否则无效
<!-- 开启事务的注解驱动。`transaction-manager`属性:指定事务管理器 -->
<tx:annotation-driven transaction-manager="txManager"/>
<!-- 开启事务的注解驱动。默认注入名称为transactionManager的事务管理器 -->
<tx:annotation-driver/>
纯注解方式
-
如果是纯注解,开启事务的注解驱动,需要在核心配置类上增加注解:
@EnableTransactionManagement -
配置示例
package com.itheima.config;

import com.mchange.v2.c3p0.ComboPooledDataSource;
import org.springframework.beans.factory.annotation.Value;
import org.springframework.context.annotation.Bean;
import org.springframework.context.annotation.ComponentScan;
import org.springframework.context.annotation.Configuration;
import org.springframework.context.annotation.PropertySource;
import org.springframework.jdbc.core.JdbcTemplate;
import org.springframework.jdbc.datasource.DataSourceTransactionManager;
import org.springframework.transaction.PlatformTransactionManager;
import org.springframework.transaction.annotation.EnableTransactionManagement;

import javax.sql.DataSource;
import java.beans.PropertyVetoException;

@Configuration
@ComponentScan("com.itheima")
@PropertySource("db.properties")
@EnableTransactionManagement
public class AppConfig {

    @Value("${driverClass}")
    private String driverClass;

    @Value("${jdbcUrl}")
    private String jdbcUrl;

    @Value("${user}")
    private String user;

    @Value("${password}")
    private String password;


    //创建jdbctemplate
    @Bean
    public JdbcTemplate template(DataSource dataSource){
        return new JdbcTemplate(dataSource);
    }


    @Bean
    public DataSource dataSource() throws PropertyVetoException {
        ComboPooledDataSource ds = new ComboPooledDataSource();
        ds.setDriverClass(driverClass);
        ds.setJdbcUrl(jdbcUrl);
        ds.setUser(user);
        ds.setPassword(password);
        return ds;
    }

    @Bean
    public PlatformTransactionManager transactionManager(DataSource dataSource){
        DataSourceTransactionManager tm = new DataSourceTransactionManager();
        tm.setDataSource(dataSource);
        return tm;
    }

}
- 单元测试
package com.itheima.test;

import com.itheima.config.AppConfig;
import com.itheima.service.AccountService;
import org.junit.Test;
import org.junit.runner.RunWith;
import org.springframework.beans.factory.annotation.Autowired;
import org.springframework.test.context.ContextConfiguration;
import org.springframework.test.context.junit4.SpringJUnit4ClassRunner;

@RunWith(SpringJUnit4ClassRunner.class)
@ContextConfiguration(classes = AppConfig.class)
public class TestAccountServiceImpl02 {

    @Autowired
    private AccountService as;

    @Test
    public void testTransfer(){
        as.transfer("zs", "ls" , 100);
    }
}
3) 小结
- 在xml文件里
<!-- 配置事务管理器 -->
<bean id="txManager" class="DataSourceTransactionManager全限定类名">
	<property name="dataSource" ref="连接池"/>
</bean>

<!-- 开启事务的注解驱动 -->
<tx:annotation-driven transaction-manager="txManager"/>
<context:component-scan base-package="com.itheima"/>
- 哪个方法需要事务管理,就在哪个方法上加注解:
@Transactional
拓展了解
通知中获取切入点对象
介绍
如果想要在通知方法中,获取切入点对象。可以在通知方法里直接增加以下参数:
- Spring提供的运行时连接点/切入点对象:
| 类名 | 介绍 |
|---|---|
org.aspectj.lang.JoinPoint |
切入点对象, 用于前置、后置、异常、最终通知,作为通知方法的形参 |
org.aspectj.lang.ProceedingJoinPoint |
切入点对象,是JoinPoint的子接口用于环绕通知,作为通知方法的参数 |
org.aspectj.lang.JoinPoint的常用方法
| 返回值 | 方法名 | 说明 |
|---|---|---|
java.lang.Object[] |
getArgs() |
连接点的实参值. |
Signature |
getSignature() |
连接点方法签名 |
java.lang.Object |
getTarget() |
Returns the target object. |
java.lang.Object |
getThis() |
Returns the currently executing object. |
java.lang.String |
toLongString() |
Returns an extended string representation of the join point. |
java.lang.String |
toShortString() |
Returns an abbreviated string representation of the join point. |
java.lang.String |
toString() |
|
JoinPoint.StaticPart |
getStaticPart() |
Returns an object that encapsulates the static parts of this join point. |
java.lang.String |
getKind() |
Returns a String representing the kind of join point. |
ProceedingJoinPoint是JoinPoint的子接口,它除了上述方法,还有
| 返回值 | 方法名 | 说明 |
|---|---|---|
java.lang.Object |
proceed() |
执行下一个通知; 如果后边没有通知了,调用目标方法 |
java.lang.Object |
proceed(Object[] args) |
执行下一个通知; 如果后边没有通知了,调用目标方法 |
示例
public class MyAdvice {

    public void before(JoinPoint jp) {
        System.out.println("前置:" + jp.getSignature());
    }

    public void afterReturning(JoinPoint jp){
        System.out.println("后置:" + jp.getSignature());
    }

    public void afterThrowing(JoinPoint jp){
        System.out.println("异常:" + jp.getSignature());
    }

    public void after(JoinPoint jp){
        System.out.println("最终:" + jp.getSignature());
    }

    public Object around(ProceedingJoinPoint pjp){
        Object result = null;
        try {
            System.out.println("==环绕:前置通知==");


            //调用对象的方法,返回方法执行结果
            result = pjp.proceed(pjp.getArgs());

            System.out.println("==环绕:后置通知==");
        } catch (Throwable throwable) {
            System.out.println("==环绕:异常通知==");
            throwable.printStackTrace();
        } finally {
            System.out.println("==环绕:最终通知==");
        }
        return result;
    }
}
通知中绑定参数
- 不同类型的通知,可以绑定的参数是不同的
前置通知
- 在通知中,可以绑定参数:获取切入点方法的实参
- 通知方法:
public void before(JoinPoint jp, Object params){
    System.out.println("==前置通知==");
    System.out.println("连接点:" + jp.getSignature());
    System.out.println("实参:" + params);
}
- 切入点表达式:
<aop:before method="before"
            pointcut="execution(* com.itheima..*.*(..)) and args(params)"/>
后置通知
- 在通知中,可以绑定参数:获取切入点方法的实参和返回值
- 通知方法:
public void afterReturning(JoinPoint jp, Object params, Object result){
    System.out.println("==后置通知==");
    System.out.println("方法参数:" + params);
    System.out.println("返回值:" + result);
}
- 切入点表达式:
<aop:after-returning method="afterReturning"
                     pointcut="execution(* com.itheima..*.*(..)) and args(params)"
                     returning="result"/>
异常通知
- 在通知中,可以绑定参数:获取切入点方法的实参,和异常信息对象
- 通知方法:
public void afterThrowing(Exception ex, Object params){
    System.out.println("==异常通知==");
    System.out.println("方法实参:" + params);
    System.out.println("异常:" + ex);
}
- 切入点表达式:
<aop:after-throwing method="afterThrowing"
                    pointcut="execution(* com.itheima..*.*(..)) and args(params)"
                    throwing="ex"/>
最终通知
- 在通知中,可以绑定参数:获取方法的实参
- 通知方法:
public void after(Object params){
    System.out.println("==最终通知==");
    System.out.println("方法实参:" + params);
}
- 切入点表达式:
<aop:after method="after"
           pointcut="execution(* com.itheima..*.*(..)) and args(params)"/>
总结:
-
AOP
-
是什么?
- 面向切面编程,可以降低程序间的耦合,很好的隔离各个部分的代码,提高代码的重用,可以在不改动源码的前提下,完成对原有功能的升级、扩展!
-
怎么用?
-
- 要提供目标类
-
- 要提供扩展出来的功能类
-
- 配置切面
1. 把目标类和扩展的功能类都交给spring托管 2. 配置切面 <aop:config> <aop:aspect ref="myAdvice"> <aop:before method="print" pointcut="excution(* com.itheima..*.*(..))"/> </aop:aspect> </aop:config> -
-
通知的种类
- 前置增强
- 后置增强
- 异常增强
- 最终增强
- 环绕增强
-
-
事务管理
-
在spring里面,事务的管理有两种方式: 编程式事务管理 和 声明式事务管理
-
声明式事务管理
- xml方式
1. 配置管理员 2. 配置事务的规则 3. 配置切面: 表示找方法,给什么样的方法应用上事务。- 注解方式
-
- 类上|方法上 打注解 : @Transactional
- 打开开关: <tx:annotation-driven transaction-manager="transactionManager"/>
-
- 纯注解的就是这个开关: @EnableTransactionManagement // 启用事务管理员
-

 浙公网安备 33010602011771号