
第3章 我的主页
今日内容介绍
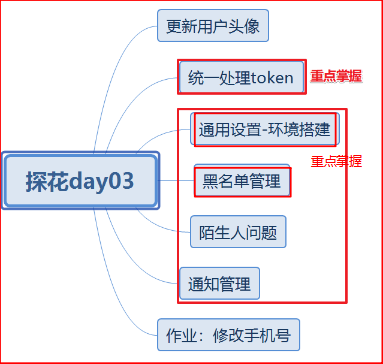
学习目标
- 更新用户头像-作业
- 统一token处理
- 实现通用信息查询
- 实现陌生人管理
- 实现黑名单管理
- 实现通知设置
- 实现修改手机号码-作业
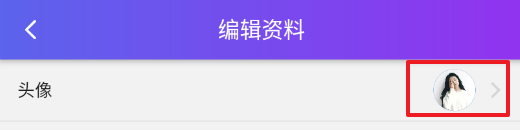
1. 更新用户头像(作业)
【目标】
掌握更新用户头像
【路径】
1:更新用户头像分析
2:更新用户头像实现
【讲解】
1.1. 服务消费者-更新用户头像

1.1.1. 接口说明
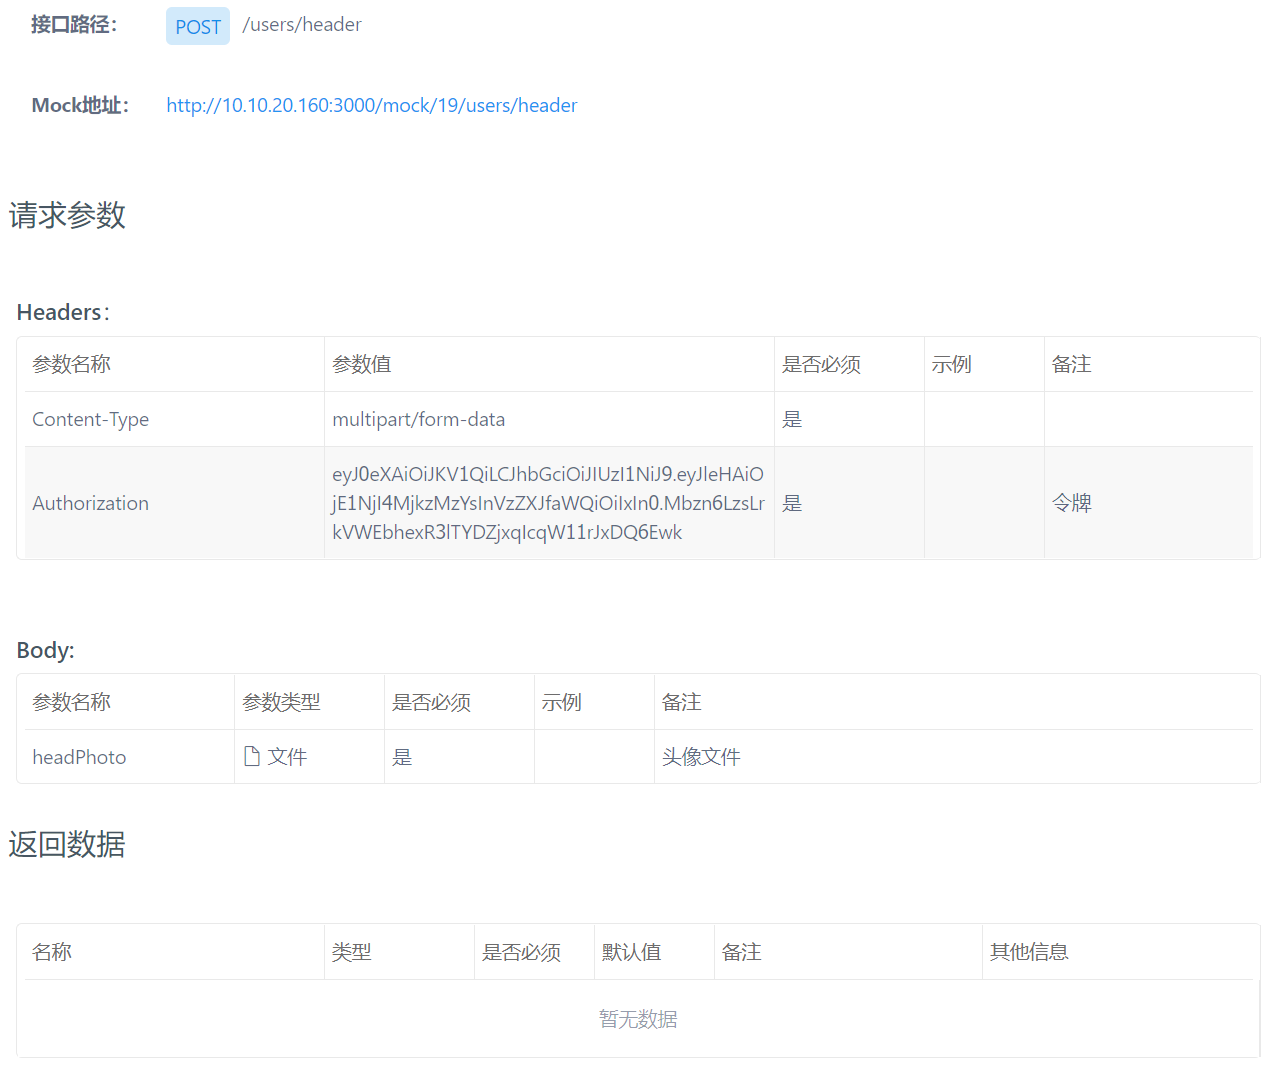
1.1.2. UserInfoController
tanhua-server模块新增更新头像请求
@Autowired
private UserService userService;
/**
  * 更新用户头像
  */
@RequestMapping(value = "/header",method = RequestMethod.POST)
public ResponseEntity header(@RequestHeader("Authorization") String token, MultipartFile headPhoto) {
    userService.header(token,headPhoto);
    return ResponseEntity.ok(null);
}
1.1.3. UserService
tanhua-server模块新增更新头像业务处理
/**
  * 更新用户头像
  */
public void header(String token, MultipartFile headPhoto) {
    log.info("更新用户头像{},token{}",headPhoto.getOriginalFilename(),token);
    try {
        //1.基于token获取用户信息
        String userStr = redisTemplate.opsForValue().get("TOKEN_" + token);
        if(StringUtils.isEmpty(userStr)){
            throw new TanHuaException("登陆超时,请重新登陆");
        }
        User user = JSON.parseObject(userStr, User.class);
        Long userId = user.getId();
        //2.查询用户信息(后续用于删除头像)
        UserInfo userInfo = userInfoApi.findByUserId(userId);
        //更新头像之前的头像
        String oldAvatar = userInfo.getAvatar();
        //3.人脸识别
        boolean detect = faceTemplate.detect(headPhoto.getBytes());
        if(!detect){
            throw new TanHuaException("没有检测到人脸,请重新上传");
        }
        log.info("人脸识别成功了....");

        //4.上传头像
        String filename = headPhoto.getOriginalFilename();
        String avatar = ossTemplate.upload(filename, headPhoto.getInputStream());
        log.info("图片上传成功了....");

        //5.更新用户头像
        userInfo  = new UserInfo();//更新头像
        userInfo.setAvatar(avatar);//头像
        userInfo.setId(userId);
        userInfoApi.update(userInfo);
        log.info("更新用户头像成功了....");
        //6.删除头像
        ossTemplate.deleteFile(oldAvatar);
        log.info("删除阿里云头像成功了....");
    } catch (IOException e) {
        e.printStackTrace();
        throw new TanHuaException("更新头像失败,请稍后重试");
    }
}
1.1.4. OssTemplate
tanhua-commons模块修改OssTemplate,添加删除头像方法
/**
  * 删除头像
  */
public void deleteFile(String objectName) {
    // Endpoint以杭州为例,其它Region请按实际情况填写。
    String endpoint = ossProperties.getEndpoint();
    // 阿里云主账号AccessKey拥有所有API的访问权限,风险很高。强烈建议您创建并使用RAM账号进行API访问或日常运维,请登录 https://ram.console.aliyun.com 创建RAM账号。
    String accessKeyId = ossProperties.getAccessKeyId();
    String accessKeySecret = ossProperties.getAccessKeySecret();
    String bucketName = ossProperties.getBucketName();
    // 创建OSSClient实例。
    OSS ossClient = new OSSClientBuilder().build(endpoint, accessKeyId, accessKeySecret);
    // 删除文件。如需删除文件夹,请将ObjectName设置为对应的文件夹名称。如果文件夹非空,则需要将文件夹下的所有object删除后才能删除该文件夹。
    ossClient.deleteObject(bucketName, objectName.replace(ossProperties.getUrl()+ "/",""));
    // 关闭OSSClient。
    ossClient.shutdown();
}
1.2. 服务提供者-更新用户头像
1.2.1. UserInfoApi
tanhua-dubbo-interface模块创建findByUserId方法
/**
  * 根据用户id查询用户信息对象
  */
UserInfo findByUserId(Long userId);
1.2.2. UserInfoApiImpl
tanhua-dubbo-service模块创建findByUserId方法
@Override
public UserInfo findByUserId(Long userId) {
	return userInfoMapper.selectById(userId);
}
1.2.3. 测试
【小结】
掌握更新用户头像
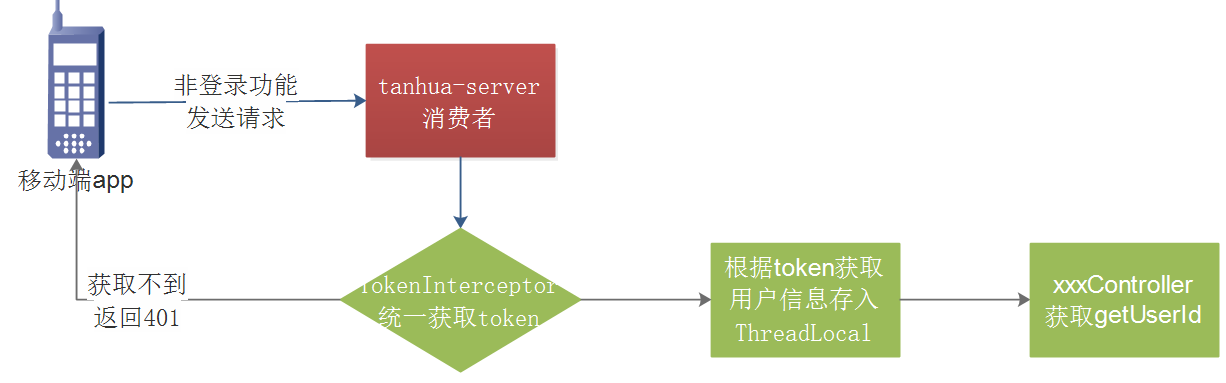
2. 统一处理token(重点)
【目标】
掌握ThreadLocal结合SpringMvc拦截器实现统一token处理
【路径】
1:token解析存在问题分析
2:技术方案实现分析
3:统一token处理实现
【讲解】
在之前的开发代码中,我们会在每一个Service中对token做解析获取用户,这是一项繁琐且重复度比较高的工作。有什么好的解决方法吗?本节内容我通过ThreadLocal结合SpringMVC拦截器来实现统一token处理
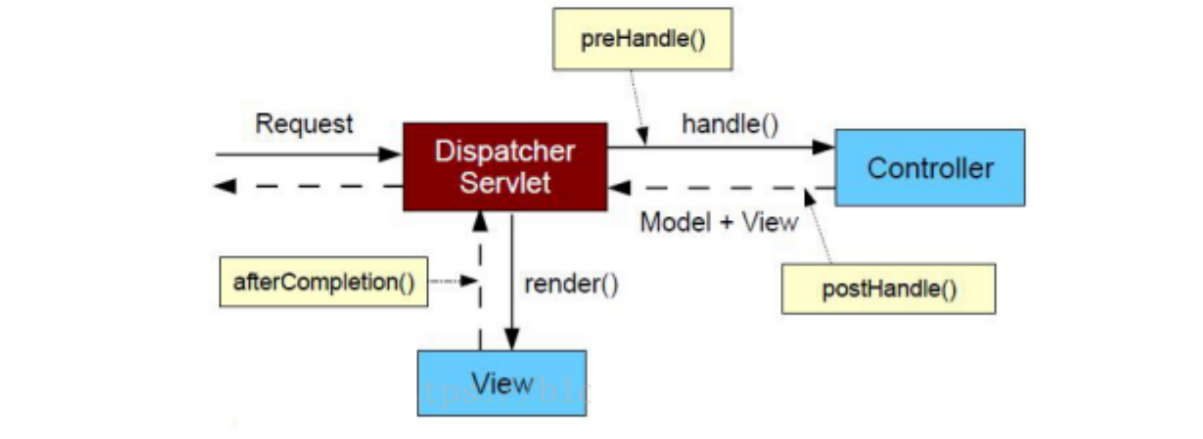
2.1. 拦截器简介
拦截器是Spring提供的一种技术, 它的功能似于过滤器Filter,它会在进入controller之前,离开controller之后以及页面渲染完毕之后进行拦截。
拦截器对比过滤器:(面试之前背)
https://www.cnblogs.com/panxuejun/p/7715917.html
- 二者规范不同:Filter是在servlet规范中定义,用于servlet容器中。而拦截器是spring框架提供的,用于spring容器内。
- 使用范围不同:Filter是servlet规定的,只能用于web工程中。而拦截器没有此限制。
拦截器的使用步骤:
-
自定义一个类实现HandleInterceptor接口。
-
实现HandlerInterceptor接口的三个方法:
- preHandle() : 在目标方法之前执行,一般用于预处理
- postHandle():在目标方法执行之后执行,一般用于后处理
- afterCompletion():整个请求处理完毕,在视图渲染完毕时回调,一般用于资源的清理或性能的统计
-
在SpringBoot中注册拦截器并使用
2.1.1. TokenInterceptor
tanhua-server模块新增自定义拦截器
package com.tanhua.server.interceptor;

import org.springframework.stereotype.Component;
import org.springframework.web.servlet.HandlerInterceptor;

import javax.servlet.http.HttpServletRequest;
import javax.servlet.http.HttpServletResponse;

@Component
public class TokenInterceptor implements HandlerInterceptor {
    @Override
    public boolean preHandle(HttpServletRequest request, HttpServletResponse response, Object handler) throws Exception {
        System.out.println("进入前置处理器");
        return false;
    }
}
2.1.2. WebConfig
tanhua-server模块新增注册拦截器
package com.tanhua.server.config;

import com.tanhua.server.interceptor.TokenInterceptor;
import org.springframework.beans.factory.annotation.Autowired;
import org.springframework.context.annotation.Configuration;
import org.springframework.web.servlet.config.annotation.InterceptorRegistry;
import org.springframework.web.servlet.config.annotation.WebMvcConfigurer;

@Configuration
public class WebConfig implements WebMvcConfigurer {

    @Autowired
    private TokenInterceptor tokenInterceptor;

    @Override
    public void addInterceptors(InterceptorRegistry registry) {
        registry.addInterceptor(tokenInterceptor)
            .addPathPatterns("/**") // 拦截所有的请求
            // 过滤的请求
            .excludePathPatterns("/user/login","/user/loginVerification");
    }
}
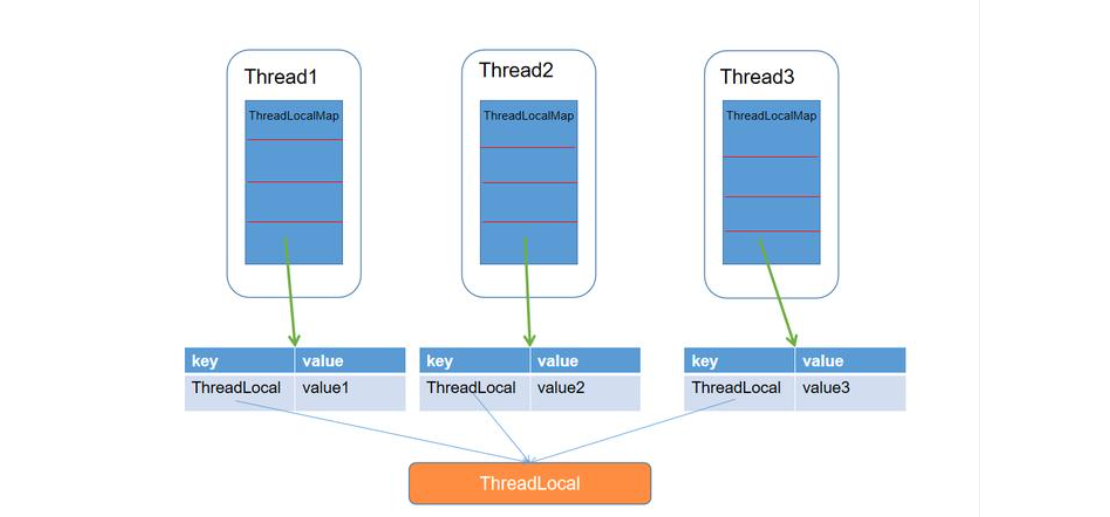
2.2. ThreadLocal简介
ThreadLocal提供线程本地变量,每个线程拥有本地变量的副本,各个线程之间的变量互不干扰。ThreadLocal实现在多线程环境下去保证变量的安全。
ThreadLocal的作用是提供线程内的局部变量,这种变量在线程的生命周期内起作用。
作用:提供一个线程内公共变量(比如本次请求的用户信息),减少同一个线程内多个函数或者组件之间一些公共变量的传递的复杂度,或者为线程提供一个私有的变量副本,这样每一个线程都可以随意修改自己的变量副本,而不会对其他线程产生影响。
Threadlocal使用方法很简单
ThreadLocal<T> threadLocal = new ThreadLocal<T>();
threadLocal.set() //将数据绑定到当前线程
threadLocal.get() //从当前线程中获取数据
2.3. 统一处理token实现
2.3.1. UserHolder
tanhua-server模块新增UserHolder
package com.tanhua.server.interceptor;

import com.tanhua.domain.db.User;

/**
 * 登陆用户信息持有者
 * 通过ThreadLocal的形式,存储登陆用户的数据
 */
public class UserHolder {

    private static ThreadLocal<User> userThreadLocal = new ThreadLocal<User>();

    /**
     * 向当前线程中存入用户数据
     * @param user
     */
    public static void setUser(User user){
        userThreadLocal.set(user);
    }

    /**
     * 从当前线程中获取用户数据
     * @return
     */
    public static User getUser(){
        return userThreadLocal.get();
    }

    /**
     * 获取登陆用户的id
     * @return
     */
    public static Long getUserId(){
        return userThreadLocal.get().getId();
    }
}
2.3.2. TokenInterceptor
tanhua-server模块新增UserHolder
package com.tanhua.server.interceptor;

import com.tanhua.domain.db.User;
import com.tanhua.server.service.UserService;
import lombok.extern.slf4j.Slf4j;
import org.springframework.beans.factory.annotation.Autowired;
import org.springframework.stereotype.Component;
import org.springframework.util.StringUtils;
import org.springframework.web.servlet.HandlerInterceptor;

import javax.servlet.http.HttpServletRequest;
import javax.servlet.http.HttpServletResponse;

/**
 * 统一处理token拦截器类
 */
@Component
@Slf4j
public class TokenInterceptor implements HandlerInterceptor {

    @Autowired
    private UserService userService;

    /**
     * 进入controller之前执行此方法
     *
     * @param request
     * @param response
     * @param handler
     * @return
     * @throws Exception
     */
    public boolean preHandle(HttpServletRequest request, HttpServletResponse response, Object handler) throws Exception {
        log.debug("进入拦截器了。。。");
        //1 获取请求头中token
        String token = request.getHeader("Authorization");
        //2 token如果为空
        if (StringUtils.isEmpty(token)) {
            response.setStatus(401);
            return false;
        }
        //3 根据token获取user对象
        User user = userService.getUserByToken(token);
        //4 用户对象不存在,返回401 权限不足 return false;
        if (user == null) {
            response.setStatus(401);
            return false;
        }
        //5 用户存在,存入ThreadLocal
        UserHolder.setUser(user);
        return true;
    }
}
2.3.3. UserInfoService
package com.tanhua.server.service;

import com.alibaba.fastjson.JSON;
import com.tanhua.domain.db.User;
import com.tanhua.domain.db.UserInfo;
import com.tanhua.domain.vo.ErrorResult;
import com.tanhua.domain.vo.UserInfoVo;
import com.tanhua.dubbo.api.db.UserInfoApi;
import com.tanhua.server.exception.TanHuaException;
import com.tanhua.server.interceptor.UserHolder;
import com.tanhua.server.utils.GetAgeUtil;
import lombok.extern.slf4j.Slf4j;
import org.apache.dubbo.config.annotation.Reference;
import org.springframework.beans.BeanUtils;
import org.springframework.beans.factory.annotation.Autowired;
import org.springframework.data.redis.core.RedisTemplate;
import org.springframework.stereotype.Service;
import org.springframework.transaction.annotation.Transactional;
import org.springframework.util.StringUtils;

/**
 * 用户信息管理-业务逻辑处理层
 */
@Service
@Transactional
@Slf4j //日志注解
public class UserInfoService {


    @Autowired
    private RedisTemplate<String,String> redisTemplate;

    @Reference
    private UserInfoApi userInfoApi;

    @Autowired
    private UserService userService;

    /**
     *  用户资料 - 读取
     */
    public UserInfoVo findUserInfoByUserId(Long userID, Long huanxinID) {
        //userID  huanxinID 这两个参数没有用到 都是null值
        //a.从token中获取用户信息
        Long currentUserId = UserHolder.getUserId();
        //d.跟用户id查询用户信息(调用服务)
        UserInfo userInfo = userInfoApi.findUserInfoByUserId(currentUserId);
        //将userInfo copy userInfoVo
        UserInfoVo userInfoVo = new UserInfoVo();
        BeanUtils.copyProperties(userInfo,userInfoVo);
        //age类型单独处理下 将userInfo中Integer 类型 转为 String类型
        if(!StringUtils.isEmpty(userInfo.getAge())){
            userInfoVo.setAge(String.valueOf(userInfo.getAge()));
        }
        return userInfoVo;
    }

    /**
     *  用户资料 - 保存
     */
    public void updateUserInfoByUserId(UserInfoVo userInfoVo) {
        //a.从token中获取用户信息
        Long currentUserId = UserHolder.getUserId();
        //d.根据用户id更新用户信息(调用服务)
        UserInfo userInfo = new UserInfo();
        //将UserInfoVo copy UserInfo
        BeanUtils.copyProperties(userInfoVo,userInfo);
        //设置当前用户id
        userInfo.setId(currentUserId);
        //还存在问题
        if(!StringUtils.isEmpty(userInfoVo.getBirthday())){
            userInfo.setAge(GetAgeUtil.getAge(userInfoVo.getBirthday()));
        }
        userInfoApi.updateUserInfo(userInfo);
    }
}
2.3.4. UserService
package com.tanhua.server.service;

import com.alibaba.fastjson.JSON;
import com.tanhua.commons.templates.FaceTemplate;
import com.tanhua.commons.templates.OssTemplate;
import com.tanhua.commons.templates.SmsTemplate;
import com.tanhua.domain.db.User;
import com.tanhua.domain.db.UserInfo;
import com.tanhua.domain.vo.ErrorResult;
import com.tanhua.domain.vo.UserInfoVo;
import com.tanhua.dubbo.api.db.UserApi;
import com.tanhua.dubbo.api.db.UserInfoApi;
import com.tanhua.server.exception.TanHuaException;
import com.tanhua.server.interceptor.UserHolder;
import com.tanhua.server.utils.JwtUtils;
import lombok.extern.slf4j.Slf4j;
import org.apache.commons.lang3.RandomStringUtils;
import org.apache.dubbo.config.annotation.Reference;
import org.springframework.beans.BeanUtils;
import org.springframework.beans.factory.annotation.Autowired;
import org.springframework.beans.factory.annotation.Value;
import org.springframework.data.redis.core.RedisTemplate;
import org.springframework.stereotype.Service;
import org.springframework.transaction.annotation.Transactional;
import org.springframework.util.StringUtils;
import org.springframework.web.multipart.MultipartFile;

import java.io.IOException;
import java.util.HashMap;
import java.util.Map;
import java.util.concurrent.TimeUnit;

/**
 * 用户管理-业务逻辑处理层
 */
@Service
@Transactional
@Slf4j //日志注解
public class UserService {

    //调用服务提供者
    @Reference
    private UserApi userApi;

    @Reference
    private UserInfoApi userInfoApi;

    @Autowired
    private RedisTemplate<String,String> redisTemplate;

    //获取验证码前缀
    @Value("${tanhua.redisValidateCodeKeyPrefix}")
    private String codePrefix;

    @Autowired
    private SmsTemplate smsTemplate;

    @Autowired
    private JwtUtils jwtUtils;

    @Autowired
    private FaceTemplate faceTemplate;

    @Autowired
    private OssTemplate ossTemplate;


    /**
     *完成用户保存返回用户id
     * ResponseEntity:spring提供对象
     * ResponseEntity.ok:200
     */
    public Long saveUser(User user) {
        return userApi.saveUser(user);
    }


    /**
     * 根据手机号码查询用户
     */
    public User findByMobile(String mobile) {
        return userApi.findByMobile(mobile);
    }

    /**
     * 注册登录-发送验证码
     * @param phone
     */
    public void sendCode(String phone) {
        //a.根据手机号查询redis记录是否存在
        String key = codePrefix+phone;
        String redisCode = redisTemplate.opsForValue().get(key);
        //b.redis记录存在,验证码还未失效,请登录
        if(!StringUtils.isEmpty(redisCode)){
            //1.抛出异常
            //throw new RuntimeException("验证码还未失效,请直接登录");
            throw new TanHuaException(ErrorResult.duplicate());
        }
        //c.redis记录不存在,调用阿里云短信接口发送短信(单独抽取组件)
        String numCode = RandomStringUtils.randomNumeric(6);
        numCode="111111";
        if(false) {//永不执行
            Map<String, String> smsRs = smsTemplate.sendValidateCode(phone, numCode);
            if (smsRs != null) {
                throw new TanHuaException(ErrorResult.error());
            }
        }
        log.debug("手机号:::{},发送验证码:::{}",phone,numCode);
        //d.将验证码写入redis 5分钟有效
        redisTemplate.opsForValue().set(key,numCode,5, TimeUnit.MINUTES);
    }


    /**
     * 注册登录-新用户注册登录或老用户直接登录
     */
    public Map loginVerification(String phone, String verificationCode) {
        boolean flag = false;//默认老用户
        //a.根据手机号查询redis验证码是否存在
        String key = codePrefix+phone;
        String redisCode = redisTemplate.opsForValue().get(key);
        //b.不存在,验证码失效
        if(StringUtils.isEmpty(redisCode)){
            throw new TanHuaException(ErrorResult.loginError());
        }
        //c.存在,校验验证码 验证码错误提示
        if(!redisCode.equals(verificationCode)){
            throw new TanHuaException(ErrorResult.validateCodeError());
        }
        //d.验证码成功,根据手机号查询tb_user表记录是否存在
        User user = userApi.findByMobile(phone);
        //e.如果用户不存在,自动注册
        if(user == null){
            user = new User();
            user.setMobile(phone);
            Long userId = userApi.saveUser(user);
            user.setId(userId);//将userId设置到user对象中
            flag = true;
        }
        //f.生成token(单独抽取来分析) 存入redis 返回给前端(token isNew)
        String token = jwtUtils.createJWT(phone, user.getId());
        //存入redis
        String userStr = JSON.toJSONString(user);
        redisTemplate.opsForValue().set("TOKEN_"+token,userStr,1,TimeUnit.DAYS);//key:token value:用户对象
        Map rsMap = new HashMap();
        rsMap.put("token",token);
        rsMap.put("isNew",flag);//true新用户 false老用户
        //g.删除验证码
        redisTemplate.delete(key);
        return rsMap;
    }

    /**
     * 新用户---1填写资料
     */
    public void loginReginfo(UserInfoVo userInfoVo) {
        Long userId = UserHolder.getUserId();
        UserInfo userInfo = new UserInfo();
        //copy代码尽量要放到手动设置值前面
        BeanUtils.copyProperties(userInfoVo,userInfo);//属性名称 类型一样即可copy //昵称 生日 性别 城市
        //将userInfoVo 设置到 UserInfo中
        userInfo.setId(userId);//用户信息表id 跟 用户表 一对一关系
       /* userInfo.setNickname(userInfoVo.getNickname());//昵称
        userInfo.setBirthday(userInfoVo.getBirthday());//生日
        userInfo.setGender(userInfoVo.getGender());//性别
        userInfo.setCity(userInfoVo.getCity());//城市*/
        userInfoApi.saveUserInfo(userInfo);
    }

    /**
     * 根据token作为key查询redis中user信息是否存在
     * @param headToken
     * @return
     */
    public User getUserByToken(String headToken) {
        String key = "TOKEN_" + headToken;
        //a.从token中获取用户信息
        String userStr = redisTemplate.opsForValue().get(key);
        //b.如果不存在,则登录超时
        if (StringUtils.isEmpty(userStr)) {
            return null;
        }
        //c.如果存在,往个人信息表保存用户信息记录(调用服务提供者)
        //将key进行续期 1天有效
        redisTemplate.expire(key,1,TimeUnit.DAYS);
        //基于userStr获取user对象 得到userId
        return JSON.parseObject(userStr, User.class);
    }

    /**
     * 新用户---2选取头像
     * @RequestHeader("Authorization") 请求头 token信息
     */
    public void loginReginfoHead(MultipartFile headPhoto) throws IOException {
        //a.从token中获取用户信息
        Long userId = UserHolder.getUserId();
        //c.百度人脸识别
        boolean detect = faceTemplate.detect(headPhoto.getBytes());
        log.debug("调用人脸识别接口,结果*****{}*********"+detect);
        if(!detect){
            throw new TanHuaException(ErrorResult.faceError());
        }
        //d.上传头像到oss
        String originalFilename = headPhoto.getOriginalFilename();//获取原始文件名称
        String headUrl = ossTemplate.upload(originalFilename, headPhoto.getInputStream());
        //e.更新用户个人信息表头像字段
        UserInfo userInfo = new UserInfo();
        userInfo.setId(userId);
        userInfo.setAvatar(headUrl);
        userInfoApi.updateUserInfo(userInfo);
    }
}
2.3.5. LoginController
package com.tanhua.server.controller;

import com.tanhua.domain.db.User;
import com.tanhua.domain.vo.UserInfoVo;
import com.tanhua.server.service.UserService;
import org.springframework.beans.factory.annotation.Autowired;
import org.springframework.http.ResponseEntity;
import org.springframework.web.bind.annotation.*;
import org.springframework.web.multipart.MultipartFile;

import java.io.IOException;
import java.util.Map;

/**
 * 登录注册控制层
 */
@RestController
@RequestMapping("/user")
public class LoginController {

    //控制层调用业务层
    @Autowired
    private UserService userService;

    /**
     * 测试-完成用户保存返回用户id
     * ResponseEntity:spring提供对象
     * ResponseEntity.ok:200
     */
    @RequestMapping(value = "/saveUser",method = RequestMethod.POST)
    public ResponseEntity saveUser(@RequestBody User user){
        Long userId=userService.saveUser(user);
        return ResponseEntity.ok(userId);
    }


    /**
     * 测试-根据手机号码查询用户
     */
    @RequestMapping(value = "/findByMobile",method = RequestMethod.GET)
    public ResponseEntity findByMobile(String mobile){
        User user = userService.findByMobile(mobile);
        return ResponseEntity.ok(user);
    }

    /**
     * 注册登录-发送验证码
     * 参数接收:如果参数比较多,定义VO对象来接收
     */
    @RequestMapping(value = "/login",method = RequestMethod.POST)
    public ResponseEntity sendCode(@RequestBody Map<String,String> params){
        userService.sendCode(params.get("phone"));
        return ResponseEntity.ok(null);
    }

    /**
     * 注册登录-新用户注册登录或老用户直接登录
     */
    @RequestMapping(value = "/loginVerification",method = RequestMethod.POST)
    public ResponseEntity loginVerification(@RequestBody Map<String,String> params){
        Map map = userService.loginVerification(params.get("phone"),params.get("verificationCode"));
        return ResponseEntity.ok(map);
    }


    /**
     * 新用户---1填写资料
     * @RequestHeader("Authorization") 请求头 token信息
     */
    @RequestMapping(value = "/loginReginfo",method = RequestMethod.POST)
    public ResponseEntity loginReginfo(@RequestBody UserInfoVo userInfoVo){
        userService.loginReginfo(userInfoVo);
        return ResponseEntity.ok(null);
    }


    /**
     * 新用户---2选取头像
     * @RequestHeader("Authorization") 请求头 token信息
     */
    @RequestMapping(value = "/loginReginfo/head",method = RequestMethod.POST)
    public ResponseEntity loginReginfoHead(MultipartFile headPhoto) throws IOException {
        userService.loginReginfoHead(headPhoto);
        return ResponseEntity.ok(null);
    }
}
2.3.6. UserInfoController
package com.tanhua.server.controller;

import com.tanhua.domain.vo.UserInfoVo;
import com.tanhua.server.service.UserInfoService;
import org.springframework.beans.factory.annotation.Autowired;
import org.springframework.http.ResponseEntity;
import org.springframework.web.bind.annotation.*;

/**
 * 用户信息管理控制层
 */
@RestController
@RequestMapping("users")
public class UserInfoController {

    @Autowired
    private UserInfoService userInfoService;

    /**
     *  用户资料 - 读取
     */
    @RequestMapping(method = RequestMethod.GET)
    public ResponseEntity findUserInfoByUserId(Long userID,Long huanxinID){
        UserInfoVo userInfoVo = userInfoService.findUserInfoByUserId(userID,huanxinID);
        return ResponseEntity.ok(userInfoVo);
    }


    /**
     *  用户资料 - 保存
     */
    @RequestMapping(method = RequestMethod.PUT)
    public ResponseEntity updateUserInfoByUserId(@RequestBody UserInfoVo userInfoVo){
        userInfoService.updateUserInfoByUserId(userInfoVo);
        return ResponseEntity.ok(null);
    }

}
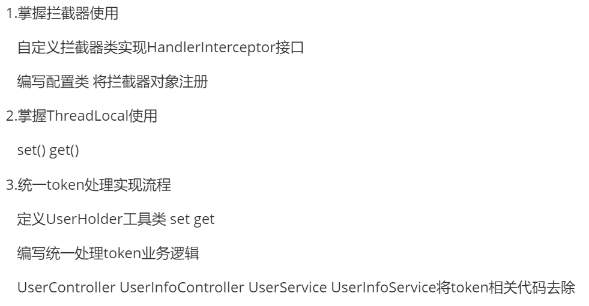
【小结】
1.掌握拦截器使用
自定义拦截器类实现HandlerInterceptor接口
编写配置类 将拦截器对象注册
2.掌握ThreadLocal使用
set() get()
3.统一token处理实现流程
定义UserHolder工具类 set get
编写统一处理token业务逻辑
UserController UserInfoController UserService UserInfoService将token相关代码去除
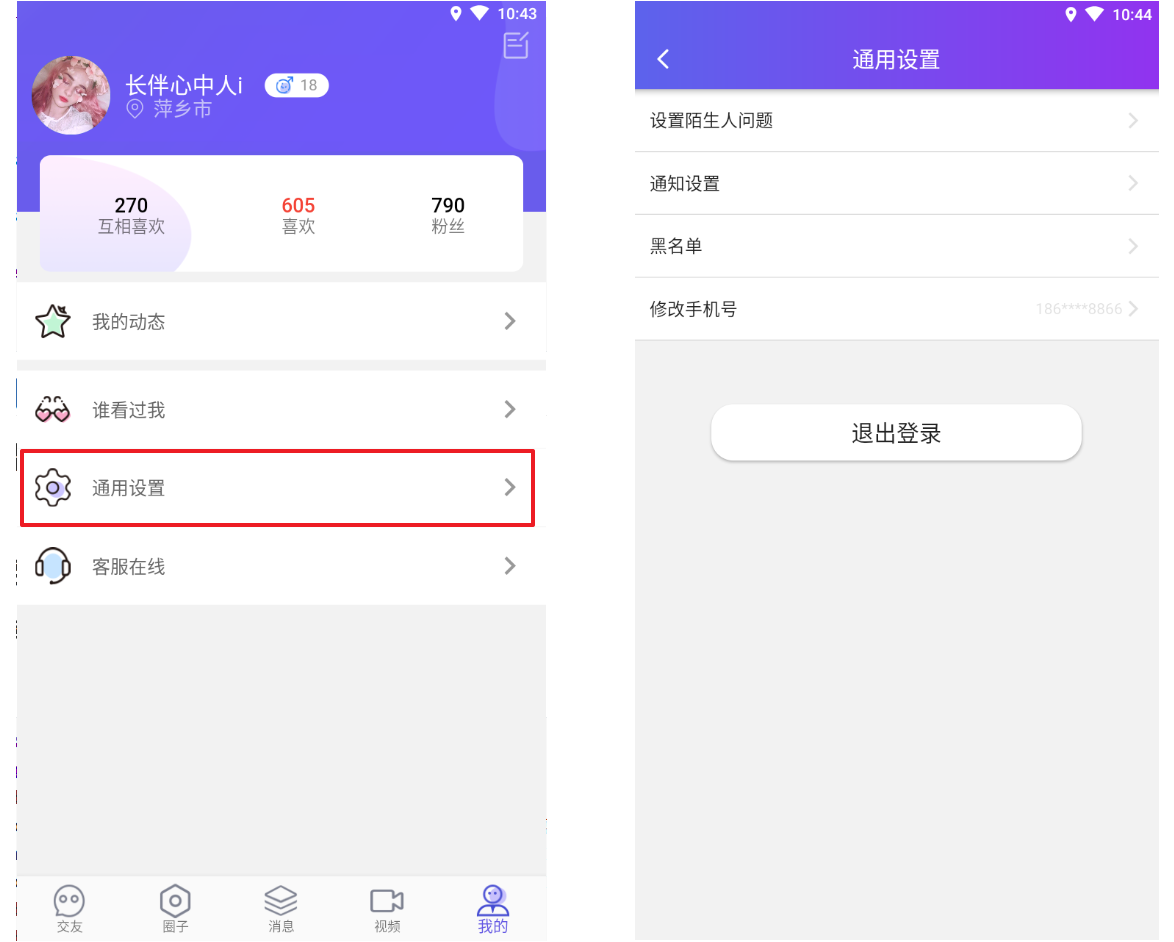
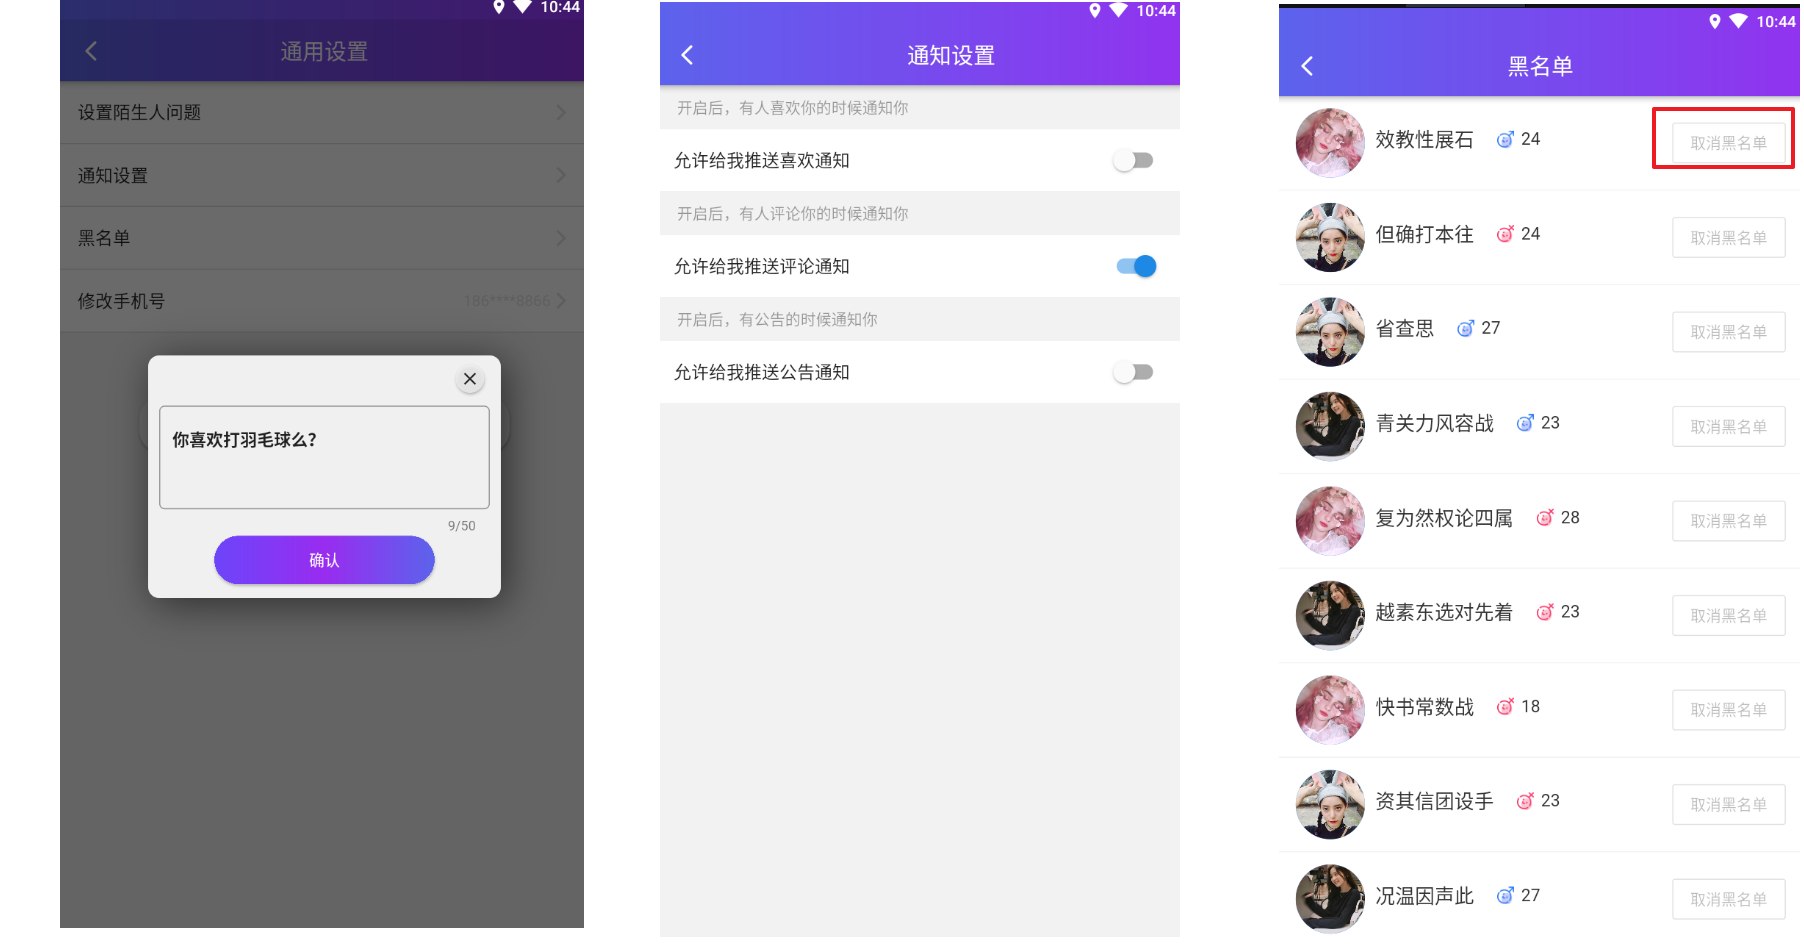
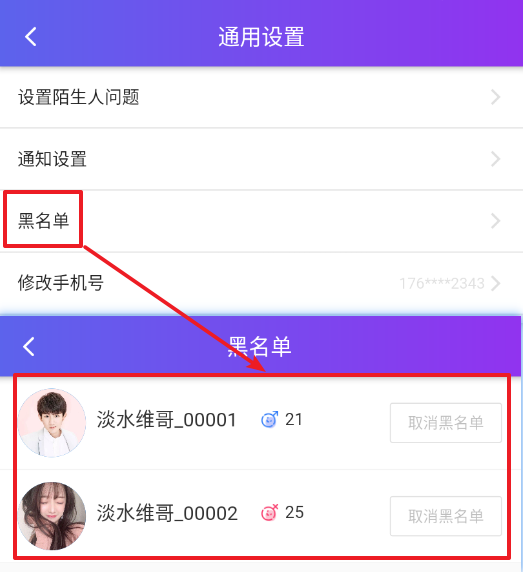
3. 通用设置
【目标】
完成通用设置功能
【路径】
1:通用设置查询分析与实现
2:黑名单管理分析与实现
3:陌生人管理分析与实现
4:通知管理分析与实现
【讲解】
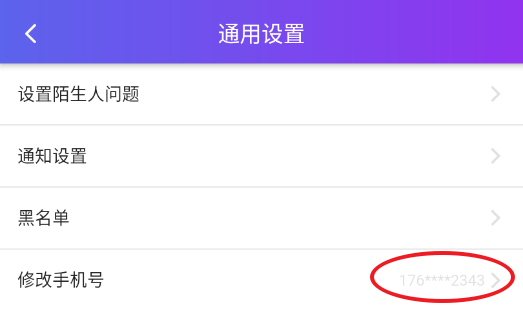
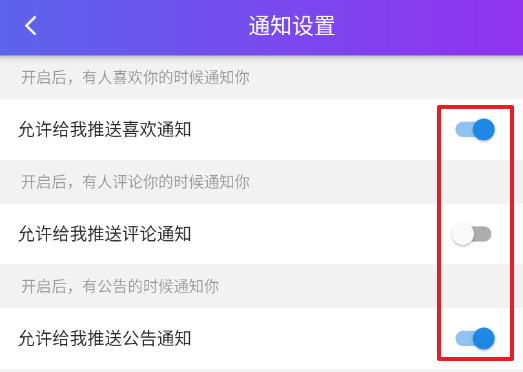
3.1. 功能介绍
通用设置,包含探花交友APP基本的软件设置功能。包含:
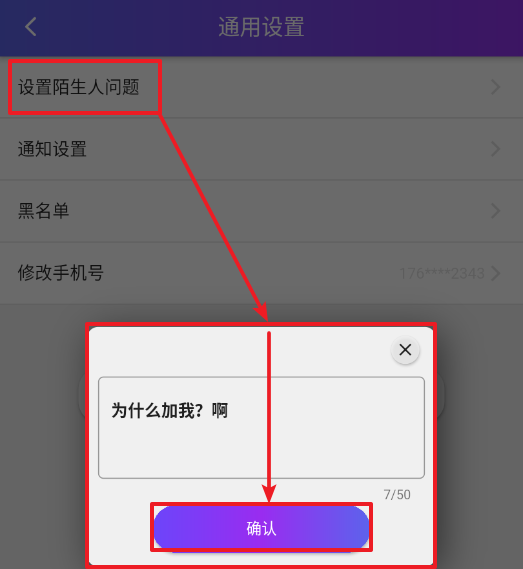
设置陌生人问题:当平台其他用户想进行在线交流时需要回答陌生人问题。
通用设置:包含一些APP通知设置
黑名单:对于不感兴趣的用户设置黑名单屏蔽骚扰
3.2. 数据库表分析
3.2.1. 数据库表
① 通用设置
CREATE TABLE `tb_settings` (
  `id` bigint(20) NOT NULL AUTO_INCREMENT,
  `user_id` bigint(20) DEFAULT NULL,
  `like_notification` tinyint(4) DEFAULT '1' COMMENT '推送喜欢通知',
  `pinglun_notification` tinyint(4) DEFAULT '1' COMMENT '推送评论通知',
  `gonggao_notification` tinyint(4) DEFAULT '1' COMMENT '推送公告通知',
  `created` datetime DEFAULT NULL,
  `updated` datetime DEFAULT NULL,
  PRIMARY KEY (`id`)
) ENGINE=InnoDB DEFAULT CHARSET=utf8 COMMENT='设置表';
② 问题表
CREATE TABLE `tb_question` (
  `id` bigint(20) NOT NULL AUTO_INCREMENT,
  `user_id` bigint(20) DEFAULT NULL COMMENT '用户id',
  `txt` varchar(200) DEFAULT NULL COMMENT '问题内容',
  `created` datetime DEFAULT NULL,
  `updated` datetime DEFAULT NULL,
  PRIMARY KEY (`id`),
  KEY `user_id` (`user_id`)
) ENGINE=InnoDB AUTO_INCREMENT=6 DEFAULT CHARSET=utf8
③ 黑名单
CREATE TABLE `tb_black_list` (
  `id` bigint(20) NOT NULL AUTO_INCREMENT,
  `user_id` bigint(20) DEFAULT NULL,
  `black_user_id` bigint(20) DEFAULT NULL,
  `created` datetime DEFAULT NULL,
  `updated` datetime DEFAULT NULL,
  PRIMARY KEY (`id`),
  KEY `user_id` (`user_id`)
) ENGINE=InnoDB DEFAULT CHARSET=utf8 COMMENT='黑名单';
3.2.2. 实体类与VO
在tanhua-domain中创建以下实体类
① Settings
package com.tanhua.domain.db;
import lombok.Data;

@Data
public class Settings extends BasePojo {
    private Long id;
    private Long userId;
    private Boolean likeNotification;
    private Boolean pinglunNotification;
    private Boolean gonggaoNotification;
}
② Question
package com.tanhua.domain.db;
import lombok.Data;

@Data
public class Question extends BasePojo {
    private Long id;
    private Long userId;
    //问题内容
    private String txt;
}
③ BlackList
package com.tanhua.domain.db;
import lombok.Data;

@Data
public class BlackList extends BasePojo {
    private Long id;
    private Long userId;
    private Long blackUserId;
}
在tanhua-domain中创建以下VO
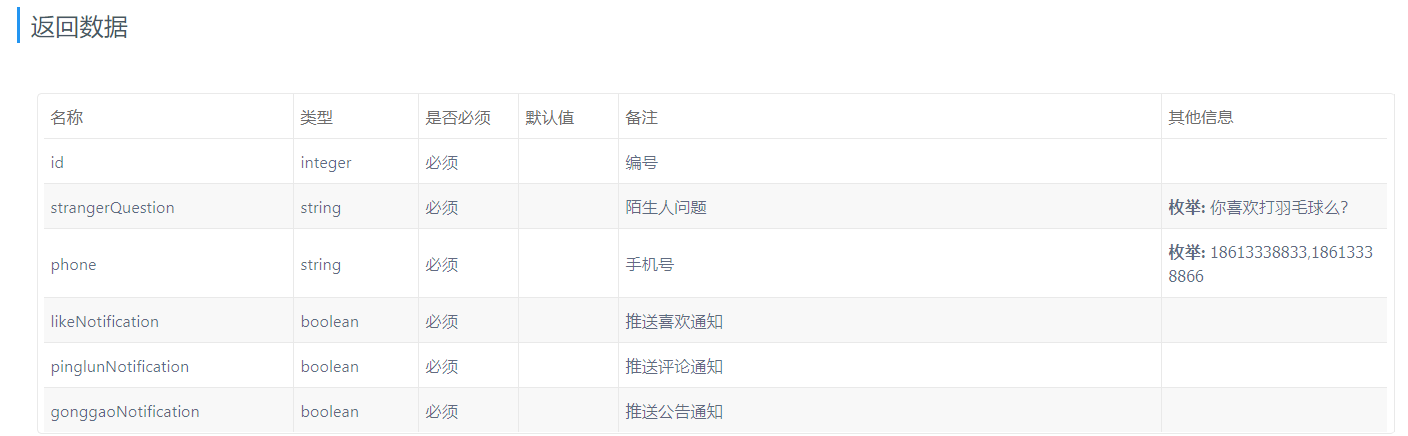
④ SettingsVo
package com.tanhua.domain.vo;

import lombok.Data;

@Data
public class SettingsVo {
    private Long id;
    private String strangerQuestion;
    private String phone;
    private Boolean likeNotification;
    private Boolean pinglunNotification;
    private Boolean gonggaoNotification;
}
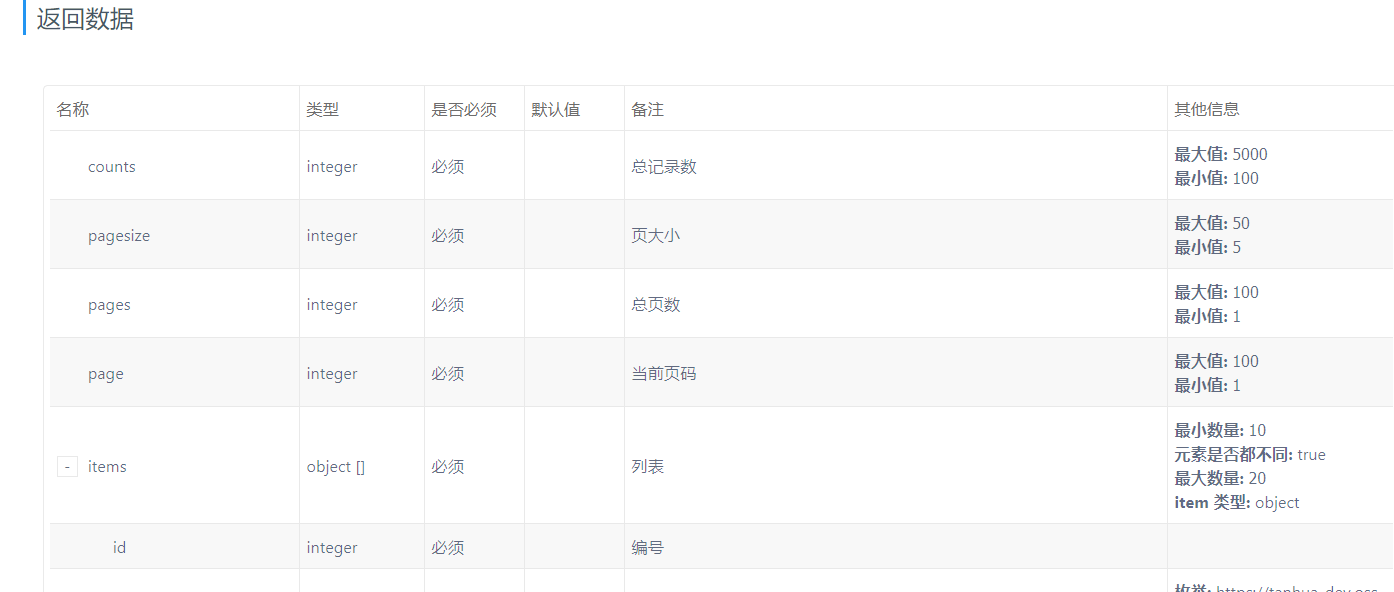
⑤ PageResult
package com.tanhua.domain.vo;
import lombok.AllArgsConstructor;
import lombok.Data;
import lombok.NoArgsConstructor;
import java.io.Serializable;
import java.util.Collections;
import java.util.List;
@Data
@AllArgsConstructor
@NoArgsConstructor
public class PageResult<T> implements Serializable {
    private Long counts; // 总记录数
    private Long pagesize;// 每页大小
    private Long pages;// 总页数
    private Long page;// 页码
    private List<T> items = Collections.emptyList();
}
3.2.3. 分页插件
在tanhua-dubbo-service模块中创建 mybatis-plus 分页插件
package com.tanhua.dubbo.config;

import com.baomidou.mybatisplus.extension.plugins.PaginationInterceptor;
import org.springframework.context.annotation.Bean;
import org.springframework.context.annotation.Configuration;

@Configuration
public class MybatisPlusConfig {
    /**
     * 启用分页插件
     * @return
     */
    @Bean
    public PaginationInterceptor paginationInterceptor(){
        return new PaginationInterceptor();
    }
}
使用mybatis-plus的分页:
- 创建分页对象:Page,指定当前页和每页查询条数
- 基础查询:mapper.selectPage(page,查询条件)
- 自定义查询:Ipage 方法名称(Page对象,xxx查询条件)
3.3. 服务消费者-通用设置查询
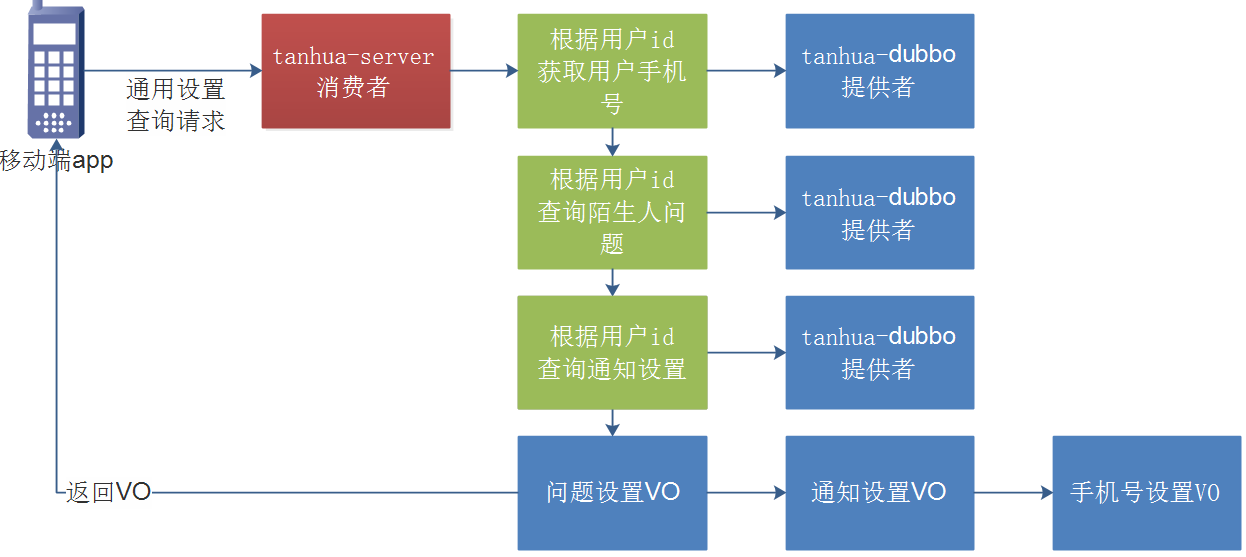
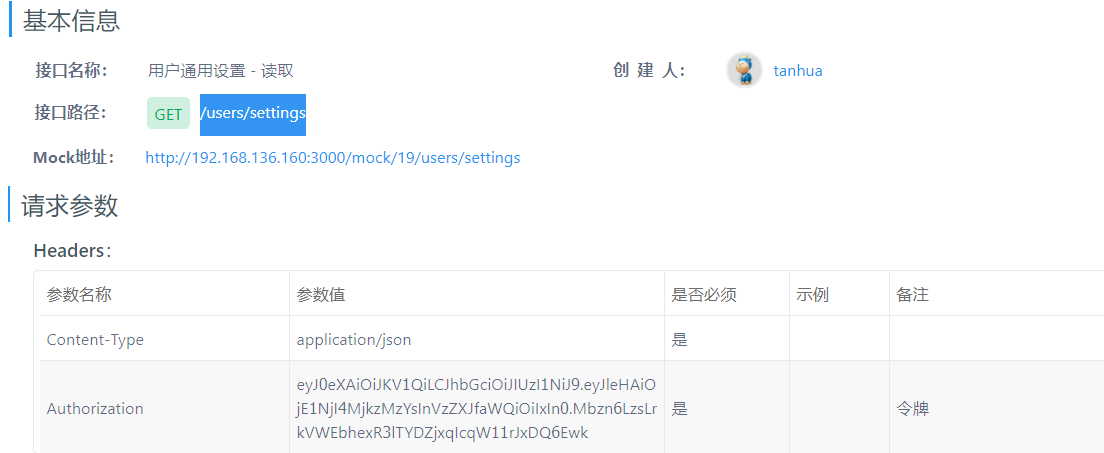
3.3.1. 接口说明
3.3.2. SettingController
在tanhua-server模块下创建SettingsController
package com.tanhua.server.controller;

import com.tanhua.server.service.SettingsService;
import org.springframework.beans.factory.annotation.Autowired;
import org.springframework.http.ResponseEntity;
import org.springframework.web.bind.annotation.GetMapping;
import org.springframework.web.bind.annotation.RequestMapping;
import org.springframework.web.bind.annotation.RestController;

@RestController
@RequestMapping("/users")
public class SettingsController {

    @Autowired
    private SettingsService settingsService;

    /**
     * 读取用户的通用设置
     * 请求连接:
     *  GET  /settings
     */
    @GetMapping("/settings")
    public ResponseEntity querySettings() {
        return settingsService.querySettings();
    }
}
3.3.3. SettingService
在tanhua-server模块下创建SettingsService
@Service
public class SettingsService {

    @Reference
    private SettingsApi settingsApi;

    @Reference
    private QuestionApi questionApi;

    /**
     * 查询用户的通用设置
     */
    public ResponseEntity querySettings() {
        //1、获取当前用户
        User user = UserHolder.getUser();
        SettingsVo vo = new SettingsVo();
        //2、查询陌生人问题
        Question question = questionApi.findByUserId(user.getId());
        if(question != null) {
            vo.setStrangerQuestion(question.getTxt());
        }
        //3、查询用户的通知设置
        Settings settings = settingsApi.findByUserId(user.getId());
        if(settings != null) {
            BeanUtils.copyProperties(settings, vo);
        }
        //4、构造返回值
        vo.setPhone(user.getMobile());
        return ResponseEntity.ok(vo);
    }
}
3.4. 服务提供者-通用设置查询
3.4.1. SettingsMapper
在tanhua-dubbo-service模块下创建SettingsMapper
package com.tanhua.dubbo.mapper;
import com.baomidou.mybatisplus.core.mapper.BaseMapper;
import com.tanhua.domain.db.Settings;

public interface SettingsMapper extends BaseMapper<Settings> {
}
3.4.2. SettingsApi
在tanhua-dubbo-interface模块中创建SettingsApi
package com.tanhua.dubbo.api;

import com.tanhua.domain.db.Settings;

public interface SettingsApi {
    //根据用户id查询通知配置
    Settings findByUserId(Long userId);
}
3.4.3. SettingsApiImpl
在tanhua-dubbo-service模块中创建SettingsApiImpl
package com.tanhua.dubbo.api;

import com.baomidou.mybatisplus.core.conditions.query.QueryWrapper;
import com.tanhua.domain.db.Settings;
import com.tanhua.dubbo.mapper.SettingsMapper;
import org.apache.dubbo.config.annotation.Service;
import org.springframework.beans.factory.annotation.Autowired;

@Service
public class SettingsApiImpl implements SettingsApi {

    @Autowired
    private SettingsMapper settingsMapper;

    //根据userId查询
    public Settings findByUserId(Long userId) {
        QueryWrapper<Settings> queryWrapper = new QueryWrapper<>();
        queryWrapper.eq("user_id", userId);
        return settingsMapper.selectOne(queryWrapper);
    }
}
3.4.4. QuestionMapper
在tanhua-dubbo-service模块下创建QuestionMapper
package com.tanhua.dubbo.mapper;
import com.baomidou.mybatisplus.core.mapper.BaseMapper;
import com.tanhua.domain.db.Question;

public interface QuestionMapper extends BaseMapper<Question> {

}
3.4.5. QuestionApi
在tanhua-dubbo-service模块中创建QuestionApi
package com.tanhua.dubbo.api;
import com.tanhua.domain.db.Question;

public interface QuestionApi {
    //根据用户id查询通知配置
    Question findByUserId(Long userId);
}
3.4.6. QuestionApiImpl
在tanhua-dubbo-service模块中创建QuestionApiImpl
package com.tanhua.dubbo.api;

import com.baomidou.mybatisplus.core.conditions.query.QueryWrapper;
import com.tanhua.domain.db.Question;
import com.tanhua.dubbo.mapper.QuestionMapper;
import org.apache.dubbo.config.annotation.Service;
import org.springframework.beans.factory.annotation.Autowired;

@Service
public class QuestionApiImpl implements QuestionApi {

    @Autowired
    private QuestionMapper questionMapper;

    @Override
    public Question findByUserId(Long userId) {
        QueryWrapper<Question> queryWrapper = new QueryWrapper<>();
        queryWrapper.eq("user_id", userId);
        return questionMapper.selectOne(queryWrapper);
    }
}
3.4.7. 测试
查看手机号码
查看陌生人问题

查看消息通知

3.5. 服务消费者-通知管理

3.5.1. 接口说明
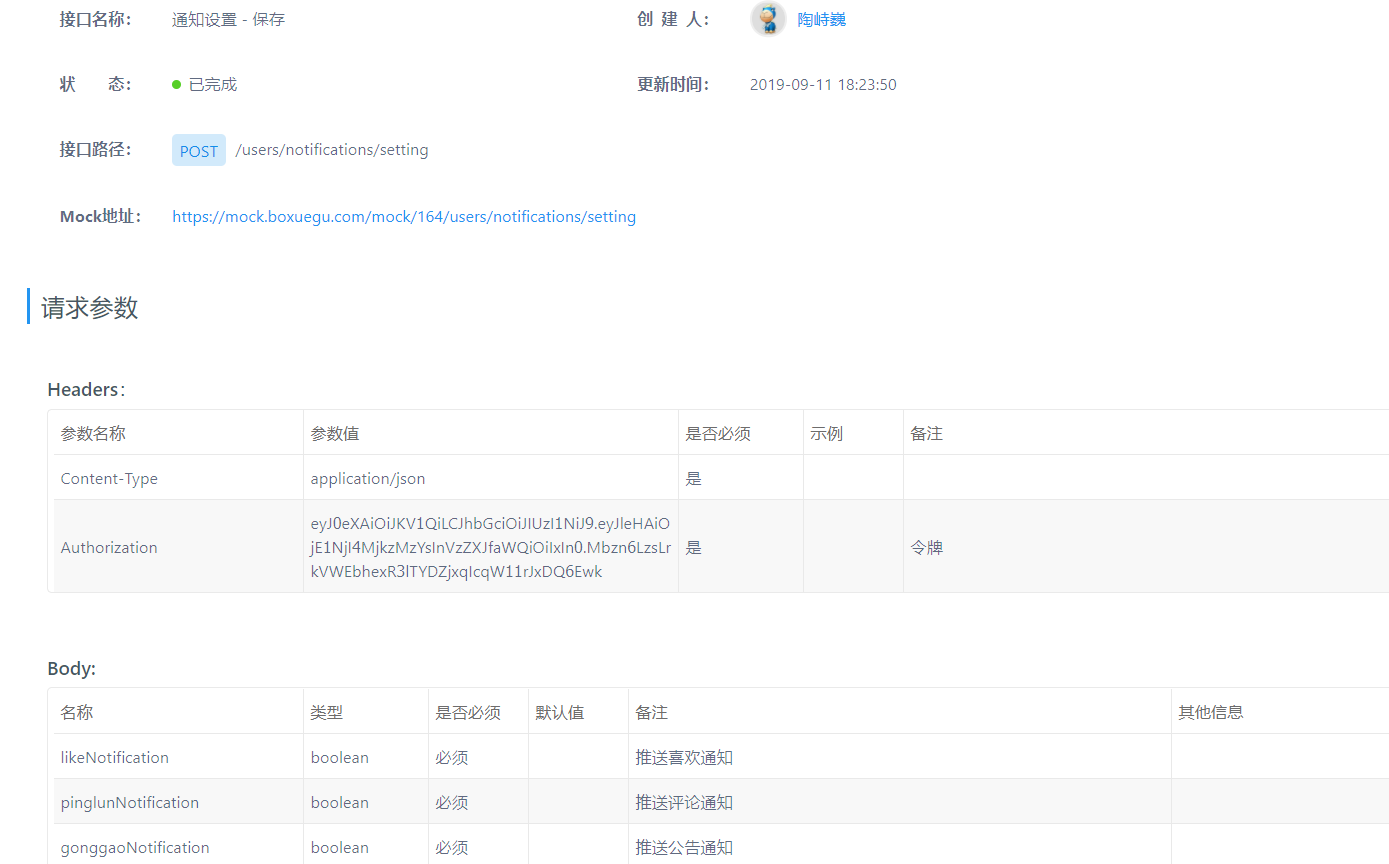
3.5.2. SettingController
在tanhua-server模块下创建SettingController
    /**
     * 通知设置
     *   POST /notifications/setting
     */
    @PostMapping("/notifications/setting")
    public ResponseEntity updateNotification(@RequestBody Map map) {
        //1、获取输入内容
        boolean like = (Boolean) map.get("likeNotification");
        boolean pinglun = (Boolean) map.get("pinglunNotification");
        boolean gonggao = (Boolean) map.get("gonggaoNotification");
        //2、调用service保存或者更新
        return settingsService.updateNotification(like,pinglun,gonggao);
    }
3.5.3. SettingService
在tanhua-server模块下创建SettingService
    /**
     * 保存或者更新 通知
     */
    public ResponseEntity updateNotification(boolean like, boolean pinglun, boolean gonggao) {
        Settings settings = settingsApi.findByUserId(UserHolder.getUserId());
        if(settings == null) {
            settings = new Settings();
            settings.setUserId(UserHolder.getUserId());
            settings.setLikeNotification(like);
            settings.setGonggaoNotification(gonggao);
            settings.setPinglunNotification(pinglun);
            settingsApi.save(settings);
        }else {
            settings.setLikeNotification(like);
            settings.setGonggaoNotification(gonggao);
            settings.setPinglunNotification(pinglun);
            settingsApi.update(settings);
        }
        return ResponseEntity.ok(null);
    }
3.6. 服务提供者-通知管理
3.4.2. SettingsApi
在tanhua-dubbo-interface模块中创建SettingsApi
package com.tanhua.dubbo.api;

import com.tanhua.domain.db.Settings;

public interface SettingsApi {

    void save(Settings settings);

    void update(Settings settings);
}
3.4.3. SettingsApiImpl
在tanhua-dubbo-service模块中创建SettingsApiImpl
package com.tanhua.dubbo.api;

import com.baomidou.mybatisplus.core.conditions.query.QueryWrapper;
import com.tanhua.domain.db.Settings;
import com.tanhua.dubbo.mapper.SettingsMapper;
import org.apache.dubbo.config.annotation.Service;
import org.springframework.beans.factory.annotation.Autowired;

@Service
public class SettingsApiImpl implements SettingsApi {

    @Autowired
    private SettingsMapper settingsMapper;

    @Override
    public void save(Settings settings) {
        settingsMapper.insert(settings);
    }

    @Override
    public void update(Settings settings) {
        settingsMapper.updateById(settings);
    }
}
3.4.4. 测试
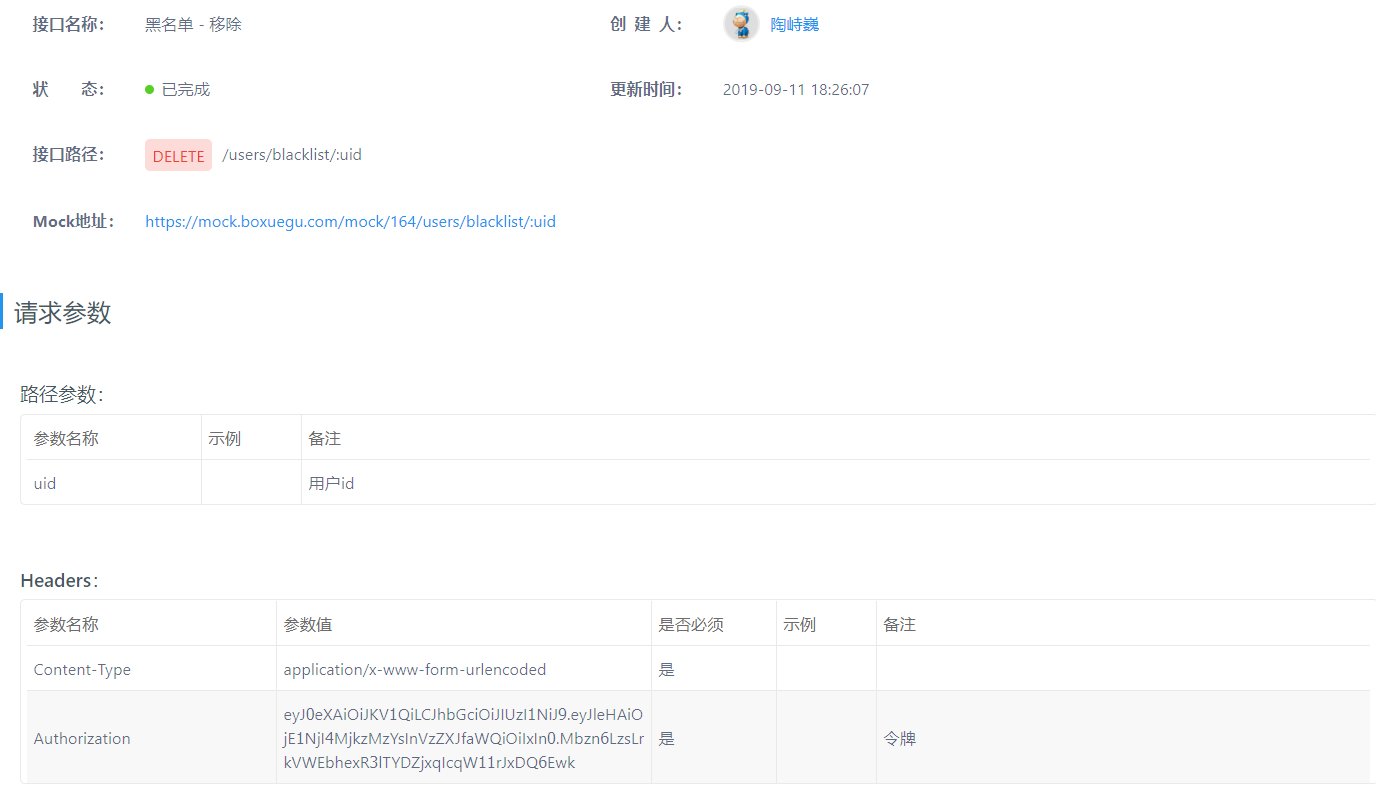
3.5. 服务消费者-黑名单管理
黑名单管理,这里只完成黑名单列表查询和移除黑名单。
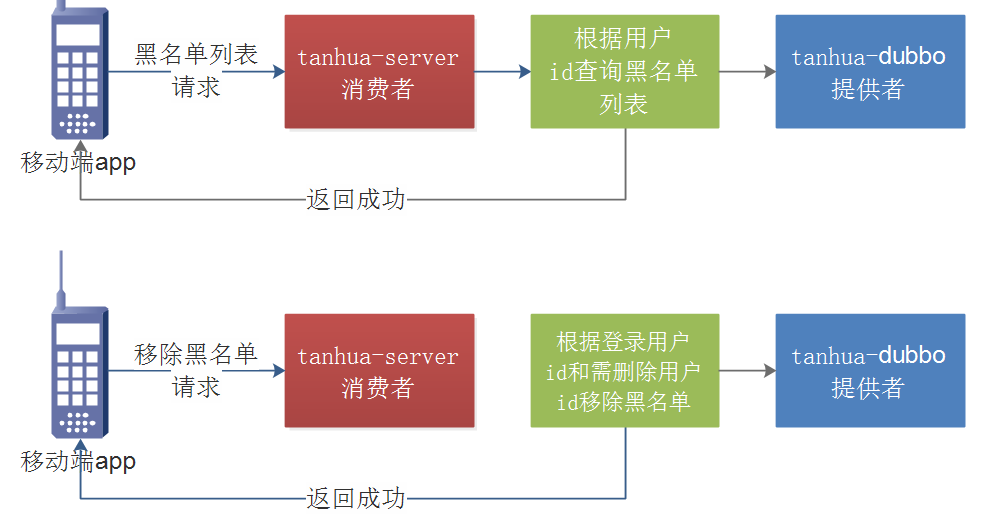
3.5.1. 接口说明
- 移除黑名单
3.5.1. SettingController
在tanhua-server模块下修改SettingsController
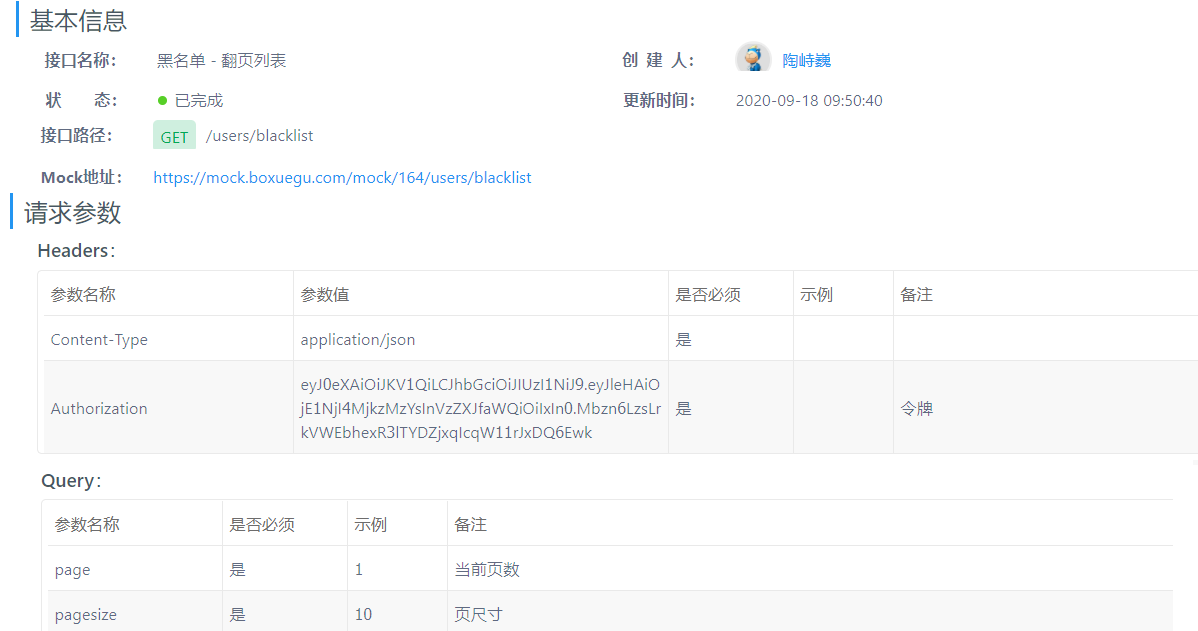
    /**
     * 分页查询黑名单列表
     *  请求连接:
     *      GET /blacklist
     *  请求参数:
     *      Query参数:
     *          page:当前页
     *          pagesize:每页查询条数
     */
    @GetMapping("/blacklist")
    public ResponseEntity findBlackList(@RequestParam(defaultValue = "1") int page,
                                    @RequestParam(defaultValue = "10")  int pagesize) {
        return settingsService.findBlackList(page,pagesize);
    }

    /**
     * 移除黑名单
     *  请求连接:
     *      DELETE  /blacklist/{uid}
     */
    @DeleteMapping("/blacklist/{uid}")
    public ResponseEntity delBlacklist(@PathVariable("uid") long deleteUserId) {
        return settingsService.delBlacklist(deleteUserId);
    }
3.5.2. SettingService
在tanhua-server模块下修改SettingsService
   @Reference
   private BlackListApi blackListApi;
   /**
     * 分页查询当前用户的黑名单列表
     */
    public ResponseEntity findBlackList(int page, int pagesize) {
        Long userId = UserHolder.getUserId();
        PageResult<UserInfo> pageResult = blackListApi.findBlackList(page,pagesize,userId);
        return ResponseEntity.ok(pageResult);
    }

    //移除黑名单
    public ResponseEntity delBlacklist(Long deleteUserId) {
        //1、获取当前用户的userid
        Long userId = UserHolder.getUserId();
        //2、调用api删除黑名单数据
        blackListApi.delete(userId,deleteUserId);
        return ResponseEntity.ok(null);
    }
3.6. 服务提供者-黑名单管理
3.6.1. BlackListMapper
在tanhua-dubbo-service模块下创建BlackListMapper
package com.tanhua.dubbo.mapper;
import com.baomidou.mybatisplus.core.mapper.BaseMapper;
import com.baomidou.mybatisplus.core.metadata.IPage;
import com.baomidou.mybatisplus.extension.plugins.pagination.Page;
import com.tanhua.domain.db.BlackList;
import com.tanhua.domain.db.UserInfo;
import org.apache.ibatis.annotations.Param;
import org.apache.ibatis.annotations.Select;

public interface BlackListMapper extends BaseMapper<BlackList> {
    /**
     * 查询 黑名单用户信息
     * 需要 tb_user_info 和 tb_black_list两张变联合查询
     * 分页查询
     */
    @Select(value = "select tui.id,tui.avatar,tui.nickname,tui.gender,tui.age from  tb_user_info tui,tb_black_list tbl where tui.id = tbl.black_user_id and tbl.user_id=#{userId}")
    IPage<UserInfo> findBlackList(Page<UserInfo> page, @Param("userId") Long userId);
}
3.6.2. BlackListApi
在tanhua-dubbo-interface模块中创建BlackListApi
package com.tanhua.dubbo.api;

import com.baomidou.mybatisplus.core.metadata.IPage;
import com.tanhua.domain.db.UserInfo;

public interface  BlackListApi{

    /**
     * 黑名单列表分页查询
     */
    PageResult<UserInfo> findBlackList(int page, int pagesize, Long id);

    //根据用户id和黑名单用户id,删除
    void delete(Long userId,Long blackUserId);
}
3.6.3. BlackListApiImpl
在tanhua-dubbo-service模块中创建BlackListApiImpl
package com.tanhua.dubbo.api;
import com.baomidou.mybatisplus.core.conditions.query.QueryWrapper;
import com.baomidou.mybatisplus.core.metadata.IPage;
import com.baomidou.mybatisplus.extension.plugins.pagination.Page;
import com.tanhua.domain.db.BlackList;
import com.tanhua.domain.db.UserInfo;
import com.tanhua.domain.vo.PageResult;
import com.tanhua.dubbo.mapper.BlackListMapper;
import org.springframework.beans.factory.annotation.Autowired;
import org.springframework.stereotype.Service;

@Service
public class BlackListApiImpl implements BlackListApi {
    @Autowired
    private BlackListMapper blackListMapper;

    @Override
    public PageResult<UserInfo> findBlackList(int page, int pagesize, Long id) {
        Page pageRequest = new Page(page, pagesize);
        IPage<UserInfo> pageInfo = blackListMapper.findBlackList(pageRequest, id);
        PageResult<UserInfo> pageResult = new PageResult<UserInfo>(pageInfo.getTotal(), pageInfo.getSize(),pageInfo.getPages(),pageInfo.getCurrent(),pageInfo.getRecords());
        return pageResult;
    }
    public void delete(Long userId, Long blackUserId) {
        QueryWrapper<BlackList> queryWrapper = new QueryWrapper<>();
        queryWrapper.eq("user_id", userId)
                .eq("black_user_id", blackUserId);
        blackListMapper.delete(queryWrapper);
    }
}
3.6.4. 测试
3.7. 服务消费者-陌生人问题
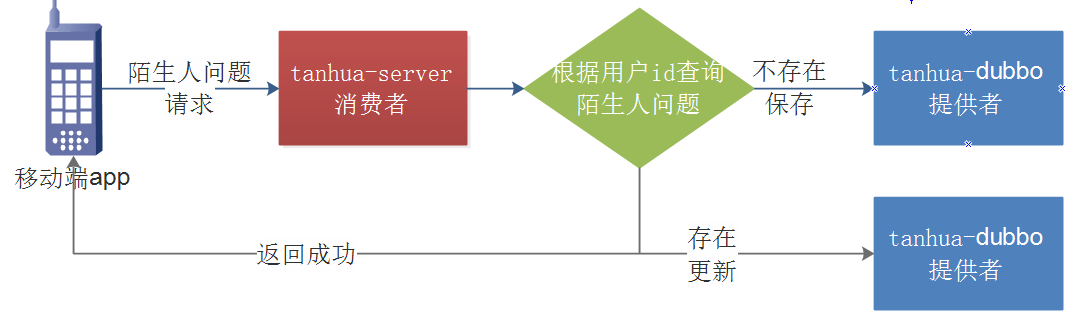
3.7.1. 接口说明
3.7.2. SettingController
在tanhua-server模块下修改SettingsController
/**
* 设置陌生人问题
* 请求连接
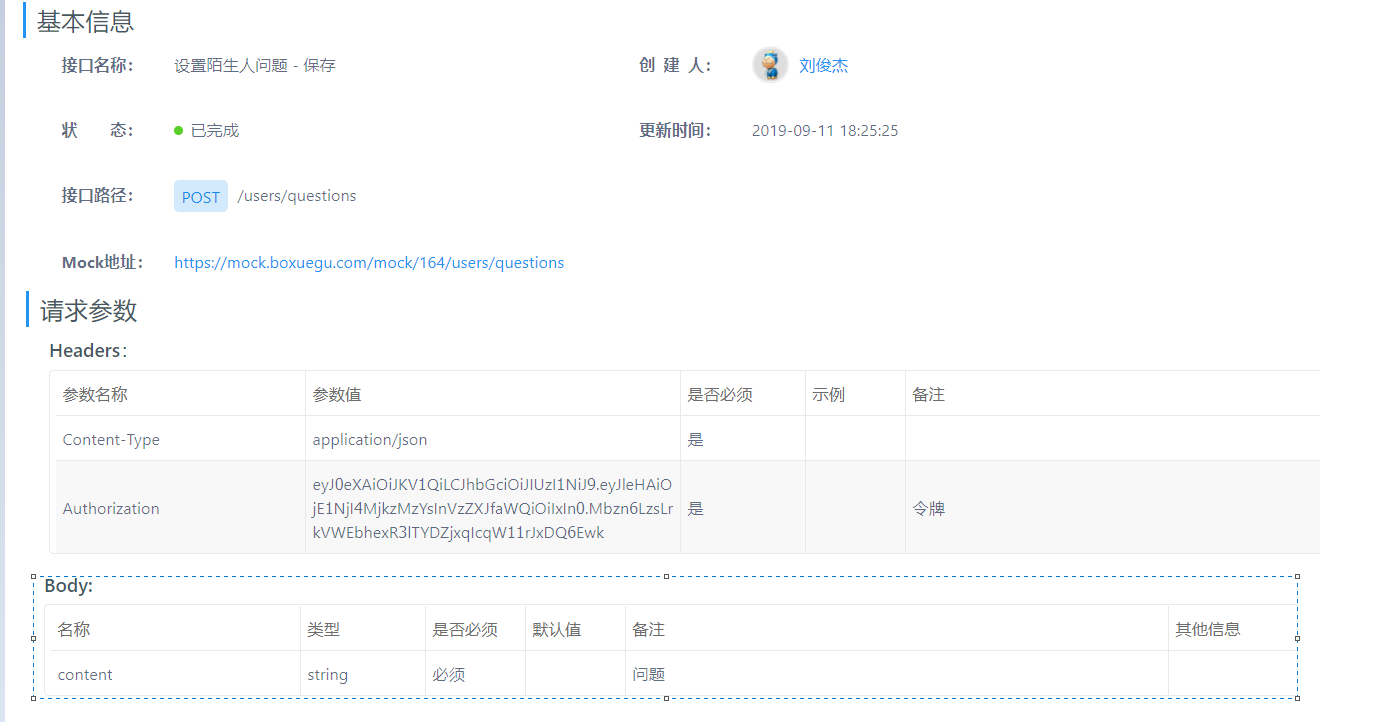
* POST /questions
* 参数: body :content
*/
@PostMapping("/questions")
public ResponseEntity saveQuestions(@RequestBody Map map) {
//1、获取输入内容
String content = (String) map.get("content");
//2、调用service保存或者更新
return settingsService.saveQuestions(content);
}
3.7.3. SettingService
在tanhua-server模块下修改SettingsService
    /**
     * 保存或者更新陌生问问题
     */
    public ResponseEntity saveQuestions(String content) {
        //1、根据当前登录用户查询问题
        Question question = questionApi.findByUserId(UserHolder.getUserId());
        //2、如果未设置,保存
        if(question == null) {
            question = new Question();
            question.setUserId(UserHolder.getUserId());
            question.setTxt(content);
            questionApi.save(question);
        }else {
            //3、如果以设置,更新
            question.setTxt(content);
            questionApi.update(question);
        }
        return ResponseEntity.ok(null);
    }
3.8. 服务提供者-陌生人问题
3.8.1. QuestionApi
在tanhua-dubbo-interface模块中创建QuestionApi
package com.tanhua.dubbo.api;
import com.tanhua.domain.db.Question;

public interface QuestionApi {

    void save(Question question);

    void update(Question question);
}
3.8.2. QuestionApiImpl
在tanhua-dubbo-service模块中创建QuestionApiImpl
package com.tanhua.dubbo.api;

import com.baomidou.mybatisplus.core.conditions.query.QueryWrapper;
import com.tanhua.domain.db.Question;
import com.tanhua.dubbo.mapper.QuestionMapper;
import org.apache.dubbo.config.annotation.Service;
import org.springframework.beans.factory.annotation.Autowired;

@Service
public class QuestionApiImpl implements QuestionApi {

    @Autowired
    private QuestionMapper questionMapper;

    @Override
    public void save(Question question) {
        questionMapper.insert(question);
    }

    @Override
    public void update(Question question) {
        questionMapper.updateById(question);
    }
}
3.8.3. 测试
【小结】
1:掌握通用设置查询
2:掌握黑名单管理
3:掌握陌生人问题
4:掌握通知管理
4. 修改手机号码(作业)
【目标】
完成修改手机号码功能
【路径】
1:修改手机号码分析
2:修改手机号码实现
【讲解】
4.1. 功能介绍
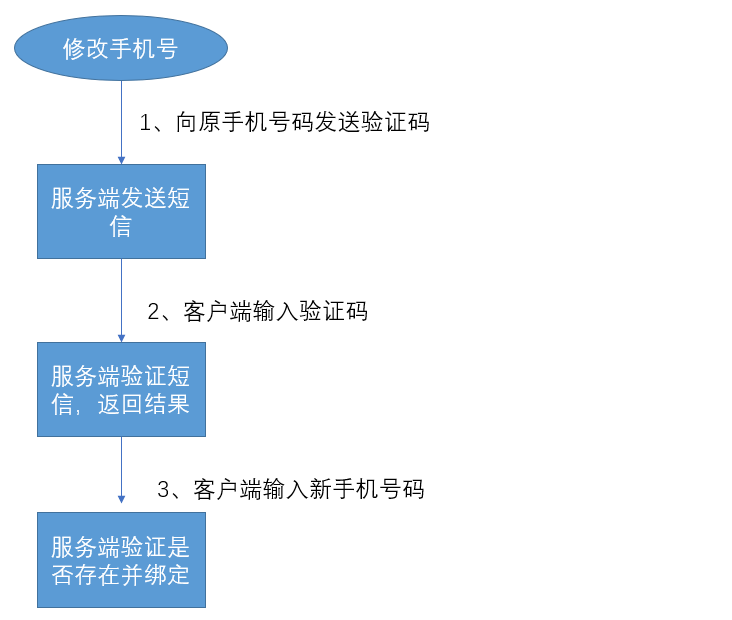
4.2. 接口说明
4.2.1. 发送验证码
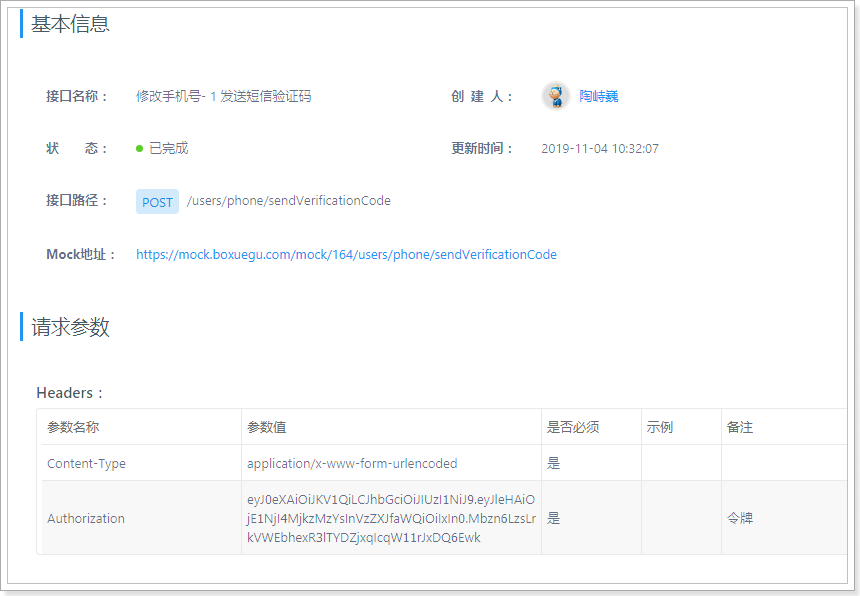
4.2.2. 检验验证码
4.3. 服务消费者-发送验证码
4.3.1. SettingsController
在tanhua-server模块下修改SettingsController
/**
  * 修改手机号码:1.发送验证码
  */
@PostMapping("/phone/sendVerificationCode")
public ResponseEntity sendValidateCode(){
    settingsService.sendValidateCode();
    return ResponseEntity.ok(null);
}
4.4. 服务消费者-检验验证码
4.4.1. SettingsController
在tanhua-server模块下修改SettingsController
/**
* 修改手机号 - 2 校验验证码
*/
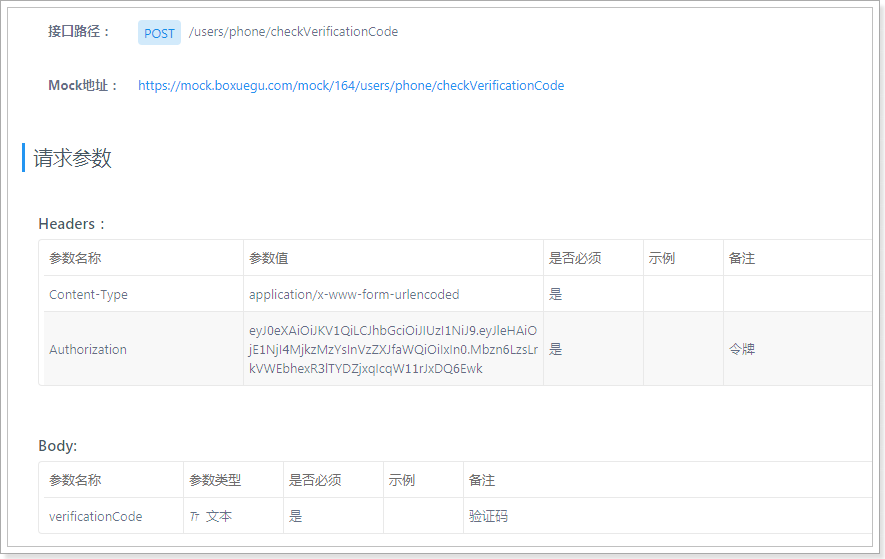
@PostMapping("/phone/checkVerificationCode")
public ResponseEntity checkValidateCode(@RequestBody Map<String,String> param){
boolean flag = settingsService.checkValidateCode(param.get("verificationCode"));
Map<String,Boolean> result = new HashMap<String,Boolean>();
result.put("verification",flag);
return ResponseEntity.ok(result);
}
4.4.2. SettingsService
在tanhua-server模块下修改SettingsService
@Autowired
private RedisTemplate<String,String> redisTemplate;
@Autowired
private SmsTemplate smsTemplate;
@Reference
private UserApi userApi;
/**
* 修改手机号码:1.发送验证码
*/
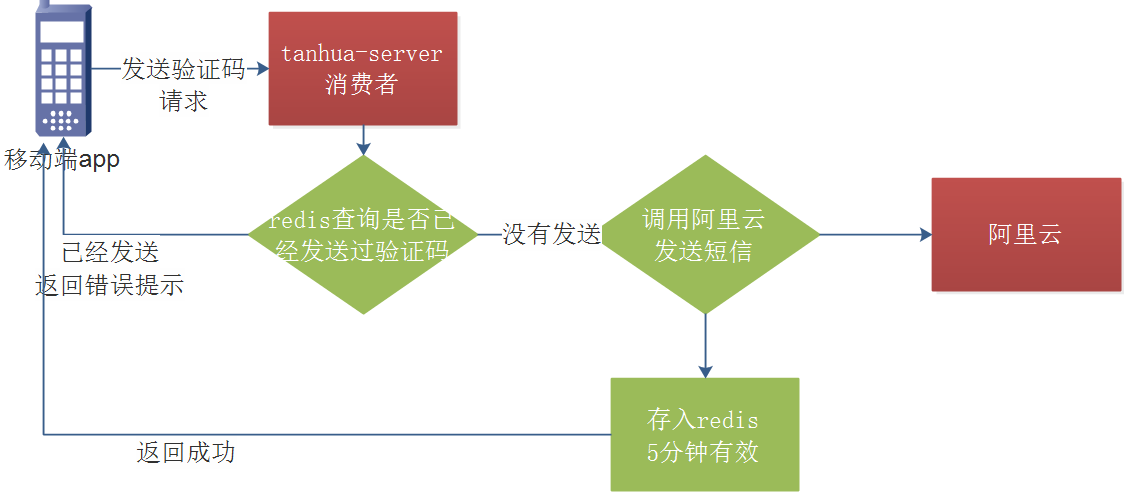
public void sendValidateCode() {
String mobile = UserHolder.getUser().getMobile();
// redis中存入验证码的key
String key = RedisKeyConst.CHANGE_MOBILE_VALIDATE_CODE + mobile;
// redis中的验证码
String codeInRedis = redisTemplate.opsForValue().get(key);
log.debug("========== redis中的验证码 修改手机号码:{},{}",mobile,codeInRedis);
if(StringUtils.isNotEmpty(codeInRedis)){
// 已经发送过了
//return ErrorResult.duplicate();
throw new TanHuaException(ErrorResult.duplicate());
}
// 生成验证码
String validateCode = RandomStringUtils.randomNumeric(6);
// 发送验证码
log.debug("========== 发送验证码 修改手机号码:{},{}",mobile,validateCode);
Map<String, String> smsResult = smsTemplate.sendValidateCode(mobile, validateCode);
if(null != smsResult){
// 发送失败
throw new TanHuaException(ErrorResult.fail());
}
// 存入redis,有效期5分钟
log.info("========== 验证码存入redis");
redisTemplate.opsForValue().set(key,validateCode, 5, TimeUnit.MINUTES);
}
/**
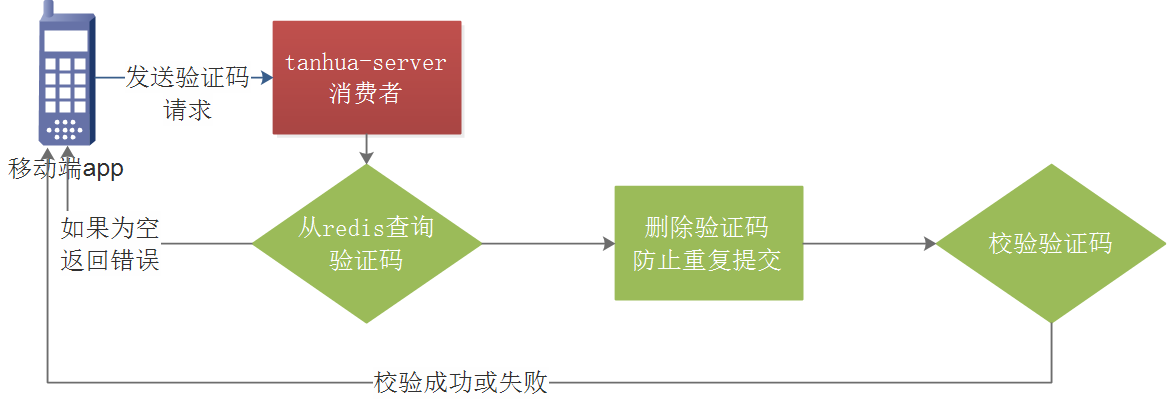
* 修改手机号 - 2 校验验证码
* @param verificationCode
* @return
*/
public boolean checkValidateCode(String verificationCode) {
User user = UserHolder.getUser();
String phone = user.getMobile();
// redis中存入验证码的key
String key = RedisKeyConst.CHANGE_MOBILE_VALIDATE_CODE + phone;
// redis中的验证码
String codeInRedis = redisTemplate.opsForValue().get(key);
redisTemplate.delete(key);// 防止重复提交
log.debug("==========修改手机号 校验 验证码:{},{},{}",phone,codeInRedis,verificationCode);
if(StringUtils.isEmpty(codeInRedis)){
throw new TanHuaException(ErrorResult.loginError());
}
if(!codeInRedis.equals(verificationCode)){
return false;
}
return true;
}
4.4.3. RedisKeyConst
在tanhua-commons模块下修改RedisKeyConst
package com.tanhua.commons;
/**
 * Redis Key 常量
 */
public interface RedisKeyConst {

    /** 登陆与注册时使用的验证码 */
    static final String LOGIN_VALIDATE_CODE="VALIDATE_CODE_LOGIN:";

    /** 修改手机号码时使用的验证码 */
    static final String CHANGE_MOBILE_VALIDATE_CODE="VALIDATE_CODE_CHANGE_MOBILE:";

    /** 登陆用户Token */
    static final String TOKEN = "TOKEN_";
}
4.5. 服务消费者-更新手机号
4.5.1. SettingsController
在tanhua-server模块下修改SettingsController
/**
* 修改手机号 - 3 保存
*/
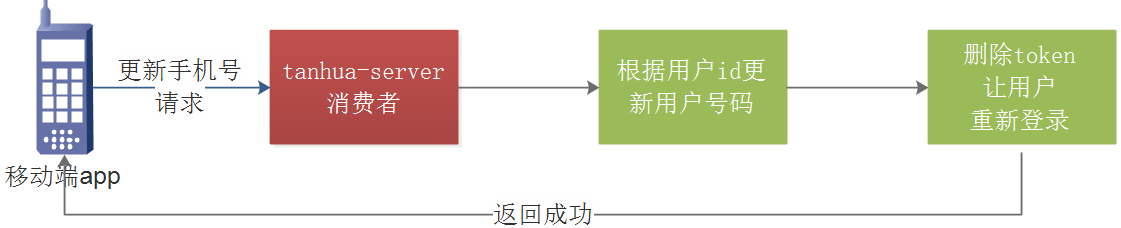
@PostMapping("/phone")
public ResponseEntity changeMobile(@RequestBody Map<String,String> param, @RequestHeader("Authorization") String token){
settingsService.changeMobile(param.get("phone"),token);
return ResponseEntity.ok(null);
}
4.5.2. SettingsService
在tanhua-server模块下修改SettingsService
/**
  * 修改手机号 - 3 保存
  * @param phone
  * @param token
  */
public void changeMobile(String phone,String token) {
    Long userId = UserHolder.getUserId();
    userApi.updateMobile(userId, phone);
    log.debug("修改手机号码成功(old:{})=>(new:{})",UserHolder.getUser().getMobile(),phone);
    // 删除token,让用户重新登陆
    String key = RedisKeyConst.TOKEN + token;
    redisTemplate.delete(key);
}
4.6. 服务提供者-更新手机号
4.6.1. UserApi
在tanhua-dubbo-interface模块中修改UserApi
/**
  * 修改手机号码
  * @param userId
  * @param phone
  */
void updateMobile(Long userId, String phone);
4.6.2. UserApiImpl
在tanhua-dubbo-service模块中修改UserApiImpl
/**
  * 修改手机号码
  * @param userId
  * @param phone
  */
@Override
public void updateMobile(Long userId, String phone) {
    User user = new User();
    user.setMobile(phone);
    user.setId(userId);
    userMapper.updateById(user);
}
【小结】
1:掌握修改手机号码
作业
1.通用设置所有功能-实现分析写一写
总结
1.统一token处理-重点掌握
2.通用设置查询-重点掌握
3.黑名单管理-重点掌握(多表分页查询)
4.通知管理、陌生人问题、修改手机号

 浙公网安备 33010602011771号