
第2章 完善个人信息
今日内容介绍
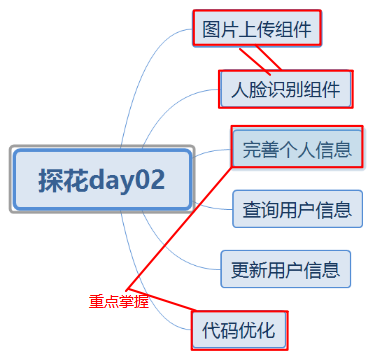
学习目标
- 代码优化
- 阿里云OSS服务应用
- 百度人脸识别
- 完善个人信息
- 个人信息管理
1. 代码优化
【分析】
问题:所有的表都存在创建时间 修改时间 ,服务提供者中这两个时间能够统一自动处理。
保存操作:创建时间 修改时间 需要设置时间 更新操作:只有修改时间需要设置

【目标】
代码优化
【路径】
1:代码分析
2:代码优化
【讲解】
1.1. 抽取BasePojo
为了简化实体类中created和updated字段
修改tanhua-domain工程,抽取BasePojo
package com.tanhua.domain.db;

import com.baomidou.mybatisplus.annotation.FieldFill;
import com.baomidou.mybatisplus.annotation.TableField;
import lombok.Data;
import java.io.Serializable;
import java.util.Date;
/**
 * 抽取BasePojo
 */
@Data
public abstract class BasePojo implements Serializable {
    @TableField(fill = FieldFill.INSERT)
    private Date created;
    @TableField(fill = FieldFill.INSERT_UPDATE)
    private Date updated;
}
修改User类
package com.tanhua.domain.db;
import com.alibaba.fastjson.annotation.JSONField;
import lombok.Data;
import java.util.Date;
@Data
public class User extends BasePojo {
    private Long id;
    private String mobile; //手机号
    @JSONField(serialize = false)
    private String password; //密码,json序列化时忽略
    //private Date created;
    //private Date updated;
}
1.2. 自动填充
对于created和updated字段,每次操作都需要手动设置。为了解决这个问题,mybatis-plus支持自定义处理器的形式实现保存更新的自动填充。
在tanhua-dubbo-service工程中添加MyMetaObjectHandler
package com.tanhua.dubbo.handler;

import com.baomidou.mybatisplus.core.handlers.MetaObjectHandler;
import org.apache.ibatis.reflection.MetaObject;
import org.springframework.stereotype.Component;
import java.util.Date;

/**
 * 公共填充类
 */
@Component
public class MyMetaObjectHandler implements MetaObjectHandler {
    /**
     * 插入时自动填充 created updated
     * @param metaObject
     */
    @Override
    public void insertFill(MetaObject metaObject) {
        setFieldValByName("created", new Date(), metaObject);
        setFieldValByName("updated", new Date(), metaObject);
    }

    /**
     * 更新时自动填充 updated
     *
     * @param metaObject
     */
    @Override
    public void updateFill(MetaObject metaObject) {
        setFieldValByName("updated", new Date(), metaObject);
    }
}
【小结】
完成简化实体类代码优化
2. 图片上传
【目标】
完成图片上传功能
【路径】
1:图片存储解决方案
2:抽取组件
【讲解】
2.1. 图片存储解决方案
实现图片上传服务,需要有存储的支持,那么我们的解决方案将以下几种:
- 直接将图片保存到服务的硬盘
- 优点:开发便捷,成本低
- 缺点:扩容困难
- 使用分布式文件系统进行存储
- 优点:容易实现扩容
- 缺点:开发复杂度稍大(有成熟的产品可以使用,比如:FastDFS)
- 使用第三方的存储服务
- 优点:开发简单,拥有强大功能,免维护
- 缺点:付费
完善个人信息选用阿里云的OSS服务进行图片存储。
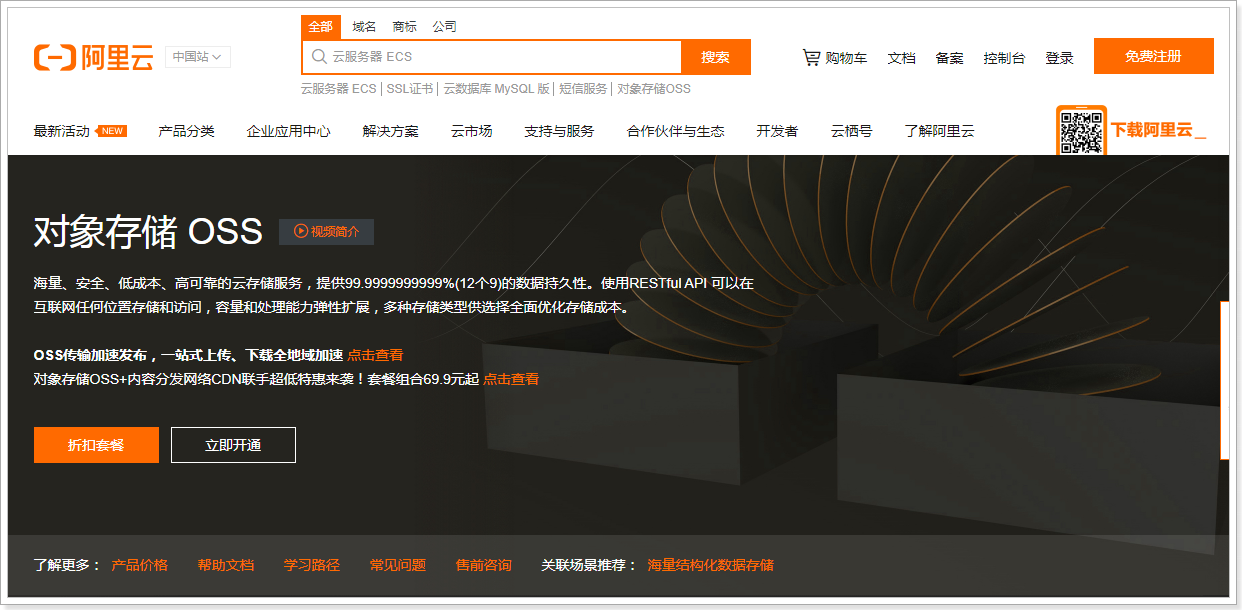
2.2. 阿里云OSS存储
2.2.1. 什么是OSS服务?
地址:https://www.aliyun.com/product/oss
2.2.2. 开通对象存储OSS服务
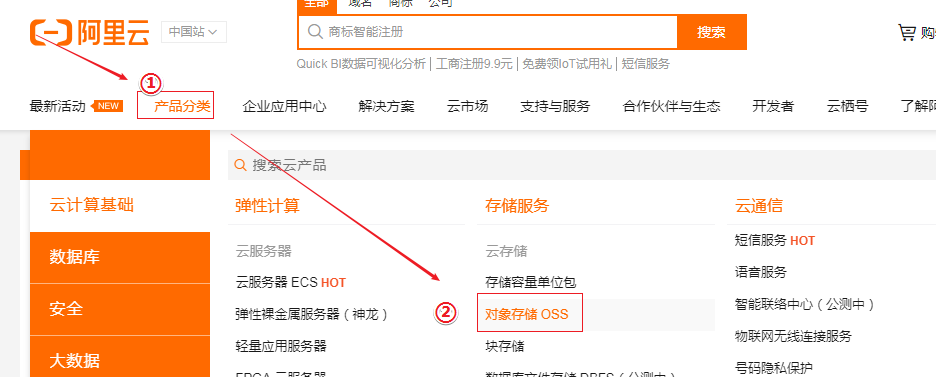
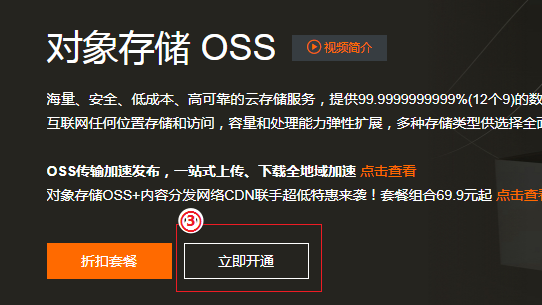
2.2.3. 创建Bucket
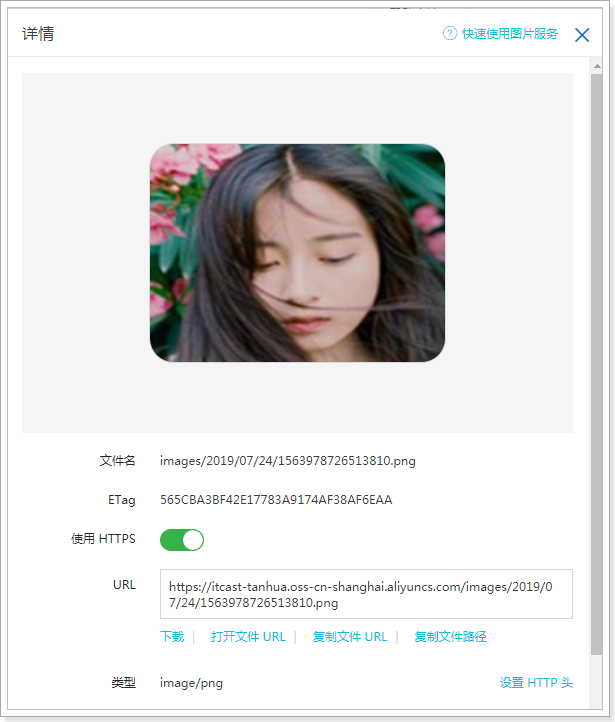
使用OSS,首先需要创建Bucket,Bucket翻译成中文是水桶的意思,把存储的图片资源看做是水,想要盛水必须得有桶,就是这个意思了。
进入控制台,https://oss.console.aliyun.com/overview
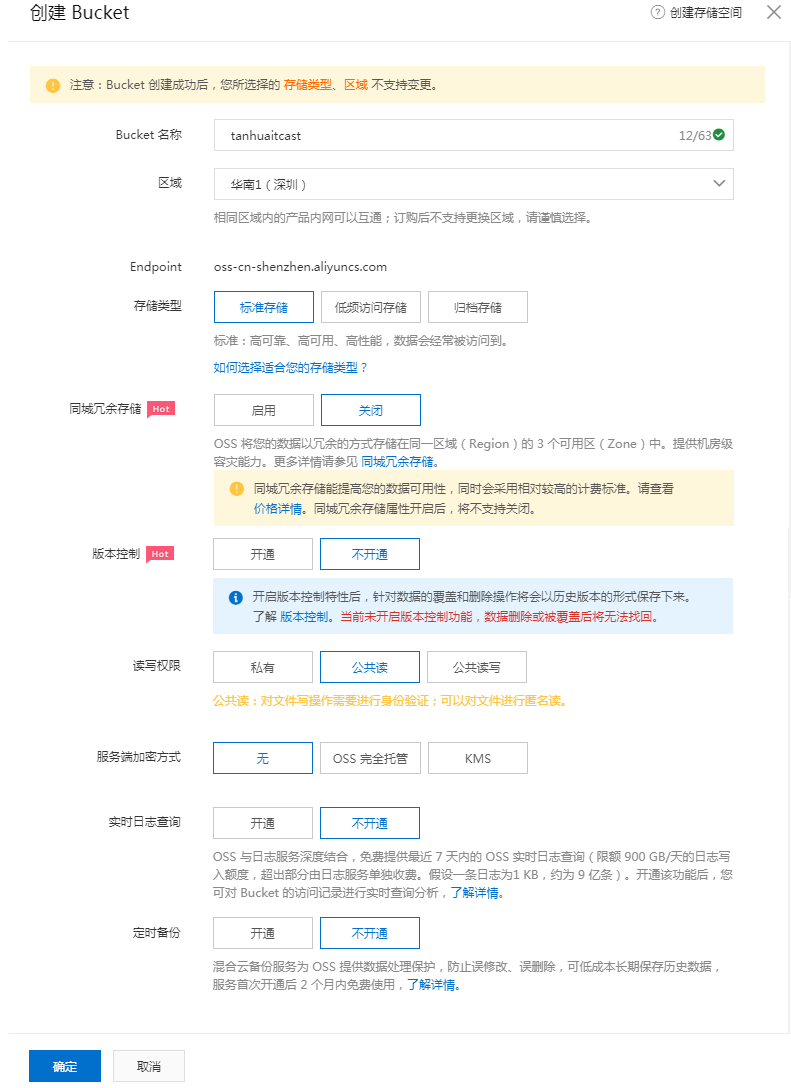
记下重要的配置信息
endpoint: oss-cn-shenzhen.aliyuncs.com
Bucket 名称: tanhuaitcast
选择Bucket后,即可看到对应的信息,如:url、消耗流量等 :
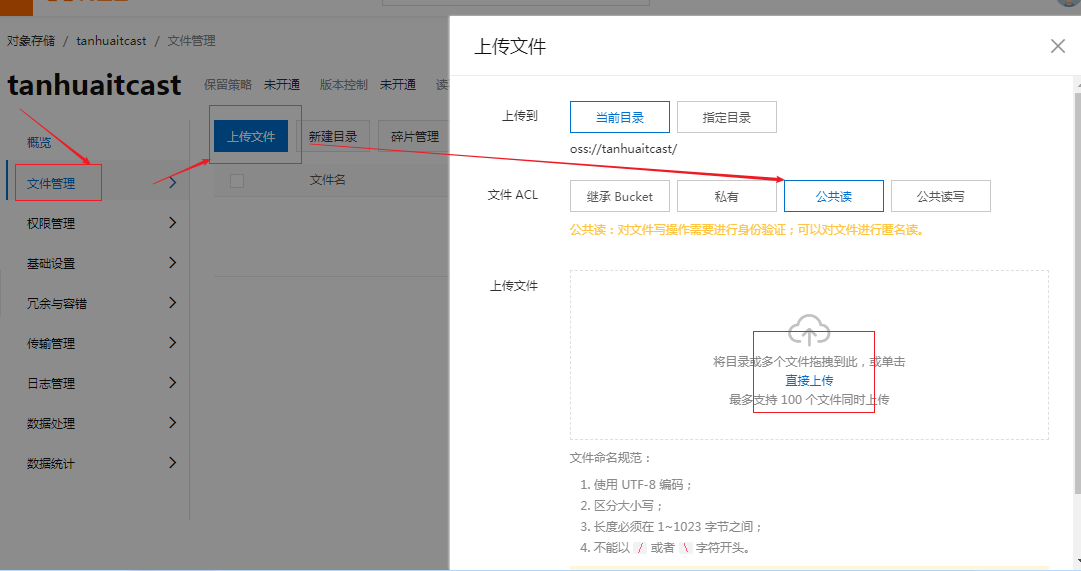
2.2.4. 上传文件
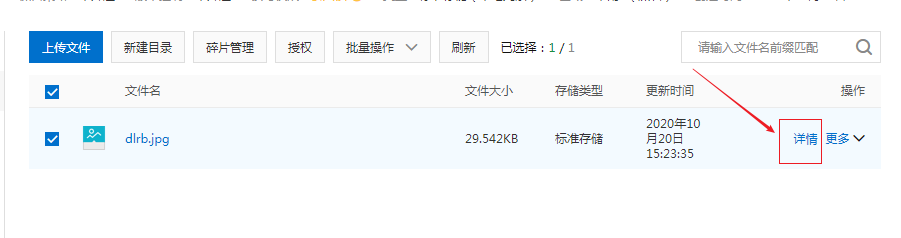
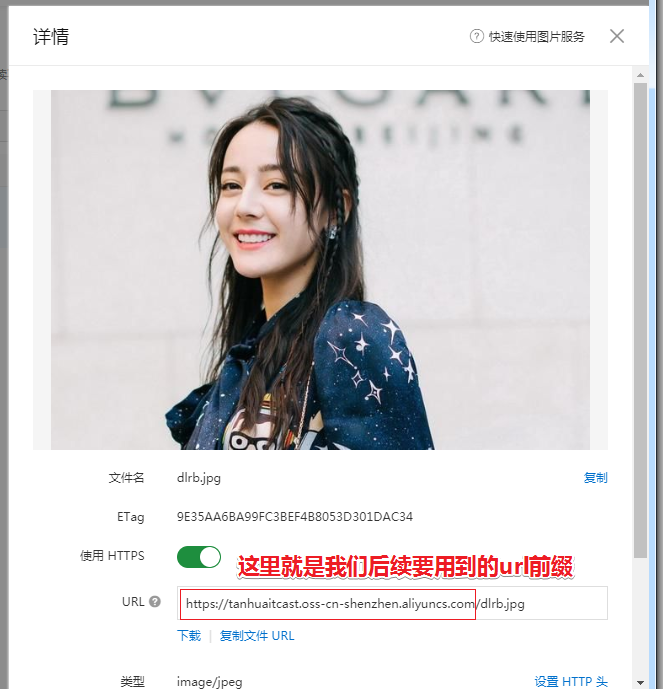
2.2.5. 查看文件
2.3. 抽取组件
oss所需配置
存储空间名称:mysztanhua119
地域:深圳 Endpoint  oss-cn-shenzhen.aliyuncs.com
访问域名地址:https://mysztanhua119.oss-cn-shenzhen.aliyuncs.com
参照阿里提供的开发指南JavaSDK版
https://help.aliyun.com/document_detail/32009.html?spm=a2c4g.11186623.6.916.6f416d39e2YD5I
2.3.1. 导入依赖
在tanhua-commons中添加javaSDK的依赖,如果之前已经添加过,则忽略些步骤
<dependency>
    <groupId>com.aliyun.oss</groupId>
    <artifactId>aliyun-sdk-oss</artifactId>
    <version>3.10.2</version>
</dependency>
2.3.2. Propeties配置对象
在tanhua-commons工程中创建OssProperties类中,从配置文件中获取阿里云OSS存储配置信息
package com.tanhua.commons.properties;
import lombok.Data;
import org.springframework.boot.context.properties.ConfigurationProperties;

@Data
@ConfigurationProperties(prefix = "tanhua.oss")
public class OssProperties {
    private String endpoint;
    private String accessKeyId;
    private String accessKeySecret;
    private String bucketName;
    private String url;//sztanhua.oss-cn-shenzhen.aliyuncs.com
}
2.3.3. 上传模板对象
在tanhua-commons中创建上传模板类OssTemplate,自动装配注入此对象,完成上传图片功能
package com.tanhua.commons.templates;

import com.aliyun.oss.OSS;
import com.aliyun.oss.OSSClientBuilder;
import com.tanhua.commons.properties.OssProperties;
import java.io.FileInputStream;
import java.io.InputStream;
import java.text.SimpleDateFormat;
import java.util.Date;
import java.util.UUID;

public class OssTemplate {

    private OssProperties ossProperties;

    public OssTemplate(OssProperties ossProperties){
        this.ossProperties = ossProperties;
    }

    /**
     * 上传文件
     * @param filename
     * @param is
     * @return
     */
    public String upload(String filename, InputStream is) {
        // Endpoint以杭州为例,其它Region请按实际情况填写。
        String endpoint = ossProperties.getEndpoint();
        // 云账号AccessKey有所有API访问权限,建议遵循阿里云安全最佳实践,创建并使用RAM子账号进行API访问或日常运维,请登录 https://ram.console.aliyun.com 创建。
        String accessKeyId = ossProperties.getAccessKeyId();
        String accessKeySecret = ossProperties.getAccessKeySecret();

        // 创建OSSClient实例。
        OSS ossClient = new OSSClientBuilder().build(endpoint, accessKeyId, accessKeySecret);

        String suffix = filename.substring(filename.lastIndexOf("."));
        String ymd = new SimpleDateFormat("yyyy/MM/dd").format(new Date());
        String name = "images/" + ymd + "/" + UUID.randomUUID().toString() + suffix;

        // 上传文件流。
        ossClient.putObject(ossProperties.getBucketName(), name, is);

        // 关闭OSSClient。
        ossClient.shutdown();
        return ossProperties.getUrl() + "/" + name;
    }
}
2.3.4. 配置类
在配置类TanhuaAutoConfiguration中加入OssTemplate对象相关配置
package com.tanhua.commons;

import com.tanhua.commons.properties.FaceProperties;
import com.tanhua.commons.properties.OssProperties;
import com.tanhua.commons.properties.SmsProperties;
import com.tanhua.commons.templates.OssTemplate;
import com.tanhua.commons.templates.SmsTemplate;
import org.springframework.boot.context.properties.EnableConfigurationProperties;
import org.springframework.context.annotation.Bean;
import org.springframework.context.annotation.Configuration;

@Configuration
@EnableConfigurationProperties({
    SmsProperties.class, OssProperties.class
})
public class CommonsAutoConfiguration {

    @Bean
    public SmsTemplate smsTemplate(SmsProperties smsProperties){
        SmsTemplate smsTemplate = new SmsTemplate(smsProperties);
        smsTemplate.init();
        return smsTemplate;
    }

    @Bean
    public OssTemplate ossTemplate(OssProperties ossProperties){
        OssTemplate ossTemplate = new OssTemplate(ossProperties);
        return ossTemplate;
    }
}
2.3.5. 测试
tanhua-server工程的application.yml中加入oss配置信息如下
tanhua:
  ...
  oss:
    endpoint: http://oss-cn-shenzhen.aliyuncs.com
    bucketName: sztanhua
    url: https://sztanhua.oss-cn-shenzhen.aliyuncs.com
    accessKeyId: LTAI4FyG7DDp4FhmgfidgeAt
    accessKeySecret: LBXIjWlVmR2bpp9CVzYzqojUfJ6ezi
tanhua-server工程中添加测试类,测试文件上传功能
package com.tanhua.server.test;

import com.tanhua.commons.templates.OssTemplate;
import com.tanhua.commons.templates.SmsTemplate;
import org.junit.Test;
import org.junit.runner.RunWith;
import org.springframework.beans.factory.annotation.Autowired;
import org.springframework.boot.test.context.SpringBootTest;
import org.springframework.test.context.junit4.SpringRunner;

import java.io.FileInputStream;
import java.io.FileNotFoundException;
import java.util.Map;

@SpringBootTest
@RunWith(SpringRunner.class)
public class OssTest {

    @Autowired
    private OssTemplate ossTemplate;

    @Test
    public void testOss() throws FileNotFoundException {
        FileInputStream is = new FileInputStream("C:\\Users\\Eric\\Desktop\\file\\timg.jpg");
        ossTemplate.upload("timg.jpg",is);
    }
}
【小结】
1:了解图片存储解决方案
2:完成图片存储组件抽取
3. 人脸检测
【目标】
完成人脸检测功能
【路径】
1:百度云AI介绍
2:百度云组件抽取
【讲解】
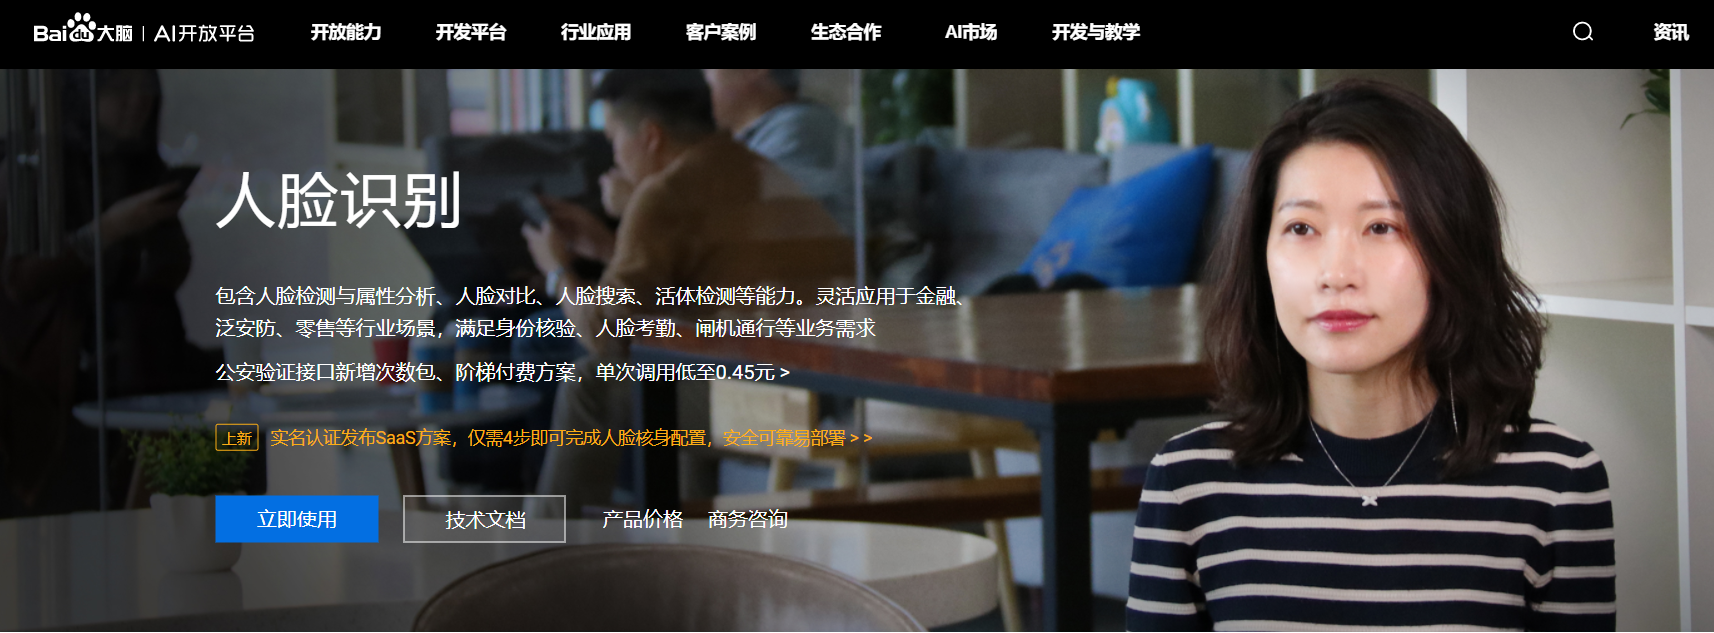
3.1. 百度云AI
地址:https://ai.baidu.com/tech/face
3.2. 账号申请
3.2.1. 账号登录注册
百度云AI支持百度账号登录,也可以支持云账号。按需注册即可
3.2.2. 创建应用
按需创建应用
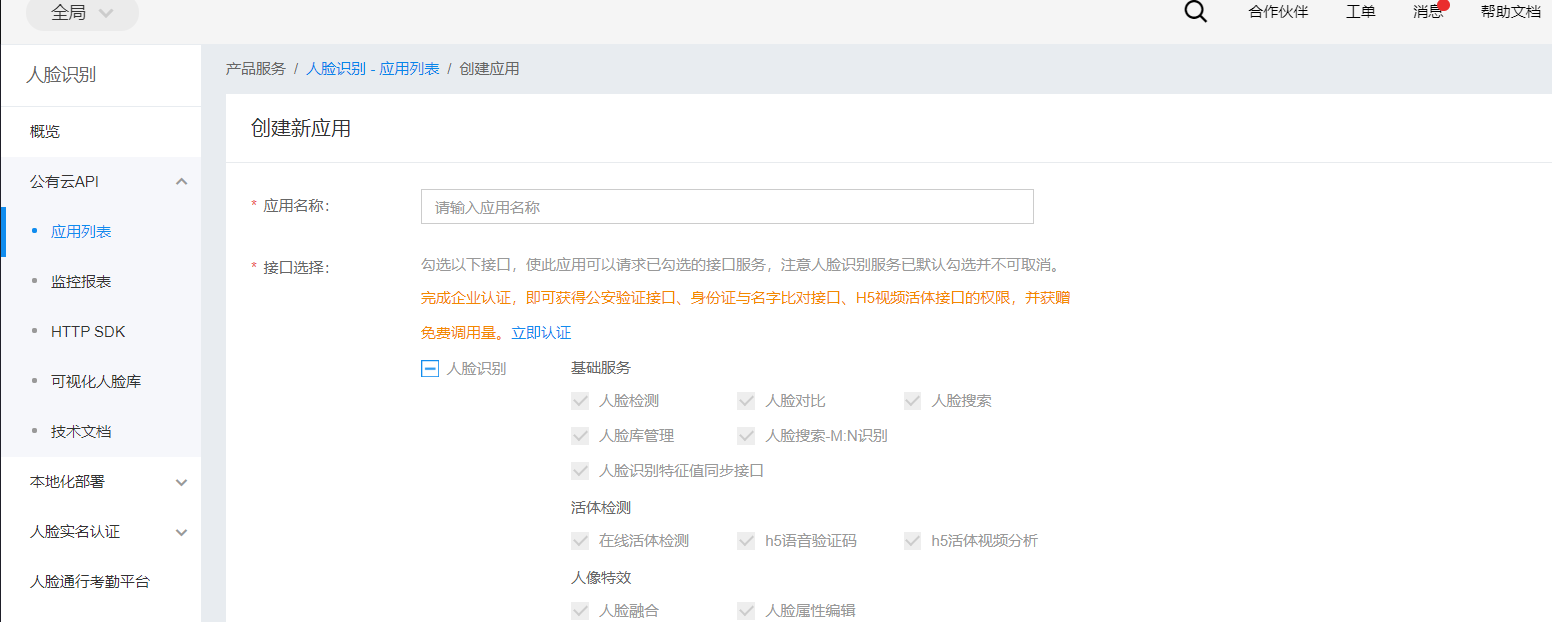
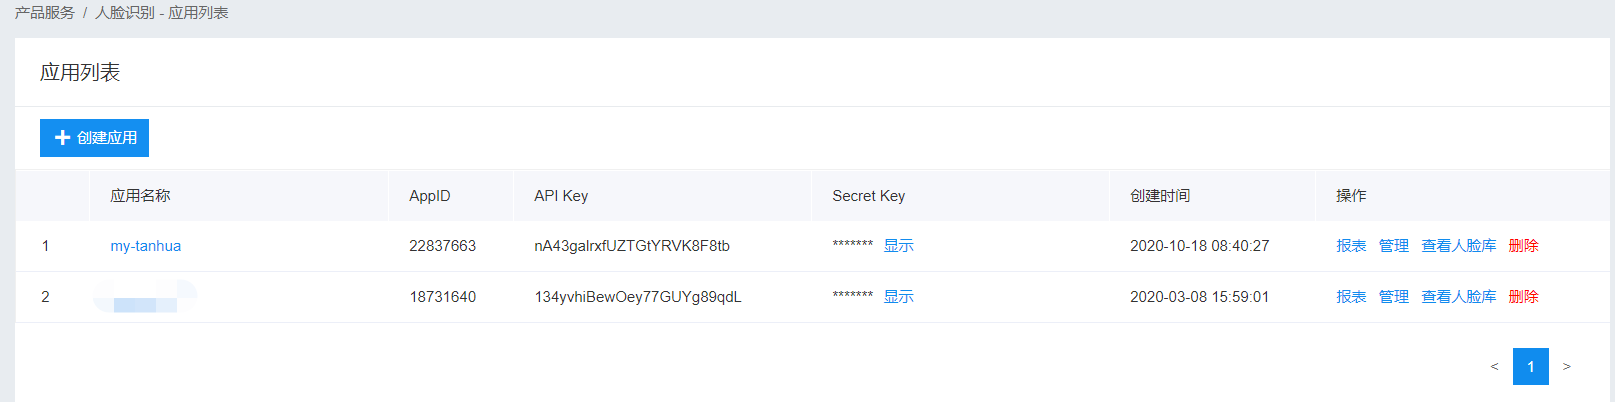
获取对应的应用配置信息
3.3. 抽取组件
所需配置
应用名称:tanhua119
AppID:25047210
API Key:TlK02Q7dIwOScr4pq2nQWqQN
Secret Key:t2XAzjUkf6Bh23jQUxuacl8vKp5nb75k
3.3.1. 导入依赖
此步略过
<!--百度人脸识别API-->
<dependency>
    <groupId>com.baidu.aip</groupId>
    <artifactId>java-sdk</artifactId>
    <version>4.8.0</version>
</dependency>
3.3.2. Propeties配置对象
在tanhua-commons工程中创建AipFaceProperties类中,从配置文件中获取配置信息
package com.tanhua.commons.properties;

import lombok.Data;
import org.springframework.boot.context.properties.ConfigurationProperties;

@Data
@ConfigurationProperties(prefix = "tanhua.face")
public class FaceProperties {
    private String appId;
    private String apiKey;
    private String secretKey;
}
3.3.3. 上传模板对象
在tanhua-commons工程中创建创建AipFaceTemplate,自动装配注入此对象,完成图片人脸检测
package com.tanhua.commons.templates;

import com.baidu.aip.face.AipFace;
import com.baidu.aip.util.Base64Util;
import com.tanhua.commons.properties.FaceProperties;
import lombok.extern.slf4j.Slf4j;
import org.json.JSONObject;

import java.util.HashMap;

@Slf4j
public class FaceTemplate {

    private FaceProperties faceProperties;

    public FaceTemplate(FaceProperties faceProperties){
        this.faceProperties = faceProperties;
    }

    /**
     * 人脸识别方法 成功返回true 失败返回false
     * @param bytes
     * @return
     */
    public boolean detect(byte[] bytes){
        // 初始化一个AipFace
        AipFace client = new AipFace(faceProperties.getAppId(), faceProperties.getApiKey(), faceProperties.getSecretKey());

        HashMap<String, String> options = new HashMap<String, String>();
        options.put("face_field", "age");
        options.put("max_face_num", "2");
        options.put("face_type", "LIVE");
        options.put("liveness_control", "LOW");

        // 调用接口
        String image = Base64Util.encode(bytes);
        String imageType = "BASE64";

        // 人脸检测
        JSONObject res = client.detect(image, imageType, options);
        // 没检测到人脸时,error_code值不为0
        Integer error_code = (Integer)res.get("error_code");
        log.debug("人脸识别结果********{}***",error_code);
        return error_code == 0;
    }
}
3.3.4. 配置类
在tanhua-commons工程中创建TanhuaAutoConfiguration中加入AipFaceTemplate对象相关配置
package com.tanhua.commons;

import com.tanhua.commons.properties.FaceProperties;
import com.tanhua.commons.properties.OssProperties;
import com.tanhua.commons.properties.SmsProperties;
import com.tanhua.commons.templates.FaceTemplate;
import com.tanhua.commons.templates.OssTemplate;
import com.tanhua.commons.templates.SmsTemplate;
import org.springframework.boot.context.properties.EnableConfigurationProperties;
import org.springframework.context.annotation.Bean;
import org.springframework.context.annotation.Configuration;

@Configuration
@EnableConfigurationProperties({
    SmsProperties.class, OssProperties.class, FaceProperties.class
})
public class CommonsAutoConfiguration {

    @Bean
    public SmsTemplate smsTemplate(SmsProperties smsProperties){
        SmsTemplate smsTemplate = new SmsTemplate(smsProperties);
        smsTemplate.init();
        return smsTemplate;
    }

    @Bean
    public OssTemplate ossTemplate(OssProperties ossProperties){
        OssTemplate ossTemplate = new OssTemplate(ossProperties);
        return ossTemplate;
    }

    @Bean
    public FaceTemplate faceTemplate(FaceProperties faceProperties){
        return new FaceTemplate(faceProperties);
    }
}
3.3.5. 测试
tanhua-server工程加入oss配置信息如下
tanhua:
  ...
  face:
    appId: 22949516
    apiKey: uDkEBDhtO02soeMB6kuMZTZi
    secretKey: sMGUX8tzPhc0eBfvy3rbGYuXiK6MZCEF
编写测试类,测试文件上传功能
package com.tanhua.server.test;

import com.tanhua.commons.templates.FaceTemplate;
import org.junit.Test;
import org.junit.runner.RunWith;
import org.springframework.beans.factory.annotation.Autowired;
import org.springframework.boot.test.context.SpringBootTest;
import org.springframework.test.context.junit4.SpringRunner;

import java.io.File;
import java.io.FileInputStream;
import java.io.FileNotFoundException;
import java.io.IOException;
import java.nio.file.Files;

@SpringBootTest
@RunWith(SpringRunner.class)
public class FaceTest {

    @Autowired
    private FaceTemplate faceTemplate;

    @Test
    public void testFace() throws IOException {
        faceTemplate.detect(Files.readAllBytes(new File("C:\\Users\\Eric\\Desktop\\file\\test1.jpg").toPath()));
    }
}
【小结】
1:了解百度云AI
2:完成百度云组件抽取
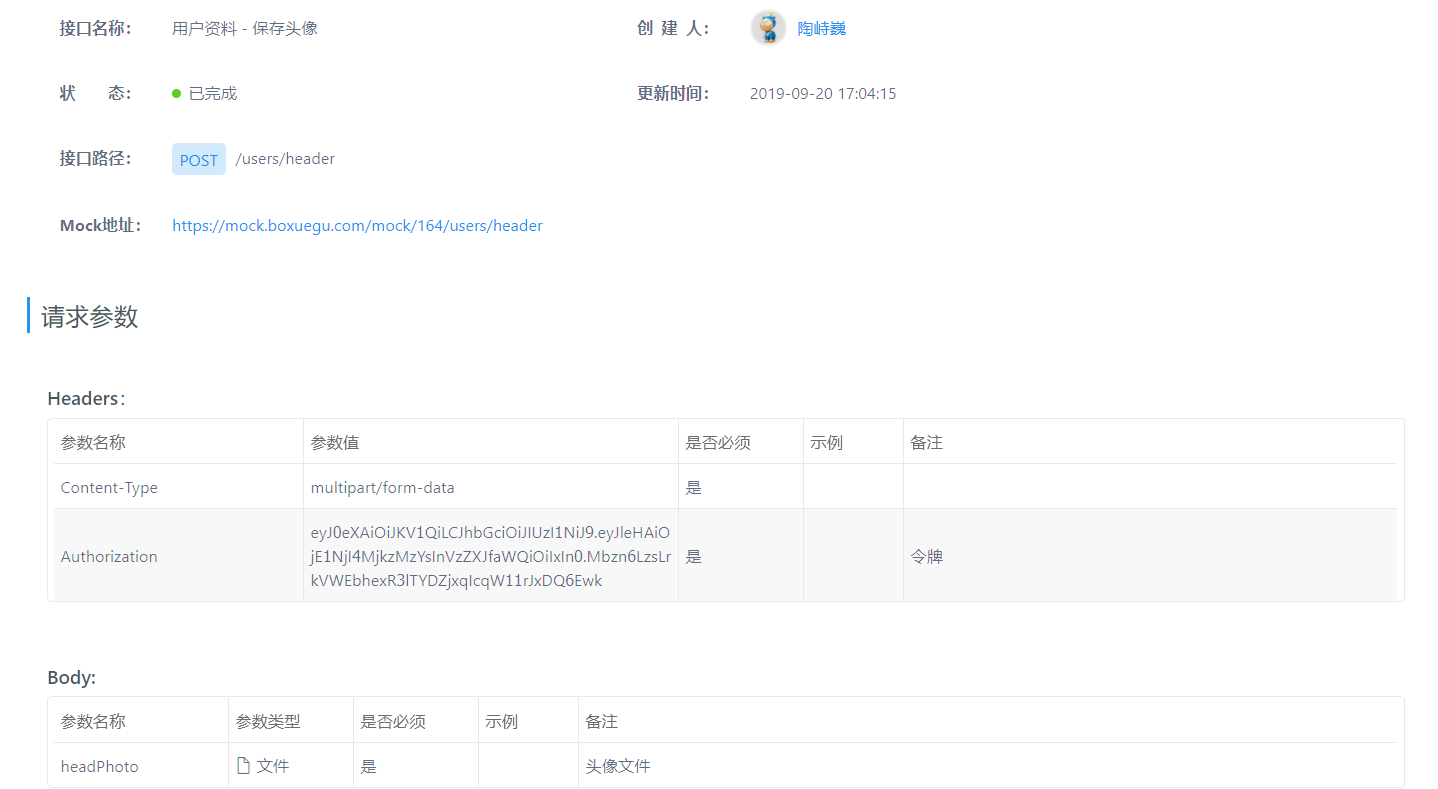
4. 完善个人信息(重点)
【分析】
【需求分析】
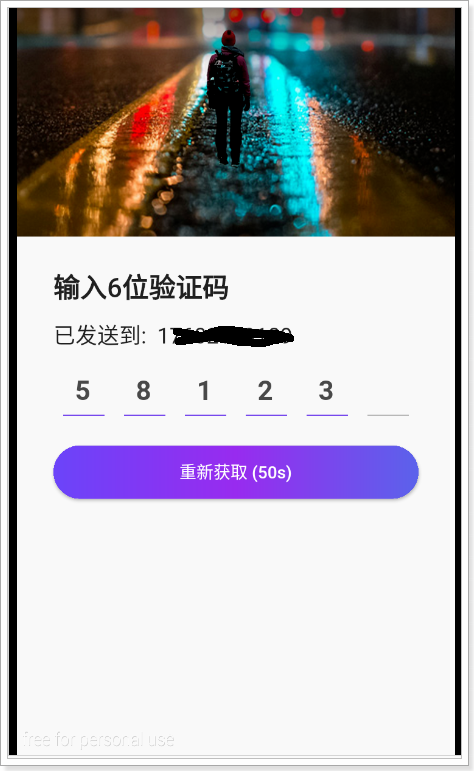
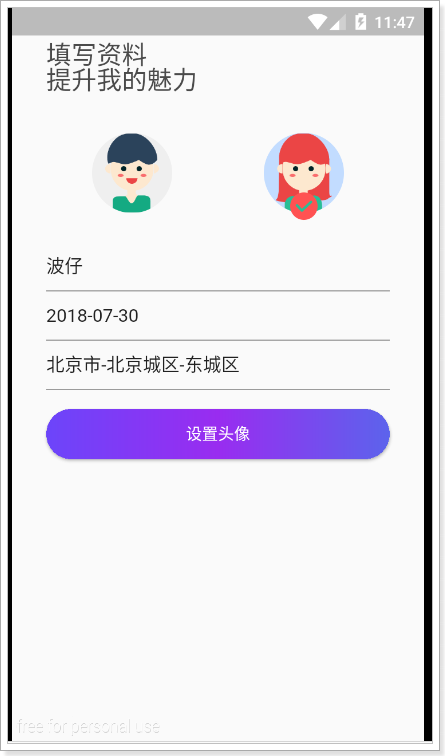
输入正确的验证码,如果是新用户则会跳转完善个人信息页面,输入昵称,生日,选择性别,居住城市****点击设置头像,发送保存个人信息请求
设置头像不仅仅是发送请求还弹出拍照进行人脸识别窗口,拍照并确认,发送上传头像请求,更新个人信息表头像字段(百度人脸识别 上传头像到oss 更新用户个人信息表头像字段)。
【数据库表分析】
tb_user_info保存 更新
保存个人信息-【消费者编码分析】
-
controller接收保存个人信息请求 @RequestBody UserInfoVo @RequestHeader("Authorization") String headToken
-
controller调用service
a.从token中获取用户信息
b.如果不存在,则登录超时
c.如果存在,往个人信息表保存用户信息记录(调用服务提供者)
保存个人信息-【服务提供者编码分析】
- 编写服务提供者接口 保存用户信息接口
- 编写服务提供者接口实现类 保存用户信息接口实现方法 调用dao
人脸识别-【消费者编码分析】
-
controller接收人脸识别请求 MultipartFile headPhoto @RequestHeader("Authorization") String headToken
-
controller调用service
a.从token中获取用户信息
b.如果不存在,则登录超时
c.百度人脸识别
d.上传头像到oss
e.更新用户个人信息表头像字段
人脸识别-【服务提供者编码分析】
- 编写服务提供者接口 更新用户头像接口
- 编写服务提供者接口实现类 更新用户头像接口实现方法 调用dao
【目标】
完善个人信息
【路径】
1:完善个人信息分析
2:完善个人信息实现
【讲解】
用户在首次登录时需要完善个人信息,包括性别、昵称、生日、城市、头像等。
其中,头像数据需要做图片上传,这里采用阿里云的OSS服务作为我们的图片服务器,并且对头像要做人脸识别,非人脸照片不得上传。
包含两步操作
- 填写用户基础信息
- 上传用户头像,更新用户的头像信息
数据库表:
- 用户表(tb_user): id,mobile,password,created,updated
- 用户详细信息表(tb_info)
CREATE TABLE `tb_user_info` (
  `id` bigint(20) NOT NULL,
  `nickname` varchar(50) DEFAULT NULL COMMENT '昵称',
  `avatar` varchar(200) DEFAULT NULL COMMENT '用户头像',
  `tags` varchar(50) DEFAULT '单身,本科,年龄相仿' COMMENT '用户标签:多个用逗号分隔',
  `gender` varchar(10) DEFAULT '3' COMMENT '性别,1-男,2-女,3-未知',
  `age` int(11) DEFAULT NULL COMMENT '用户年龄',
  `education` varchar(20) DEFAULT NULL COMMENT '学历',
  `city` varchar(100) DEFAULT NULL COMMENT '居住城市',
  `birthday` varchar(20) DEFAULT NULL COMMENT '生日',
  `cover_pic` varchar(200) DEFAULT NULL COMMENT '封面图片',
  `profession` varchar(20) DEFAULT NULL COMMENT '行业',
  `income` varchar(20) DEFAULT NULL COMMENT '收入',
  `created` datetime DEFAULT NULL,
  `updated` datetime DEFAULT NULL,
  `marriage` int(1) DEFAULT '0' COMMENT '0:未婚,1:已婚',
  PRIMARY KEY (`id`)
) ENGINE=InnoDB DEFAULT CHARSET=utf8 COMMENT='用户信息表';
- 用户表和信息表:一对一关系
- 维护关系:公用主键的关系(用户id1 ,用户信息id1)
完善个人信息流程:
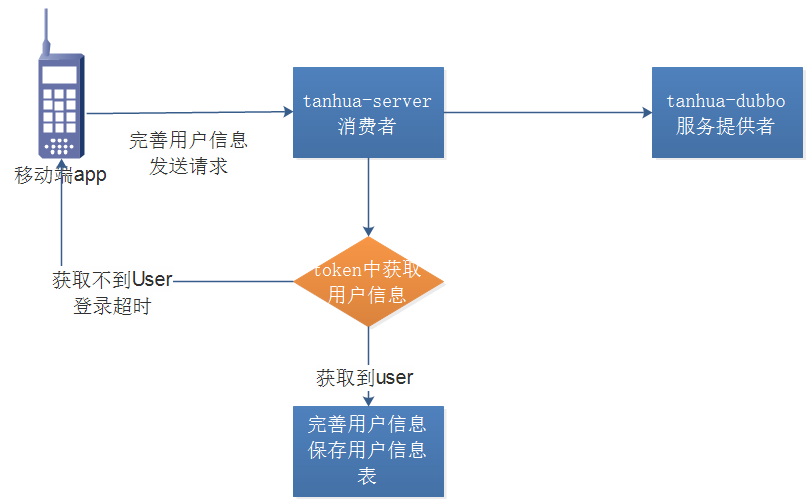
上传头像流程:

4.1. 接口信息
- 完善个人信息
- 上传头像
4.2. Token有效期分析
用户登录成功之后,服务端返回Token作为客户端和服务端间用户认证的“密钥”,已经将token存到redis中,但token的有效期该如何实现呢?
4.2.1. 根据token获取用户
客户端发起请求,会在请求头header中携带Authorization参数。后端开发人员获取Authorization参数后,从redis中获取用户对象,并续期。
tanhua-server中的UserService添加方法
/**
 * 通过token获取登陆用户信息
 * @param token
 * @return
 */
public User getUserByToken(String token){
    String key = "TOKEN_" + token;
    String userJsonStr = redisTemplate.opsForValue().get(key);
    if(StringUtils.isEmpty(userJsonStr)){
        return null;
    }
    // 延长有效期,续期
    redisTemplate.expire(key,1, TimeUnit.DAYS);
    User user = JSON.parseObject(userJsonStr, User.class);
    return user;
}
4.3. 服务提供者
4.3.1. UserInfo与UserInfoVo
tanhua-domain模块中编写用户信息实体类UserInfo
package com.tanhua.domain.db;

import com.baomidou.mybatisplus.annotation.IdType;
import com.baomidou.mybatisplus.annotation.TableId;
import lombok.Data;

@Data
public class UserInfo extends BasePojo{
    @TableId(type= IdType.INPUT)
    private Long id; //用户id
    private String nickname; //昵称
    private String avatar; //用户头像
    private String birthday; //生日
    private String gender; //性别
    private Integer age; //年龄
    private String city; //城市
    private String income; //收入
    private String education; //学历
    private String profession; //行业
    private Integer marriage; //婚姻状态
    private String tags; //用户标签:多个用逗号分隔
    private String coverPic; // 封面图片
}
vo包下添加UserInfoVo
package com.tanhua.domain.vo;

import lombok.Data;
import java.io.Serializable;

@Data
public class UserInfoVo implements Serializable {
    private Long id; //用户id
    private String nickname; //昵称
    private String avatar; //用户头像
    private String birthday; //生日
    private String gender; //性别
    private String age; //年龄
    private String city; //城市
    private String income; //收入
    private String education; //学历
    private String profession; //行业
    private Integer marriage; //婚姻状态
}
4.3.2. UserInfoMapper
tanhua-dubbo-service模块编写持久层代码UserInfoMapper
package com.tanhua.dubbo.mapper;

import com.baomidou.mybatisplus.core.mapper.BaseMapper;
import com.tanhua.domain.db.UserInfo;


public interface UserInfoMapper extends BaseMapper<UserInfo> {
}
4.3.3. UserInfoApi
tanhua-dubbo-interface模块编写公共接口UserInfoApi
package com.tanhua.dubbo.api.db;

import com.tanhua.domain.db.UserInfo;

/**
 * 用户信息服务接口
 */
public interface UserInfoApi {
    /**
     * 新用户---1填写资料
     */
    void saveUserInfo(UserInfo userInfo);

    /**
     * 更新用户个人信息表头像字段
     * 更新用户个人信息(昵称 生日 城市 等)
     */
    void updateUserInfo(UserInfo userInfo);
}
4.3.4. UserInfoApiImpl
tanhua-dubbo-service模块编写服务提供者核心代码UserInfoApiImpl
package com.tanhua.dubbo.api.db;

import com.tanhua.domain.db.UserInfo;
import com.tanhua.dubbo.mapper.UserInfoMapper;
import org.apache.dubbo.config.annotation.Service;
import org.springframework.beans.factory.annotation.Autowired;

/**
 * 用户信息服务接口实现类
 */
@Service
public class UserInfoApiImpl implements UserInfoApi{

    @Autowired
    private UserInfoMapper userInfoMapper;

    /**
     * 新用户---1填写资料
     */
    @Override
    public void saveUserInfo(UserInfo userInfo) {
        userInfoMapper.insert(userInfo);
    }


    /**
     * 更新用户个人信息表头像字段
     */
    @Override
    public void updateUserInfo(UserInfo userInfo) {
        userInfoMapper.updateById(userInfo);
    }
}
4.4. 服务消费者
4.4.1. LoginController
tanhua-server模块编写LoginController
package com.tanhua.server.controller;
import com.tanhua.domain.db.User;
import com.tanhua.domain.vo.UserInfoVo;
import com.tanhua.server.service.UserService;
import org.springframework.beans.factory.annotation.Autowired;
import org.springframework.http.ResponseEntity;
import org.springframework.web.bind.annotation.*;
import java.util.Map;
/**
* 登录注册控制层
*/
@RestController
@RequestMapping("/user")
public class LoginController {
//控制层调用业务层
@Autowired
private UserService userService;
。。。。。。。。。。。。。。。。。
/**
* 新用户---1填写资料
* @RequestHeader("Authorization") 请求头 token信息
*/
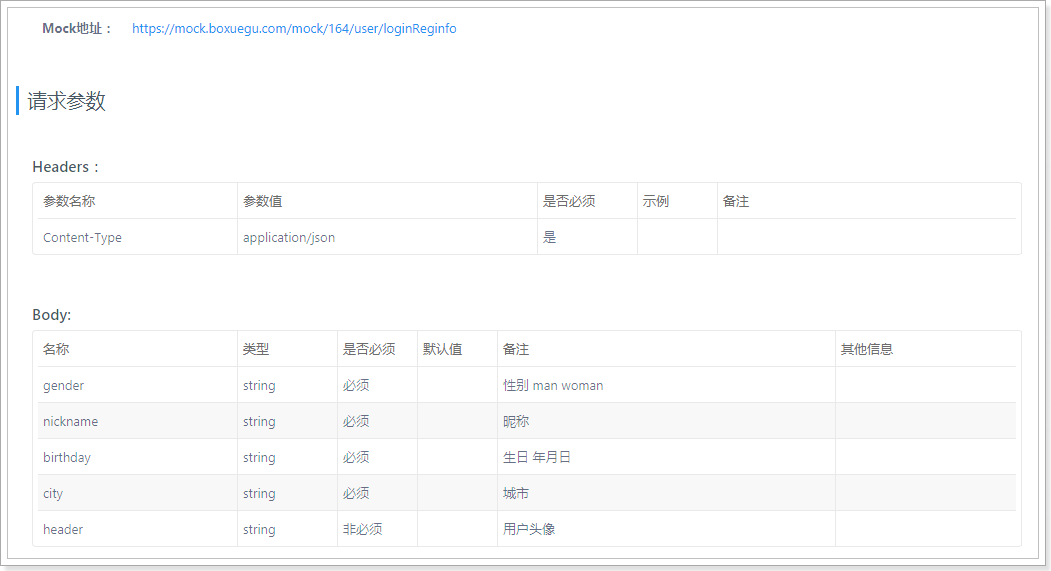
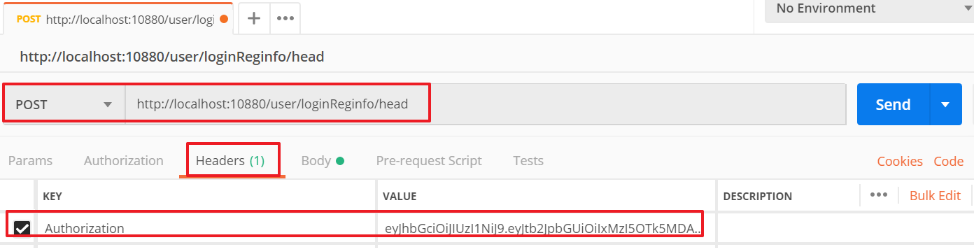
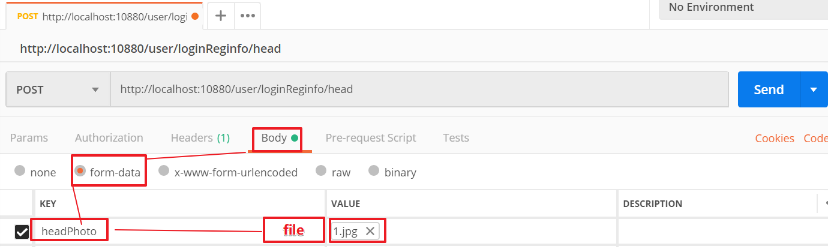
@RequestMapping(value = "/loginReginfo",method = RequestMethod.POST)
public ResponseEntity loginReginfo(@RequestBody UserInfoVo userInfoVo, @RequestHeader("Authorization") String headToken){
userService.loginReginfo(userInfoVo,headToken);
return ResponseEntity.ok(null);
}
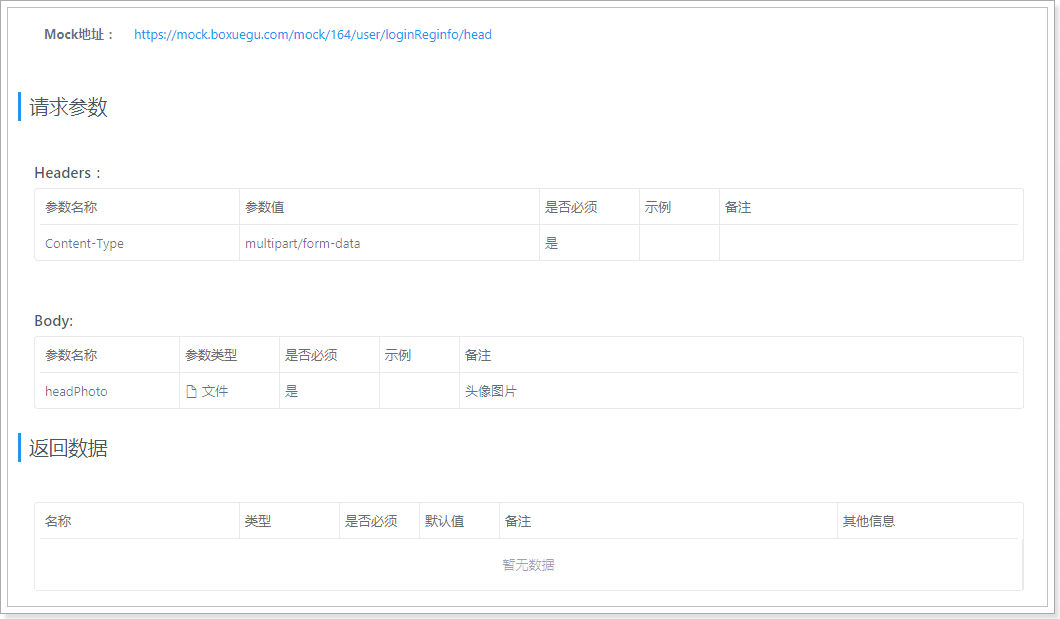
/**
* 新用户---2选取头像
* @RequestHeader("Authorization") 请求头 token信息
*/
@RequestMapping(value = "/loginReginfo/head",method = RequestMethod.POST)
public ResponseEntity loginReginfoHead(MultipartFile headPhoto, @RequestHeader("Authorization") String headToken) throws IOException {
userService.loginReginfoHead(headPhoto,headToken);
return ResponseEntity.ok(null);
}
}
4.4.2. UserService
package com.tanhua.server.service;

import com.alibaba.fastjson.JSON;
import com.tanhua.commons.templates.SmsTemplate;
import com.tanhua.domain.db.User;
import com.tanhua.domain.db.UserInfo;
import com.tanhua.domain.vo.ErrorResult;
import com.tanhua.domain.vo.UserInfoVo;
import com.tanhua.dubbo.api.db.UserApi;
import com.tanhua.dubbo.api.db.UserInfoApi;
import com.tanhua.server.exception.TanHuaException;
import com.tanhua.server.utils.JwtUtils;
import lombok.extern.slf4j.Slf4j;
import org.apache.commons.lang3.RandomStringUtils;
import org.apache.dubbo.config.annotation.Reference;
import org.springframework.beans.BeanUtils;
import org.springframework.beans.factory.annotation.Autowired;
import org.springframework.beans.factory.annotation.Value;
import org.springframework.data.redis.core.RedisTemplate;
import org.springframework.stereotype.Service;
import org.springframework.transaction.annotation.Transactional;
import org.springframework.util.StringUtils;

import java.util.HashMap;
import java.util.Map;
import java.util.concurrent.TimeUnit;

/**
 * 用户管理-业务逻辑处理层
 */
@Service
@Transactional
@Slf4j //日志注解
public class UserService {

    @Reference
    private UserInfoApi userInfoApi;

    /**
     * 新用户---1填写资料
     */
    public void loginReginfo(UserInfoVo userInfoVo, String headToken) {
        //a.从token中获取用户信息
        String userStr = redisTemplate.opsForValue().get("TOKEN_" + headToken);
        //b.如果不存在,则登录超时
        if(StringUtils.isEmpty(userStr)){
            throw new TanHuaException(ErrorResult.loginFail());
        }
        //c.如果存在,往个人信息表保存用户信息记录(调用服务提供者)
        //基于userStr获取user对象 得到userId
        User user = JSON.parseObject(userStr, User.class);
        Long userId = user.getId();
        UserInfo userInfo = new UserInfo();
        //copy代码尽量要放到手动设置值前面
        BeanUtils.copyProperties(userInfoVo,userInfo);//属性名称 类型一样即可copy //昵称 生日 性别 城市
        //将userInfoVo 设置到 UserInfo中
        userInfo.setId(userId);//用户信息表id 跟 用户表 一对一关系
       /* userInfo.setNickname(userInfoVo.getNickname());//昵称
        userInfo.setBirthday(userInfoVo.getBirthday());//生日
        userInfo.setGender(userInfoVo.getGender());//性别
        userInfo.setCity(userInfoVo.getCity());//城市*/
        userInfoApi.saveUserInfo(userInfo);
    }
       /**
     * 新用户---2选取头像
     * @RequestHeader("Authorization") 请求头 token信息
     */
    public void loginReginfoHead(MultipartFile headPhoto, String headToken) throws IOException {
        //a.从token中获取用户信息
        String userStr = redisTemplate.opsForValue().get("TOKEN_" + headToken);
        //b.如果不存在,则登录超时
        if(StringUtils.isEmpty(userStr)){
            throw new TanHuaException(ErrorResult.loginFail());
        }
        //基于userStr获取user对象 得到userId
        User user = JSON.parseObject(userStr, User.class);
        Long userId = user.getId();
        //c.百度人脸识别
        boolean detect = faceTemplate.detect(headPhoto.getBytes());
        log.debug("调用人脸识别接口,结果*****{}*********"+detect);
        if(!detect){
            throw new TanHuaException(ErrorResult.faceError());
        }
        //d.上传头像到oss
        String originalFilename = headPhoto.getOriginalFilename();//获取原始文件名称
        String headUrl = ossTemplate.upload(originalFilename, headPhoto.getInputStream());
        //e.更新用户个人信息表头像字段
        UserInfo userInfo = new UserInfo();
        userInfo.setId(userId);
        userInfo.setAvatar(headUrl);
        userInfoApi.updateUserInfo(userInfo);
    }
}
4.4.3. 测试

postman测试:需要掌握
【小结】
1:掌握完善个人信息功能
5. 查询用户信息
【目标】
查询用户信息
【路径】
1:查询用户信息分析
2:查询用户信息实现
【讲解】
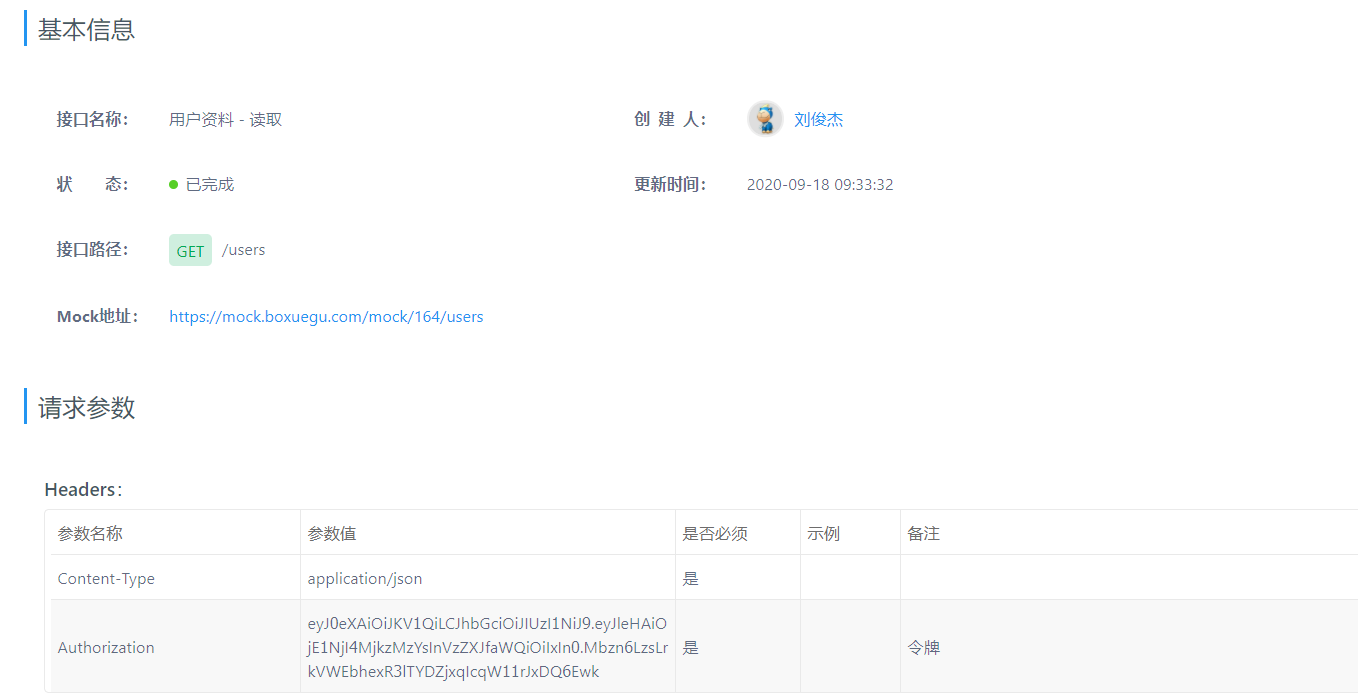
5.1. 接口信息
接口地址:https://mock.boxuegu.com/project/164/interface/api/64673
5.2. 服务提供者
5.2.1. UserInfoApi
tanhua-dubbo-interface模块编写公共接口UserInfoApi
/**
 * 通过id查询用户基本信息
 * @param userId
 * @return
 */
UserInfo findById(Long userId);
5.2.2. UserInfoApiImpl
tanhua-dubbo-service模块编写服务提供者核心代码UserInfoApiImpl
/**
 * 通过id查询用户基本信息
 * @param userId
 */
@Override
public UserInfo findById(Long userId) {
    return userInfoMapper.selectById(userId);
}
5.3. 服务消费者
5.3.1. UserInfoController
tanhua-server模块编写UserInfoController
package com.tanhua.server.controller;

import com.tanhua.domain.db.User;
import com.tanhua.domain.vo.ErrorResult;
import com.tanhua.domain.vo.UserInfoVo;
import com.tanhua.server.service.UserService;
import org.springframework.beans.factory.annotation.Autowired;
import org.springframework.http.HttpStatus;
import org.springframework.http.ResponseEntity;
import org.springframework.web.bind.annotation.GetMapping;
import org.springframework.web.bind.annotation.RequestHeader;
import org.springframework.web.bind.annotation.RequestMapping;
import org.springframework.web.bind.annotation.RestController;

@RestController
@RequestMapping("/users")
public class UserInfoController {

    @Autowired
    private UserService userService;

    @GetMapping
    public ResponseEntity getUserInfo(Long userID, Long huanxinID, @RequestHeader("Authorization") String token){
        Long userId = huanxinID;
        if(null == userId){
            userId = userID;
        }
        if(null == userId){
            User user = userService.getUserByToken(token);
            if(null == user){
                return ResponseEntity.status(HttpStatus.INTERNAL_SERVER_ERROR).body(ErrorResult.error("000006","请重新登陆后再操作"));
            }
            userId = user.getId();
        }
        // 通过id查询用户基本信息
        UserInfoVo userInfoVo = userService.findUserInfoById(userId);
        return ResponseEntity.ok(userInfoVo);
    }
}
5.2.2. UserSerivce
tanhua-server模块编写UserSerivce
/**
 * 通过id查询用户基本信息
 * @param userId
 * @return
 */
public UserInfoVo findUserInfoById(Long userId) {
    UserInfo userInfo = userInfoApi.findById(userId);
    UserInfoVo vo = new UserInfoVo();
    BeanUtils.copyProperties(userInfo, vo);
    // 年龄字段,数据库存的是数值,而页面需要的是字符串。
    if(null != userInfo.getAge()){
        vo.setAge(String.valueOf(userInfo.getAge().intValue()));
    }
    return vo;
}
5.2.3. 测试
【小结】
1:掌握查询用户信息功能
6. 更新用户信息
【目标】
更新用户信息
【路径】
1:更新用户信息分析
2:更新用户信息实现
【讲解】
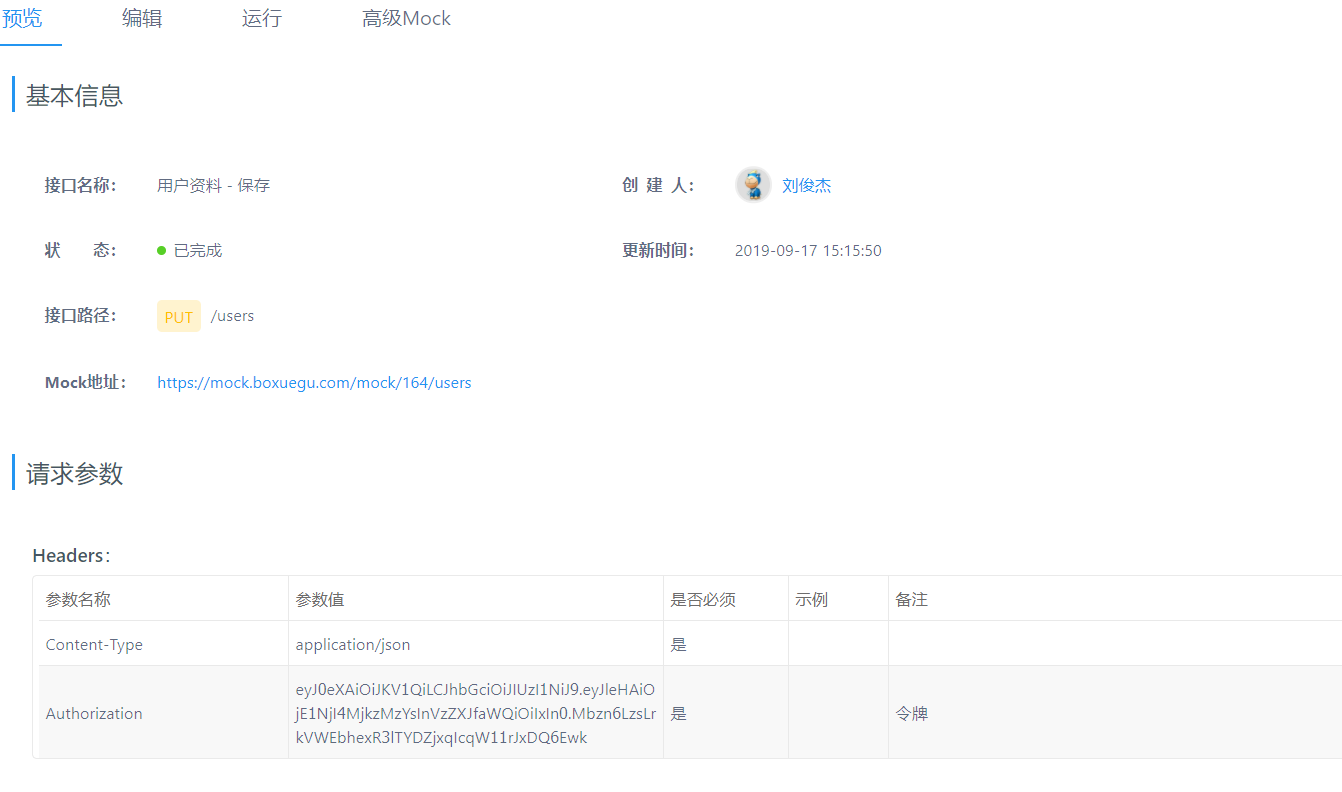
6.1. 接口信息
接口地址:https://mock.boxuegu.com/project/164/interface/api/64687
6.2. 服务提供者
tanhua-dubbo-service模块编写服务提供者(UserInfoApi UserInfoApiImpl)已经实现
6.3.服务消费者
6.3.1. UserInfoController
    /**
     *  用户资料 - 保存
     */
    @RequestMapping(method = RequestMethod.PUT)
    public ResponseEntity updateUserInfoByUserId(@RequestBody UserInfoVo userInfoVo,@RequestHeader("Authorization") String headToken){
        userInfoService.updateUserInfoByUserId(userInfoVo,headToken);
        return ResponseEntity.ok(null);
    }
6.3.2. UserSerivce
    /**
     *  用户资料 - 保存
     */
    public void updateUserInfoByUserId(UserInfoVo userInfoVo, String headToken) {
        //a.从token中获取用户信息
        String userStr = redisTemplate.opsForValue().get("TOKEN_" + headToken);
        //b.如果不存在,则登录超时
        if(StringUtils.isEmpty(userStr)){
            throw new TanHuaException(ErrorResult.loginFail());
        }
        //c.如果存在,往个人信息表保存用户信息记录(调用服务提供者)
        //基于userStr获取user对象 得到userId
        User user = JSON.parseObject(userStr, User.class);
        Long currentUserId = user.getId();//当前登录用户id

        //d.根据用户id更新用户信息(调用服务)
        UserInfo userInfo = new UserInfo();
        //将UserInfoVo copy UserInfo
        BeanUtils.copyProperties(userInfoVo,userInfo);
        //设置当前用户id
        userInfo.setId(currentUserId);
        //还存在问题
        if(!StringUtils.isEmpty(userInfoVo.getBirthday())){
            userInfo.setAge(GetAgeUtil.getAge(userInfoVo.getBirthday()));
        }
        userInfoApi.updateUserInfo(userInfo);
    }
6.3.3. GetAgeUtil
package com.tanhua.server.utils;

import org.joda.time.DateTime;
import org.joda.time.Years;
import java.text.ParseException;
import java.text.SimpleDateFormat;
import java.util.Date;

/**
 * 根据出生日期获取年龄
 */
public class GetAgeUtil {
    public static int getAge(String yearMonthDay){
        try {
            SimpleDateFormat sdf = new SimpleDateFormat("yyyy-MM-dd");
            Date birthDay = sdf.parse(yearMonthDay);
            Years years = Years.yearsBetween(new DateTime(birthDay), DateTime.now());
            return years.getYears();
        } catch (ParseException e) {
            e.printStackTrace();
            return 0;
        }
    }
}
6.3.4. 测试
6.3.5. 代码优化
需求:业务层逻辑执行之前,判断用户是否登录了(根据token作为查询redis记录是否存在)?
快捷键:control+alt+M
6.3.5.1 UserService
    /**
     * 注册登录-新用户注册登录或老用户直接登录
     */
    public Map loginVerification(String phone, String verificationCode) {
        boolean flag = false;//默认老用户
        //a.根据手机号查询redis验证码是否存在
        String key = codePrefix+phone;
        String redisCode = redisTemplate.opsForValue().get(key);
        //b.不存在,验证码失效
        if(StringUtils.isEmpty(redisCode)){
            throw new TanHuaException(ErrorResult.loginError());
        }
        //c.存在,校验验证码 验证码错误提示
        if(!redisCode.equals(verificationCode)){
            throw new TanHuaException(ErrorResult.validateCodeError());
        }
        //d.验证码成功,根据手机号查询tb_user表记录是否存在
        User user = userApi.findByMobile(phone);
        //e.如果用户不存在,自动注册
        if(user == null){
            user = new User();
            user.setMobile(phone);
            Long userId = userApi.saveUser(user);
            user.setId(userId);//将userId设置到user对象中
            flag = true;
        }
        //f.生成token(单独抽取来分析) 存入redis 返回给前端(token isNew)
        String token = jwtUtils.createJWT(phone, user.getId());
        //存入redis
        String userStr = JSON.toJSONString(user);
        redisTemplate.opsForValue().set("TOKEN_"+token,userStr,1,TimeUnit.DAYS);//key:token value:用户对象
        Map rsMap = new HashMap();
        rsMap.put("token",token);
        rsMap.put("isNew",flag);//true新用户 false老用户
        //g.删除验证码
        redisTemplate.delete(key);
        return rsMap;
    }
   /**
     * 新用户---1填写资料
     */
    public void loginReginfo(UserInfoVo userInfoVo, String headToken) {
        User user = getUserByToken(headToken);
        if(user == null){
            throw new TanHuaException(ErrorResult.loginFail());
        }
        Long userId = user.getId();
        UserInfo userInfo = new UserInfo();
        //copy代码尽量要放到手动设置值前面
        BeanUtils.copyProperties(userInfoVo,userInfo);//属性名称 类型一样即可copy //昵称 生日 性别 城市
        //将userInfoVo 设置到 UserInfo中
        userInfo.setId(userId);//用户信息表id 跟 用户表 一对一关系
       /* userInfo.setNickname(userInfoVo.getNickname());//昵称
        userInfo.setBirthday(userInfoVo.getBirthday());//生日
        userInfo.setGender(userInfoVo.getGender());//性别
        userInfo.setCity(userInfoVo.getCity());//城市*/
        userInfoApi.saveUserInfo(userInfo);
    }

    /**
     * 根据token作为key查询redis中user信息是否存在
     * @param headToken
     * @return
     */
    public User getUserByToken(String headToken) {
        String key = "TOKEN_" + headToken;
        //a.从token中获取用户信息
        String userStr = redisTemplate.opsForValue().get(key);
        //b.如果不存在,则登录超时
        if (StringUtils.isEmpty(userStr)) {
            return null;
        }
        //c.如果存在,往个人信息表保存用户信息记录(调用服务提供者)
        //将key进行续期 1天有效
        redisTemplate.expire(key,1,TimeUnit.DAYS);
        //基于userStr获取user对象 得到userId
        return JSON.parseObject(userStr, User.class);
    }

    /**
     * 新用户---2选取头像
     * @RequestHeader("Authorization") 请求头 token信息
     */
    public void loginReginfoHead(MultipartFile headPhoto, String headToken) throws IOException {
        //a.从token中获取用户信息
        User user = getUserByToken(headToken);
        if(user == null){
            throw new TanHuaException(ErrorResult.loginFail());
        }
        Long userId = user.getId();
        //c.百度人脸识别
        boolean detect = faceTemplate.detect(headPhoto.getBytes());
        log.debug("调用人脸识别接口,结果*****{}*********"+detect);
        if(!detect){
            throw new TanHuaException(ErrorResult.faceError());
        }
        //d.上传头像到oss
        String originalFilename = headPhoto.getOriginalFilename();//获取原始文件名称
        String headUrl = ossTemplate.upload(originalFilename, headPhoto.getInputStream());
        //e.更新用户个人信息表头像字段
        UserInfo userInfo = new UserInfo();
        userInfo.setId(userId);
        userInfo.setAvatar(headUrl);
        userInfoApi.updateUserInfo(userInfo);
    }
6.3.5.2 UserInfoService
package com.tanhua.server.service;

import com.alibaba.fastjson.JSON;
import com.tanhua.domain.db.User;
import com.tanhua.domain.db.UserInfo;
import com.tanhua.domain.vo.ErrorResult;
import com.tanhua.domain.vo.UserInfoVo;
import com.tanhua.dubbo.api.db.UserInfoApi;
import com.tanhua.server.exception.TanHuaException;
import com.tanhua.server.utils.GetAgeUtil;
import lombok.extern.slf4j.Slf4j;
import org.apache.dubbo.config.annotation.Reference;
import org.springframework.beans.BeanUtils;
import org.springframework.beans.factory.annotation.Autowired;
import org.springframework.data.redis.core.RedisTemplate;
import org.springframework.stereotype.Service;
import org.springframework.transaction.annotation.Transactional;
import org.springframework.util.StringUtils;

/**
 * 用户信息管理-业务逻辑处理层
 */
@Service
@Transactional
@Slf4j //日志注解
public class UserInfoService {


    @Autowired
    private RedisTemplate<String,String> redisTemplate;

    @Reference
    private UserInfoApi userInfoApi;

    @Autowired
    private UserService userService;

    /**
     *  用户资料 - 读取
     */
    public UserInfoVo findUserInfoByUserId(Long userID, Long huanxinID, String headToken) {
        //userID  huanxinID 这两个参数没有用到 都是null值
        //a.从token中获取用户信息
        User user = userService.getUserByToken(headToken);
        //b.如果不存在,则登录超时
        if(user == null){
            throw new TanHuaException(ErrorResult.loginFail());
        }
        Long currentUserId = user.getId();//当前登录用户id

        //d.跟用户id查询用户信息(调用服务)
        UserInfo userInfo = userInfoApi.findUserInfoByUserId(currentUserId);
        //将userInfo copy userInfoVo
        UserInfoVo userInfoVo = new UserInfoVo();
        BeanUtils.copyProperties(userInfo,userInfoVo);
        //age类型单独处理下 将userInfo中Integer 类型 转为 String类型
        if(!StringUtils.isEmpty(userInfo.getAge())){
            userInfoVo.setAge(String.valueOf(userInfo.getAge()));
        }
        return userInfoVo;
    }

    /**
     *  用户资料 - 保存
     */
    public void updateUserInfoByUserId(UserInfoVo userInfoVo, String headToken) {
        //a.从token中获取用户信息
        User user = userService.getUserByToken(headToken);
        //b.如果不存在,则登录超时
        if(user == null){
            throw new TanHuaException(ErrorResult.loginFail());
        }

        Long currentUserId = user.getId();//当前登录用户id

        //d.根据用户id更新用户信息(调用服务)
        UserInfo userInfo = new UserInfo();
        //将UserInfoVo copy UserInfo
        BeanUtils.copyProperties(userInfoVo,userInfo);
        //设置当前用户id
        userInfo.setId(currentUserId);
        //还存在问题
        if(!StringUtils.isEmpty(userInfoVo.getBirthday())){
            userInfo.setAge(GetAgeUtil.getAge(userInfoVo.getBirthday()));
        }
        userInfoApi.updateUserInfo(userInfo);
    }
}
【小结】
1:掌握更新用户信息功能
2:完善个人信息
7. 更新用户头像(作业)
7.1. 接口信息
接口地址:https://mock.boxuegu.com/project/164/interface/api/77931
7.2. 实现思路
作业
1.查询用户信息-实现思路分析
2.更新用户信息-实现思路分析
3.更新用户头像-编码实现
总结
1.created updated代码优化-需要掌握
2.图片上传 人脸识别-会使用即可(依赖 创建对象配置类 属性配置类 模板对象类 spring.factories)
3.完善个人信息-重点掌握
4.查询用户信息 更新用户信息
5.getUserByToken代码优化 登录token有效期1天

 浙公网安备 33010602011771号