docker(ubuntu18.04) + 宿主机(ubuntu20.04) + ROS + 乐视三合一体感摄像头LeTMC-520 环境搭建
参考链接:https://blog.csdn.net/weixin_45225720/article/details/114464244
1. 准备 docker 环境
docker pull hyeonjaegil/vins-mono

docker run -it --privileged     --network host  --gpus all \
-v /tmp/.X11-unix:/tmp/.X11-unix   \
-e DISPLAY -e NVIDIA_VISIBLE_DEVICES=all   \
-e NVIDIA_DRIVER_CAPABILITIES=all   \
-e FASTRTPS_DEFAULT_PROFILES_FILE=/usr/local/share/middleware_profiles/rtps_udp_profile.xml   \
-v /dev/*:/dev/*       \
-v /etc/localtime:/etc/localtime:ro       \
-v ~/.Xauthority:/root/.Xauthority:rw   \
-v /home/h/projects/LET-NET:/root/LET-NET       \
--name LeTMC-520-IMU      \
hyeonjaegil/vins-mono:melodic     /bin/bash
在容器内查看系统版本:
lsb_release -a
输出:
No LSB modules are available.
Distributor ID:	Ubuntu
Description:	Ubuntu 18.04.6 LTS
Release:	18.04
Codename:	bionic
查看内核版本
cat /proc/version
Linux version 5.15.0-107-generic (buildd@lcy02-amd64-017) (gcc (Ubuntu 9.4.0-1ubuntu1~20.04.2) 9.4.0, GNU ld (GNU Binutils for Ubuntu) 2.34) #117~20.04.1-Ubuntu SMP Tue Apr 30 10:35:57 UTC 2024

uname -a
Linux h-pc 5.15.0-107-generic #117~20.04.1-Ubuntu SMP Tue Apr 30 10:35:57 UTC 2024 x86_64 x86_64 x86_64 GNU/Linux
问题:为什么容器内 显示操作系统是 18.04, 而 内核版本又显示 20.04 呢?
答案:
我的宿主机版本是 20.04。
你在 Docker 容器中看到的操作系统版本与宿主机的内核版本不一致,这是 Docker 的预期行为。下面解释为什么会出现这种情况:
容器内的操作系统版本
Docker 容器的操作系统版本由其基础镜像决定。例如,如果你使用的是 ubuntu:18.04 镜像,那么容器内的操作系统版本就是 Ubuntu 18.04。这就是为什么你在容器内运行 lsb_release -a 时会看到以上信息。
容器内的内核版本
Docker 容器使用的是宿主机的内核,这意味着容器内的所有进程实际上在使用宿主机的内核。这也是为什么你在容器内运行 uname -a 和 cat /proc/version 时,会看到宿主机的内核版本,而不是基础镜像的内核版本。例如,你在容器内看到的内核版本和宿主机的内核版本一致。
原因总结
容器使用宿主机内核:
- Docker 容器共享宿主机的内核,因此在容器内看到的内核版本与宿主机相同。这是 Docker 轻量级虚拟化的一部分,允许多个容器共享一个宿主机内核,提高资源利用效率。
- 基础镜像决定用户空间环境:
Docker 容器的用户空间环境(包括操作系统版本)由其基础镜像决定。例如,使用 ubuntu:18.04 基础镜像时,容器内的操作系统版本是 Ubuntu 18.04。
以上行为说明:容器的用户空间环境是 Ubuntu 18.04,但它使用的是宿主机的内核 5.15.0-107-generic,这是预期的行为。
总结
这种行为是 Docker 设计的一部分,目的是在轻量级虚拟化环境中共享宿主机资源,提高效率。因此,看到这种不一致是正常的,不需要担心。如果有特定需求需要在容器内使用不同的内核,则需要考虑其他虚拟化技术,如使用虚拟机。
2. 安装相机驱动 astra_camera_ros
参考:https://github.com/orbbec/ros_astra_camera
安装依赖:
apt install libgflags-dev  ros-$ROS_DISTRO-image-geometry ros-$ROS_DISTRO-camera-info-manager ros-$ROS_DISTRO-image-transport ros-$ROS_DISTRO-image-publisher libgoogle-glog-dev libusb-1.0-0-dev libeigen3-dev
# 其实上面的 docker 镜像已经满足这个依赖了。
Install libuvc.
cd  # /root
git clone https://github.com/libuvc/libuvc.git
cd libuvc
mkdir build && cd build
cmake .. && make -j4
sudo make install
sudo ldconfig
开始:
Create a ros workspace( if you don't have one).
mkdir -p ~/ros_ws/src
Clone code from github.
cd ~/ros_ws/src
git clone https://github.com/orbbec/ros_astra_camera.git
Build
cd ~/ros_ws
catkin_make
Install udev rules.
cd ~/ros_ws
source ./devel/setup.bash
roscd astra_camera
./scripts/create_udev_rules
报错:
This script copies a udev rule to /etc to facilitate bringing
up the astra usb connection as /dev/astra*
cp: cannot create regular file '/etc/udev/rules.d': No such file or directory
Restarting udev
udev: unrecognized service
udev: unrecognized service
解决:
apt-get update
apt -y install udev
./scripts/create_udev_rules
报错:
Restarting udev
- udev does not support containers, not started
- udev does not support containers, not started
先不管它
udevadm control --reload && sudo udevadm trigger
Start the camera
In terminal 1
cd ~/ros_ws
source ./devel/setup.bash
roslaunch astra_camera astra.launch
In terminal 2
docker exec -it 容器id /bin/bash
cd ~/ros_ws
source ./devel/setup.bash
rviz
In terminal 3
docker exec -it 容器id /bin/bash
rqt
问题:
无法显示 rgb 图像。
解决:
参考:https://blog.csdn.net/Numberors/article/details/105637209
apt-get install -y usbutils && lsusb

Bus 002 Device 002: ID 174c:3074 ASMedia Technology Inc. ASM1074 SuperSpeed hub
Bus 002 Device 001: ID 1d6b:0003 Linux Foundation 3.0 root hub
Bus 001 Device 009: ID 2bc5:0502
Bus 001 Device 008: ID 2bc5:0403
Bus 001 Device 007: ID 05e3:0610 Genesys Logic, Inc. 4-port hub
Bus 001 Device 002: ID 174c:2074 ASMedia Technology Inc. ASM1074 High-Speed hub
Bus 001 Device 005: ID 8087:0032 Intel Corp.
Bus 001 Device 004: ID 26ce:01a2
Bus 001 Device 003: ID 17ef:608c Lenovo
Bus 001 Device 001: ID 1d6b:0002 Linux Foundation 2.0 root hub
修改 astra_pro.launch 文件, 将 501 改为 502:
vim src/ros_astra_camera/launch/astra_pro.launch

<arg name="uvc_product_id" default="0x0502"/>
然后在终端1:
source ./devel/setup.bash
roslaunch astra_camera astra_pro.launch
终端2:
rviz
终端3:
rqt
在 rvis add 一个 topic

恭喜你 rgb 出来了:

问题:无法显示彩色的点云
解决:
https://blog.csdn.net/xpc0507/article/details/120842435
https://robot.czxy.com/car/orbslam/astra_ros/
https://github.com/orbbec/ros_astra_camera/tree/eefd2a06f435a5c807ee1a492df91e28be242c2f
https://blog.csdn.net/qq_50220094/article/details/126186616
cd /root/ros_ws/src/ros_astra_camera/cfg
wget https://robot.czxy.com/car/orbslam/assets/camera.yaml
vim /root/ros_ws/src/ros_astra_camera/cfg/camera.yaml
修改:
camera_name: rgb_camera

vim ../../../src/ros_astra_camera/launch/astra_pro.launch
修改为:
<arg name="enable_point_cloud_xyzrgb" default="true"/>
<arg name="color_info_uri" default="file:///root/ros_ws/src/ros_astra_camera/cfg/camera.yaml"/>
然后在 Rviz:
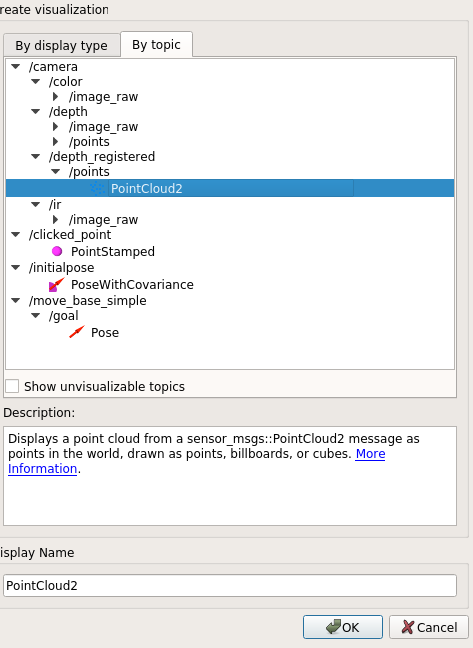

然后我们就成功了。

红色为 x, 绿色为 y,蓝色是 z。
ROS 信息
root@h-pc:~# rostopic list
/camera/color/camera_info
/camera/color/image_raw
/camera/depth/camera_info
/camera/depth/image_raw
/camera/depth/points
/camera/depth_registered/points
/camera/ir/camera_info
/camera/ir/image_raw
/rosout
/rosout_agg
/tf
/tf_static
root@h-pc:~# rostopic echo /camera/color/camera_info
header:
  seq: 0
  stamp:
    secs: 1719279759
    nsecs: 428655562
  frame_id: "camera_color_optical_frame"
height: 480
width: 640
distortion_model: "plumb_bob"
D: [0.125197, -0.196591, 0.006816, -0.006225, 0.0]
K: [577.54679, 0.0, 310.24326, 0.0, 578.63325, 253.65539, 0.0, 0.0, 1.0]
R: [1.0, 0.0, 0.0, 0.0, 1.0, 0.0, 0.0, 0.0, 1.0]
P: [590.55457, 0.0, 306.57339, 0.0, 0.0, 592.83978, 256.43008, 0.0, 0.0, 0.0, 1.0, 0.0]
binning_x: 0
binning_y: 0
roi:
  x_offset: 0
  y_offset: 0
  height: 0
  width: 0
  do_rectify: False
---
这个参数竟然和我们下载的一样,看来我们下载的地方是对的。
注意: 该 RGB 相机是 卷帘门相机。
IMU 标定:https://blog.csdn.net/LoveJSH/article/details/131953776
自己做相机标定,请参考:
http://www.javashuo.com/article/p-ugupylzx-kh.html
https://blog.csdn.net/weixin_40511249/article/details/124803685

 浙公网安备 33010602011771号