
IMX6ULL系列03-开发板第一个 APP 和驱动实验
开发板第一个 APP 实验
- 获取源代码
git clone https://e.coding.net/weidongshan/01_all_series_quickstart.git
测试源代码位于 01_all_series_quickstart\ 04_嵌入式 Linux 应用开发基础知识\ source\01_hello(注意在 Ubuntu 上使用 “/” )
- 给 ARM 板编译程序
arm-buildroot-linux-gnueabihf-gcc  -o hello hello.c
cp hello /home/parallels/nfs_rootfs/
file hello
hello: ELF 32-bit LSB executable, ARM, EABI5 version 1 (SYSV), dynamically linked, interpreter /lib/ld-linux-armhf.so.3, for GNU/Linux 4.9.0, not stripped
查看 /home/parallels/nfs_rootfs/ 目录,存在 hello 文件
- 上传程序到开发板并运行
[root@imx6ull:/mnt]# mount -t nfs -o nolock,vers=3 192.168.1.12:/home/parallels/nfs_rootfs /mnt
[root@imx6ull:/]# cd /mnt/
[root@imx6ull:/mnt]# ls
hello
[root@imx6ull:/mnt]# chmod +x hello
[root@imx6ull:/mnt]# ./hello
Hello, world!
开发板第一个驱动实验
git clone https://e.coding.net/weidongshan/01_all_series_quickstart.git
测试源代码位于 cd 01_all_series_quickstart/05_嵌入式Linux驱动开发基础知识/source/02_led_drv/02_led_drv_for_boards/100ask_imx6ull_src_bin/(注意在 Ubuntu 上使用 “/” )
获取 Led 驱动源码
编译内核
原因
- 驱动程序需要内核文件:
#include<asm/io.h>
- 编译驱动时用的内核和开发板上运行内核要一致
- 开发板上运行的内核是出厂烧录的
- 编译驱动时用的内核是自己编译的
- 编译驱动前,自己编译的内核要放到板子上
- 更换板子上内核后,板子上其他驱动也要更换
编译内核
-
准备好工具链等一些环境变量
-
编译内核
cd Linux-4.9.88 make mrproper make 100ask_imx6ull_defconfig make zImage -j4 make dtbs cp arch/arm/boot/zImage ~/nfs_rootfs cp arch/arm/boot/dts/100ask_imx6ull-14x14.dtb ~/nfs_rootfs若编译过程出现问题bin/sh:1:lzop: not found,输入命令
sudo apt-get install lzop,安装 lzop。 -
编译内核模块
cd Linux-4.9.88 make ARCH=arm CROSS_COMPILE=arm-linux-gnueabihf- modules sudo make ARCH=arm INSTALL_MOD_PATH=~/nfs_rootfs module_install sudo apt install tree cd ~/nfs_rootfs && tree -
安装内核和模块到开发板上
执行完上面命令,在 Ubuntu 的 /home/book/nfs_rootfs目录下已经有了zImage或uImage、dtb文件, 并且有lib/modules子目录(里面含有各种模块)mount -t nfs -o nolock,vers=3,port=2049,mountport=9999 192.168.1.100:/home/book/nfs_rootfs /mnt cp /mnt/zImage /boot 或 cp /mnt/uImage /boot cp /mnt/*.dtb /boot cp /mnt/lib/modules /lib -rfd sync reboot
编译 Led 模块
- 编译内核,把内核 zImage 和其他模块放到开发板上。
- 查看 Led 源码和 Makefile
$ cd 01_all_series_quickstart/05_嵌入式Linux驱动开发基础知识/source/02_led_drv/02_led_drv_for_boards/100ask_imx6ull_src_bin/
$ ls
board_100ask_imx6ull.c board_demo.c leddrv.c led_opr.h ledtest.c Makefile
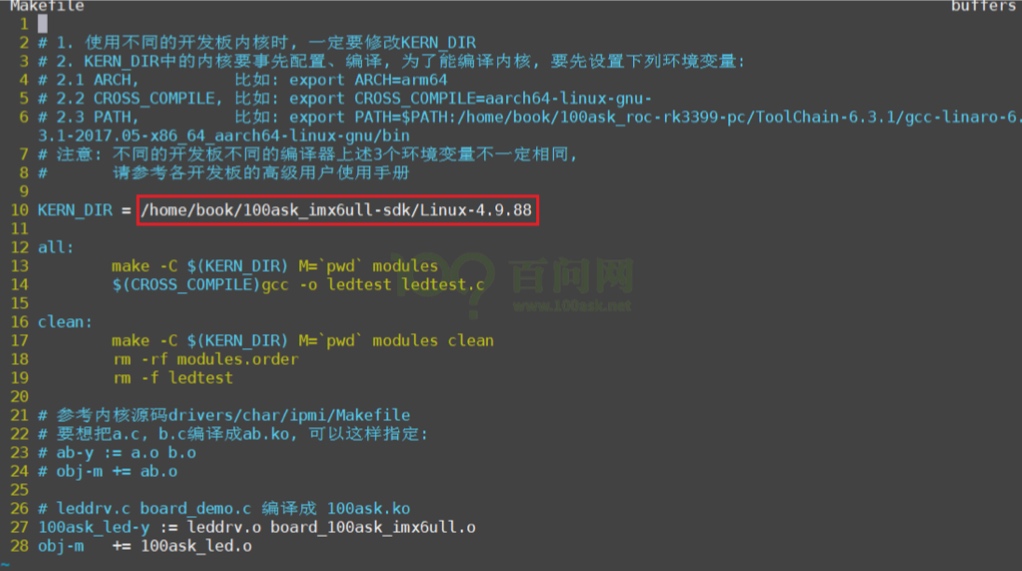
$ vim Makefile
修改 Makefile 中 KERN_DIR 文件夹,为 /home/book/100ask_imx6ull-sdk/Linux-4.9.88/arch/arm/boot/zImage 编译的内核。
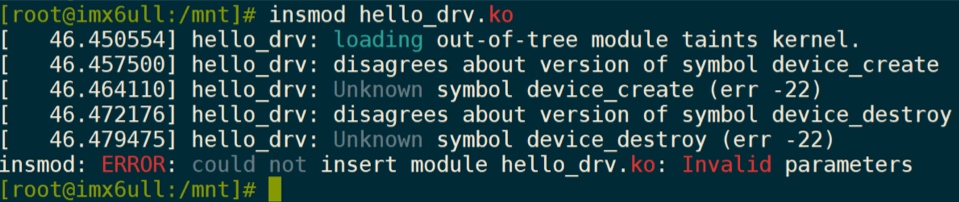
注意:安装驱动程序前,需要先更新内核,就是把你编译出来的 zImage 放到开发板上去并重启。否则安装你新编译的驱动时,内核会提示如下错误:你的驱动会污染(taint)内核,版本不匹配不允许使用某些函数。
不更新内核时,会出现类似如下错误:
你当然可以强行安装驱动程序,比如使用 “insmod -f hello_drv.ko”这样的命令, 它会提示说 “内核已经被污染了” ,但是不影响学习、不影响使用,如下:

如果不想看到这些提示污染的信息, 就需要把在 Ubuntu 上编译出来的 zImage 复制到开发板的/boot 目录下,并且把 Ubuntu 上编译出来的各种模块复制到开发板的/lib/modules 目录下。
之所以也要更新/lib/modules 目录,是你更新了 zImage,它就跟/lib/modules 下的驱动不匹配了,所以/lib/modules 也要用新编译出来的。
- 编译 Led 模块驱动
$ make all
make -C /home/parallels/100ask_imx6ull-sdk/Linux-4.9.88 M=`pwd` modules
make[1]: Entering directory '/home/parallels/100ask_imx6ull-sdk/Linux-4.9.88'
  CC [M]  /home/parallels/Desktop/01_all_series_quickstart/05_嵌入式Linux驱动开发基础知识/source/02_led_drv/02_led_drv_for_boards/100ask_imx6ull_src_bin/leddrv.o
  CC [M]  /home/parallels/Desktop/01_all_series_quickstart/05_嵌入式Linux驱动开发基础知识/source/02_led_drv/02_led_drv_for_boards/100ask_imx6ull_src_bin/board_100ask_imx6ull.o
  LD [M]  /home/parallels/Desktop/01_all_series_quickstart/05_嵌入式Linux驱动开发基础知识/source/02_led_drv/02_led_drv_for_boards/100ask_imx6ull_src_bin/100ask_led.o
  Building modules, stage 2.
  MODPOST 1 modules
  CC      /home/parallels/Desktop/01_all_series_quickstart/05_嵌入式Linux驱动开发基础知识/source/02_led_drv/02_led_drv_for_boards/100ask_imx6ull_src_bin/100ask_led.mod.o
  LD [M]  /home/parallels/Desktop/01_all_series_quickstart/05_嵌入式Linux驱动开发基础知识/source/02_led_drv/02_led_drv_for_boards/100ask_imx6ull_src_bin/100ask_led.ko
make[1]: Leaving directory '/home/parallels/100ask_imx6ull-sdk/Linux-4.9.88'
arm-buildroot-linux-gnueabihf-gcc -o ledtest ledtest.c
$ ls
100ask_led.ko     board_100ask_imx6ull.c  leddrv.o   Makefile
100ask_led.mod.c  board_100ask_imx6ull.o  led_opr.h  modules.order
100ask_led.mod.o  board_demo.c            ledtest    Module.symvers
100ask_led.o      leddrv.c                ledtest.c
$ cp  100ask_led.ko   ledtest   ~/nfs_rootfs
$ cp  /mnt/100ask_led.ko   ./
- 开发板安装驱动模块
- 下载编译好内核镜像和驱动模块到开发板
[root@imx6ull:~]# mount -t nfs -o nolock,vers=3 192.168.1.100:/home/book/nfs_rootfs /mnt
[root@imx6ull:~]# cp  /mnt/100ask_led.ko   ./
[root@imx6ull:~]# cp  /mnt/ledtest        ./
- 安装驱动模块
[root@imx6ull:~]# insmod 100ask_led.ko
[root@imx6ull:~]# lsmod
Module                  Size  Used by
100ask_led              3721  0
inv_mpu6050_spi         2320  0
inv_mpu6050            11894  2 inv_mpu6050_spi
evbug                   2282  0
- 执行测试程序
[root@imx6ull:~]# chmod  +x  ./ledtest
[root@imx6ull:~]# ./ledtest
Usage: ./ledtest <dev> <on | off>
[root@imx6ull:~]# ./ledtest /dev/100ask_led0 on
[root@imx6ull:~]# ./ledtest /dev/100ask_led0 off
