1.方法介绍
join(): 正在执行的线程需要等待调用join()的线程执行完之后,才可以继续执行。
2.使用场景
两个线程依次执行;
三个线程依次执行(需要加boolean变量控制顺序) (Leetcode 1114)
1
2
3
4
5
6
7
8
9
10
11
12
13
14
15
16
17
18
19
20
21
22
23
24
25
26
27
28
29
30
31
32
33
34
35
36
37
38
39
40
41
42
/**
* 功能描述:顺序执行步骤1,2,3<br> * @author nxf
* @since 2020-06-08
*/
class TestJoin {
public static void main(String[] args) {
Thread t1 = new Thread(new Runnable() {
@Override
public void run() {
System.out.println("第1步");
}
});
Thread t2 = new Thread(new Runnable() {
@Override
public void run() {
try {
t1.join();
System.out.println("第2步");
} catch (InterruptedException e) {
e.printStackTrace();
}
}
});
Thread t3 = new Thread(new Runnable() {
@Override
public void run() {
try {
t2.join();
System.out.println("第3步");
} catch (InterruptedException e) {
e.printStackTrace();
}
}
});
System.out.println("第2步准备...");
t2.start();
System.out.println("第3步准备...");
t3.start();
System.out.println("第1步准备...");
t1.start();
}
}
1
2
3
4
5
6
第2步准备...
第3步准备...
第1步准备...
第1步
第2步
第3步
1
2
3
4
5
6
7
8
9
10
11
12
13
14
15
16
17
18
19
20
21
22
23
24
25
26
27
28
29
30
31
32
33
34
35
36
37
38
39
40
41
42
43
44
/**
* 功能描述:顺序执行步骤1,2,3,
*
* @author nxf
* @since 2020-06-08
*/
class TestMainThreadJoin {
public static void main(String[] args) throws InterruptedException {
Thread t1 = new Thread(new Runnable() {
@Override
public void run() {
System.out.println("第1步正在执行...");
}
});
Thread t2 = new Thread(new Runnable() {
@Override
public void run() {
System.out.println("第2步正在执行...");
}
});
Thread t3 = new Thread(new Runnable() {
@Override
public void run() {
System.out.println("第3步正在执行...");
}
});
System.out.println("第1步准备...");
System.out.println("第2步准备...");
System.out.println("第3步准备...");
t1.start();
System.out.println("...第2步和第3步等待...");
t1.join();
System.out.println("第1步完成");
t2.start();
System.out.println("...第3步等待...");
t2.join();
System.out.println("第2步完成");
t3.start();
System.out.println("第3步完成");
}
}
1
2
3
4
5
6
7
8
9
10
11
第1步准备...
第2步准备...
第3步准备...
...第2步和第3步等待...
第1步正在执行...
第1步完成
...第3步等待...
第2步正在执行...
第2步完成
第3步完成
第3步正在执行...
1.方法介绍
wait(): Object的方法,作用是让当前线程进入等待状态,同时,wait()也会让当前线程释放它所持有的锁。直到其他线程调用此对象的 notify() 方法或 notifyAll() 方法,当前线程被唤醒(进入“就绪状态”)notify()和notifyAll(): 是Object的方法,作用则是唤醒当前对象上的等待线程;notify()是唤醒单个线程,而notifyAll()是唤醒所有的线程。wait(long timeout): 让当前线程处于“等待(阻塞)状态”,直到其他线程调用此对象的notify()方法或 notifyAll() 方法,或者超过指定的时间量,当前线程被唤醒(进入“就绪状态”)。
2.使用场景
两个线程有序运行(用了boolean变量控制先后,例1 【Leetcode 1115】);
三个线程有序运行(用了2个锁,见下面例1;例2 【LeetCode 1114】);
1
2
3
4
5
6
7
8
9
10
11
12
13
14
15
16
17
18
19
20
21
22
23
24
25
26
27
28
29
30
31
32
33
34
35
36
37
38
39
40
41
42
43
44
45
46
47
48
49
50
51
52
53
54
55
56
57
58
59
60
61
62
63
64
65
66
67
68
69
70
package 多线程.顺序执行线程;
/**
* 功能描述:顺序执行步骤1,2,3,
*
* @author nxf
* @since 2020-06-08
*/
class TestWait {
static Object lock1 = new Object();
static Object lock2 = new Object();
static Boolean b1 = false;
static Boolean b2 = false;
public static void main(String[] args) {
Thread t1 = new Thread(new Runnable() {
@Override
public void run() {
synchronized (lock1){
System.out.println("步骤1执行");
b1 = true;
lock1.notify();
}
}
});
Thread t2 = new Thread(new Runnable() {
@Override
public void run() {
synchronized (lock1){
if(!b1){
System.out.println("步骤2继续等待...");
try {
lock1.wait();
} catch (InterruptedException e) {
e.printStackTrace();
}
}
synchronized (lock2){
System.out.println("步骤2执行");
b2 = true;
lock2.notify();
}
}
}
});
Thread t3 = new Thread(new Runnable() {
@Override
public void run() {
synchronized (lock2){
if(!b2){
System.out.println("步骤3继续等待...");
try {
lock2.wait();
} catch (InterruptedException e) {
e.printStackTrace();
}
}
System.out.println("步骤3执行");
}
}
});
System.out.println("步骤3准备...");
t3.start();
System.out.println("步骤2准备...");
t2.start();
System.out.println("步骤1准备...");
t1.start();
}
}
1
2
3
4
5
6
7
8
步骤3准备...
步骤2准备...
步骤1准备...
步骤3继续等待...
步骤2继续等待...
步骤1执行
步骤2执行
步骤3执行
1.方法介绍
单线程化线程池(newSingleThreadExecutor)可以实现串行执行任务。如果这个唯一的线程因为异常结束,那么会有一个新的线程来替代它。此线程池保证所有任务的执行顺序按照任务的提交顺序执行。
2.使用场景
单线程的线程池可以实现按序运行任务(跟任务传入的顺序有关)
1
2
3
4
5
6
7
8
9
10
11
12
13
14
15
16
17
18
19
20
21
22
23
24
25
26
27
28
29
30
31
32
33
34
35
36
37
38
39
40
41
package 多线程.顺序执行线程;
import java.util.concurrent.ExecutorService;
import java.util.concurrent.Executors;
/**
* 功能描述
*
* @author nxf
* @since 2020-06-08
*/
class TestSingleThreadPool {
public static void main(String[] args) {
ExecutorService es = Executors.newSingleThreadExecutor();
Thread t1 = new Thread(new Runnable() {
@Override
public void run() {
System.out.println("步骤1执行中...");
}
});
Thread t2 = new Thread(new Runnable() {
@Override
public void run() {
System.out.println("步骤2执行中...");
}
});
Thread t3 = new Thread(new Runnable() {
@Override
public void run() {
System.out.println("步骤3执行中...");
}
});
System.out.println("步骤3准备...");
System.out.println("步骤2准备...");
System.out.println("步骤1准备...");
es.submit(t1);
es.submit(t2);
es.submit(t3);
es.shutdown();
}
}
1
2
3
4
5
6
步骤3准备...
步骤2准备...
步骤1准备...
步骤1执行中...
步骤2执行中...
步骤3执行中...
1.方法介绍
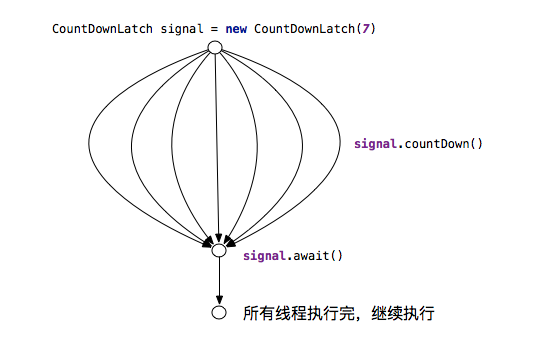
CountDownLatch (倒计时器): CountDownLatch内部维护一个计数器(父类的int state),主线程先执行await方法,如果此时计数器大于0,则阻塞等待。当一个线程完成任务后,计数器值减1。直到计数器为0时,表示所有的线程已经完成任务,等待的主线程被唤醒继续执行。
关于CountDownLatch的描述,正确的是 (ABCD)
A. CountDownLatch.countDown()计数为0就会释放所有线程
B. CountDownLatch计数为0后,无法重置
C. CountDownLatch.countdown()为计数减控制
D. CountDownLatch.await()只能触发阻塞等待,计数不会-1
解析:
官方注释:A CountDownLatch is initialized with a given count. The await methods block until the current count reaches zero due to invocations of the countDown method, after which all waiting threads are released and any subsequent invocations of await return immediately. This is a one-shot phenomenon -- the count cannot be reset. If you need a version that resets the count, consider using a CyclicBarrier.
(1)构造方法
CountDownLatch内部是使用AQS实现的,通过构造函数初始化了计数器的值,实际上是把计数器的值赋值给了AQS的状态值state,也即用AQS的状态值来表示计数器值。
1
2
3
4
5
6
7
8
9
10
11
12
13
public CountDownLatch(int count)
{
if (count < 0)
{
throw new IllegalArgumentException("count < 0");
}
this.sync = new Sync(count);
}
Sync(int count)
{
setState(count);
}
(2)void await()方法
当线程调用了CountDownLatch对象的await方法后,当前线程会被阻塞,直到下面的情况之一发生才会返回:
当所有线程都调用了CountDownLatch对象的countDown方法后,也即计时器值为0时; 其它线程调用了当前线程的interrupt()方法中断了当前线程,当前线程会抛出InterruptedException异常后返回。
await()方法委托sync调用了AQS的acquireSharedInterruptibly方法。acquireSharedInterruptibly方法的特点是线程获取资源的时候可以被中断,并且获取的资源是共享资源。方法内部首先判断,如果当前线程被中断了则抛出异常,否则调用sync实现的tryAcquireShared方法看当前状态值(计数器值)是否为0,是则当前线程的await()方法直接返回,否则调用AQS的doAcquireSharedInterruptibly让当前线程阻塞。另外可知,tryAcquireShared传递的arg参数是没有用到的,调用tryAcquireShared的方法仅仅是检查当前状态值是不是0,并没有调用CAS让当前状态值减去1。
1
2
3
4
5
6
7
8
9
10
11
12
13
14
15
16
17
18
19
20
21
22
23
24
25
26
public final void acquireSharedInterruptibly(int arg) throws InterruptedException
{
if (Thread.interrupted())
{
throw new InterruptedException();
}
if (tryAcquireShared(arg) < 0)
{
doAcquireSharedInterruptibly(arg);
}
}
protected int tryAcquireShared(int acquires)
{
return (getState() == 0) ? 1 : -1;
}
public void await() throws InterruptedException
{
sync.acquireSharedInterruptibly(1);
}
(3)boolean await(long timeout, TimeUnit unit)方法
当线程调用了CountDownLatch对象的该方法后,当前线程会被阻塞,直到下面的情况之一发生才会返回:
当所有线程都调用了CountDownLatch对象的countDown方法后,也就是计时器值为0的时候,返回true;
设置的timeout时间到了,因为超时而返回false;
其他线程调用了当前线程的interrupt()方法中断了当前线程,当前线程会抛出InterruptedException异常后返回。
1
2
3
4
public boolean await(long timeout, TimeUnit unit) throws InterruptedException
{
return sync.tryAcquireSharedNanos(1, unit.toNanos(timeout));
}
(4)void countDown()方法
当线程调用了该方法后,会递减计数器的值,递减后,如果计数器为0则会唤醒所有调用await方法而被阻塞的线程,否则什么都不做。
1
2
3
4
5
6
7
8
9
10
11
12
13
14
15
16
17
18
19
20
21
22
23
24
25
26
27
28
29
30
31
32
33
34
35
36
37
38
39
40
41
42
protected boolean tryReleaseShared(int releases)
{
for (; ; )
{
int c = getState();
if (c == 0)
{
return false;
}
int nextc = c - 1;
if (compareAndSetState(c, nextc))
{
return nextc == 0;
}
}
}
public final boolean releaseShared(int arg)
{
if (tryReleaseShared(arg))
{
doReleaseShared();
return true;
}
return false;
}
public void countDown()
{
sync.releaseShared(1);
}
CountDownLatch的countDown()方法是委托sync调用了AQS的releaseShared方法。releaseShared内部首先调用了sync实现的AQS的tryReleaseShared。
该方法获取当前状态值(计数器值),执行代码A,如果当前状态值为0则直接返回false,countDown()方法直接返回;否则执行代码B使用CAS设置计数器减一,CAS失败则循环重试,否则如果当前计数器为0则返回true,返回true后说明当前线程是最后一个线程调用的countdown方法,那么该线程除了让计数器值减1外,还需要唤醒调用CountDownLatch的await方法而被阻塞的线程,也就是AQS的doReleaseShared()方法。
添加代码A,是为了防止当计数器值为0后,其他线程又调用了countDown方法,如果没有代码A,状态值就会变成负数了。
(5)long getCount()方法
获取当前计数器的值,也就是AQS的state的值,一般在debug测试的时候使用。
1
2
3
4
5
6
7
8
9
public long getCount()
{
return sync.getCount();
}
int getCount()
{
return getState();
}
内部调用AQS的getState方法来获取state的值。
2.使用方法
countDown()方法要在finally块内执行,避免抛异常后得不到执行。
3.使用场景
一个线程去等待多个线程(多个进程间可以保持同步运行)的情况(举例:开会必须等待所有员工就位才可以开始)。
1
2
3
4
5
6
7
8
9
10
11
12
13
14
15
16
17
18
19
20
21
22
23
24
25
26
27
28
29
30
31
32
33
34
35
36
37
38
39
40
41
42
43
44
45
46
47
48
49
50
51
52
53
54
55
56
57
58
59
60
61
62
63
64
65
66
67
68
69
70
71
package 线程池.AQS;
import java.util.Random;
import java.util.concurrent.CountDownLatch;
import java.util.concurrent.ExecutorService;
import java.util.concurrent.Executors;
/**
* 功能描述:用CountDownLatch+线程池实现对数组中的偶数*2,奇数*10
*
* @author nxf
* @since 2020-06-09
*/
class TestCountDownLatch {
private static Random random = new Random(System.currentTimeMillis());
private static ExecutorService es = Executors.newFixedThreadPool(2);
private static final CountDownLatch latch = new CountDownLatch(10);
public static void main(String[] args) throws InterruptedException {
int[] data = query();
for (int i=0;i<data.length;i++){
es.execute(new SimpleRunnable(data,i, latch));
}
latch.await();
es.shutdown();
System.out.println("all of works finish done!");
}
static class SimpleRunnable implements Runnable{
private final int[] data;
private final int index;
private final CountDownLatch latch;
SimpleRunnable(int[] data, int index, CountDownLatch latch) {
this.data = data;
this.index = index;
this.latch = latch;
}
@Override
public void run() {
try {
Thread.sleep(random.nextInt(2000));
} catch (InterruptedException e) {
e.printStackTrace();
}
int value = data[index];
if (value%2 == 0){
data[index] = value * 2;
}else{
data[index] = value * 10;
}
System.out.println(Thread.currentThread().getName()+"finished"+" "+value+"--->"+data[index]);
latch.countDown();
}
}
private static int[] query(){
return new int[]{1,2,3,4,5,6,7,8,9,10};
}
}
1
2
3
4
5
6
7
8
9
10
11
pool-1-thread-2finished 2--->4
pool-1-thread-2finished 3--->30
pool-1-thread-1finished 1--->10
pool-1-thread-2finished 4--->8
pool-1-thread-1finished 5--->50
pool-1-thread-2finished 6--->12
pool-1-thread-1finished 7--->70
pool-1-thread-2finished 8--->16
pool-1-thread-1finished 9--->90
pool-1-thread-2finished 10--->20
all of works finish done!
1
2
3
4
5
6
7
8
9
10
11
12
13
14
15
16
17
18
19
20
21
22
23
24
25
26
27
28
29
30
31
32
33
34
35
36
37
38
39
40
41
42
43
44
45
46
47
48
49
50
51
52
53
54
55
56
57
58
59
60
61
package 线程池.AQS;
import java.util.concurrent.CountDownLatch;
/**
* 功能描述:用CountDownLatch实现,2个线程按序执行
*
* @author nxf
* @since 2020-06-09
*/
class TestCountDownLatch2 {
public static void main(String[] args) throws InterruptedException {
final CountDownLatch latch = new CountDownLatch(1);
new Thread(){
@Override
public void run() {
System.out.println("第一步-1");
try {
Thread.sleep(1000);
latch.await();
System.out.println("第一步-2");
} catch (InterruptedException e) {
e.printStackTrace();
}
}
}.start();
new Thread(){
@Override
public void run() {
System.out.println("第二步-1");
try {
Thread.sleep(100);
System.out.println("第二步-2");
} catch (InterruptedException e) {
e.printStackTrace();
}finally {
latch.countDown();
}
}
}.start();
new Thread(){
@Override
public void run() {
System.out.println("第三步-1");
try {
latch.await();
Thread.sleep(2000);
System.out.println("第三步-2");
} catch (InterruptedException e) {
e.printStackTrace();
}
}
}.start();
Thread.currentThread().join();
}
}
1
2
3
4
5
6
第一步-1
第二步-1
第三步-1
第二步-2
第一步-2
第三步-2
举例3: 四个线程 A B C D,其中 D 要等到 A B C 全执行完毕后才执行,而且 A B C 是同步运行的
可以利用 CountdownLatch 来实现这类通信方式。它的基本用法是:
创建一个计数器,设置初始值,CountdownLatch countDownLatch = new CountDownLatch(2);
在 等待线程 里调用 countDownLatch.await() 方法,进入等待状态,直到计数值变成 0;
在 其他线程 里,调用 countDownLatch.countDown() 方法,该方法会将计数值减小 1;
当 其他线程 的 countDown() 方法把计数值变成 0 时,等待线程 里的 countDownLatch.await() 立即退出,继续执行下面的代码。
1
2
3
4
5
6
7
8
9
10
11
12
13
14
15
16
17
18
19
20
21
22
23
24
25
26
27
28
29
30
31
32
33
34
35
36
37
38
39
40
41
42
43
package 线程池.CountDownLatch;
import java.util.concurrent.CountDownLatch;
/**
* 功能描述:四个线程 A B C D,其中 D 要等到 A B C 全执行完毕后才执行,而且 A B C 是同步运行的
*
* @author nxf
* @since 2020-06-09
*/
class TestCountDownLatch5{
public static void main(String[] args) {
int worker = 3;
CountDownLatch countDownLatch = new CountDownLatch(worker);
new Thread(new Runnable() {
@Override
public void run() {
System.out.println("D is waiting for other three threads");
try {
countDownLatch.await();
System.out.println("All done, D starts working");
} catch (InterruptedException e) {
e.printStackTrace();
}
}
}).start();
for (char threadName='A'; threadName <= 'C'; threadName++) {
final String tN = String.valueOf(threadName);
new Thread(new Runnable() {
public void run() {
System.out.println(tN + " is working");
try {
Thread.sleep(100);
} catch (Exception e) {
e.printStackTrace();}
System.out.println(tN + " finished");
countDownLatch.countDown();
}
}).start();
}
}
}
1
2
3
4
5
6
7
8
D is waiting for other three threads
C is working
A is working
B is working
A finished
B finished
C finished
All done, D starts working
1.方法介绍
CycliBarrier对象是做加法,CountDownLatch对象是做减法,Semaphore是既做加法也做减法的。
(1)acquire()/acquire(int permits): 获取资源(许可证)/获取指定个数的资源;
(2)release()/release(int permits): 释放资源/释放指定个数的资源
(3)acquireUninterruptibly()/acquireUninterruptibly(int permits): 从这个信号灯获取许可证,阻止一个可用的/阻止指定数量的
(4)int availablePermits(): 获取当前可以用的资源数量
2.使用方法
在声明smaphore的时候需要设置线程数量,然后使用acquire获取资源,在finally方法里面调用release方法进行释放资源。
3.使用场景
控制一组线程同时执行(例1【见下面代码】);
两个线程交替执行,相互控制对方的信号量(例1 【Leetcode 1115】)
1
2
3
4
5
6
7
8
9
10
11
12
13
14
15
16
17
18
19
20
21
22
23
24
25
26
27
28
29
30
31
32
33
34
35
36
37
38
39
40
41
42
43
44
45
46
47
48
49
50
51
52
53
54
55
56
57
package 线程池.Semaphore;
import java.util.concurrent.Semaphore;
import java.util.concurrent.TimeUnit;
/**
* 功能描述:两个线程共用1个信号量执行
* 形象比喻:海底捞
* (1)根据CountDownLatch的特性,只能使用一次的特征来说,海底捞这种场景当然不能够使用了。因为开个店不可能只使用一次。
* (2)CyclicBarrier,虽然可以使用多次,但是需要reset之后才可以多次使用。意思就是,只有等餐厅里面5个桌的客人都吃完之后,才可以让其他人进来就餐的。这种情况也是不符合业务逻辑的。
*
* 使用方法:在声明semaphore的时候需要设置线程数量。然后使用acquire获取资源。
* 在finally方法里面调用release方法进行释放资源。
*
*
* @author nxf
* @since 2020-06-09
*/
class TestSemaphore1 {
static class SemachoreLock{
private final Semaphore semaphore = new Semaphore(1);
public void lock() throws InterruptedException {
semaphore.acquire();
}
public void unlock(){
semaphore.release();
}
}
public static void main(String[] args) {
final SemachoreLock lock = new SemachoreLock();
for (int i=0;i<2;i++){
new Thread(){
@Override
public void run() {
try {
System.out.println(Thread.currentThread().getName() + " is running...");
lock.lock();
System.out.println(Thread.currentThread().getName() + " get the #SemaphoreLock");
TimeUnit.SECONDS.sleep(1);
} catch (InterruptedException e) {
e.printStackTrace();
} finally {
lock.unlock();
}
System.out.println(Thread.currentThread().getName() + " release #SemaphoreLock");
}
}.start();
}
}
}
1
2
3
4
5
6
Thread-1 is running...
Thread-0 is running...
Thread-1 get the #SemaphoreLock
Thread-0 get the #SemaphoreLock
Thread-1 release #SemaphoreLock
Thread-0 release #SemaphoreLock
参考文献:
【1】理解CountDownLatch - 知乎
【2】Java多线程并发工具类-信号量Sema phore对象讲解 - 知乎
【3】让线程按顺序执行8种方法-Java知音
【4】Java 如何线程间通信 -知乎
【5】Java工程师 高并发与多线程网络编程
【6】Java多线程访问Synchronized同步方法的八种使用场景_五道口-CSDN博客_javasynchronized在什么业务场景下会使用到
【7】浅析Java高并发下的ReadWriteLock读写锁 - SegmentFault 思否
【8】Java并发之CyclicBarrier、CountDownLatch、Phaser - aheizi - 博客园


【推荐】国内首个AI IDE,深度理解中文开发场景,立即下载体验Trae
【推荐】编程新体验,更懂你的AI,立即体验豆包MarsCode编程助手
【推荐】抖音旗下AI助手豆包,你的智能百科全书,全免费不限次数
【推荐】轻量又高性能的 SSH 工具 IShell:AI 加持,快人一步
· go语言实现终端里的倒计时
· 如何编写易于单元测试的代码
· 10年+ .NET Coder 心语,封装的思维:从隐藏、稳定开始理解其本质意义
· .NET Core 中如何实现缓存的预热?
· 从 HTTP 原因短语缺失研究 HTTP/2 和 HTTP/3 的设计差异
· 分享一个免费、快速、无限量使用的满血 DeepSeek R1 模型,支持深度思考和联网搜索!
· 使用C#创建一个MCP客户端
· ollama系列1:轻松3步本地部署deepseek,普通电脑可用
· 基于 Docker 搭建 FRP 内网穿透开源项目(很简单哒)
· 按钮权限的设计及实现