javaAPI_多线程基础_多线程基础3
1.JDK5以后Lock锁的概述和使用
(1).概述
虽然我们可以理解同步代码块和同步方法的锁对象问题,但是我们并没有直接看到在哪里加上了锁,在哪里释放了锁,为了更清晰的表达
如何加锁和释放锁,JDK5以后提供了一个新的锁对象Lock。
(2).相关方法
Lock:
void lock(): 获取锁。
void unlock():释放锁。
由于lock是一个接口,所以我们需要用实现类来创建对象,ReentrantLock是Lock的实现类
(3).代码实现
//线程类
public class SellTicket implements Runnable {
// 定义票
private int tickets = 100;
// 定义锁对象
private Lock lock = new ReentrantLock();
@Override
public void run() {
while (true) {
try {
// 加锁
lock.lock();
if (tickets > 0) {
try {
Thread.sleep(100);
} catch (InterruptedException e) {
e.printStackTrace();
}
System.out.println(Thread.currentThread().getName()
+ "正在出售第" + (tickets--) + "张票");
}
} finally {
// 释放锁
lock.unlock();
}
}
}
}
//测试类
public static void main(String[] args) {
// 创建资源对象
SellTicket st = new SellTicket();
// 创建三个窗口
Thread t1 = new Thread(st, "窗口1");
Thread t2 = new Thread(st, "窗口2");
Thread t3 = new Thread(st, "窗口3");
// 启动线程
t1.start();
t2.start();
t3.start();
}
2.死锁问题概述和使用
(1).同步的弊端
A:由于加了锁之后,所以每一次都需要判断一下是否锁存在,所以会导致效率低下。
B:如果代码中间有嵌套,那么这一个时候会出现死锁的情况。
(2).死锁
是指两个或者两个以上的线程在执行的过程中,因争夺资源产生的一种互相等待现象。
(3).死锁的代码
//定义俩个锁对象
public class MyLock {
// 创建两把锁对象
public static final Object objA = new Object();
public static final Object objB = new Object();
}
//多线程类
public class DieLock extends Thread {
private boolean flag;
public DieLock(boolean flag) {
this.flag = flag;
}
@Override
public void run() {
if (flag) {
synchronized (MyLock.objA) {
System.out.println("if objA");
synchronized (MyLock.objB) {
System.out.println("if objB");
}
}
} else {
synchronized (MyLock.objB) {
System.out.println("else objB");
synchronized (MyLock.objA) {
System.out.println("else objA");
}
}
}
}
}
//测试类
public static void main(String[] args) {
DieLock dl1 = new DieLock(true);
DieLock dl2 = new DieLock(false);
dl1.start();
dl2.start();
}
3.生产消费者问题描述图解[线程之间通讯问题]
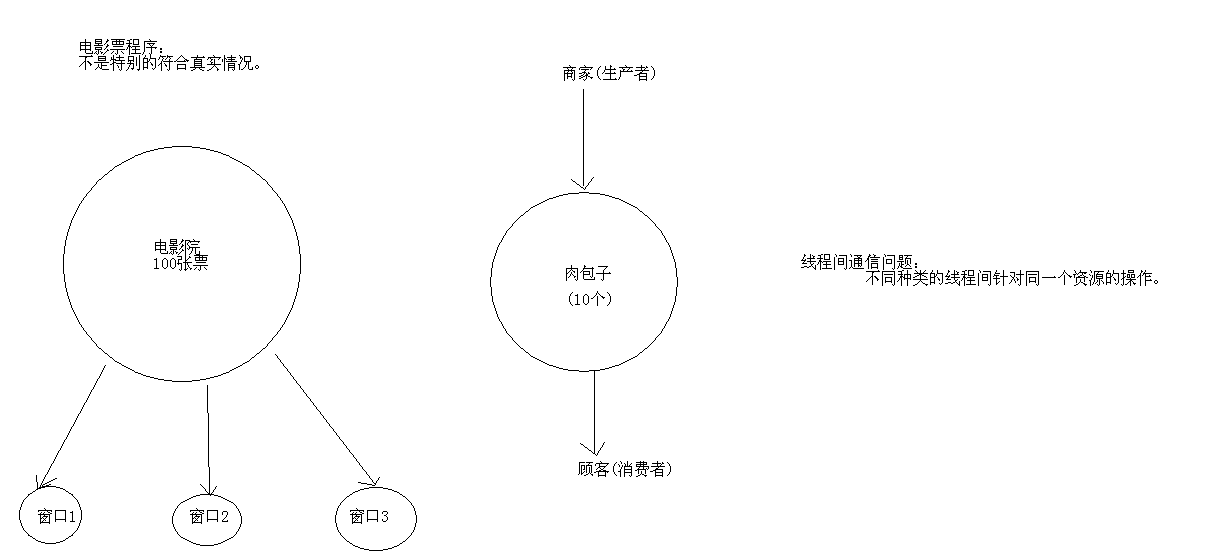
(1).生产消费者案例分析
通过设置线程(生产者)和获取线程(消费者)针对同一个学生对象进行操作
(2).分析
资源类:Student
设置学生数据:SetThread(生产者)
获取学生数据:GetThread(消费者)
测试类:StudentDemo
(3).代码实现[半成品代码]
//学生类
public class Student {
String name;
int age;
}
//生产者代码[设置学生对象类]
public class SetThread implements Runnable {
private Student s;
public SetThread(Student s) {
this.s = s;
}
@Override
public void run() {
// Student s = new Student();
s.name = "林青霞";
s.age = 27;
}
}
//获取学生对象类[消费者]
public class GetThread implements Runnable {
private Student s;
public GetThread(Student s) {
this.s = s;
}
@Override
public void run() {
// Student s = new Student();
System.out.println(s.name + "---" + s.age);
}
}
//测试类
public static void main(String[] args) {
//创建资源
Student s = new Student();
//设置和获取的类
SetThread st = new SetThread(s);
GetThread gt = new GetThread(s);
//线程类
Thread t1 = new Thread(st);
Thread t2 = new Thread(gt);
//启动线程
t1.start();
t2.start();
}
(4).存在的问题
问题1:按照思路写代码,发现数据每次都是:null---0
原因:我们在每个线程中都创建了新的资源,而我们要求的时候设置和获取线程的资源应该是同一个
如何实现呢?
在外界把这个数据创建出来,通过构造方法传递给其他的类。
问题2:为了数据的效果好一些,我加入了循环和判断,给出不同的值,这个时候产生了新的问题
A:同一个数据出现多次
B:姓名和年龄不匹配
原因:
A:同一个数据出现多次
CPU的一点点时间片的执行权,就足够你执行很多次。
B:姓名和年龄不匹配
线程运行的随机性
线程安全问题:
A:是否是多线程环境 是
B:是否有共享数据 是
C:是否有多条语句操作共享数据 是
解决方案:
加锁。
注意:
A:不同种类的线程都要加锁。
B:不同种类的线程加的锁必须是同一把。
代码改进:加锁[解决线程安全问题]
//生产者代码
public class SetThread implements Runnable {
private Student s;
private int x = 0;
public SetThread(Student s) {
this.s = s;
}
@Override
public void run() {
while (true) {
synchronized (s) {
if (x % 2 == 0) {
s.name = "林青霞";//刚走到这里,就被别人抢到了执行权
s.age = 27;
} else {
s.name = "刘意"; //刚走到这里,就被别人抢到了执行权
s.age = 30;
}
x++;
}
}
}
}
//消费者
public class GetThread implements Runnable {
private Student s;
public GetThread(Student s) {
this.s = s;
}
@Override
public void run() {
while (true) {
synchronized (s) {
System.out.println(s.name + "---" + s.age);
}
}
}
}
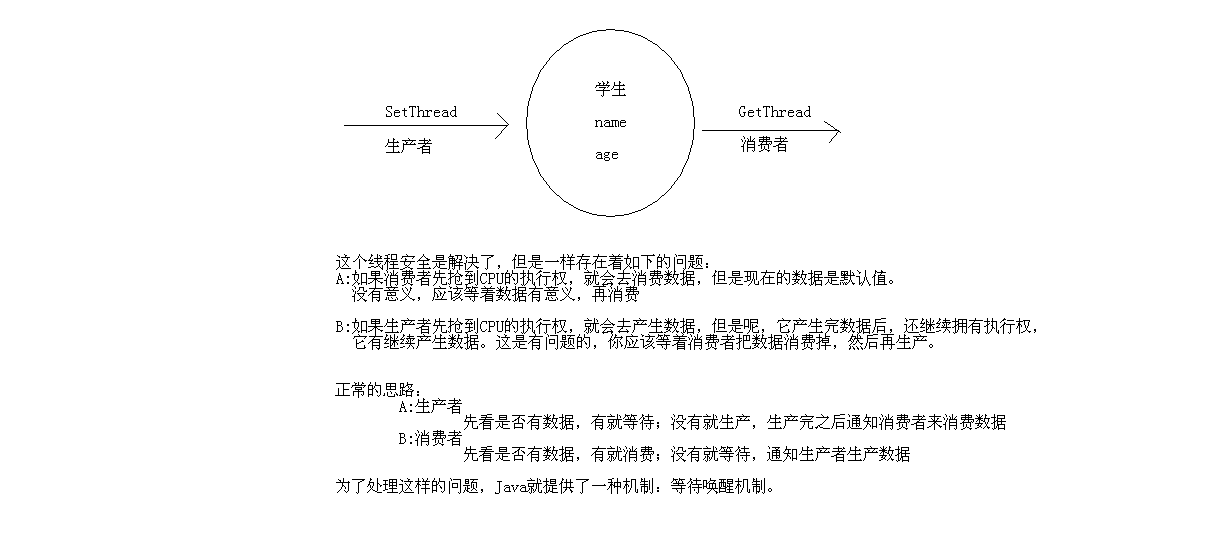
4.生产消费者机制图解以及等待唤醒机制思想
5.等待唤醒机制代码体现[还是学生对象]
(1).上述代码存在的问题?
虽然数据安全了,但是呢,一次一大片不好看,我就想依次的一次一个输出。
如何实现呢?
通过Java提供的等待唤醒机制解决。
(2).等待唤醒:
Object类中提供了三个方法:
wait():等待
notify():唤醒单个线程
notifyAll():唤醒所有线程
为什么这些方法不定义在Thread类中呢?
这些方法的调用必须通过锁对象调用,而我们刚才使用的锁对象是任意锁对象。
所以,这些方法必须定义在Object类中。
(3).代码改进[可用]
//学生类
public class Student {
String name;
int age;
boolean flag; // 默认情况是没有数据,如果是true,说明有数据
}
//设置线程
public class SetThread implements Runnable {
private Student s;
private int x = 0;
public SetThread(Student s) {
this.s = s;
}
@Override
public void run() {
while (true) {
synchronized (s) {
//判断有没有
if(s.flag){
try {
s.wait(); //t1等着,释放锁
} catch (InterruptedException e) {
e.printStackTrace();
}
}
if (x % 2 == 0) {
s.name = "林青霞";
s.age = 27;
} else {
s.name = "刘意";
s.age = 30;
}
x++; //x=1
//修改标记
s.flag = true;
//唤醒线程
s.notify(); //唤醒t2,唤醒并不表示你立马可以执行,必须还得抢CPU的执行权。
}
//t1有,或者t2有
}
}
}
//获取线程
public class GetThread implements Runnable {
private Student s;
public GetThread(Student s) {
this.s = s;
}
@Override
public void run() {
while (true) {
synchronized (s) {
if(!s.flag){
try {
s.wait(); //t2就等待了。立即释放锁。将来醒过来的时候,是从这里醒过来的时候,wait()方法特点
} catch (InterruptedException e) {
e.printStackTrace();
}
}
System.out.println(s.name + "---" + s.age);
//林青霞---27
//刘意---30
//修改标记
s.flag = false;
//唤醒线程
s.notify(); //唤醒t1
}
}
}
}
//测试代码
public static void main(String[] args) {
//创建资源
Student s = new Student();
//设置和获取的类
SetThread st = new SetThread(s);
GetThread gt = new GetThread(s);
//线程类
Thread t1 = new Thread(st);
Thread t2 = new Thread(gt);
//启动线程
t1.start();
t2.start();
}
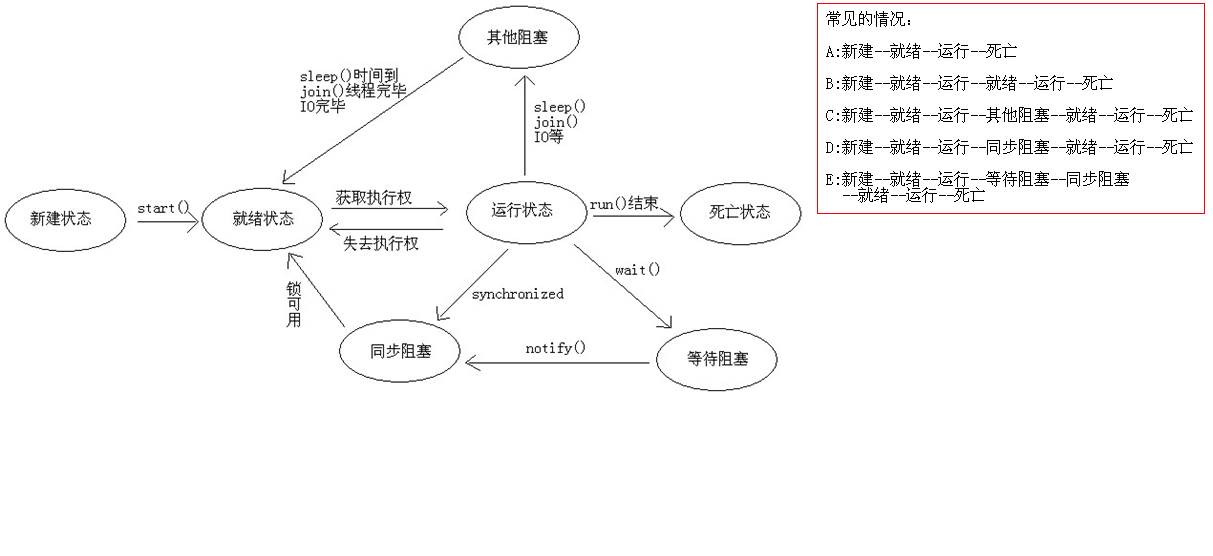
6.线程状态转化图
7.等待唤醒机制代码优化
(1).最终版代码中:
把Student的成员变量给私有的了。
把设置和获取的操作给封装成了功能,并加了同步。
设置或者获取的线程里面只需要调用方法即可。
(2).代码实现
//学生类
public class Student {
private String name;
private int age;
private boolean flag; // 默认情况是没有数据,如果是true,说明有数据
public synchronized void set(String name, int age) {
// 如果有数据,就等待
if (this.flag) {
try {
this.wait();
} catch (InterruptedException e) {
e.printStackTrace();
}
}
// 设置数据
this.name = name;
this.age = age;
// 修改标记
this.flag = true;
this.notify();
}
public synchronized void get() {
// 如果没有数据,就等待
if (!this.flag) {
try {
this.wait();
} catch (InterruptedException e) {
e.printStackTrace();
}
}
// 获取数据
System.out.println(this.name + "---" + this.age);
// 修改标记
this.flag = false;
this.notify();
}
}
//设置线程类
public class SetThread implements Runnable {
private Student s;
private int x = 0;
public SetThread(Student s) {
this.s = s;
}
@Override
public void run() {
while (true) {
if (x % 2 == 0) {
s.set("林青霞", 27);
} else {
s.set("刘意", 30);
}
x++;
}
}
}
//获取线程类
public class GetThread implements Runnable {
private Student s;
public GetThread(Student s) {
this.s = s;
}
@Override
public void run() {
while (true) {
s.get();
}
}
}
//测试代码类
public static void main(String[] args) {
//创建资源
Student s = new Student();
//设置和获取的类
SetThread st = new SetThread(s);
GetThread gt = new GetThread(s);
//线程类
Thread t1 = new Thread(st);
Thread t2 = new Thread(gt);
//启动线程
t1.start();
t2.start();
}
