
UI卡顿与布局优化
一、理论基础
从生物学角度来讲:
- 12fps大概是手动快速翻书的帧率,人眼可以明显察觉每一页之间的过渡。
- 24fps是早期电视画面的刷新频率,人眼感知的是连续性的动作,帧与帧之间的过渡已经模糊化,但人眼与大脑依然可以感知其流畅度。
- 60fps是人眼与大脑能感知的最大刷新频率,超过60fps的刷新频率对于人眼来说已经没有太大意义。
对于手机来说,UI流畅度优化的目标是实现60fps的刷新频率,也就是每一帧的总渲染时间不能超过1/60≈16.667ms。
正是基于此,Android手机每隔16ms发出VSYNC信号,触发对UI进行渲染。如果整个过程保证在16ms以内则会是一个流畅的画面,否则就只能等待下一个VSYNC信号,也就是在32ms内显示的都是同一个画面,帧率掉到了约30fps左右,人眼很容易察觉到卡顿。

UI卡顿的原因是无法在16ms内完成渲染,而造成这个结果的原因一般是:UI设计或开发的过于复杂臃肿,执行了没必要的measure、layout等。
那应该从哪里入手解决呢?下面这张图可以作为很好的指导:

Android的渲染是个复杂的过程,我们大致分为两步:
- CPU端通过measure、layout等操作制作出display list渲染列表
- GPU端对display list光栅化处理
由此可见,UI绘制过程的优化分两个方向:
| 问题 | 举例 | 检测工具 | 方案 |
| layouts & invalidations | 不必要嵌套 |
Hierarchy Viewer |
轻量化布局 |
|
Lint、Profile GPU rendering |
|||
| overdraw | 重复背景 |
去掉重复背景 ClipRect |
|
|
调试GPU过度绘制 |
二、冗余布局
(1)Lint
关于Lint的使用方法可以参考另一篇文章:Lint
使用Lint随手检查了一下手头的项目,发现真的有布局相关问题:
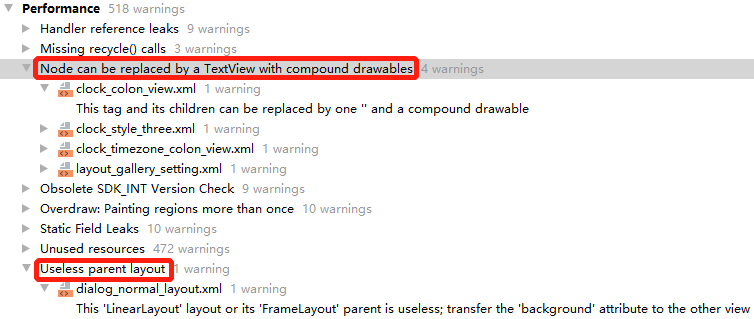
"Node can be replaced by a TextView with compound drawables"是因为如下布局可以只用一个TextView代替:
<LinearLayout xmlns:android="http://schemas.android.com/apk/res/android"
    android:layout_width="wrap_content"
    android:layout_height="wrap_content"
    android:gravity="center"
    android:layout_gravity="center_vertical"
    android:orientation="vertical">

    <TextView
        android:id="@+id/colonTop"
        android:layout_width="wrap_content"
        android:layout_height="wrap_content"
        android:textSize="@dimen/keyguard_clock_colon_size"
        android:textColor="@color/clock_num_text"
        android:text="@string/num_colon"/>

    <ImageView
        android:id="@+id/colonBottom"
        android:layout_width="wrap_content"
        android:layout_height="wrap_content"
        android:src="@drawable/dot"
        android:visibility="gone"/>

</LinearLayout>
"Useless parent layout"是典型的不必要嵌套造成的,下面布局中LinearLayout和FrameLayout可以去掉一层:
<?xml version="1.0" encoding="utf-8"?>
<FrameLayout xmlns:android="http://schemas.android.com/apk/res/android"
    android:layout_width="match_parent"
    android:layout_height="match_parent"
    android:clickable="true"
    android:orientation="vertical"
    android:padding="20.0dip" >

    <LinearLayout
        android:layout_width="match_parent"
        android:layout_height="wrap_content"
        android:layout_gravity="center"
        android:background="@drawable/not_wifi_dialog_bg"
        android:orientation="vertical" >

        <TextView
            android:id="@+id/title"
            android:layout_width="match_parent"
            android:layout_height="wrap_content"
            android:gravity="center"
            android:layout_marginTop="25dp"
            android:text="@string/gallery_dialog_title"
            android:textColor="#ff000000"
            android:textSize="18sp" />
(2)Hierarchy Viewer
使用HierarchyViewer工具可以更直观的识别渲染性能低的部分。

比如,下面的RelativeLayout就是不必要的:

需要注意的是:
- 红色一般是性能低可能出问题的地方,但也不是一定有问题,视业务复杂度和子view多少而定;
- 绿色也不一定就没问题,比如上面Lint查出的第一个问题,虽然布局简单是绿色的但依然可以优化。
多个工具结合使用,才能达到更好的优化效果!
三、过度绘制(OverDraw)
OverDraw是个常见的UI性能问题,可以使用Lint、Profile GPU rendering和GPU调试过度绘制等工具来检测。
(1)Lint
Lint也可以检测到过度绘制

这是因为application主题和xml根元素都设置了背景造成了重复绘制, 解决方法是去掉xml背景,为application设置指定的style:
<application
    android:icon="@drawable/ic_logo"
    android:label="@string/app_name"
    android:theme="@style/MyTheme" >
<style name="MyTheme" parent="android:Theme">
    <item name="android:background">@drawable/main</item>
    <item name="android:windowNoTitle">true</item>
    <item name="android:windowFullscreen">true</item>
</style>
(2)调试GPU过度绘制
检测过度绘制最常用、最直观的方法是打开“开发者选项”中的“调试GPU过度绘制”。
对比下图判断过度绘制的倍数,如果红色过多,则需要优化:

造成过度绘制的常见情况大致分为两种:
- 背景重复绘制
- 多个View互相重叠遮挡
a、背景重复
关于背景重复的问题,可对照过度绘制倍数图层层筛查布局文件,一般不难找到。如下,根布局和ListView设置了同样颜色的背景:
<?xml version="1.0" encoding="utf-8"?>
<LinearLayout xmlns:android="http://schemas.android.com/apk/res/android"
              android:layout_width="match_parent"
              android:layout_height="match_parent"
              android:background="@android:color/white"
              android:orientation="vertical">

    <ListView
        android:id="@+id/id_listview_chats"
        android:layout_width="match_parent"
        android:background="@android:color/white"
        android:layout_height="wrap_content"/>
</LinearLayout>
b、clipRect和clipPath
关于多个View互相重叠遮挡,会造成重叠部分过度绘制,可以使用ClipRect或ClipPath方法裁切画布,避免绘制被遮挡部分。

除了最后一张图片,前面的图片只需要绘制漏出的部分就可以:
  protected void onDraw(Canvas canvas)
    {

        super.onDraw(canvas);

        canvas.save();
        canvas.translate(20, 20);
        for (int i = 0; i < mCards.length; i++)
        {
            canvas.translate(120, 0);
            canvas.save();
            if (i < mCards.length - 1)
            {
               //只需要绘制120宽度的部分
                canvas.clipRect(0, 0, 120, mCards[i].getHeight());
            }
            canvas.drawBitmap(mCards[i], 0, 0, null);
            canvas.restore();
        }
        canvas.restore();

    }
四、include、merge和viewStub
(1)include
include的用法类似c、c++中的头文件,将一些需要重复使用的布局——比如多个界面的顶部布局是一样的——独立成一个xml,在使用的时候,通过<include>标签导入。
<?xml version="1.0" encoding="utf-8"?>
<LinearLayout xmlns:android="http://schemas.android.com/apk/res/android"
    android:layout_width="match_parent"
    android:layout_height="match_parent"
    android:orientation="vertical" >

    <include
        android:id="@+id/my_title_ly"
        android:layout_width="match_parent"
        android:layout_height="wrap_content"
        layout="@layout/my_title_layout" />

    <!-- ... -->
</LinearLayout>
注意事项:使用<include>标签时,外部id会覆盖内部根元素id。比如,上面my_title_ly会覆盖my_title_layout根元素id。
(2)Merge
The tag helps eliminate redundant view groups in your view hierarchy when including one layout within another. For example, if your main layout is a vertical LinearLayout in which two consecutive views can be re-used in multiple layouts, then the re-usable layout in which you place the two views requires its own root view. However, using another LinearLayout as the root for the re-usable layout would result in a vertical LinearLayout inside a vertical LinearLayout. The nested LinearLayout serves no real purpose other than to slow down your UI performance.
merge的作用是减少include布局时的层级。比如,上面include的布局文件my_title_layout是多个子元素的合集,必然要用一个ViewGroup来组织:
<FrameLayout xmlns:android="http://schemas.android.com/apk/res/android"
    android:layout_width="fill_parent"
    android:layout_height="fill_parent">

    <ImageView
        android:layout_width="fill_parent"
        android:layout_height="fill_parent"
        android:scaleType="center"
        android:src="@drawable/golden_gate" />

    <TextView
        android:layout_width="wrap_content"
        android:layout_height="wrap_content"
        android:text="Golden Gate" />

</FrameLayout>
这就导致最终布局多了一个FrameLayout,更有效的写法是使用<merge>标签:
<merge xmlns:android="http://schemas.android.com/apk/res/android" >

    <ImageView
        android:layout_width="fill_parent"
        android:layout_height="fill_parent"
        android:scaleType="center"
        android:src="@drawable/golden_gate" />

    <TextView
        android:layout_width="wrap_content"
        android:layout_height="wrap_content"
        android:text="Golden Gate" />

</merge>
实际上,<merge>标签的作用是将其内部元素直接解析到它的parent布局中,这样就少了一层ViewGroup。
(3)ViewStub
ViewStub is a lightweight view with no dimension and doesn’t draw anything or participate in the layout. As such, it’s cheap to inflate and cheap to leave in a view hierarchy. Each ViewStub simply needs to include the android:layout attribute to specify the layout to inflate.
对于一些只在特定情境下才需要显示的布局(比如,首次进入时的欢迎界面),可以使用viewStub代替,具体用法如下:
<ViewStub
    android:id="@+id/stub_id"
    android:inflatedId="@+id/stub_inflated_id"
    android:layout="@layout/my_stub_layout"
    android:layout_width="wrap_content"
    android:layout_height="wrap_content"
    android:layout_gravity="bottom" />
ViewStub实际上是一个高度为0的View,只有当调用其setVisibility或inflate函数时才会将其要装载的布局加载进来,从而实现了懒加载。
注意事项:与<include>标签类似,使用<ViewStub>标签时,inflatedId如果不为空,则会覆盖装载layout的根元素布局。
五、总结
UI布局优化是一个繁琐细致的工作,可以首先通过 "Profile GPU rendering" 和 "GPU调试过度绘制" 等工具做一个整体的检测,然后具体问题具体分析。
"Profile GPU rendering"用法:

其中,绿线是16ms线,全部渲染低于此线才能保证界面刷新为60fps。
- 蓝色部分记录了这一帧对所有需要更新的view完成这两步花费的时间,当它很高的时候,说明有很多view突然无效(invalidate)了,或者是有几个自定义view在onDraw函数中做了特别复杂的绘制逻辑。
- 红色部分代表执行时间,也就是Android 2D渲染引擎(OpenGL)执行display list的时间,如果这一段比较高,复杂的view都可能是罪魁祸首。
- 橙色部分代表处理时间,就是CPU告诉GPU渲染已经完成的时间,这个时间是阻塞的,如果这里比较高,通常是由于很多复杂的view绘制导致GPU做的任务太多了。

 浙公网安备 33010602011771号