20221031&20221101 Keras
小摆几天😊
keras.model.fit
     y=None, #输入的y标签值
     batch_size=None, #整数 ,每次梯度更新的样本数即批量大小。未指定,默认为32。
     epochs=1, #迭代次数
     verbose=1, #整数,代表以什么形式来展示日志状态
     callbacks=None, #回调函数,这个list中的回调函数将会在训练过程中的适当时机被调用,参考回调函数
     validation_split=0.0, #浮点数0-1之间,用作验证集的训练数据的比例。模型将分出一部分不会被训练的验证数据,并将在每一轮结束时评估这些验证数据的误差和任何其他模型指标。
     validation_data=None, #这个参数会覆盖 validation_split,即两个函数只能存在一个,它的输入为元组 (x_val,y_val),这作为验证数据。
     shuffle=True, #布尔值。是否在每轮迭代之前混洗数据
     class_weight=None,
     sample_weight=None,
     initial_epoch=0,
     steps_per_epoch=None, #一个epoch包含的步数(每一步是一个batch的数据送入),当使用如TensorFlow数据Tensor之类的输入张量进行训练时,默认的None代表自动分割,即数据集样本数/batch样本数。
     validation_steps=None, #在验证集上的step总数,仅当steps_per_epoch被指定时有用。
     validation_freq=1, #指使用验证集实施验证的频率。当等于1时代表每个epoch结束都验证一次
     max_queue_size=10,
     workers=1,
     use_multiprocessing=False
   )
再看上次的代码,必须理解load_data的数据类型
seclar = pp.MinMaxScaler(feature_range=(0, 1)) # 将数据的每一个特征缩放到给定的范围,将数据的每一个属性值减去其最小值,然后除以其极差(最大值 - 最小值)
data = seclar.fit_transform(data) #fit_transform方法是fit和transform的结合,fit_transform(X_train) 意思是找出X_train的均值和标准差,并应用在X_train上
np.random.shuffle(data) #打乱顺序函数
去除归一化部分,似乎可以看起来更直观,但需要加上data = np.array(data)
将范围num改为11时涉及输出代码和对应train和test输出为
train_x, train_y = data[: int(len(data) * 0.7), 0: 2], labels[: int(len(labels) * 0.7)]
    print(train_x,train_y)
    test_x, test_y = data[int(len(data) * 0.7): len(data), 0: 2], labels[int(len(labels) * 0.7): len(labels)]
    print('=============')
    print(test_x,test_y)

    print(train_x.shape)
    print(test_x.shape)
output:
[[ 3  3  0]
 [11  1  0]
 [21  1  0]
 [20  0  1]
 [12  2  1]
 [16  6  1]
 [ 5  5  0]
 [17  7  0]
 [13  3  0]
 [10  0  1]
 [ 4  4  1]
 [ 1  1  0]
 [18  8  1]
 [ 6  6  1]
 [15  5  0]
 [ 2  2  1]
 [ 8  8  1]
 [ 9  9  0]
 [ 7  7  0]
 [14  4  1]
 [19  9  0]]
[0 0 0 1 1 1 0 0 0 1 1 0 1 1 0 1 1 0 0 1 0]
[[ 3  3]
 [11  1]
 [21  1]
 [20  0]
 [12  2]
 [16  6]
 [ 5  5]
 [17  7]
 [13  3]
 [10  0]
 [ 4  4]
 [ 1  1]
 [18  8]
 [ 6  6]] [0 0 0 1 1 1 0 0 0 1 1 0 1 1]
=============
[[15  5]
 [ 2  2]
 [ 8  8]
 [ 9  9]
 [ 7  7]
 [14  4]
 [19  9]] [0 1 1 0 0 1 0]
(14, 2)
(7, 2)
用前一部分数据训练模型,用后一部分数据来测试模型准确性
from keras.layers import Dense, Dropout
from keras.models import Sequential
import matplotlib.pyplot as plt
import numpy as np
import sklearn.preprocessing as pp
from load_data import load_data
def built_model():
    model = Sequential()
    model.add(Dense(units=256,
                    input_dim=2,
                    activation='relu'))
    model.add(Dropout(0.5))
    model.add(Dense(units=128,
                    activation='relu'))
    model.add(Dropout(0.5))
    model.add(Dense(units=1,
                    activation='sigmoid'))
    model.compile(loss='binary_crossentropy',
                  optimizer='adam',
                  metrics=['accuracy'])
    model.summary()
    return model

def train_model(batch_size=32, verbose=2, validation_split=0.2, model=None):#batch size为默认的32,verbose为2决定log的显示方式,
    data, labels = load_data()
    train_x, train_y = data[: int(len(data) * 0.7), 0: 2], labels[: int(len(labels) * 0.7)]
    print(train_x,train_y)
    test_x, test_y = data[int(len(data) * 0.7): len(data), 0: 2], labels[int(len(labels) * 0.7): len(labels)]
    print(test_x,test_y)
    if model is None:
        model = built_model()
        history = model.fit(train_x, train_y,
                            batch_size=batch_size,
                            epochs=10,
                            verbose=verbose,
                            validation_split=validation_split) #History类对象包含两个属性,分别为epoch和history,epoch为训练轮数
        # print ("刻画损失函数的变化趋势")
        #
        # plt.figure('f1')
        # plt.plot(history.history['loss'], label='train')
        # plt.plot(history.history['val_loss'], label='valid') # 训练集loss: loss 测试集loss: val_loss
        # plt.legend()
        # plt.show()
        print ("模型构建成功,开始预测数据")

        score = model.evaluate(test_x, test_y,
                               batch_size=batch_size) #在测试模式下返回模型的误差值和评估标准值
        print (score)
        print ("画图")
        predicted = model.predict(test_x,
                                  batch_size=batch_size,
                                  verbose=0)
        #为输入样本生成输出预测。
        rounded = [np.round(w) for w in predicted]

        plt.figure('f2')
        plt.scatter(test_y, list(range(len(test_y))), marker='+')

        plt.figure('f3')
        plt.scatter(rounded, list(range(len(predicted))), marker='*')
        plt.show()

        num=input("属于需判断奇偶的数字:")
        print(predicted)


if __name__ == '__main__':
    train_model()
models.fit/f1部分
history = model.fit(train_x, train_y,
                            batch_size=batch_size,
                            epochs=10,
                            verbose=verbose,
                            validation_split=validation_split)
/////
plt.plot(history.history['loss'], label='train')
plt.plot(history.history['val_loss'], label='valid')
对于分类问题,最常用的损失函数是交叉熵损失函数 Cross Entropy Loss
https://zhuanlan.zhihu.com/p/35709485
https://www.pyimagesearch.com/2019/10/14/why-is-my-validation-loss-lower-than-my-training-loss/
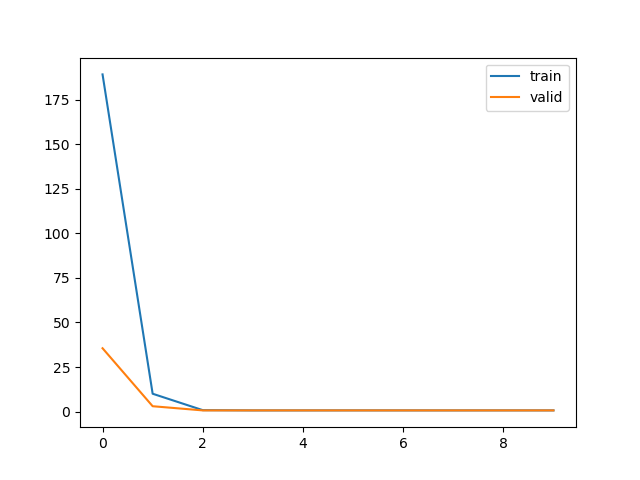
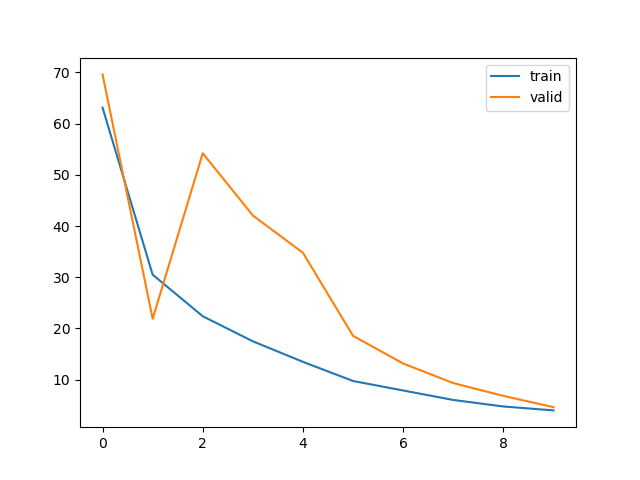
train loss 不断下降,test loss不断下降,说明网络仍在学习;(最好的)
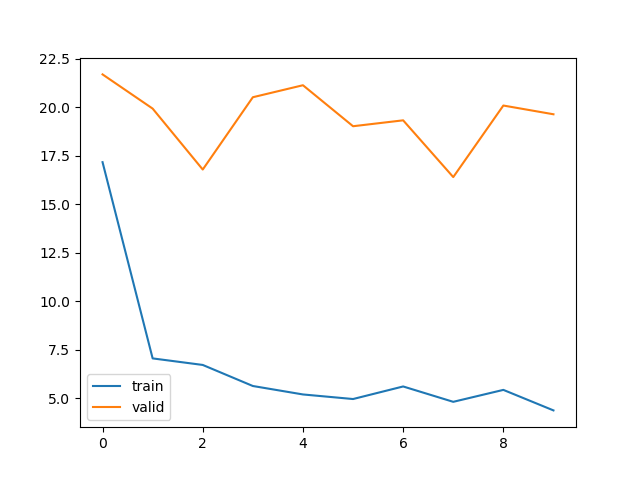
train loss 不断下降,test loss趋于不变,说明网络过拟合;(max pool或者正则化)
train loss 趋于不变,test loss不断下降,说明数据集100%有问题;(检查dataset)
train loss 趋于不变,test loss趋于不变,说明学习遇到瓶颈,需要减小学习率或批量数目;(减少学习率)
train loss 不断上升,test loss不断上升,说明网络结构设计不当,训练超参数设置不当,数据集经过清洗等问题。(最不好的情况)

num=100001时候在epoch=2时学习完备

epoch=2之前的图像表现为欠拟合


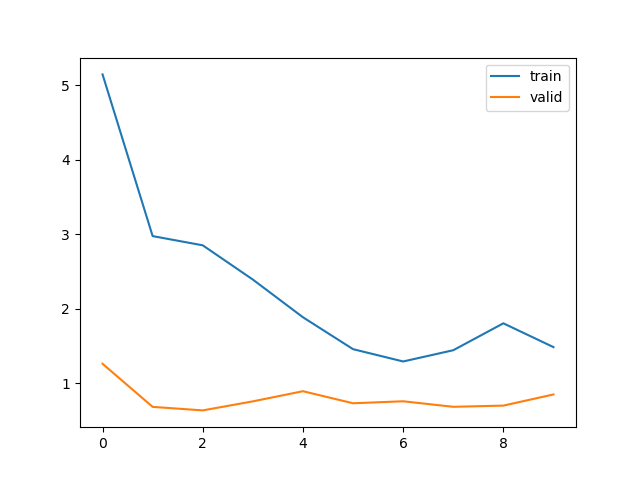
num逐渐减少后均表现出欠拟合
models.evaluate/models.predict
model.evaluate
Returns
Scalar test loss (if the model has a single output and no metrics) or list of scalars (if the model has multiple outputs and/or metrics). The attribute model.metrics_names will give you the display labels for the scalar outputs.
model.predict
输入测试数据,输出预测结果 (通常用在需要得到预测结果的时候,比如需要拿到结果来画图)
https://keras.io/api/models/model_training_apis/#predict_on_batch-method
Arguments
-
- x
- Input samples. It could be:
- A Numpy array (or array-like), or a list of arrays (in case the model has multiple inputs).
- A TensorFlow tensor, or a list of tensors (in case the model has multiple inputs).
- A
tf.datadataset. - A generator or
keras.utils.Sequenceinstance. A more detailed description of unpacking behavior for iterator types (Dataset, generator, Sequence) is given in theUnpacking behavior for iterator-like inputssection ofModel.fit.
Returns
Numpy array(s) of predictions.
https://qastack.cn/datascience/36238/what-does-the-output-of-model-predict-function-from-keras-mean
做中文版网站直接把原内容机翻过来(
其中一句话比较有参考性:默认情况下,神经网络的输出永远不会是二进制的-即零或一。网络使用连续值(不是离散值)工作,以便在梯度下降的框架中更自由地优化损耗。
这就需要rounded = [np.round(w) for w in predicted]使得非0/1的值最终成为0/1(属性/种类判断,具体为奇偶性判断)
print(rounded)时候输出为[array([0.], dtype=float32), array([0.], dtype=float32), array([0.], dtype=float32), array([0.], dtype=float32), array([0.], dtype=float32), array([0.], dtype=float32), array([0.], dtype=float32)]
https://www.numpy.org.cn/reference/arrays/dtypes.html#指定和构造数据类型
同时输出test_x可以直观的实现奇偶性判断功能
[[ 8 8] [13 3] [12 2] [10 0] [ 4 4] [ 5 5] [15 5]] [array([0.], dtype=float32), array([0.], dtype=float32), array([0.], dtype=float32), array([0.], dtype=float32), array([0.], dtype=float32), array([0.], dtype=float32), array([0.], dtype=float32)]
到这里大致理解了上次实现代码的所有函数,以及去除归一化后对实现的效果有了具体的体现
但是对这个场景产生了一些思考,如果给定数字仅仅作为不同的符号数字和数字之间没有关系也是无法判断数字属性的,我们习惯看到一个数字是十进制数,那么一个十进制数字按照对10取mod(末尾数字)分成10类是否也是约定俗成的?按照老师说的取模的操作是将无限数域投影到有限数域了,但是我觉得准确来说应该是将无限数域投影到有限个无限数域了,任何进制条件下的数字(无限数域)都可以投影到其对应进制的无限数域。自己再脑补一下,作为一个数字它一定有既定进制从而细化成几个域,那其他事件一定有被忽视掉的特性从而可以用来划分特征,预测特征


