springboot+dubbo+zookeeper+mybatis
参考地址:https://www.cnblogs.com/gaopengfirst/p/9555240.html
首先创建一个maven项目:
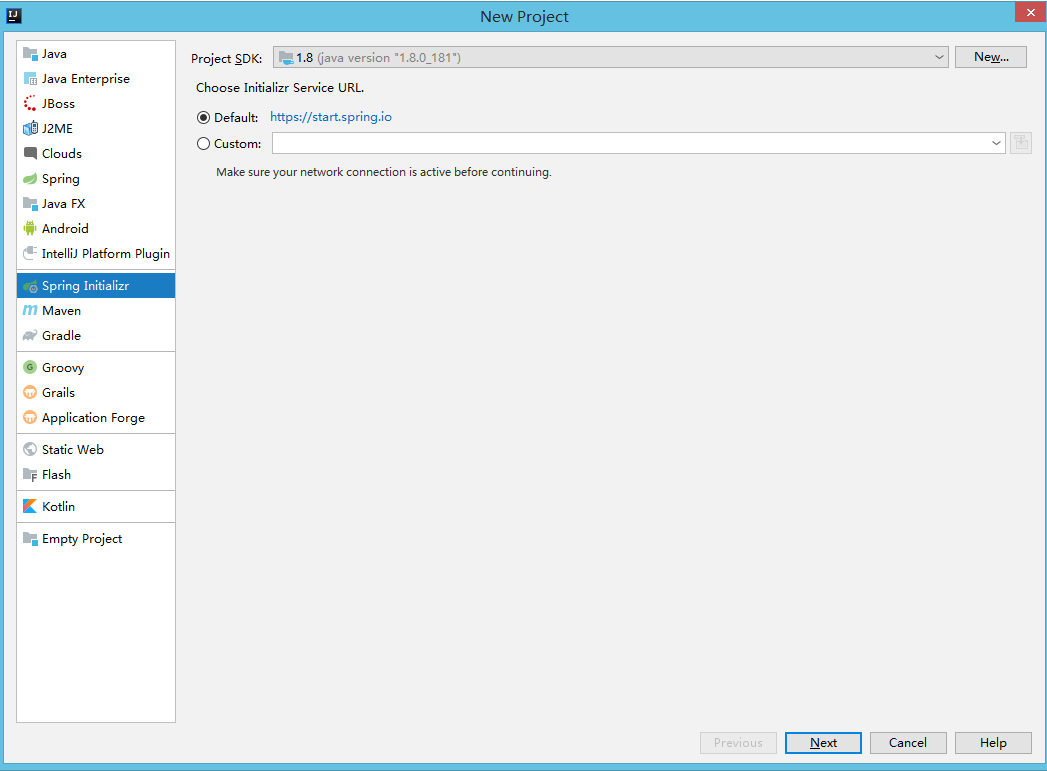
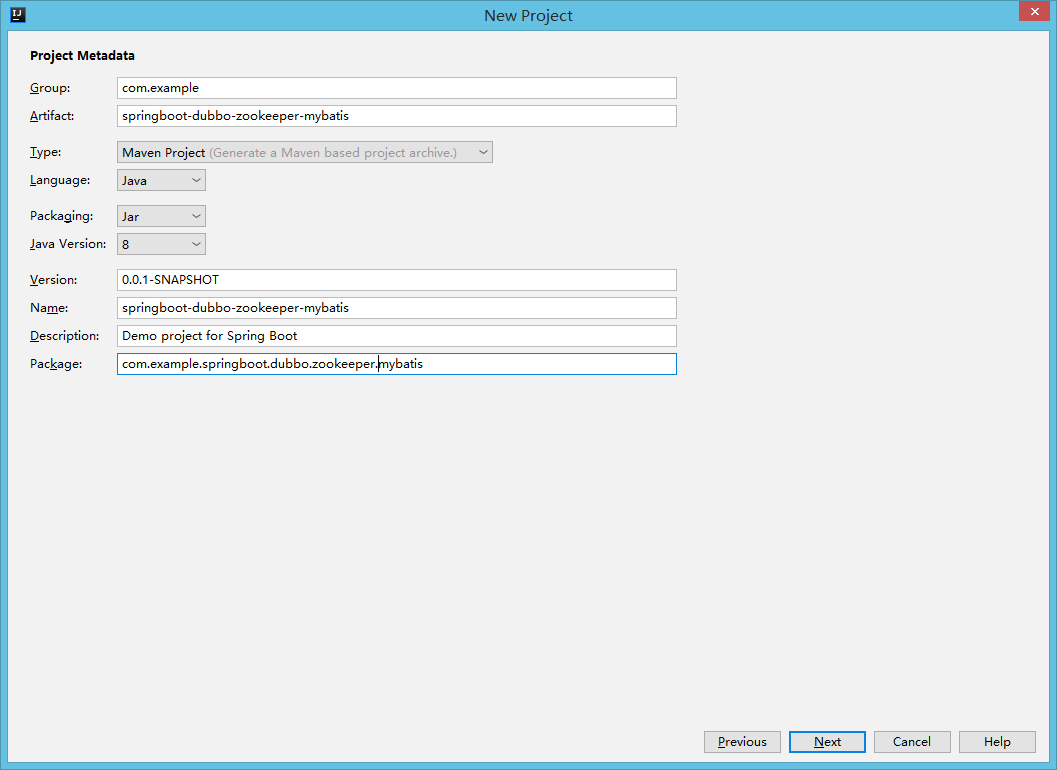
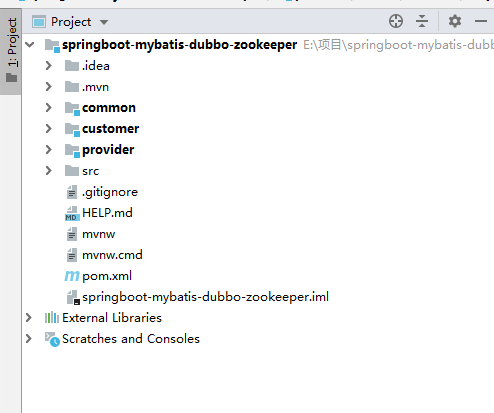
再在该父项目中创建3个module,分别是:provider(服务端)、customer(消费端)、common(存放所有接口和实体类)
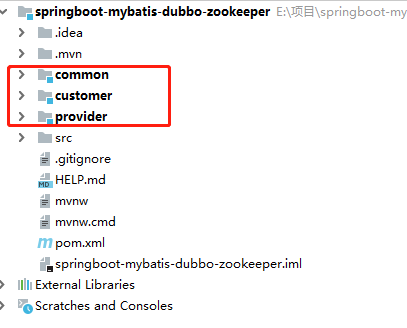
我们在父项目的pom.xml文件中添加需要的jar包。
<?xml version="1.0" encoding="UTF-8"?>
<project xmlns="http://maven.apache.org/POM/4.0.0" xmlns:xsi="http://www.w3.org/2001/XMLSchema-instance"
         xsi:schemaLocation="http://maven.apache.org/POM/4.0.0 https://maven.apache.org/xsd/maven-4.0.0.xsd">
    <modelVersion>4.0.0</modelVersion>


    <parent>
        <groupId>org.springframework.boot</groupId>
        <artifactId>spring-boot-starter-parent</artifactId>
        <version>2.2.1.RELEASE</version>
        <relativePath/> <!-- lookup parent from repository -->
    </parent>

    <groupId>com.example</groupId>
    <artifactId>springboot-mybatis-dubbo-zookeeper</artifactId>
    <version>0.0.1-SNAPSHOT</version>
    <packaging>jar</packaging>
    <name>springboot-mybatis-dubbo-zookeeper</name>
    <description>Demo project for Spring Boot</description>

    <properties>
        <project.build.sourceEncoding>UTF-8</project.build.sourceEncoding>
        <project.reporting.outputEncoding>UTF-8</project.reporting.outputEncoding>
        <java.version>1.8</java.version>
        <dubbo.version>2.5.5</dubbo.version>
        <zkclient.version>0.10</zkclient.version>
        <lombok.version>1.16.18</lombok.version>
        <spring-boot.version>1.5.7.RELEASE</spring-boot.version>
    </properties>


    <modules>
        <!-- 服务消费者工程 -->
        <module>customer</module>
        <!--  服务提供者工程-->
        <module>provider</module>
        <!-- 主要放实体、接口、也可以放一些公用的工具类工程-->
        <module>common</module>
    </modules>


    <dependencies>
        <dependency>
            <groupId>org.springframework.boot</groupId>
            <artifactId>spring-boot-starter</artifactId>
            <version>${spring-boot.version}</version>
        </dependency>

        <!-- 使用lombok实现JavaBean的get、set、toString、hashCode、equals等方法的自动生成  -->
        <dependency>
            <groupId>org.projectlombok</groupId>
            <artifactId>lombok</artifactId>
            <version>${lombok.version}</version>
            <scope>provided</scope>
        </dependency>

        <!-- Dubbo依赖 -->
        <dependency>
            <groupId>com.alibaba</groupId>
            <artifactId>dubbo</artifactId>
            <version>${dubbo.version}</version>
            <exclusions>
                <exclusion>
                    <groupId>log4j</groupId>
                    <artifactId>log4j</artifactId>
                </exclusion>
            </exclusions>
        </dependency>

        <!--zookeeper的客户端依赖-->
        <dependency>
            <groupId>com.101tec</groupId>
            <artifactId>zkclient</artifactId>
            <version>${zkclient.version}</version>
        </dependency>


        <dependency>
            <groupId>org.springframework.boot</groupId>
            <artifactId>spring-boot-starter-web</artifactId>
        </dependency>

        <dependency>
            <groupId>org.mybatis.spring.boot</groupId>
            <artifactId>mybatis-spring-boot-starter</artifactId>
            <version>2.1.1</version>
        </dependency>

        <dependency>
            <groupId>org.springframework.boot</groupId>
            <artifactId>spring-boot-starter-test</artifactId>
            <scope>test</scope>
            <exclusions>
                <exclusion>
                    <groupId>org.junit.vintage</groupId>
                    <artifactId>junit-vintage-engine</artifactId>
                </exclusion>
            </exclusions>
        </dependency>


    </dependencies>

    <build>
        <plugins>
            <plugin>
                <groupId>org.apache.maven.plugins</groupId>
                <artifactId>maven-compiler-plugin</artifactId>
                <configuration>
                    <source>${java.version}</source>
                    <target>${java.version}</target>
                    <encoding>UTF-8</encoding>
                </configuration>

            </plugin>
            <plugin>
                <groupId>org.apache.maven.plugins</groupId>
                <artifactId>maven-resources-plugin</artifactId>
                <configuration>
                    <encoding>UTF-8</encoding>
                </configuration>
            </plugin>
        </plugins>
    </build>


</project>
至此,父项目就可以不用管它了。
接着我们再来搭建common模块:
首先是pom.xml,如下:
<?xml version="1.0" encoding="UTF-8"?>
<project xmlns="http://maven.apache.org/POM/4.0.0" xmlns:xsi="http://www.w3.org/2001/XMLSchema-instance"
         xsi:schemaLocation="http://maven.apache.org/POM/4.0.0 https://maven.apache.org/xsd/maven-4.0.0.xsd">
    <modelVersion>4.0.0</modelVersion>
    <parent>
        <groupId>org.springframework.boot</groupId>
        <artifactId>spring-boot-starter-parent</artifactId>
        <version>2.2.1.RELEASE</version>
        <relativePath/> <!-- lookup parent from repository -->
    </parent>
    <groupId>com.example</groupId>
    <artifactId>common</artifactId>
    <version>0.0.1-SNAPSHOT</version>
    <packaging>jar</packaging>
    <name>common</name>
    <description>Demo project for Spring Boot</description>

    <properties>
        <project.build.sourceEncoding>UTF-8</project.build.sourceEncoding>
        <project.reporting.outputEncoding>UTF-8</project.reporting.outputEncoding>
        <java.version>1.8</java.version>
    </properties>

    <dependencies>
        <dependency>
            <groupId>org.springframework.boot</groupId>
            <artifactId>spring-boot-starter</artifactId>
        </dependency>

        <dependency>
            <groupId>org.springframework.boot</groupId>
            <artifactId>spring-boot-starter-test</artifactId>
            <scope>test</scope>
            <exclusions>
                <exclusion>
                    <groupId>org.junit.vintage</groupId>
                    <artifactId>junit-vintage-engine</artifactId>
                </exclusion>
            </exclusions>
        </dependency>
    </dependencies>

    <build>
        <plugins>
            <plugin>
                <groupId>org.springframework.boot</groupId>
                <artifactId>spring-boot-maven-plugin</artifactId>
            </plugin>
        </plugins>
    </build>

</project>
在common下创建domin(放实体类)和service(放接口)两个文件夹
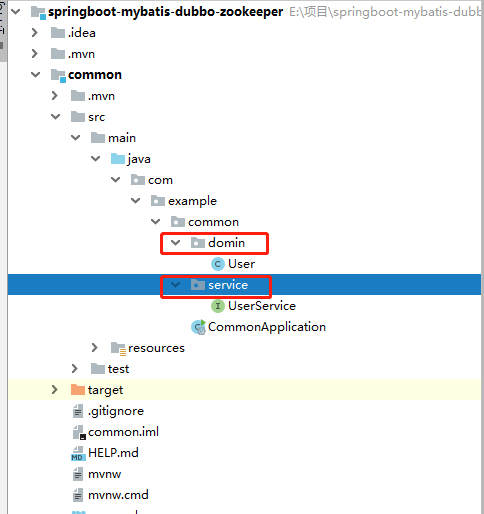
在domin中创建User.java实体类(这里有一个坑,就是该实体类一定要实现java.io.Serializable这个接口,否则会报错这是因为一个类只有实现了Serializable接口,它的对象才是可序列化的。如果要序列化某些类的对象,这些类就必须实现Serializable接口。而实际上,Serializable是一个空接口,没有什么具体内容,它的目的只是简单的标识一个类的对象可以被序列化。这是我踩过的一个坑,大家可以试着把implements Serializable 去掉,肯定会报错的,报错中会有一句
Serialized class com.yykj.mall.dto.ProductListItemDTO must implement java.io.Serializable):
package com.example.common.domin;

import java.io.Serializable;

public class User implements Serializable {
    private int id;

    private  String name;

    private  int age;

    private String sex;

    public int getId() {
        return id;
    }

    public void setId(int id) {
        this.id = id;
    }

    public String getName() {
        return name;
    }

    public void setName(String name) {
        this.name = name;
    }

    public int getAge() {
        return age;
    }

    public void setAge(int age) {
        this.age = age;
    }

    public String getSex() {
        return sex;
    }

    public void setSex(String sex) {
        this.sex = sex;
    }

    @Override
    public String toString() {
        return "User{" +
                "id=" + id +
                ", name='" + name + '\'' +
                ", age=" + age +
                ", sex='" + sex + '\'' +
                '}';
    }
}
在service中创建UserService接口:
package com.example.common.service;

import com.example.common.domin.User;

/*
*@ZN
*@date 2019/11/11
 */
public interface UserService {
    User findUser();
}
application.properties这个文件是空的,大家不用理会,此时,common模块基本完成。
接下来就是provider模块了
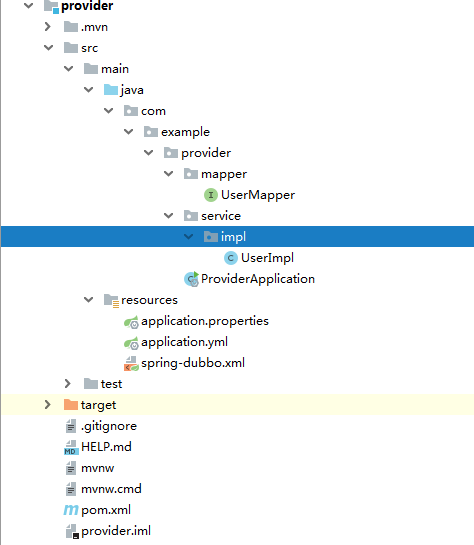
如上图,pom.xml添加依赖:
<?xml version="1.0" encoding="UTF-8"?>
<project xmlns="http://maven.apache.org/POM/4.0.0" xmlns:xsi="http://www.w3.org/2001/XMLSchema-instance"
         xsi:schemaLocation="http://maven.apache.org/POM/4.0.0 https://maven.apache.org/xsd/maven-4.0.0.xsd">
    <modelVersion>4.0.0</modelVersion>
    <parent>
        <groupId>org.springframework.boot</groupId>
        <artifactId>spring-boot-starter-parent</artifactId>
        <version>2.2.1.RELEASE</version>
        <relativePath/> <!-- lookup parent from repository -->
    </parent>
    <groupId>com.example</groupId>
    <artifactId>provider</artifactId>
    <version>0.0.1-SNAPSHOT</version>
    <packaging>jar</packaging>
    <name>provider</name>
    <description>Demo project for Spring Boot</description>

    <properties>
        <project.build.sourceEncoding>UTF-8</project.build.sourceEncoding>
        <project.reporting.outputEncoding>UTF-8</project.reporting.outputEncoding>
        <java.version>1.8</java.version>
        <zkclient.version>0.10</zkclient.version>
    </properties>

    <dependencies>

        <dependency>
            <groupId>com.example</groupId>
            <artifactId>common</artifactId>
            <version>0.0.1-SNAPSHOT</version>
        </dependency>


        <dependency>
            <groupId>org.springframework.boot</groupId>
            <artifactId>spring-boot-starter</artifactId>
        </dependency>

        <dependency>
            <groupId>org.springframework.boot</groupId>
            <artifactId>spring-boot-starter-test</artifactId>
            <scope>test</scope>
            <exclusions>
                <exclusion>
                    <groupId>org.junit.vintage</groupId>
                    <artifactId>junit-vintage-engine</artifactId>
                </exclusion>
            </exclusions>
        </dependency>


        <dependency>
            <groupId>com.alibaba</groupId>
            <artifactId>dubbo</artifactId>
            <version>2.5.5</version>
            <exclusions>
                <exclusion>
                    <groupId>log4j</groupId>
                    <artifactId>log4j</artifactId>
                </exclusion>
            </exclusions>
        </dependency>

        <!--zookeeper的客户端依赖-->
        <dependency>
            <groupId>com.101tec</groupId>
            <artifactId>zkclient</artifactId>
            <version>${zkclient.version}</version>
        </dependency>

        <dependency>
            <groupId>org.mybatis.spring.boot</groupId>
            <artifactId>mybatis-spring-boot-starter</artifactId>
            <version>1.3.1</version>
        </dependency>
        <dependency>
            <groupId>org.springframework.boot</groupId>
            <artifactId>spring-boot-starter-jdbc</artifactId>
        </dependency>


        <!-- https://mvnrepository.com/artifact/org.mariadb.jdbc/mariadb-java-client -->
        <dependency>
            <groupId>org.mariadb.jdbc</groupId>
            <artifactId>mariadb-java-client</artifactId>
            <version>2.5.1</version>
        </dependency>

        <!-- alibaba的druid数据库连接池 -->
        <dependency>
            <groupId>com.alibaba</groupId>
            <artifactId>druid</artifactId>
            <version>1.0.11</version>
        </dependency>


    </dependencies>

    <build>
        <plugins>
            <plugin>
                <groupId>org.springframework.boot</groupId>
                <artifactId>spring-boot-maven-plugin</artifactId>
            </plugin>
        </plugins>
    </build>

</project>
我们这边使用springboot,因为基本上都封装好了,配置就很简单了。我们先新增一个application.yml,具体配置如下,这边直接将mybatis的配置写在配置文件里了,就不需要像ssm一样需要xml文件配置了。application.yml:
server:
  port: 8082
  servlet:
    context-path: /
spring:
 datasource:
        name: test
        url: jdbc:mysql://127.0.0.1:3306/springdb
        username: root
        password: root
        # 使用druid数据源
        type: com.alibaba.druid.pool.DruidDataSource
        driver-class-name: com.mysql.jdbc.Driver
        filters: stat
        maxActive: 20
        initialSize: 1
        maxWait: 60000
        minIdle: 1
        timeBetweenEvictionRunsMillis: 60000
        minEvictableIdleTimeMillis: 300000
        validationQuery: select 'x'
        testWhileIdle: true
        testOnBorrow: false
        testOnReturn: false
        poolPreparedStatements: true
        maxOpenPreparedStatements: 20
        mybatis:
          type-aliases-package:  domain
同时,我们需要在项目中配置dubbo,让该项目成为提供者。
SpringBoot_Dubbo_Provider 的 spring-dubbo.xml:
<?xml version="1.0" encoding="UTF-8"?>
<beans xmlns="http://www.springframework.org/schema/beans"
       xmlns:xsi="http://www.w3.org/2001/XMLSchema-instance"
       xmlns:dubbo="http://code.alibabatech.com/schema/dubbo"
       xsi:schemaLocation="http://www.springframework.org/schema/beans
       http://www.springframework.org/schema/beans/spring-beans.xsd
       http://code.alibabatech.com/schema/dubbo
       http://code.alibabatech.com/schema/dubbo/dubbo.xsd">

    <dubbo:application name="provider"/>
    <!-- 注册中心的ip地址 -->
    <dubbo:registry address="zookeeper://127.0.0.1:2181"/>
    <!-- 扫描注解包路径,多个包用逗号分隔,不填pacakge表示扫描当前ApplicationContext中所有的类 -->
    <dubbo:annotation package="service.impl"/>

    <!-- use dubbo protocol to export service on port 20880 -->
    <dubbo:protocol name="dubbo" port="20880"/>

    <!-- service implementation, as same as regular local bean -->
    <bean id="userService" class="com.example.provider.service.impl.UserImpl"/>
    <!-- declare the service interface to be exported -->
    <dubbo:service interface="com.example.common.service.UserService" ref="userService"/>
</beans>
Springboot是使用类来作为启动器的,所以启动器ProviderApplication.java,在启动器中将dubbo的配置文件引用,并且去扫描mapper包。
package com.example.provider;

import org.mybatis.spring.annotation.MapperScan;
import org.springframework.boot.SpringApplication;
import org.springframework.boot.autoconfigure.SpringBootApplication;
import org.springframework.context.annotation.ImportResource;

import java.io.IOException;

@SpringBootApplication
@ImportResource({"classpath:spring-dubbo.xml"})
@MapperScan("mapper")
public class ProviderApplication {

    public static void main(String[] args) {
        SpringApplication.run(ProviderApplication.class, args);
        System.out.println("服务端启动成功!!!");
        try {
            System.in.read();
        } catch (IOException e) {
            e.printStackTrace();
        }
    }

}
同样我们也要为这个项目写一个启动器。在启动器中加载dubbo配置文件 。这里提供者和消费者两个项目不能使用相同的端口号,所以消费者这边端口我使用的是8081 提供者为8082。
也就是在provider中的application.properties中写上server.port=8082,在customer中的application.properties中写上server.port=8081
然后创建mapper文件夹,在里面创建UserMapper接口,接口内容如下:
package com.example.provider.mapper;

import com.example.common.domin.User;
import org.apache.ibatis.annotations.*;

import java.util.List;

@Mapper
public interface UserMapper {

    @Results(id = "userMap", value = {
            @Result(column = "id", property = "id"),
            @Result(column = "name", property = "name"),
            @Result(column = "age", property = "age"),
            @Result(column = "sex", property = "sex")})
    @Select("SELECT * FROM u_user")
    List<User> getAll();

    @Select("SELECT * FROM u_user t WHERE t.id = #{id}")
    @ResultMap("userMap")
    User getOne(Long id);

}
在service文件夹下的Impl中编写UserImpl接口的实现类,内容如下:
package com.example.provider.service.impl;

import com.example.common.domin.User;
import com.example.common.service.UserService;
import com.example.provider.mapper.UserMapper;
import org.springframework.beans.factory.annotation.Autowired;

public class UserImpl implements UserService {

    @Autowired
    private UserMapper userMapper;


    @Override
    public User findUser() {
        return userMapper.getOne(1L);
    }
}
此时provider服务端就编写完毕了。
接下来就是编写customer消费端了:
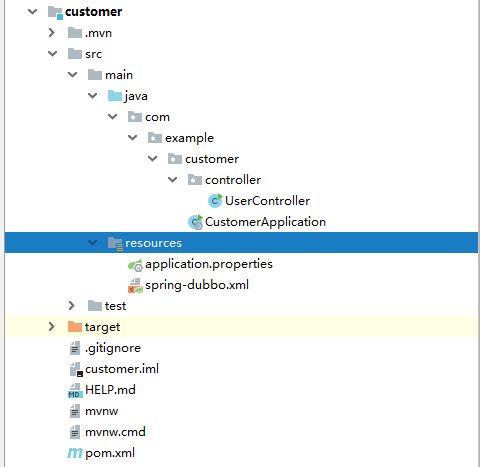
pom.xml添加依赖:
<?xml version="1.0" encoding="UTF-8"?>
<project xmlns="http://maven.apache.org/POM/4.0.0" xmlns:xsi="http://www.w3.org/2001/XMLSchema-instance"
         xsi:schemaLocation="http://maven.apache.org/POM/4.0.0 https://maven.apache.org/xsd/maven-4.0.0.xsd">
    <modelVersion>4.0.0</modelVersion>
    <parent>
        <groupId>org.springframework.boot</groupId>
        <artifactId>spring-boot-starter-parent</artifactId>
        <version>2.2.1.RELEASE</version>
        <relativePath/> <!-- lookup parent from repository -->
    </parent>
    <groupId>com.example</groupId>
    <artifactId>customer</artifactId>
    <version>0.0.1-SNAPSHOT</version>
    <packaging>jar</packaging>
    <name>customer</name>
    <description>Demo project for Spring Boot</description>

    <properties>
        <project.build.sourceEncoding>UTF-8</project.build.sourceEncoding>
        <project.reporting.outputEncoding>UTF-8</project.reporting.outputEncoding>
        <java.version>1.8</java.version>
        <zkclient.version>0.10</zkclient.version>
    </properties>

    <dependencies>

        <dependency>
            <groupId>com.example</groupId>
            <artifactId>common</artifactId>
            <version>0.0.1-SNAPSHOT</version>
        </dependency>

        <dependency>
            <groupId>org.springframework.boot</groupId>
            <artifactId>spring-boot-starter-web</artifactId>
        </dependency>

        <dependency>
            <groupId>org.springframework.boot</groupId>
            <artifactId>spring-boot-starter</artifactId>
        </dependency>

        <dependency>
            <groupId>org.springframework.boot</groupId>
            <artifactId>spring-boot-starter-test</artifactId>
            <scope>test</scope>
            <exclusions>
                <exclusion>
                    <groupId>org.junit.vintage</groupId>
                    <artifactId>junit-vintage-engine</artifactId>
                </exclusion>
            </exclusions>
        </dependency>

        <dependency>
            <groupId>com.alibaba</groupId>
            <artifactId>dubbo</artifactId>
            <version>2.5.5</version>
            <exclusions>
                <exclusion>
                    <groupId>log4j</groupId>
                    <artifactId>log4j</artifactId>
                </exclusion>
            </exclusions>
        </dependency>

        <!--zookeeper的客户端依赖-->
        <dependency>
            <groupId>com.101tec</groupId>
            <artifactId>zkclient</artifactId>
            <version>${zkclient.version}</version>
        </dependency>


    </dependencies>

    <build>
        <plugins>
            <plugin>
                <groupId>org.springframework.boot</groupId>
                <artifactId>spring-boot-maven-plugin</artifactId>
            </plugin>
        </plugins>
    </build>

</project>
接下来要为dubbo编写xml配置文件,在resource文件夹中新建spring-dubbo.xml文件,配置内容如下:
<?xml version="1.0" encoding="UTF-8"?>
<beans xmlns="http://www.springframework.org/schema/beans"
       xmlns:xsi="http://www.w3.org/2001/XMLSchema-instance"
       xmlns:dubbo="http://code.alibabatech.com/schema/dubbo"
       xsi:schemaLocation="http://www.springframework.org/schema/beans
       http://www.springframework.org/schema/beans/spring-beans.xsd
       http://code.alibabatech.com/schema/dubbo
       http://code.alibabatech.com/schema/dubbo/dubbo.xsd">

    <dubbo:application name="consumer"/>
    <dubbo:registry address="zookeeper://127.0.0.1:2181"/>
    <dubbo:protocol name="dubbo" port="20880"/>
    <dubbo:reference id="userService" check="false" interface="com.example.common.service.UserService"/>
    <dubbo:annotation package="controller"/>
</beans>
然后就是编写controller了,创建UserController.java文件,调用common中的UserService接口,这里是用注解的形式注入的
package com.example.customer.controller;

import com.alibaba.dubbo.config.annotation.Reference;
import com.example.common.domin.User;
import com.example.common.service.UserService;
import org.springframework.web.bind.annotation.GetMapping;
import org.springframework.web.bind.annotation.RestController;

import javax.annotation.Resource;


/**
 * Created with IntelliJ IDEA.
 * User: zj
 * Date: 2019/11/12
 * Time: 10:45
 * Description:
 */
@RestController
public class UserController {

    @Resource
    @Reference(version = "1.0.0")
    private UserService userService;

    @GetMapping("getUser")
    public User user() {
        System.out.println("进来了!!!!!!!!!!!!!!!!");
        System.out.println(userService.hashCode() + "!!!!!!!!!!!!!!!!");
        System.out.println(userService.findUser());
        return userService.findUser();
    }
}
再给customer消费端启动类CustomerApplication:
package com.example.customer;

import org.springframework.boot.SpringApplication;
import org.springframework.boot.autoconfigure.SpringBootApplication;
import org.springframework.context.annotation.ImportResource;

@SpringBootApplication
@ImportResource({"classpath:spring-dubbo.xml"})
public class CustomerApplication {

    public static void main(String[] args) {
        SpringApplication.run(CustomerApplication.class, args);
        System.out.println("消费端启动成功!!!");
    }

}
这样,所有的配置我们都完成了,这里,我就简单的从数据库根据ID查一个user信息为例子。
首先创建一个u_user表:
CREATE TABLE `u_user` (
  `id` int(11) NOT NULL AUTO_INCREMENT COMMENT '主键id',
  `name` varchar(256) DEFAULT NULL COMMENT '姓名',
  `age` int(11) DEFAULT NULL COMMENT '年龄',
  `sex` varchar(4) DEFAULT NULL COMMENT '性别',
  PRIMARY KEY (`id`)
) ENGINE=InnoDB AUTO_INCREMENT=3 DEFAULT CHARSET=utf8
这时再先后启动provider和customer,可以在dubbo可视化界面中看到项目的生产者和消费者都启动成功了:


打来浏览器访问:
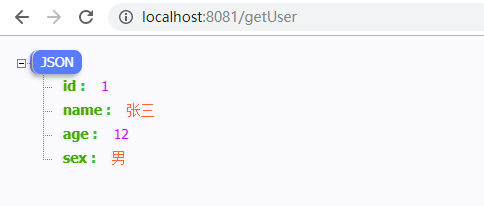
可以看到,数据已经从数据库中查出来了,至此,SpringBoot+dubbo+zookeeper+maven框架搭建完毕!


