谈谈java中的NIO
一、NIO的基本概念:
我喜欢把NIO看成是non-blocking io的缩写,这也体现它的特性:非阻塞,它有三大核心部分:
- Buffer(缓冲区)
- Channel(通道)
- Selector(多路复用器)
二、Buffer缓冲区:
首先我们看一下Buffer类的结构
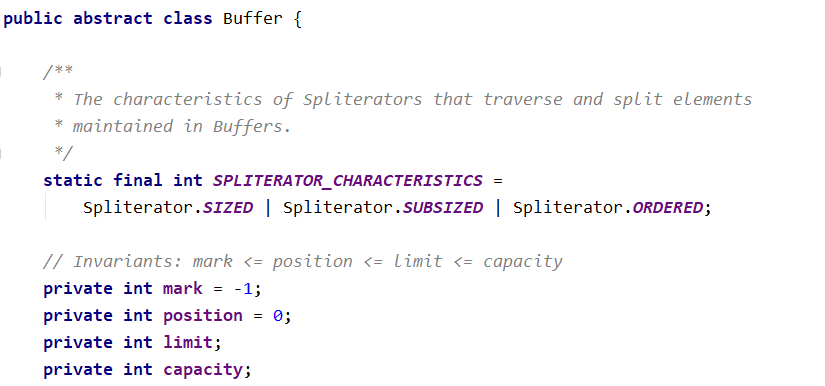
由图中可以看出它是一个抽象类,Buffer类主要有以下属性:
- mark:用于标记当前position的前一个位置
- position:下一个要读取或写入的元素的索引
- limit:指向缓冲区中不能读取或写入的第一个元素的索引
- capacity:缓冲区的容量,即包含元素的个数
它们三个大小关系为:0<=mark <= position <= limit <= capacity
注意:缓冲区就是一个数组,另外Buffer还有以下几个直接子类,我们也可以在jdk8的api文档中找到:

它们分别对应了Byte、Char、Double、Float、int、Long、Short等数据类型的数据,其中ByteBuffer是使用最为广泛的。
我们先创建一个ByteBuffer缓冲区:
public class NioDemo {
public static void main(String[] args) {
// 创建一个大小为1024b的缓冲区
ByteBuffer byteBuffer = ByteBuffer.allocate(1024);
System.out.println("------初始化缓冲区:---------");
// 打印一下mark、postion、limit、capacity初始化大小
System.out.println("初始化时position的值:" + byteBuffer.position());
System.out.println("初始化时limit的值:" + byteBuffer.limit());
System.out.println("初始化时capacity的值:" + byteBuffer.capacity());
System.out.println("初始化时mark的值:" + byteBuffer.mark());
System.out.println("------往缓冲区中加入数据后:---------");
// 往buffer中写入数据,查看mark、postion、limit、capacity的值的变化
String bs = "java";
byteBuffer.put(bs.getBytes());
System.out.println("position的值:" + byteBuffer.position());
System.out.println("limit的值:" + byteBuffer.limit());
System.out.println("capacity的值:" + byteBuffer.capacity());
System.out.println("mark的值:" + byteBuffer.mark());
// 把缓冲区切换成读模式
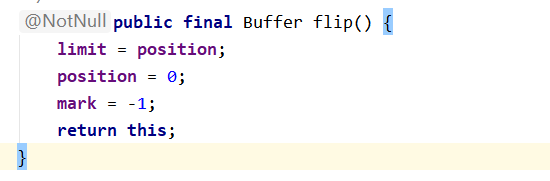
byteBuffer.flip();
System.out.println("------执行flip()方法后:---------");
System.out.println("position的值:" + byteBuffer.position());
System.out.println("limit的值:" + byteBuffer.limit());
System.out.println("capacity的值:" + byteBuffer.capacity());
System.out.println("mark的值:" + byteBuffer.mark());
//
byteBuffer.clear();
System.out.println("\n读取出的数据为:");
// 从缓冲区中取出数据
byte[] bytes = new byte[byteBuffer.limit()];
byteBuffer.get(bytes);
System.out.println(new String(bytes, 0, bytes.length));
}
}
以上代码运行结果如下:
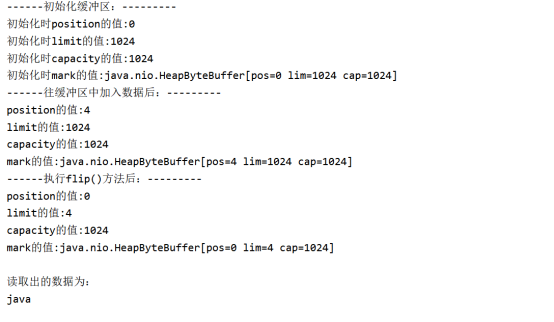
接下来我们看看代码以及执行过程中position、limit、capacity的变换:
1.初始化缓冲区时,buffer数组如下图:
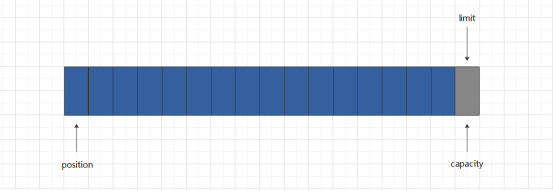
2.当我们执行Buffer的put()方法往缓冲区中放入数据时,buffer数组如下图:
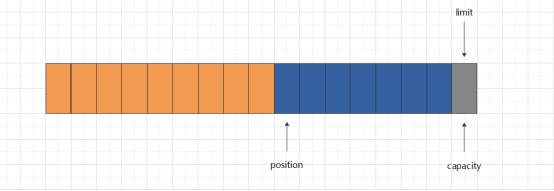
3.当我们想把缓冲区中的数据的数据读取出来时,我们得先调用Buffer的filp()方法,此时buffer数组如下图:
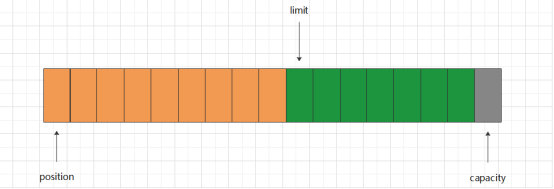
我们先暂停脚步来分析一下flip()方法,从源码中我们可以看到flip()方法中让limit指向了position的位置,position指向缓冲区起始位置,所以就得到上图所示的结果。这时我们可能就会想到:当我们调用flip()方法后,limit是用于限制读到哪里,position限制从哪里开始读,这也就是为什么我们从buffer中读取数据时先调用flip()方法,我们也称flip()为”切换为读模式”。
4.当我们读取完数据后,又想往buffer中写数据时,我们需要调用clear()方法,此时buffer数组又如1图中所示。以下为clear()的函数的源码:
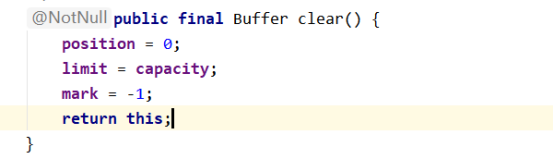
由上图可以看出,clear()方法只是把position指向了初始位置,并把limit指向capacity位置,也就是说执行clear()方法后缓冲区中的数据并没有真正被清空,只是进行覆盖(如果还有数据放入缓冲区的话)。
三、Channel通道
首先我们先来看一张图:
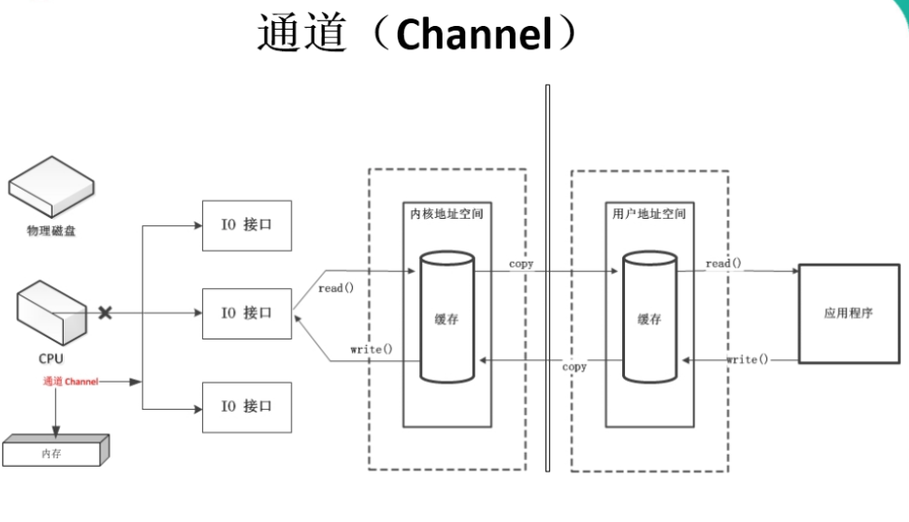
从上图中我们可以看到,channel是专门用来IO操作的,这样就解放了cpu提高了效率。Channel可以用来读写数据,它是全双工的可以同时用来读写操作。我们前面说过,channel需要配合Buffer使用,Channel通道的一端连接的是buffer,一端连接的是数据源实体。
Channel它有以下几个常见的实现:
- FileChannel:文件读写数据通道,用于本地数据传输
- SocketChannel:TCP读写网络数据通道
- ServerSockerChannel:服务端网络读写通道,可以监听TCP连接,对于每一个进来的连接都会创建一个SocketChannel
- DataGramChannel:UDP读写网络连接
3.1 FileChannel
以下代码是通过FileChannel完成本地文件的复制
public class NioChannelDemo {

    public static void main(String[] args) {
        try(FileInputStream fileInputStream = new FileInputStream("D:\\upload\\3.jpg");
            FileOutputStream fileOutputStream = new FileOutputStream("D:\\upload\\4.jpg")) {
            // 获取通道Channel
            FileChannel inputChannel = fileInputStream.getChannel();
            FileChannel outputChannel = fileOutputStream.getChannel();

            // 分配非直接缓冲区
            ByteBuffer buffer = ByteBuffer.allocate(1024);

            while (true) {
                buffer.clear();
                // 把数据写入缓冲区
                if (inputChannel.read(buffer) <= 0) {
                    break;
                }
                // 切换为读模式
                buffer.flip();
                // 读取缓冲区中的数据
                outputChannel.write(buffer);
            }
        } catch (IOException e) {
            e.printStackTrace();
        }

    }

}
注意:FileChannel不能使用非阻塞模式,至于阻塞和非阻塞我们下面会分析。
3.2 SocketChannel
public class NioCustomerBlockDemo {

    public static void main(String[] args) throws IOException {

//        sendWithoutResponse();
        sendWithResponseBlock();

    }

    /**
     * 阻塞的方式
     *
     * @throws IOException
     */
    private static void sendWithResponseBlock() throws IOException {
        // 1、获取通道
        SocketChannel socketChannel = SocketChannel.open(new InetSocketAddress("127.0.0.1", 9010));

        // 2、分配指定大小的缓冲区
        ByteBuffer buffer = ByteBuffer.allocate(1024);

        // 3、从本地读取文件并发送至服务端
        FileChannel inputFileChannel = FileChannel.open(Paths.get("D:\\upload\\3.jpg"), StandardOpenOption.READ);
        while (inputFileChannel.read(buffer) != -1) {
            buffer.flip();
            socketChannel.write(buffer);
            buffer.clear();
        }

        // 告诉服务器,数据已经发送完毕
        socketChannel.shutdownOutput();

        int len = 0;
        while ((len = socketChannel.read(buffer)) != -1) {
            buffer.flip();
            System.out.println(new String(buffer.array(), 0, len));
        }

        inputFileChannel.close();
        socketChannel.close();
    }

    private static void sendWithoutResponse() throws IOException {
        // 1、获取通道
        SocketChannel socketChannel = SocketChannel.open(new InetSocketAddress("127.0.0.1", 9009));

        // 2、分配指定大小的缓冲区
        ByteBuffer buffer = ByteBuffer.allocate(1024);

        // 3、从本地读取文件并发送至服务端
        FileChannel inputFileChannel = FileChannel.open(Paths.get("D:\\upload\\3.jpg"), StandardOpenOption.READ);
        while (inputFileChannel.read(buffer) != -1) {
            buffer.flip();
            socketChannel.write(buffer);
            buffer.clear();
        }

        inputFileChannel.close();
        socketChannel.close();
    }
}
以上代码中 sendWithoutResponse() 和sendWithResponseBlock() 方法写出了客户端通过SockerChannel和FileChannel实现了发送本地文件给服务器的功能,不同的是前者是直接发送不等待服务器的回复,而后者等待服务器的回复。
注意:在阻塞的方法中,我们需要调用socketChannel.shutdownOutput();方法告诉服务端我们数据已经全部传输完成,不然服务端会一直阻塞等待客户端的数据,而实际上客户端数据已经传输完成了。
3.3 ServerSocketChannel
在3.2中我们介绍了客户端,现在我们通过ServerSocketChannel介绍服务端:
public class NioServiceBlockDemo {

    public static void main(String[] args) throws IOException {

//        receiveWithoutResponse();
        receiveWithResponse();
    }

    private static void receiveWithResponse() throws IOException {
        // 1、获取通道
        ServerSocketChannel serverSocketChannel = ServerSocketChannel.open();

        // 2、绑定连接
        serverSocketChannel.bind(new InetSocketAddress(9010));

        // 3、获取客户端连接的通道
        SocketChannel socketChannel = serverSocketChannel.accept();

        // 4、接收客户端的文件并保存在本地
        FileChannel outputFileChannel = FileChannel.open(Paths.get("D:\\upload\\8.jpg"), StandardOpenOption.WRITE, StandardOpenOption.CREATE);
        ByteBuffer buffer = ByteBuffer.allocate(1024);
        while (socketChannel.read(buffer) != -1) {
            buffer.flip();
            outputFileChannel.write(buffer);
            buffer.clear();
        }

        // 发送反馈给客户端
        buffer.put("我收到你的消息了".getBytes());
        buffer.flip();
        socketChannel.write(buffer);

        socketChannel.close();
        outputFileChannel.close();
        serverSocketChannel.close();
    }

    private static void receiveWithoutResponse() throws IOException {
        // 1、获取通道
        ServerSocketChannel serverSocketChannel = ServerSocketChannel.open();

        // 2、绑定连接
        serverSocketChannel.bind(new InetSocketAddress(9009));

        // 3、获取客户端连接的通道
        SocketChannel socketChannel = serverSocketChannel.accept();

        // 4、接收客户端的文件并保存在本地
        FileChannel outputFileChannel = FileChannel.open(Paths.get("D:\\upload\\7.jpg"), StandardOpenOption.WRITE, StandardOpenOption.CREATE);
        ByteBuffer buffer = ByteBuffer.allocate(1024);
        while (socketChannel.read(buffer) != -1) {
            buffer.flip();
            outputFileChannel.write(buffer);
            buffer.clear();
        }

        socketChannel.close();
        outputFileChannel.close();
        serverSocketChannel.close();
    }
}
上述代码中的receiveWithoutResponse()方法对应3.2中客户端的sendWithoutResponse(),receiveWithResponse()方法对应了3.2中的sendWithResponseBlock()方法。
3.2和3.3分别为我们的客户端和服务端,运行以上两个代码即可实现客户端本地文件通过网络传输至服务端并保存至服务端本地的功能,注意需要先启动服务端的代码。
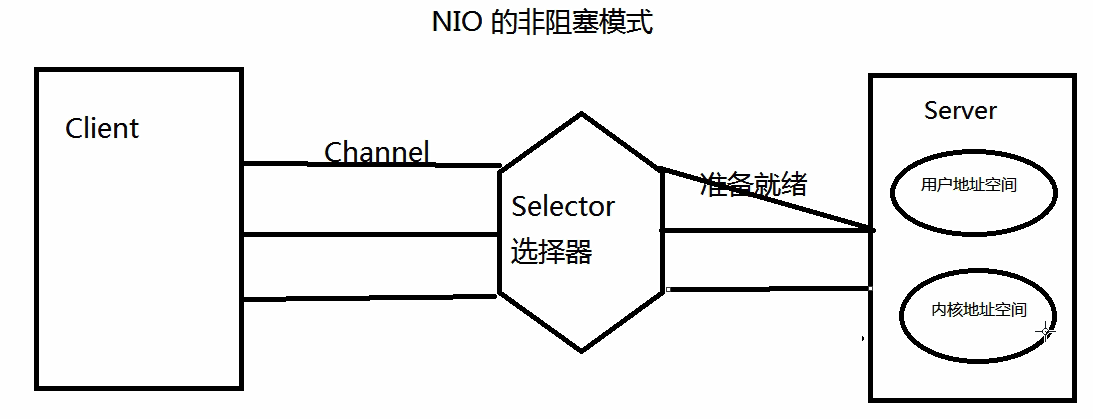
四、Selector多路复用器
在这我们来看一下非阻塞、选择器,以及选择器与通道之间有什么关系。
4.1 NIO非阻塞方式:将用于传输的通道注册到选择器上。
4.2 选择器的作用: 监控这些通道的IO状况,包括读、写、连接、接收数据。
4.3 选择器和通道的关系:通道注册在选择器上,选择器监听各个通道
当某一个通道上,某一个事件准备就绪时,那么选择器才会将这个通道分配到服务器端一个或多个线程上,再继续运行。比如说当客户端发送一些数据给服务器端,只有当客户端的所有数据都准备就绪时,选择器才会将这个注册的通道分配到服务器端的一个或者多个线程上。
接下来我们来看一下非阻塞方式客户端与服务端进行数据传输:
客户端代码:
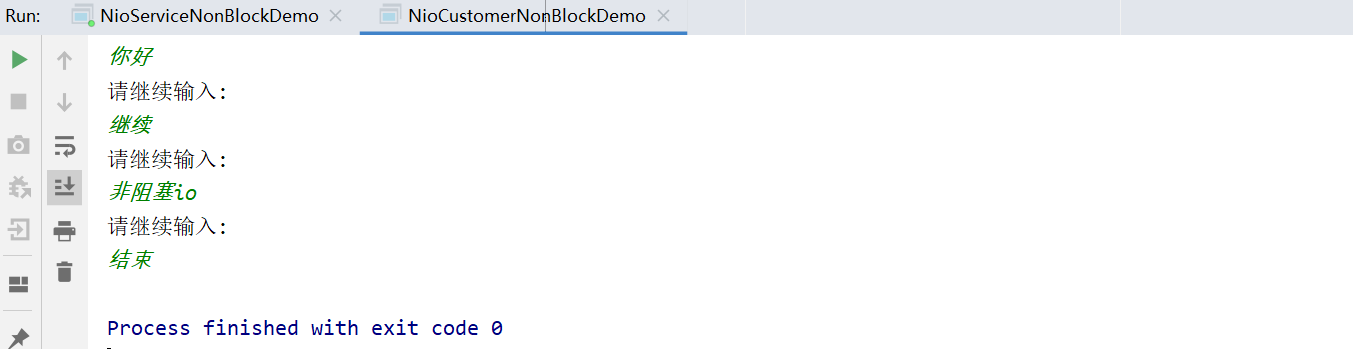
public class NioCustomerNonBlockDemo {

    public static void main(String[] args) throws IOException {
        sendMessageWithResponse1();
    }

    private static void sendMessageWithResponse1() throws IOException {
        // 1、获取通道
        SocketChannel socketChannel = SocketChannel.open(new InetSocketAddress("127.0.0.1", 9012));

        // 把通道设置成非阻塞模式
        socketChannel.configureBlocking(false);

        // 3、创建缓冲区
        ByteBuffer buffer = ByteBuffer.allocate(1024);
        System.out.println("请输入:");
        // 4、发送数据到服务器
        Scanner scanner = new Scanner(System.in);
        while (scanner.hasNext()) {
            String input = scanner.next();
            if (input.equals("结束")) {
                break;
            }
            buffer.put((new Date().toString() + "\n" + input).getBytes());
            buffer.flip();
            socketChannel.write(buffer);
            buffer.clear();
            System.out.println("请继续输入:");
        }
        scanner.close();
//        buffer.put(new Date().toString().getBytes());
//        buffer.flip();
//        socketChannel.write(buffer);
//        buffer.clear();

        // 关闭通道
        socketChannel.close();
    }
}
服务端代码:
public class NioServiceNonBlockDemo {

    public static void main(String[] args) throws IOException {
        receiveMessageWithResponse1();
    }

    private static void receiveMessageWithResponse1() throws IOException {

        // 1、获取通道
        ServerSocketChannel serverSocketChannel = ServerSocketChannel.open();

        // 2、切换非阻塞模式
        serverSocketChannel.configureBlocking(false);

        // 3、绑定客户端
        serverSocketChannel.bind(new InetSocketAddress(9012));

        // 4、获取选择器
        Selector selector = Selector.open();

        // 5、将通道注册到选择器上,选择器的第二个参数叫做选择键,用于告诉选择器需要监听这个通道的什么状态或着说事件
        // 这里服务端首先要监听客户端的接收状态
        serverSocketChannel.register(selector, SelectionKey.OP_ACCEPT);

        // 6、轮询获取选择器上已经“准备就绪”的事件
        // select()方法的作用是监控所有注册的Channel,当它们中间有需要处理的 IO 操作时,该方法返回,
        // 并将对应的 SelectionKey 加入被选择的SelectionKey 集合中,该方法返回这些 Channel 的数量。
        while (selector.select() > 0) {
            // 7、获取当前选择器中所有注册的“选择键(这里是已就绪事件)”
            Iterator<SelectionKey> selectionKeyIterator = selector.selectedKeys().iterator();
            while (selectionKeyIterator.hasNext()) {
                // 8、获取准备就绪的事件
                SelectionKey selectionKey = selectionKeyIterator.next();
                // 9、判断是什么事件准备就绪
                if (selectionKey.isAcceptable()) {
                    // 10、若是接收就绪,获取客户端连接
                    SocketChannel socketChannel = serverSocketChannel.accept();
                    // 11、客户端连接也需切换成非阻塞模式
                    socketChannel.configureBlocking(false);
                    // 12、将通道注册到选择器上,监听客户端socketChannel读就绪事件
                    socketChannel.register(selector, SelectionKey.OP_READ);
                } else if (selectionKey.isReadable()) {
                    // 13、获取读就绪状态的通道
                    SocketChannel socketChannel = (SocketChannel) selectionKey.channel();
                    // 14、读取数据
                    ByteBuffer buffer = ByteBuffer.allocate(1024);
                    int len = 0;
                    while ((len = socketChannel.read(buffer)) > 0) {
                        buffer.flip();
                        System.out.println(new String(buffer.array(), 0, len));
                        buffer.clear();
                    }
                }

                // 15、取消选择键selectionKey
                selectionKeyIterator.remove();
            }
        }
    }
}
先启动服务端代码,再启动客户端可以看到如下结果:
点击左侧服务端控制台看到结果:
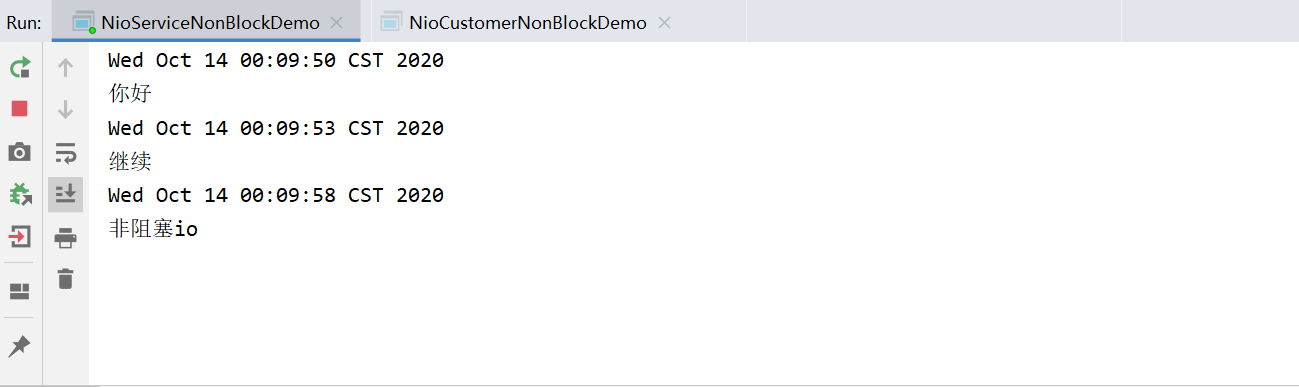
可以看到客户端发送的消息服务端全部接收到了,这也就是我们NIO的非阻塞方式。
最后,如果本文中有出现什么不准确的地方,希望大家可以指出来一起讨论、学习、进步。

 浙公网安备 33010602011771号