
微信公众号的整合
整合微信公众号实现第三方平台调用
因为个体公众号的权限很少,所以本文使用微信测试号来做示例
1、申请一个测试号:申请地址
2、配置服务器:用户从公众号和你自己的服务器进行交互的时候中间要经过微信的服务器,也就是 用户消息->微信服务器->自己服务器 这么一个过程,那么要让你写的代码可以和微信服务器打交道首先要先建立起你自己服务器和微信服务器之间的联系。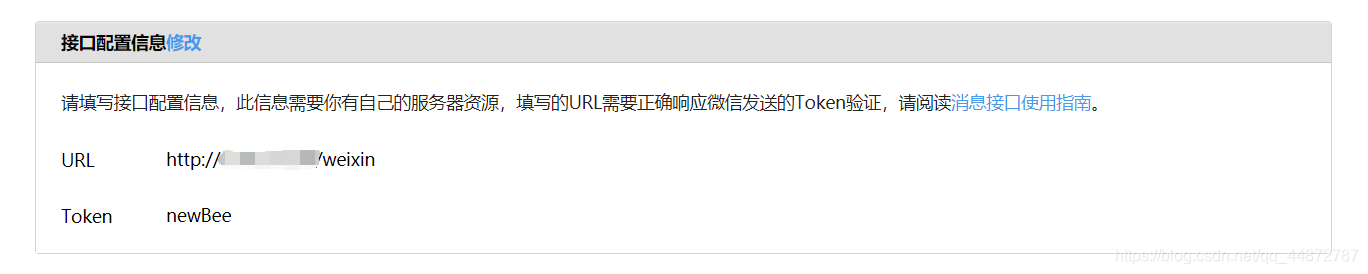
在你的测试号页面中的这个配置就是用来将微信服务器和你自己的服务器进行关联的,微信服务器会将请求全都发送到你填写的URL这个地址,url中得ip一定要是公网ip哦,再者我们都是在自己的电脑上码代码那除非你的电脑ip是公网的,不然的话你得先将自己电脑的ip穿透到公网,这样才能配置成功;当然,如果觉得穿透太麻烦的话你也可以先将程序写一部分然后部署到你的服务器试试效果。Token是用来做验证的,算是加一层安全保障。
用来接收微信服务器接口配置请求的代码:
@GetMapping(value = "/weixin",produces = "text/plain;charset=utf-8")
    public String test(HttpServletRequest request) {

        this.signature = request.getParameter("signature");
        this.timestamp = request.getParameter("timestamp");
        this.nonce  = request.getParameter("nonce");
        this.echostr = request.getParameter("echostr");

        if(StringUtils.isAnyBlank(signature,timestamp,nonce,echostr)){
            throw new IllegalArgumentException("请求参数非法,请核实!");
        }

        if(wxService.checkSignature(signature, timestamp, nonce)){
            System.out.println("验证签名成功");
            //微信服务器会接收这个echostr接收到则验证成功,如果不返回会认为验证失败
            return echostr;
        }else{
            System.out.println("验证签名失败");
            return "非法请求";
        }

    }
wxService:
@Service
public class WxService {

    @Autowired
    private WeiXinConfig weiXinConfig;

    /**检查signature*/
    public boolean checkSignature(String signature,String timestamp,String nonce){
        String token= weiXinConfig.getToken();
        String[] str = new String[]{token,timestamp,nonce};
        //排序
        Arrays.sort(str);
        //拼接字符串
        StringBuffer buffer = new StringBuffer();
        for(int i =0 ;i<str.length;i++){
            buffer.append(str[i]);
        }
        //进行sha1加密
        String temp = Sha1Util.encode(buffer.toString());
        //与微信提供的signature进行匹对
        return signature.equals(temp);
    }
}
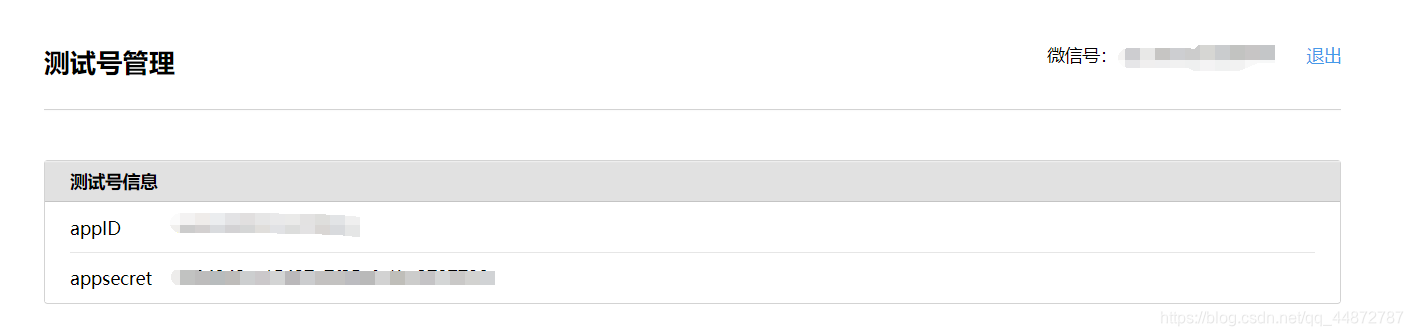
WeiXinConfig :自定义配置类
@Component
@ConfigurationProperties(prefix = "wx.config")
public class WeiXinConfig {

    /**开发者微信号*/
    private String wxNumber;

    /**开发者ID*/
    private String appId;

    /**开发者密码*/
    private String appSecret;

    /**用来做验证的token*/
    private String token;

    /**消息加密密钥*/
    private String encodingAesKey;


    public String getWxNumber() {
        return wxNumber;
    }

    public void setWxNumber(String wxNumber) {
        this.wxNumber = wxNumber;
    }

    public String getAppId() {
        return appId;
    }

    public void setAppId(String appId) {
        this.appId = appId;
    }

    public String getAppSecret() {
        return appSecret;
    }

    public void setAppSecret(String appSecret) {
        this.appSecret = appSecret;
    }

    public String getToken() {
        return token;
    }

    public void setToken(String token) {
        this.token = token;
    }

    public String getEncodingAesKey() {
        return encodingAesKey;
    }

    public void setEncodingAesKey(String encodingAesKey) {
        this.encodingAesKey = encodingAesKey;
    }
}
application.xml中的配置:

对应公众号中的配置信息:
代码弄好之后运行到服务器上 ,然后再到接口配置中进行配置就可以配置成功了,也就是将你的服务器和微信服务器进行关联了。

 浙公网安备 33010602011771号