web3D使用three.js+CSG.js做的墙体添加窗户和门功能
因为之前一直做的是后台,最近接触了下3D,所以用前端three.js做一些项目的工作,代码比较简陋,主要是个人对three.js的一些使用
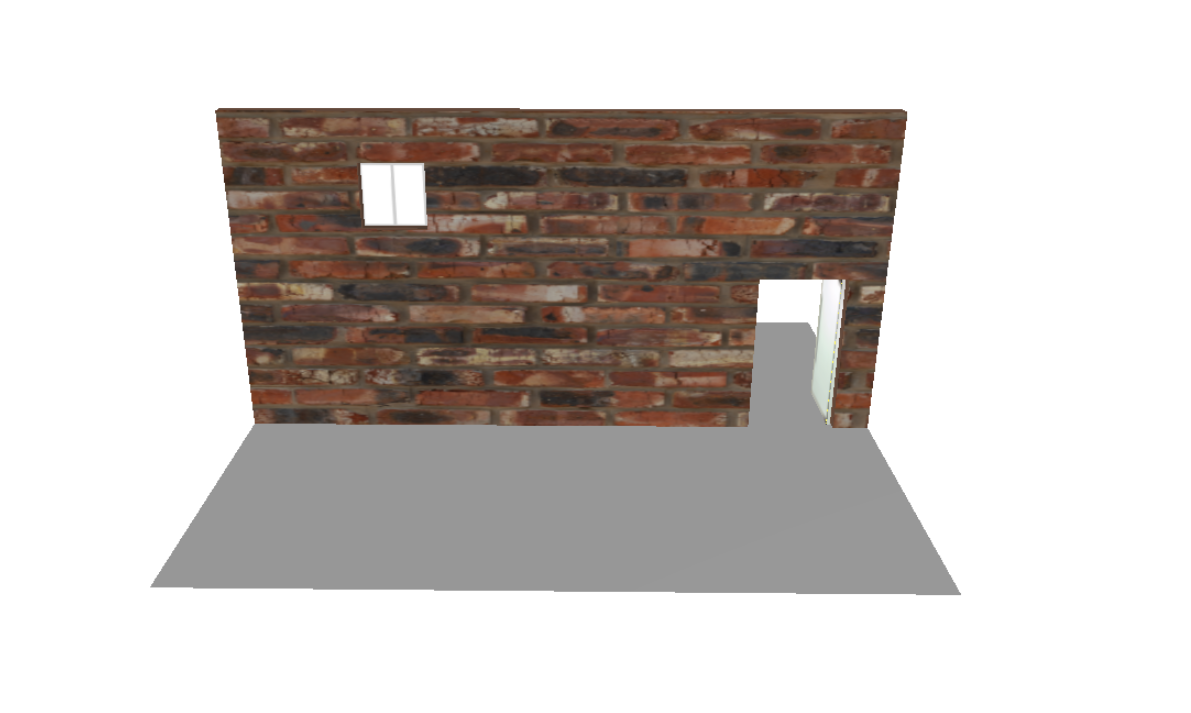
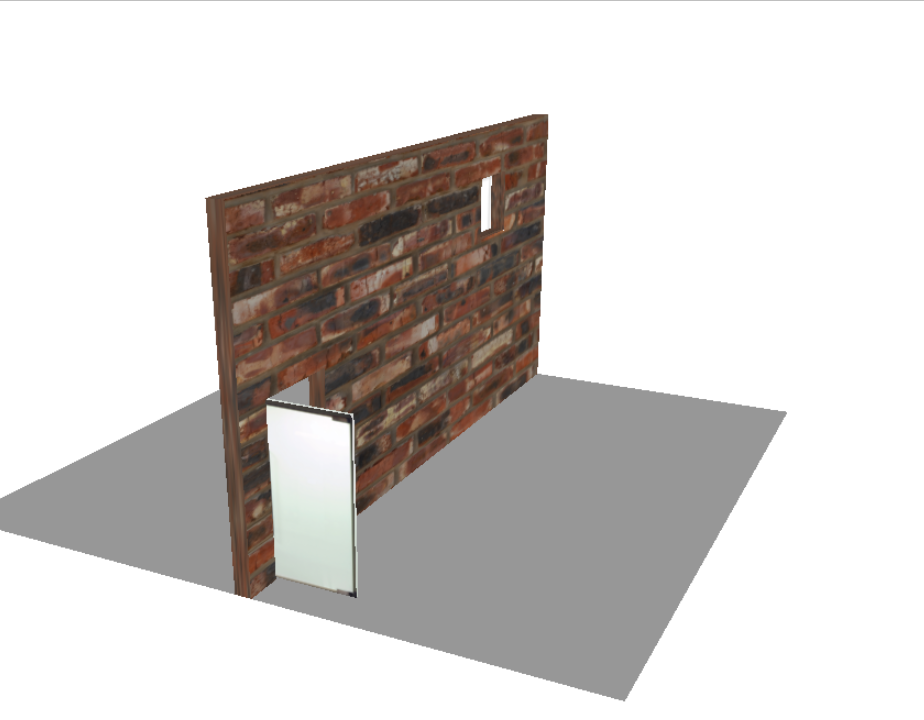
先展示3D效果模型

本文没有用ThreeBSP.js进行处理,因为我看BSP有版本要求,就没使用,我用的csg.js。
一.使用过程中遇到的问题汇总
1.使用csg对模型进行组合,合并后的材质处理,组合的相对位置处理。
2.添加门和门轴,让门围绕门轴旋转问题。
3.透明窗户的处理
二
1.csg的功能描述 见链接 Constructive Solid Geometry - Three.js Tutorials (sbcode.net)
描述
Union
返回由 A 和 B 组成的新 CSG 实体
A.union(B)

+-------+            +-------+
|       |            |       |
|   A   |            |       |
|    +--+----+   =   |       +----+
+----+--+    |       +----+       |
     |   B   |            |       |
     |       |            |       |
     +-------+            +-------+
Subtract
返回一个新的 CSG 实体,其中 B 从 A 中减去
A.subtract(B)

+-------+            +-------+
|       |            |       |
|   A   |            |       |
|    +--+----+   =   |    +--+
+----+--+    |       +----+
     |   B   |
     |       |
     +-------+
Intersect
返回 A 和 B 重叠的新 CSG 实体
A.intersect(B)

+-------+
|       |
|   A   |
|    +--+----+   =   +--+
+----+--+    |       +--+
     |   B   |
     |       |
     +-------+
csg的三个基本功能如上所示,我主要说一下开发过程中遇到的问题
第一个问题就是组合中各个模型的坐标问题
一开始我发现组合后相对位置终是居中的,就是没法移动一个模型相对于另外一个模型的位置。导致门和窗户一直在墙体正中间。
用mesh1.position.set设置坐标也不好使。
解决办法:
这样就设置的模型相对墙的位置了。
第二个问题就是设置组合的材质,我目前是把开孔的墙作为一个的模型,门和门轴是一个模型,窗户是一个模型。
如果把门和窗户都组合到墙模型的话不容易改变材质,不方便代码的改动,如果你要做多面墙的话也不方便。可以把多面墙组合到一起。
下图的代码就是给组合完成的对象添加一个纹理,然后设置组合对象的坐标
2.墙体填充门和门轴,让门围绕着门轴旋转 链接ThreeJs入门41-物体旋转的方法和技巧2 - 掘金 (juejin.cn)
旋转默认是按照模型中心旋转的,如果仅对门模型进行rotateY旋转的话,就会出现一半门在里面。一半在外面的情况。我们可以把门和门轴组合起来,然后在让门和门轴旋转就会实现门根据门轴旋转了
材质常见属性
| 材质属性 | 简介 |
|---|---|
| color | 材质颜色,比如蓝色0x0000ff |
| wireframe | 将几何图形渲染为线框。 默认值为false |
| opacity | 透明度设置,0表示完全透明,1表示完全不透明 |
| transparent | 是否开启透明,默认false |
three.module.js,OrbitControls.js和CSG.js官网都有对应的文件)
<!DOCTYPE html>
<html>

<head>
    <meta charset="utf-8">
    <meta name="viewport" content="width=device-width, initial-scale=1.0, user-scalable=yes">
    <title>Three.js - Fundamentals with light</title>
    <style>
        html,
        body {
            height: 100%;
            margin: 0;
            font-family: sans-serif;
        }

        #c {
            width: 100%;
            height: 100%;
        }

        #container {
            position: relative;
            /* makes this the origin of its children */
            width: 100%;
            height: 100%;
            overflow: hidden;
        }
    </style>
</head>

<body>

    <body>
        <div id="container">
            <canvas id="c"></canvas>
        </div>
    </body>

    <script type="importmap">
      {
        "imports": {
          "three": "../build/three.module.js",
          "three/addons/": "../build/jsm/"
        }
      }
    </script>
    <script type="module">
        import * as THREE from 'three'
        import { OrbitControls } from 'three/addons/controls/OrbitControls.js'
        import { CSG } from '../three-csg-ts/lib/esm/CSG.js'

        function main() {
            const canvas = document.querySelector('#c');
            const renderer = new THREE.WebGLRenderer({ canvas });
            const loader = new THREE.TextureLoader();
            const fov = 45;
            const aspect = 2;  // the canvas default
            const near = 0.1;
            const far = 100;
            const camera = new THREE.PerspectiveCamera(fov, aspect, near, far);
            camera.position.set(0, 10, 20);
            const controls = new OrbitControls(camera, canvas);
            const scene = new THREE.Scene();
            scene.background = new THREE.Color('white');

            //地板
            {
                const planeSize = 40;
                const planeGeo = new THREE.PlaneGeometry(planeSize, planeSize);
                const planeMat = new THREE.MeshPhongMaterial({
                    side: THREE.DoubleSide,
                    color: 0xA9A9A9
                });
                const mesh = new THREE.Mesh(planeGeo, planeMat);
                mesh.rotation.x = Math.PI * -.5;
                scene.add(mesh);
            }
            //灯光
            {
                const color = 0xFFFFFF;
                const intensity = 1;
                const light = new THREE.DirectionalLight(color, intensity);
                light.position.set(0, 10, 0);
                light.target.position.set(-5, 0, 0);
                scene.add(light);
                scene.add(light.target);
            }

            {
                //门

                const cubeGeo = new THREE.BoxGeometry(5.5, 9.9, 0.2);
                const cubeMat = new THREE.MeshBasicMaterial(
                    { map: loader.load('./images/door_right.png') });
                const mesh = new THREE.Mesh(cubeGeo, cubeMat);
                mesh.position.set(-2.5, 0, 0);
               //m门轴
                const lineGeo = new THREE.BoxGeometry(0.2, 9.9, 0.2);
                const lineMat = new THREE.MeshBasicMaterial(
                    { map: loader.load('./images/line.png') });

                const linemesh = new THREE.Mesh(lineGeo, lineMat);
                linemesh.position.set(17.5, 5, 0);
                linemesh.add(mesh);
                //旋转角度
                //linemesh.rotateY(-Math.PI / 2)
                scene.add(linemesh);

                //创建透明玻璃
                const windowsGeo = new THREE.BoxGeometry(4, 4, 0.4);
                const windowsMat = new THREE.MeshStandardMaterial({
                    map: loader.load('./images/window.png'),
                    color: 0xffffff,
                    opacity: 0.2,
                    transparent: true
                });
                const windowsmesh = new THREE.Mesh(windowsGeo, windowsMat);
                windowsmesh.position.set(-10, 15, 0);
                scene.add(windowsmesh);

                //门洞
                const cubeGeo1 = new THREE.BoxGeometry(5.5, 10, 1);
                const cubeMat1 = new THREE.MeshBasicMaterial({ color: '#8AC' });
                const mesh1 = new THREE.Mesh(cubeGeo1, cubeMat1);

                //墙
                const cubeGeo2 = new THREE.BoxGeometry(40, 20, 1);
                const cubeMat2 = new THREE.MeshBasicMaterial({ color: 0xFFFFFF });
                const mesh2 = new THREE.Mesh(cubeGeo2, cubeMat2);

                //窗户
                const cubeGeo3 = new THREE.BoxGeometry(4, 4, 1);
                const cubeMat3 = new THREE.MeshBasicMaterial({
                });

                const mesh3 = new THREE.Mesh(cubeGeo3, cubeMat3);

                //不写默认就是居中,坐标是相对于组合时的坐标
                mesh1.position.add(new THREE.Vector3(15, -5, 0))
                mesh3.position.add(new THREE.Vector3(-10, 5, 0))


                mesh1.updateMatrix()
                mesh2.updateMatrix()
                mesh3.updateMatrix()

                const g1 = CSG.fromMesh(mesh1)
                const g2 = CSG.fromMesh(mesh2)
                const g3 = CSG.fromMesh(mesh3)

                //减去
                const cubeSphereIntersectCSG1 = g2.subtract(g1)
                const cubeSphereIntersectCSG = cubeSphereIntersectCSG1.subtract(g3)
                //联盟 组合到一起不好改材质
                //const cubeSphereIntersectCSG = cubeSphereIntersectCSG2.union(g)
                //相交
                //const cubeSphereIntersectCSG = cubeSphereIntersectCSG2.intersect(g3)

                //给墙配置一个纹理
                loader.load('./images/diffuse_2k.jpg', (texture) => {
                    const material = new THREE.MeshBasicMaterial({
                        map: texture,
                    });
                    const cubeSphereIntersectMesh = CSG.toMesh(cubeSphereIntersectCSG, new THREE.Matrix4())
                    cubeSphereIntersectMesh.material = new THREE.MeshBasicMaterial({ map: texture })


                    cubeSphereIntersectMesh.position.set(0, 10, 0)
                    scene.add(cubeSphereIntersectMesh)
                });


            }

            function resizeRendererToDisplaySize(renderer) {
                const canvas = renderer.domElement;
                const width = canvas.clientWidth;
                const height = canvas.clientHeight;
                const needResize = canvas.width !== width || canvas.height !== height;
                if (needResize) {
                    renderer.setSize(width, height, false);
                }
                return needResize;
            }

            function render() {

                if (resizeRendererToDisplaySize(renderer)) {
                    const canvas = renderer.domElement;
                    camera.aspect = canvas.clientWidth / canvas.clientHeight;
                    camera.updateProjectionMatrix();
                }
                renderer.render(scene, camera);

                requestAnimationFrame(render);
            }

            requestAnimationFrame(render);
        }

        main();
    </script>

</body>

</html>

 浙公网安备 33010602011771号