
在ASP.NET Core Identity和Entity Framework Core中使用自己的数据库架构和类(干货)
我将引导您配置ASP.NET Core Identity,以使用您自己的数据库架构,而不是提供的默认表和列。这样做只会更改架构,因此它仍然允许您依赖密码哈希,cookie身份验证,防伪,角色,声明以及身份附带的所有其他优点。这样做的主要原因之一是,您可能只需要身份提供的功能的一小部分,或者您可能已经拥有一个无法轻易更改的现有数据库模式。无论出于何种原因,默认架构都提供了一个丰富的模型,但是您不需要全部使用它,您可以配置标识以使用自己的身份。
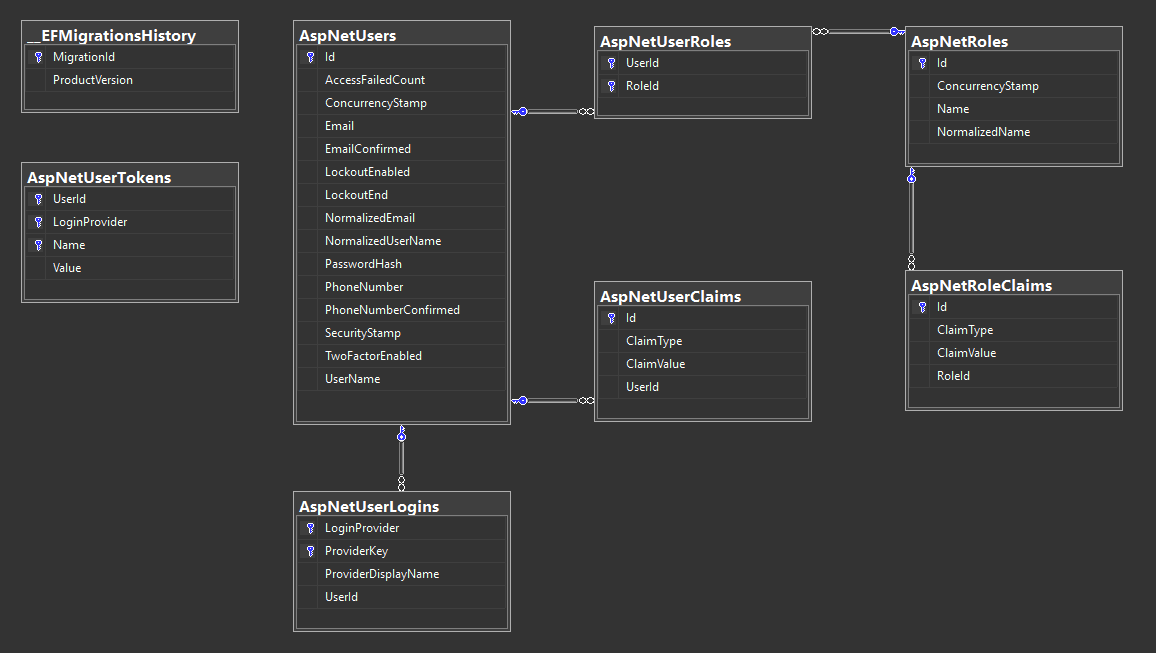
让我们看一下提供的默认架构。
我们将进行一些更简单的拍摄,例如仅要求我们的应用程序能够登录和注销用户所需的位。这是我们将要开始的地方,但是请注意,一旦学会了可能需要添加的其余功能,仅是添加了额外的部分(例如用户声明)。很简单

注意:即使我们正在实现自己的架构,您也必须为角色实现一些基本的脚手架。这并不意味着您必须使用它们,事实上,我们可以使大多数基于角色的功能不被实现,甚至不考虑使用模式,但是我将它们包含在此示例中,因为它展示了一些内容。只是基本的用户功能。
为了实现使用我们自己的模式实现自定义存储提供程序的目标,我们将执行这些任务。
- 创建我们的代码,第一类
a、DataContext : DbContext
b、User
c、UserRole
d、Role - 创建并实施
UserStore - 创建并实施
RoleStore - 插入我们的类型作为替换
Startup.ConfigureServices - 测试新的实现
创建我们的代码优先模型
数据上下文
|
1个
2个
3
4
5
6
7
8
9
10
11
12
13
14
15
16
17
18岁
19
20
21岁
22
23
24
25
26
27
28岁
29
|
namespace App.Data{ using Microsoft.EntityFrameworkCore; public class DataContext : DbContext { public DataContext(DbContextOptions<DataContext> options) : base(options) { } public DbSet<Role> Roles { get; set; } public DbSet<User> Users { get; set; } public DbSet<UserRole> UserRoles { get; set; } }} |
用户
|
1个
2个
3
4
5
6
7
8
9
10
11
12
13
14
15
16
17
18岁
19
20
21岁
22
23
24
25
26
27
28岁
29
30
31
32
33
34
|
namespace App.Data{ using System.Collections; using System.Collections.Generic; using System.ComponentModel.DataAnnotations; using System.ComponentModel.DataAnnotations.Schema; [Table("User")] public class User { [Key, Required] public int Id { get; set; } [Required, MaxLength(128)] public string UserName { get; set; } [Required, MaxLength(1024)] public string PasswordHash { get; set; } [Required, MaxLength(128)] public string Email { get; set; } [MaxLength(32)] public string FirstName { get; set; } [MaxLength(1)] public string MiddleInitial { get; set; } [MaxLength(32)] public string LastName { get; set; } public virtual ICollection<UserRole> UserRoles { get; set; } }} |
用户角色
|
1个
2个
3
4
5
6
7
8
9
10
11
12
13
14
15
16
17
18岁
19
20
21岁
|
namespace App.Data{ using System.ComponentModel.DataAnnotations; using System.ComponentModel.DataAnnotations.Schema; [Table("UserRole")] public class UserRole { [Key, Required] public int Id { get; set; } [Required, ForeignKey(nameof(User))] public int UserId { get; set; } [Required, ForeignKey(nameof(Role))] public int RoleId { get; set; } public virtual Role Role { get; set; } public virtual User User { get; set; } }} |
角色
|
1个
2个
3
4
5
6
7
8
9
10
11
12
13
14
15
16
17
18岁
19
|
namespace App.Data{ using System.Collections; using System.Collections.Generic; using System.ComponentModel.DataAnnotations; using System.ComponentModel.DataAnnotations.Schema; [Table("Role")] public class Role { [Key, Required] public int Id { get; set; } [Required] public string Name { get; set; } public virtual ICollection<UserRole> UserRoles { get; set; } }} |
重要说明:我想指出,在许多ASP.NET Core示例和文档文章中,它们使用ApplicationDbContext和ApplicationUser类,并将它们存储在ASP.NET Core项目程序集本身中。这不是必需的。看来他们这样做是为了将身份识别所需的模型的一部分封装到应用程序层中,但是您在此处看到的所有内容都可以放入一个单独的App.Data数据层项目中。如果您使用的是分层体系结构,那么这很好,这也意味着您可以使用现有的Entity Framework类和DbContext(如果已有的话)。
创建并实现UserStore
这就是我们将插入ASP.NET Core Identity系统以使用我们自己的功能的方式。该UserStore班所使用的身份进行操作,如创建或查找用户。如果您不使用实体框架,则可以在此处为用户实现适当的数据访问逻辑。在这里,您只需要实现所需的内容,但是请注意,必须实现某些方法,至少要使用某种默认的实现方法,所有这些方法才能正常工作。这是我们的准系统实施。
|
1个
2个
3
4
5
6
7
8
9
10
11
12
13
14
15
16
17
18岁
19
20
21岁
22
23
24
25
26
27
28岁
29
30
31
32
33
34
35
36
37
38
39
40
41
42
43
44
45
46
47
48
49
50
51
52
53
54
55
56
57
58
59
60
61
62
63
64
65岁
66
67
68
69
70
71
72
73
74
75
76
77
78
79
80
81
82
83
84
85
86
87
88
89
90
91
92
93
94
95
96
97
98
99
100
101
102
103
104
105
106
107
108
109
110
111
112
113
114
115
116
117
|
namespace App.Identity{ using System; using System.Linq; using System.Threading; using System.Threading.Tasks; using Microsoft.AspNetCore.Identity; using Microsoft.EntityFrameworkCore.Extensions.Internal; public class UserStore : IUserStore<User>, IUserPasswordStore<User> { private readonly DataContext db; public UserStore(DataContext db) { this.db = db; } public void Dispose() { Dispose(true); GC.SuppressFinalize(this); } protected virtual void Dispose(bool disposing) { if (disposing) { db?.Dispose(); } } public Task<string> GetUserIdAsync(User user, CancellationToken cancellationToken) { return Task.FromResult(user.Id.ToString()); } public Task<string> GetUserNameAsync(User user, CancellationToken cancellationToken) { return Task.FromResult(user.UserName); } public Task SetUserNameAsync(User user, string userName, CancellationToken cancellationToken) { throw new NotImplementedException(nameof(SetUserNameAsync)); } public Task<string> GetNormalizedUserNameAsync(User user, CancellationToken cancellationToken) { throw new NotImplementedException(nameof(GetNormalizedUserNameAsync)); } public Task SetNormalizedUserNameAsync(User user, string normalizedName, CancellationToken cancellationToken) { return Task.FromResult((object) null); } public async Task<IdentityResult> CreateAsync(User user, CancellationToken cancellationToken) { db.Add(user); await db.SaveChangesAsync(cancellationToken); return await Task.FromResult(IdentityResult.Success); } public Task<IdentityResult> UpdateAsync(User user, CancellationToken cancellationToken) { throw new NotImplementedException(nameof(UpdateAsync)); } public async Task<IdentityResult> DeleteAsync(User user, CancellationToken cancellationToken) { db.Remove(user); int i = await db.SaveChangesAsync(cancellationToken); return await Task.FromResult(i == 1 ? IdentityResult.Success : IdentityResult.Failed()); } public async Task<User> FindByIdAsync(string userId, CancellationToken cancellationToken) { if (int.TryParse(userId, out int id)) { return await db.Users.FindAsync(id); } else { return await Task.FromResult((User) null); } } public async Task<User> FindByNameAsync(string normalizedUserName, CancellationToken cancellationToken) { return await db.Users .AsAsyncEnumerable() .SingleOrDefault(p => p.UserName.Equals(normalizedUserName, StringComparison.OrdinalIgnoreCase), cancellationToken); } public Task SetPasswordHashAsync(User user, string passwordHash, CancellationToken cancellationToken) { user.PasswordHash = passwordHash; return Task.FromResult((object) null); } public Task<string> GetPasswordHashAsync(User user, CancellationToken cancellationToken) { return Task.FromResult(user.PasswordHash); } public Task<bool> HasPasswordAsync(User user, CancellationToken cancellationToken) { return Task.FromResult(!string.IsNullOrWhiteSpace(user.PasswordHash)); } }} |
DataContext每当UserStoreASP.NET Core要求a时,它将自动通过依赖项注入创建和传递,其余的是使用EF的基本数据访问,以及每种方法的基本默认实现。最终,由您决定需要实现的内容,但是请注意,我们已经实现了IUserStore<User>和IUserPasswordStore<User>。前者是可读性的冗余声明,但后者是您至少必须实现的声明。如果要实现其他功能,ASP.NET Core提供了许多可选接口,您可以选择实现。
- IUserRoleStore
- IUserClaimStore
- IUserPasswordStore
- IUserSecurityStampStore
- IUserEmailStore
- iPhone号码存储
- IQueryableUserStore
- IUserLoginStore
- IUserTwoFactorStore
- IUserLockoutStore
创建和实现RoleStore
我们在这里为基本登录/注销功能所RoleStore要做的只是定义一个,但是我们不需要实现任何东西。如果您想使用角色,并且与的实现一样UserStore,只需将数据访问逻辑插入适当的方法即可。
|
1个
2个
3
4
5
6
7
8
9
10
11
12
13
14
15
16
17
18岁
19
20
21岁
22
23
24
25
26
27
28岁
29
30
31
32
33
34
35
36
37
38
39
40
41
42
43
44
45
46
47
48
49
50
51
52
53
54
55
56
57
58
59
60
61
62
63
64
|
namespace App.Identity{ using System.Threading; using System.Threading.Tasks; using Data; using Microsoft.AspNetCore.Identity; public class RoleStore : IRoleStore<UserRole> { public void Dispose() { } public Task<IdentityResult> CreateAsync(UserRole role, CancellationToken cancellationToken) { throw new System.NotImplementedException(); } public Task<IdentityResult> UpdateAsync(UserRole role, CancellationToken cancellationToken) { throw new System.NotImplementedException(); } public Task<IdentityResult> DeleteAsync(UserRole role, CancellationToken cancellationToken) { throw new System.NotImplementedException(); } public Task<string> GetRoleIdAsync(UserRole role, CancellationToken cancellationToken) { throw new System.NotImplementedException(); } public Task<string> GetRoleNameAsync(UserRole role, CancellationToken cancellationToken) { throw new System.NotImplementedException(); } public Task SetRoleNameAsync(UserRole role, string roleName, CancellationToken cancellationToken) { throw new System.NotImplementedException(); } public Task<string> GetNormalizedRoleNameAsync(UserRole role, CancellationToken cancellationToken) { throw new System.NotImplementedException(); } public Task SetNormalizedRoleNameAsync(UserRole role, string normalizedName, CancellationToken cancellationToken) { throw new System.NotImplementedException(); } public Task<UserRole> FindByIdAsync(string roleId, CancellationToken cancellationToken) { throw new System.NotImplementedException(); } public Task<UserRole> FindByNameAsync(string normalizedRoleName, CancellationToken cancellationToken) { throw new System.NotImplementedException(); } }} |
将我们的功能插入Startup.ConfigureServices
在这里,我们需要告诉ASP.NET Core Identity如何使用我们的自定义存储提供程序实现。我们只需要整理几件事。
将我们的上下文注册为服务
|
1个
|
services.AddDbContext<DataContext>(options => options.UseSqlServer(Configuration.GetConnectionString("Default"))); |
告诉身份以对用户和角色使用我们的自定义类
|
1个
2个
|
services.AddIdentity<User, UserRole>() .AddDefaultTokenProviders(); |
告诉身份以为用户使用我们的自定义存储提供程序
|
1个
|
services.AddTransient<IUserStore<User>, UserStore>(); |
告诉身份使用我们的自定义存储提供程序来担任角色
|
1个
|
services.AddTransient<IRoleStore<UserRole>, RoleStore>(); |
完成后,您应该具有与以下内容类似的内容。
|
1个
2个
3
4
5
6
7
8
9
10
11
12
13
14
15
|
public void ConfigureServices(IServiceCollection services){ services.AddMvc(); services.AddDbContext<DataContext>(options => options.UseSqlServer(Configuration.GetConnectionString("Default"))); services.AddIdentity<User, UserRole>() .AddDefaultTokenProviders(); services.AddTransient<IUserStore<User>, UserStore>(); services.AddTransient<IRoleStore<UserRole>, RoleStore>(); services.ConfigureApplicationCookie(options => { options.Cookie.HttpOnly = true; options.LoginPath = "/Login"; options.LogoutPath = "/Logout"; });} |
测试我们的实施
现在,我们可以执行最基本的任务之一,以确保存储提供程序正常工作。我们将通过在开发应用程序时(如果尚不存在)创建一个用户来实现此目的。这是一个示例,但重要的是要确保通过调用启用了身份验证app.UseAuthentication。其他一些方法调用可能不适用于您的应用程序,例如MapSpaFallbackRoute。
注意:在运行测试之前,请确保数据库存在。就我而言,我正在使用EF迁移和NuGet来运行Add-Migration并Update-Database生成我的数据库及其架构,但是您可能会选择做一些不同的事情,例如使用数据库项目。
|
1个
2个
3
4
5
6
7
8
9
10
11
12
13
14
15
16
17
18岁
19
20
21岁
22
23
24
25
|
public void Configure(IApplicationBuilder app, IHostingEnvironment env, DataContext db, SignInManager<User> s){ if (env.IsDevelopment()) { app.UseDeveloperExceptionPage(); app.UseBrowserLink(); if (s.UserManager.FindByNameAsync("dev").Result == null) { var result = s.UserManager.CreateAsync(new User { UserName = "dev", Email = "dev@app.com" }, "Aut94L#G-a").Result; } } app.UseAuthentication(); app.UseStaticFiles(); app.UseMvc(routes => { routes.MapRoute("default", "{controller=Home}/{action=Index}/{id?}"); routes.MapSpaFallbackRoute("spa-fallback", new {controller = "Home", action = "Index"}); });} |
运行您的应用程序,然后查看您的用户表,并验证该行是否存在。
最后的想法
在我的项目,我UserStore和RoleStore一个在Identity我的ASP.NET核心项目(例如根文件夹App.Identity.UserStore),而DataContext,User,UserRole,和Role是我的是在一个单独的EF POCO类App.Data类库项目(作为产品的我的数据层)。这真的不要紧,你如何组织这些类来实现自定义的存储供应商,但我想强调给开发商不要太挂了ApplicationDbContext和ApplicationUser大多数文档和示例文章都是介绍说。
这只是您可以使用身份进行的一小部分尝试,但是对我来说,我只需要一小部分功能,并且我希望能够完全控制数据库架构。实际上,DbContext您可以通过使用中的Fluent配置来重新映射许多默认的ASP.NET Core Identity列,但是我发现您也可以通过这种方式实现它,这并不需要太多工作。

 浙公网安备 33010602011771号