一、下载 automagic 源码到本地
https://github.com/yangyang1009/automagic
python3.6 Django 3.0.2框架
二、这里我使用的是Centos7 虚拟环境
安装autoMagic 需要python 环境,而centos7 默认是python2.7的版本,首先需要将python的版本升级
三、Centos7 升级python
3.1 python3的安装
1、在Linux系统下,路径/usr/local相当于C:/Progrem Files/,通常安装软件时便安装到此目录下
执行命令
cd /usr/local
2、下载目标python版本压缩包
wget http://npm.taobao.org/mirrors/python/3.6.9/Python-3.6.9.tgz
3、解压压缩包,执行命令
tar -xvf Python-3.6.9.tgz
4、在当前目录下创建文件夹--python3
mkdir python3
5、编译与安装
a、进入刚刚解压后的文件夹中
cd Python-3.6.9
b.生成makefile文件
./configure --prefix=/usr/local/python3
checking for gcc ipa-pure-const bug... no
checking for stdatomic.h... no
checking for GCC >= 4.7 __atomic builtins... yes
checking for ensurepip... upgrade
checking if the dirent structure of a d_type field... yes
checking for the Linux getrandom() syscall... yes
checking for the getrandom() function... no
configure: creating ./config.status
config.status: creating Makefile.pre
config.status: creating Modules/Setup.config
config.status: creating Misc/python.pc
config.status: creating Misc/python-config.sh
config.status: creating Modules/ld_so_aix
config.status: creating pyconfig.h
creating Modules/Setup
creating Modules/Setup.local
creating Makefile


If you want a release build with all stable optimizations active (PGO, etc),
please run ./configure --enable-optimizations
c. 对makefile文件进行操作
make
执行完make 后如果看到如下信息说明编译通过
gcc -pthread -fPIC -Wno-unused-result -Wsign-compare -DNDEBUG -g -fwrapv -O3 -Wall -std=c99 -Wextra -Wno-unused-result -Wno-unused-parameter -Wno-missing-field-initializers -Ibuild/temp.linux-x86_64-3.6/libffi/include -Ibuild/temp.linux-x86_64-3.6/libffi -I/usr/local/Python-3.6.9/Modules/_ctypes/libffi/src -I./Include -I. -I/usr/local/include -I/usr/local/Python-3.6.9/Include -I/usr/local/Python-3.6.9 -c /usr/local/Python-3.6.9/Modules/_ctypes/libffi/src/x86/unix64.S -o build/temp.linux-x86_64-3.6/usr/local/Python-3.6.9/Modules/_ctypes/libffi/src/x86/unix64.o -Wall -fexceptions
gcc -pthread -fPIC -Wno-unused-result -Wsign-compare -DNDEBUG -g -fwrapv -O3 -Wall -std=c99 -Wextra -Wno-unused-result -Wno-unused-parameter -Wno-missing-field-initializers -Ibuild/temp.linux-x86_64-3.6/libffi/include -Ibuild/temp.linux-x86_64-3.6/libffi -I/usr/local/Python-3.6.9/Modules/_ctypes/libffi/src -I./Include -I. -I/usr/local/include -I/usr/local/Python-3.6.9/Include -I/usr/local/Python-3.6.9 -c /usr/local/Python-3.6.9/Modules/_ctypes/libffi/src/x86/ffi.c -o build/temp.linux-x86_64-3.6/usr/local/Python-3.6.9/Modules/_ctypes/libffi/src/x86/ffi.o -Wall -fexceptions
gcc -pthread -fPIC -Wno-unused-result -Wsign-compare -DNDEBUG -g -fwrapv -O3 -Wall -std=c99 -Wextra -Wno-unused-result -Wno-unused-parameter -Wno-missing-field-initializers -Ibuild/temp.linux-x86_64-3.6/libffi/include -Ibuild/temp.linux-x86_64-3.6/libffi -I/usr/local/Python-3.6.9/Modules/_ctypes/libffi/src -I./Include -I. -I/usr/local/include -I/usr/local/Python-3.6.9/Include -I/usr/local/Python-3.6.9 -c /usr/local/Python-3.6.9/Modules/_ctypes/libffi/src/x86/sysv.S -o build/temp.linux-x86_64-3.6/usr/local/Python-3.6.9/Modules/_ctypes/libffi/src/x86/sysv.o -Wall -fexceptions
gcc -pthread -shared build/temp.linux-x86_64-3.6/usr/local/Python-3.6.9/Modules/_ctypes/_ctypes.o build/temp.linux-x86_64-3.6/usr/local/Python-3.6.9/Modules/_ctypes/callbacks.o build/temp.linux-x86_64-3.6/usr/local/Python-3.6.9/Modules/_ctypes/callproc.o build/temp.linux-x86_64-3.6/usr/local/Python-3.6.9/Modules/_ctypes/stgdict.o build/temp.linux-x86_64-3.6/usr/local/Python-3.6.9/Modules/_ctypes/cfield.o build/temp.linux-x86_64-3.6/usr/local/Python-3.6.9/Modules/_ctypes/libffi/src/prep_cif.o build/temp.linux-x86_64-3.6/usr/local/Python-3.6.9/Modules/_ctypes/libffi/src/closures.o build/temp.linux-x86_64-3.6/usr/local/Python-3.6.9/Modules/_ctypes/libffi/src/x86/ffi64.o build/temp.linux-x86_64-3.6/usr/local/Python-3.6.9/Modules/_ctypes/libffi/src/x86/unix64.o build/temp.linux-x86_64-3.6/usr/local/Python-3.6.9/Modules/_ctypes/libffi/src/x86/ffi.o build/temp.linux-x86_64-3.6/usr/local/Python-3.6.9/Modules/_ctypes/libffi/src/x86/sysv.o -L/usr/local/lib -ldl -o build/lib.linux-x86_64-3.6/_ctypes.cpython-36m-x86_64-linux-gnu.so

Python build finished successfully!
The necessary bits to build these optional modules were not found:
_dbm                  _gdbm                 _sqlite3
_tkinter              readline
To find the necessary bits, look in setup.py in detect_modules() for the module's name.

The following modules found by detect_modules() in setup.py, have been
built by the Makefile instead, as configured by the Setup files:
atexit                pwd                   time
running build_scripts
creating build/scripts-3.6
copying and adjusting /usr/local/Python-3.6.9/Tools/scripts/pydoc3 -> build/scripts-3.6
copying and adjusting /usr/local/Python-3.6.9/Tools/scripts/idle3 -> build/scripts-3.6
copying and adjusting /usr/local/Python-3.6.9/Tools/scripts/2to3 -> build/scripts-3.6
copying and adjusting /usr/local/Python-3.6.9/Tools/scripts/pyvenv -> build/scripts-3.6
changing mode of build/scripts-3.6/pydoc3 from 644 to 755
changing mode of build/scripts-3.6/idle3 from 644 to 755
changing mode of build/scripts-3.6/2to3 from 644 to 755
changing mode of build/scripts-3.6/pyvenv from 644 to 755
renaming build/scripts-3.6/pydoc3 to build/scripts-3.6/pydoc3.6
renaming build/scripts-3.6/idle3 to build/scripts-3.6/idle3.6
renaming build/scripts-3.6/2to3 to build/scripts-3.6/2to3-3.6
renaming build/scripts-3.6/pyvenv to build/scripts-3.6/pyvenv-3.6
/usr/bin/install -c -m 644 ./Tools/gdb/libpython.py python-gdb.py
gcc -pthread -c -Wno-unused-result -Wsign-compare -DNDEBUG -g -fwrapv -O3 -Wall    -std=c99 -Wextra -Wno-unused-result -Wno-unused-parameter -Wno-missing-field-initializers   -I. -I./Include    -DPy_BUILD_CORE -o Programs/_testembed.o ./Programs/_testembed.c
gcc -pthread     -Xlinker -export-dynamic -o Programs/_testembed Programs/_testembed.o libpython3.6m.a -lpthread -ldl  -lutil   -lm
# Substitution happens here, as the completely-expanded BINDIR
# is not available in configure
sed -e "s,@EXENAME@,/usr/local/python3/bin/python3.6m," < ./Misc/python-config.in >python-config.py
# Replace makefile compat. variable references with shell script compat. ones;  ->
LC_ALL=C sed -e 's,\$(\([A-Za-z0-9_]*\)),\$\{\1\},g' < Misc/python-config.sh >python-config
# On Darwin, always use the python version of the script, the shell
# version doesn't use the compiler customizations that are provided
# in python (_osx_support.py).
if test `uname -s` = Darwin; then \
        cp python-config.py python-config; \
d.安装
make install
出现如下信息说明安装成功
rm -f /usr/local/python3/bin/2to3
(cd /usr/local/python3/bin; ln -s 2to3-3.6 2to3)
rm -f /usr/local/python3/bin/pyvenv
(cd /usr/local/python3/bin; ln -s pyvenv-3.6 pyvenv)
if test "x" != "x" ; then \
        rm -f /usr/local/python3/bin/python3-32; \
        (cd /usr/local/python3/bin; ln -s python3.6-32 python3-32) \
fi
rm -f /usr/local/python3/share/man/man1/python3.1
(cd /usr/local/python3/share/man/man1; ln -s python3.6.1 python3.1)
if test "xupgrade" != "xno"  ; then \
        case upgrade in \
                upgrade) ensurepip="--upgrade" ;; \
                install|*) ensurepip="" ;; \
        esac; \
         ./python -E -m ensurepip \
                $ensurepip --root=/ ; \
fi
Looking in links: /tmp/tmpqn5fzjzs
Collecting setuptools
Collecting pip
Installing collected packages: setuptools, pip
Successfully installed pip-18.1 setuptools-40.6.2
e、验证python版本
python
发现输入结果中还是python2.7.5
Python 2.7.5 (default, Aug  4 2017, 00:39:18)
[GCC 4.8.5 20150623 (Red Hat 4.8.5-16)] on linux2
Type "help", "copyright", "credits" or "license" for more information.
那么如何将新的pytohn版本替换旧的python版本呢
3.2、python3 替换python2
关于配置python版本的方法大致分为两种:
- 直接创建python3软链,利用命令 python3 调用新版本python,与自带python不冲突
- 覆盖现有python,使其指向新安装的python,利用命令 python 便可调用新版本python
所涉及命令解释
- ln命令用来为文件创建链接,链接类型分为硬链接和符号(软)链接两种,默认的连接类型是硬连接。如果要创建符号链接必须使用"-s"选项,符号链接相当于Windows下的快捷方式,即可以实现启动python时指向python3.8
ln -s a b # 建立软连接,b指向a
——参考“颜子”
下面分别对两种方法进行介绍。
3.2.1、直接创建python3软链
在/usr/bin路径下创建python3软链,指向已安装的python3
ln -s /usr/local/python3/bin/python3 /usr/bin/pyhton3
在/usr/bin路径下创建pip3软链,指向已安装的pip3
ln -s /usr/local/python3/bin/pip3 /usr/bin/pip3
此时系统中存在两个python版本:
命令 python 对应的仍是默认2.7.5版本
命令 python3 则对应新安装的3.6版本,
此本方法到此便结束了,可以快乐地打出 python3 -V, pip3 -V查看对应版本了
我这里没有进行软链接而是直接使用覆盖的方式
3.2.2 覆盖现有python,启动python时指向python3.6
备份旧python与pip
 mv /usr/bin/python /usr/bin/python2_old
 mv /usr/bin/pip /usr/bin/pip2_old  #第三部分的文件名可根据本机版本修改 如果没有pip 则不用执行这一步
修改软链接
ln -s /usr/local/python3/bin/python3 /usr/bin/python
ln -s /usr/local/python3/bin/pip3 /usr/bin/pip
此方法到这里已经完成一半啦,可以使用命令 python -V, pip -V查看版本
Python 3.6.9 (default, Mar 19 2020, 14:27:10)
[GCC 4.8.5 20150623 (Red Hat 4.8.5-39)] on linux
Type "help", "copyright", "credits" or "license" for more information.
import 'atexit' # <class '_frozen_importlib.BuiltinImporter'>
pip 18.1 from /usr/local/python3/lib/python3.6/site-packages/pip (python 3.6)
将高版本python配置到环境变量
echo 'export PATH=$PATH:/usr/local/python3' >> /etc/profile
. /etc/profile
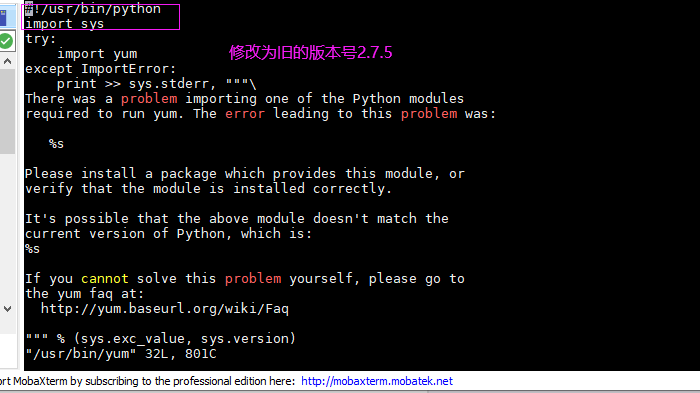
由于修改了python的版本,会导致一些依赖于旧版本的程序出现错误,如yum,可进行如下配置:
打开yum文件,重新修改配置文件中的python指向
vim /usr/bin/yum

不过在安装软件时仍会报错:
SyntaxError: invalid syntax
  File "/usr/libexec/urlgrabber-ext-down", line 28
  except OSError, e:
还是因为python更换的原因, 依照上述操作修改文件即可:打开/usr/libexec/urlgrabber-ext-down 文件,将 #!/usr/bin/python 修改为 #!/usr/bin/python2.7
/usr/bin/yum-config-manager (yum-utils包生成)
命令解释:
- 在Linux中通过源码安装程序时,对于解压文件,先执行./configure,后执行make,最后执行make install
make 命令 是对makefile文件操作,make install 是安装命令,那么 ./configure 是干什么呢?./configure 其实就是生成 makefile 文件
——参考“朝闻道”
- --prefix作用:编译的时候用来指定程序存放路径。
不指定prefix,可执行文件默认放在/usr/local/bin,库文件默认放在/usr/local/lib,配置文件默认放在/usr/local/etc,其它的资源文件放在/usr/local/share
指定prefix,直接删掉一个文件夹就够了
——参考“百度知道”
此时系统仍存在两个python版本,但命令 python 对应的是新安装的3.8版本,命令 python2 才对应之前的默认2.7版本
此方法到这里就结束啦!
但是此方法不建议使用,毕竟用到python的地方很多,所以退键使用下面的方法
方法二:第三方yum源安装
1. 下载SCLo源
yum -y install centos-release-scl-rh
2. yum安装所需python版本
yum install rh-python36
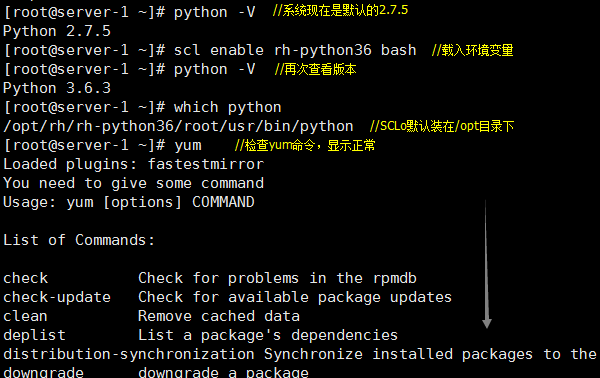
3. 载入环境变量
scl enable rh-python36 bash
4. 检查

5. 使开机启动生效
vim /etc/profile
添加如下两句:
source /opt/rh/rh-python36/enable

export X_SCLS="`scl enable rh-python36 'echo $X_SCLS'`"
说明:此种安装方式比较便捷,不过需要主机可以联网,并且部分关键字和命令不够通用熟悉。


