
spring注解版小结
IOC
组件注册
@Configuration
告诉Spring这是一个配置类(可以看成是Spring的配置文件)
@Bean
在config下配置,代表将对象加入到容器中
(@Bean注解下的参数会默认的从ioc容器中取,这点很重要,它是隐式调用@Autowired)
@ComponentScan
我们使用这个去扫描指定包下的组件,只有规定了这个,我们在指定包下的类标注@Component,@Repository,@Service,@Controller等,才会被我们加入到ioc容器中
@ComponentScan(basePackages = {"com.jd.nxj"},excludeFilters = {
     @ComponentScan.Filter(type = FilterType.ANNOTATION,classes = {Controller.class}),
     //FilterType.ASSIGNABLE_TYPE:按照给定的类型过滤
     @ComponentScan.Filter(type = FilterType.ASSIGNABLE_TYPE,classes = {User.class}),
     @ComponentScan.Filter(type = FilterType.ASSIGNABLE_TYPE,classes = {HelloService.class})
     //还有自定义的type ->CUSTOM 需要实现TypeFilter接口 然后放在这里就好,这里不写了,以后如果用到再讲
})
@Scope
(调整作用域)默认ioc管理创建对象都是单例的,在程序加载的时候就将对象创建好添加到容器中了,以后程序调用也不会再创建了,如果设置为prototype,在程序加载的时候并不会将对象创建好放入容器中,而是程序调用一次就创建一次。
我们可以设置常用的如下:
@Scope("prototype")
@Scope("singleton")
@Lazy
针对于Scope为singleton的,程序启动的时候就会创建好对象放入到容器中
标注这个注解意味着:程序启动的时候先不创建对象,在第一次调用的时候再创建对象,然后放入到容器中
*@Conditional
可以标注在类上或者方法上
这是一个接口,内部只有一个接受类信息的参数,需要这个类实现Condition接口
public class ConditionalOnWindows implements Condition {
/**
* @param context 上下文信息
* @param metadata 注释信息
* @return
*/
启动容器,结果只有bill add 2 ioc,这就是Conditional起作用的,他判断满足的
*@Import
组件名字是类的全路径名(调用的都是无参构造器,若没有无参构造器,使用@Import就会报错)
快速给容器中导入一个组件(id默认是全类名,如:com.jd.nxj.properties.TestImport1)
//这个类一般是第三方的组件(我们想导入进来,我们可以使用方法@Bean或者直接导入)
public class TestImport1 {}
public class TestImport2 {}
*ImportSelector
组件名字是类的全路径名 springboot中这里用到而很多
@Import({TestImport1.class, TestImport2.class, MyImportSelector.class})由于MyImportSelector实现了ImportSelector接口,因此并不是将这个类导入到容器中,而是将它里面方法返回的全类路径名的类导入到组件中!
//自定义逻辑需要导入的组件
public class MyImportSelector implements ImportSelector {
/**
* 返回值就是导入到容器中的组件的全类名
* @param importingClassMetadata 当前标注@Import注解的类的所有注解信息
* @return
*/
此时TestImport3与TestImport4都加入到容器中了,这个和直接放在@Import中一样,但是这里可以做相应的逻辑判断。
ImportBeanDefinitionRegistrar
组件名字是可以自定义的
public class MyImportBeanDefinitionRegistrar implements ImportBeanDefinitionRegistrar {
*FactoryBean<T>
在和其他框架整合的时候 这个用的很多!
public class MyFactoryBean implements FactoryBean<Color> {
Object bean = context.getBean("myFactoryBean");//获取的是getObject()返回的对象
System.out.println(bean.getClass());//class com.jd.nxj.properties.Color
Object bean2 = context.getBean("&myFactoryBean");//前面加个&,获取的就是myFactoryBea对象了
System.out.println(bean2.getClass());//class com.jd.nxj.properties.MyFactoryBean
小结:
(使用注解)给容器中注册组件的方式
包扫描+组件标注注解(就是使用@ComponentScan扫描 使用@Controller,@Repository等进行标注)【局限于我们自己写的组件】
@Bean【使用第三方的包(第三方的和我们包扫描的肯定不同)】,我们使用@Bean自己加入到容器
@Import【快速给容器中导入一个组件】
直接放在@Import注解中
通过实现ImportSelector的类,然后放到@Import注解中
通过实现ImportBeanDefinitionRegistrar类,然后放到@Import注解中
使用Spring提供的FactoryBean【但是还是通过@Bean加入到容器中,只不过虽然名字是这个名,但是这个对象是我们设置的对象】
默认按照名字获取到的是工厂bean调用getObject创建的对象
要获取工厂bean本身,我们需要给id前面加一个&来获取
bean生命周期
initMethod/destroyMethod
(主要针对于singleton)
对应xml中bean的配置
<bean id="dog" class="com.jd.nxj.domain.Dog" init-method="getName" destroy-method="getAge">注解中也可以进行如下设置
这些方法必须要无返回值,无参数的!
% 调用结果
car constructor...
car init...
car destroy...
initMethod:是在调用完构造函数后就马上执行的
destroyMethod :是容器关闭的时候执行(如果是prototype即使关闭context,销毁也不会执行)
@PostConstruct/@PreDestroy
使用JSR250的注解来实现
import javax.annotation.PostConstruct;
import javax.annotation.PreDestroy;
这个和@bean中的方法一样,都是标注在对象内部的方法,且只是针对于当前对象
InitializingBean/DisposableBean
这是Spring给我们提供的方式,去实现对应的接口
这样scope为单例的时候,每次被加载都会调用afterPropertiesSet,但是这个方法我测试的时候在第一位输出,所以了解一下知道有这个方法就好,这样写,容器中所有组件,在程序启动创建的时候都会调用这个创建和销毁,这和单独写@Bean的区别是@Bean只能在他声明的bean上起作用一次。
*BeanPostProcessor
(Spring底层bean注入值,Autowaired等等这些原理都是使用BeanPostProcessor)【@Autowaired 生命周期注解等都是】
原理就是:获取到注解所标识的方法,然后利用反射在相应的时机进行调用
实现这个接口,和上方的InitializingBean一样,作用于全局,任何一个bean要创建到入到容器前后都会执行相应的方法
(我觉得有点乱,主要是暂时没有想到一个好的应用的场景,先放着吧,以后真的能用到的时候,回头知道有这个东西,然后自己再看自己使用框架版本,该方法加载的时机)
属性赋值
@Value
/**
 * @Value使用
 * 1.直接赋值,String,Boolean等
 * 2.使用SPEL表达式
 * 3.读取配置文件的值 (对应配置文件是: <context:property-placeholder location="a.properties"/>)【需要在容器能识别到的位置标注@PropertySource(value = {"classpath:/a.properties"}),一般标注在配置文件上】
 */
@PropertySource
#a.properties
user.name1=寧新傑
dog.name=小红112312
dog.age=5
读取配置文件的几种方式
**@Autowired
默认按照类型寻找,如果按照类型找到组件只有一个,那么直接装配,如果有多个,则按名字寻找,当然我们也可以使用如下注解
按类型寻找,如果类型只有一个则自动装配
如果类型有多个则按照名字寻找,如果找到则自动装配,否则报错!(除非某一个bean上标注了@Primary,则加载这个bean)
ElementType.CONSTRUCTOR, //可以标注在构造器上
ElementType.METHOD,//方法上
//自动调用方法,参数就是从ioc中取得参数
ℹ️总而言之理解的就是:会在容器初始化后调用方法,参数是从容器中获取
//直接在配置文件下使用@Bean的参数实际上就是去ioc容器中取(隐式调用了@Autowired)
@Qualifier
指定我要寻找的是哪个组件@Qualifier("user2")
需要结合@Autowaired使用
@Primary
当我们不指定@Qualifier ,而在注册组件上标注@Primary时,有相同类型的时候,默认装配这个。
@Primary如果在一个类型上标注多次,我们加载的时候如果也没使用@Qualifier,就会报错
@Resource
是JSR250规范的注解:可以和@Autowired一样自动装配,不同的是它是优先按照名字寻找(因此@Primary可能不会生效)
按名字寻找,如果找到自动装配
如果找不到则按照类型寻找,如果只找到一个则自动装配,否则报错(除非某一个bean上标注了@Primary,则加载这个bean)
@Inject
是JSR330规范的注解:@Autowired功能一样(但是它里面没什么属性)【了解下得了】
-- 需要导入如下依赖
<dependency>
 <groupId>javax.inject</groupId>
 <artifactId>javax.inject</artifactId>
 <version>1</version>
</dependency>
显然使用@Autowired功能已经覆盖了@Inject
Aware接口
Spring在创建的时候,底层实现Aware的接口的类,会像回调函数一样,将对应的参数回调进来,比如实现了ApplicationContextAware,那么我们就可以在创建完这个对象后获取到ioc容器中的ApplicationContext对象
xxxAware:将他看成Spring的回调
xxxAwareProcessor:就是xxxAware回调功能的实现
@Profile
切换环境使用(如:开发环境、测试环境、生产环境)【可以标注在类上和方法上】
增加了这个注解就是加了一个环境标志,只有这个环境被激活,这个bean才能注册到ioc容器中
激活的方式:
命令行的方式【-Dspring.profiles.active=dev】
代码的方法,如下:
//ApplicationContext context = new AnnotationConfigApplicationContext(MyConfigOfProfile.class);
//代码的方法激活(其实1、3、4就是上方有参构造的代码,我们要在容器启动之前加入配置环境,就是第二步,当然可以配置多个环境)
AnnotationConfigApplicationContext context = new AnnotationConfigApplicationContext();//1
context.getEnvironment().setActiveProfiles("dev","test");//2
context.register(MyConfigOfProfile.class);//3
context.refresh();//4
AOP
@Before
前置通知
@After
后置通知
@Around
环绕通知
@AfterReturning
返回通知
@AfterThrowing
异常通知
@Pointcut
定义切入点(一般在切面类里面定义切入点)
@Aspect
告诉Spring这是一个切面(标注在切面类上)
@EnableAspectJAutoProxy
开启切面的注解功能(标注在配置类上)
底层使用的原理是动态代理

需要导入AOP的jar包:spring-aspects
定义一个业务逻辑类(我们的切面要切入这些类的方法)
定义一个切面类【@Aspect 告诉Spring这是一个切面类】
前置通知(@Before)
后置通知(@After)
返回通知(@AfterReturning)
异常通知(@AfterThrowing)
环绕通知(@Around)
给切面类的目标方法标注何时运行
将切面类和业务逻辑都加入到容器中(使用@Bean、@Component、@Import方式都行)
必须告诉Spring哪个是切面类(切面类上加一个注解@Aspect
给配置类中加@EnableAspectJAutoProxy【开启基于注解的AOP模式】
总结就如下三点:
将业务逻辑组件和切面类都加入到容器中,告诉Spring哪个是切面类(@Aspect)
在切面类上的每一个通知方法上标注通知注解,告诉Spring何时何地运行(切入点表达式)
开启基于注解的AOP模式@EnableAspectJAutoProxy
=======================
* *
* *
* *
=======================
0.业务逻辑组件示例(加入到容器)如下:
1.切面类(把各个切入的方法都写上,并且告诉Spring这是一个切面类,并加入到容器)
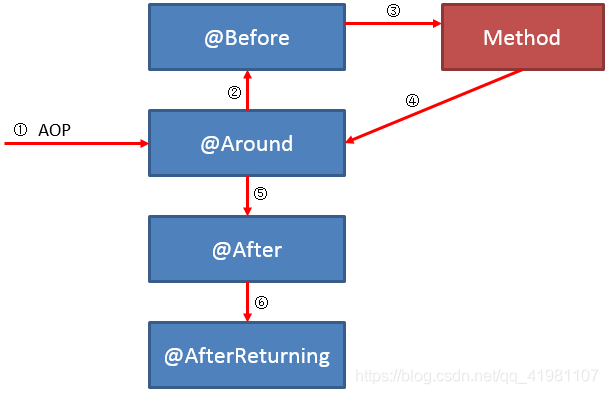
执行顺序:
@Around标注的方法中proceed()前的方法执行
@Before标注的方法执行
@Around标注的方法中proceed()后的方法执行
@After标注的方法执行
@AfterReturning/@AfterThrowing标注的方法执行
里面定义切入点(@Pointcut)
2.配置文件中开启
扩展开始了
BeanFactoryPostProcessor
所有bean的定义信息被加载了,但是bean并没有被初始化的时候调用
Modify the application context's internal bean factory after its standard
initialization. All bean definitions will have been loaded, but no beans
will have been instantiated yet. This allows for overriding or adding
properties even to eager-initializing beans.
根据标准修改应用程序上下文的内部bean工厂初始化。
所有bean定义都已加载,但没有bean还没有实例化。
这允许重写或添加属性甚至可以用于急于初始化bean。
BeanDefinitionRegistryPostProcessor
可以利用它给容器中再添加一些组件
这个是BeanFactoryPostProcessor的子接口
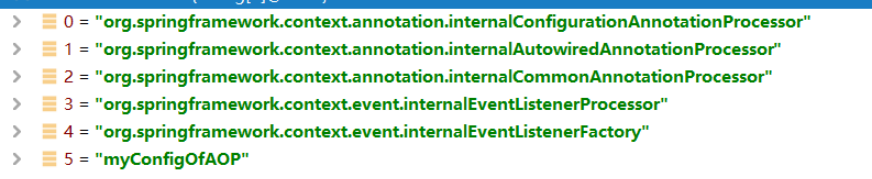
它的加载时机是在bean定义信息将要写入之前【这里讲的不太规范,实际上是,我们定义要加入到容器中和默认的如下几个组件名字都已经定义完成了,只不过我们可以在这里继续加上我们自定义的】
org.springframework.context.annotation.internalConfigurationAnnotationProcessor
org.springframework.context.annotation.internalAutowiredAnnotationProcessor
org.springframework.context.annotation.internalCommonAnnotationProcessor
org.springframework.context.event.internalEventListenerProcessor
org.springframework.context.event.internalEventListenerFactory
(由此可见,它是在他的父接口方法之前执行的)
❤️***加载过程
【看源码能看到,先找BeanDefinitionRegistryPostProcessor,先触发他的postProcessBeanDefinitionRegistry(),再触发postProcessBeanFactory(),然后再找BeanFactoryPostProcessor,触发他的postProcessBeanFactory()】
过程:
组件名称定义完成(registry.registerBeanDefinition)
执行BeanDefinitionRegistryPostProcessor的postProcessBeanDefinitionRegistry()
执行BeanDefinitionRegistryPostProcessor实现BeanFactoryPostProcessor的方法
执行BeanFactoryPostProcessor的方法
执行组件的构造函数(组件的实例化)
执行BeanPostProcessor的方法
❤️*BeanDefinitionRegistry概念
BeanDefinitionRegistry就是bean信息的保存中心,以后BeanFactory就是按照它保存的每个bean的定义信息创建bean的 (包括,bean是单例还是原型,bean的类型等等信息都是存在BeanDefinitionRegistry的)
在这里就知道了,此时注册,只是注册bean的名字,而bean还没有真正被初始化加入到容器中
最后真正加入到容器中,实例化的时候,是按照bean定义的名字来创建的(什么意思呢?【默认都是单例】假如我自己注册进去一个beanName,但是这个Class我也包含在容器中了,Spring会按照我们定义的名字来创建两个组件,组件名字不一样,虽然组件类型一样,但是并不是同一个对象)
最后加入到容器中的组件信息都是从BeanDefinitionRegistry中拿的,因此如果我们注册时候只起名字而不放入相应的类作为组件,如:
registry.registerBeanDefinition("myBeanName",new RootBeanDefinition());这样当容器创建代码走到了要创建myBeanName组件的时候,找不到类型,就会报错,就是创建组件异常。AnnotationConfigApplicationContext context = new AnnotationConfigApplicationContext(MyConfig.class);
Object myBeanName1 = context.getBean("myBeanName");
Object myBeanName2 = context.getBean("myExtClass");
System.out.println(myBeanName1.getClass());//class com.jd.nxj.ext.MyExtClass
System.out.println(myBeanName2.getClass());//class com.jd.nxj.ext.MyExtClass
System.out.println(myBeanName1==myBeanName2);//false
ApplicationListener
监听容器中发布的时间。事件驱动模型开发
只要容器中发布了事件,事件监听器就会监听到这个事件,进行回调
标注什么泛型,则只监听标注的泛型或者它的子类,不标注则全监听
//这样代表我只接收ContextRefreshedEvent的事件
public interface ApplicationListener<E extends ApplicationEvent> extends EventListener监听ApplicationEvent及下面的子事件
ioc容器在refresh【所有bean完全创建完】后发布
org.springframework.context.event.ContextRefreshedEvent事件,在容器关闭后,发布
org.springframework.context.event.ContextClosedEvent事件
发布事件
context.publishEvent(new String("自定义事件01"));//默认是PayloadApplicationEvent(它也是继承了ApplicationEvent)
context.publishEvent(new ApplicationEvent("自定义事件02") {
});
@EventListener
(标注什么那么classes就监听哪些事件,不是标注的或者它的子类我不监听)
什么都不标注,则全部监听,因为事件必须是ApplicationEvent,默认就是它,那么所有要么是它,要么是它的子类,所以全部监听
标注这个注解的方法,就相当于实现了ApplicationListener
这样很方便
这个接口点开,看EventListenerMethodProcessor
内部实现了SmartInitializingSingleton
在我们最后创建组件的时候(首先遍历一遍名字创建组件,然后再遍历一遍名字,取出对象,判断它是不是SmartInitializingSingleton的实例,如果是则调用afterSingletonsInstantiated()完成回调)
至于@EventListener与EventListenerMethodProcessor的绑定关系,以及我参数ApplicationEvent的值从哪来的,这个还没看出来,需要继续分析
是这样:
EventListenerMethodProcessor里面实现了SmartInitializingSingleton接口的时候调用了processBean()
而processBean(),里面扫描每个组件,找EventListener标识的方法,
然后通过context.addApplicationListener(applicationListener);增加监听器
此时疑惑就解决了,原来他就是在实现的方法中寻找容器中哪些方法标注了@EventListener,如果标注了,将这个监听器增加到容器中,等着后面一起调用!
原理:(因为EventListenerMethodProcessor实现了SmartInitializingSingleton,实现的方法中调用寻找@EventListener注解的方法调用)
其中EventListenerMethodProcessor容器默认添加进去,其中的SmartInitializingSingleton怎么会生效呢?如下:
refresh();
finishBeanFactoryInitialization(beanFactory);
beanFactory.preInstantiateSingletons();
下方判断是不是SmartInitializingSingleton的实例,如果是则调用afterSingletonsInstantiated();方法
❤️很重要的总结
this.
singletonObjects //是我们的ioc判断是否注册的容器
alreadyCreated //是我们创建完放的地方,
重要的理解总结就是:我们判别组件是否注册进了singletonObjects,所以说,这个是判别ioc容器是否注册了组件的基本容器(或者说我们的组件实例基本上都放在了这里!)
beanFactory.registerSingleton()这个意思就是将组件加入到容器中去!
创建bean过程
-
invokeAwareMethods(beanName, bean);//判别当前类是否实现了*Aware,如果是则执行 -
applyBeanPostProcessorsBeforeInitialization(wrappedBean, beanName);//BeanFactory的Before -
invokeInitMethods(beanName, wrappedBean, mbd);//执行比如我们在@Bean中加initMethod这个 -
applyBeanPostProcessorsAfterInitialization(wrappedBean, beanName);//BeanFactory的After
也就是说,@EnableAspectJAutoProxy导入的组件,给我们注册了实现InstantiationAwareBeanPostProcessor的AnnotationAwareAspectJAutoProxyCreator类
而实现BeanPostProcessor的组件在任何组件初始化之前,都会被容器寻找一下判别它是不是InstantiationAwareBeanPostProcessor,如果是则调用内部相应方法【postProcessBeforeInstantiation】,如果这个方法返回不是null,则调用【postProcessAfterInitialization】方法,如果返回不为null,如果不为null则返回,也就是说相当于组件创建返回给的就是这个。
个人随时记录总结:
关于BeanPostProcessor作用范围以及加载的疑问解决
在加载配置类的时候new AnnotationConfigApplicationContext(MyConfigOfAOP.class);
refresh();
registerBeanPostProcessors();
PostProcessorRegistrationDelegate.registerBeanPostProcessors(beanFactory, this【applicationContext】);
//内部实现:
String[] postProcessorNames = beanFactory.getBeanNamesForType(BeanPostProcessor.class, true, false);
//通过断点能够看到,我们自己添加的实现 BeanPostProcessor的类的名字在这里获取到了
由此可见,实现BeanPostProcessor的组件只要注册到容器中,确实作用于全局。
请教磊哥:Spring加载的时候,先统计要加入到容器中所有组件的元数据(类的全路径,它上面标注的注解等),此时并没有将组件注册到ioc容器中,统计完成后,才会将组件依次注册进去。(这样就解决了一个疑问,就是如何保证@Condition的类先注入进来才能保证,显然是不需要@Condition判断的类先进来,我只需要配判断元信息有没有我需要的类的时候,就解决了,如果有,则加载这个类,调用方法,这个就是整个思想!)
prepareRefresh();
/*
1.标记容器开启(判断是否开启debug)
2.验证验证所有标记为必需的属性都是可解析的:
3.设置earlyApplicationListeners与applicationListeners
*/
===
ConfigurableListableBeanFactory beanFactory = obtainFreshBeanFactory();
//告诉子类刷新内部bean工厂。
//获取beanFactory
===
//在这里注册了单例(environment;systemProperties;systemEnvironment)
// Prepare the bean factory for use in this context.
prepareBeanFactory(beanFactory);
// Configure the bean factory with context callbacks.
beanFactory.addBeanPostProcessor(new ApplicationContextAwareProcessor(this));
beanFactory.ignoreDependencyInterface(EnvironmentAware.class);
beanFactory.ignoreDependencyInterface(EmbeddedValueResolverAware.class);
beanFactory.ignoreDependencyInterface(ResourceLoaderAware.class);
beanFactory.ignoreDependencyInterface(ApplicationEventPublisherAware.class);
beanFactory.ignoreDependencyInterface(MessageSourceAware.class);
beanFactory.ignoreDependencyInterface(ApplicationContextAware.class);
===
//获取BeanDefinitionRegistryPostProcessor
invokeBeanFactoryPostProcessors();
//处理配置组件定义 processConfigBeanDefinitions()
在这个方法中,我们寻找下面哪些类是配置类
将配置类找出来,加入到configCandidates
这个方法里面就解析了我们注册的能扫到的所有组件 //下面的代码,完成了解析 parser.parse(candidates); parser.validate();
Set<ConfigurationClass> configClasses = new LinkedHashSet<>(parser.getConfigurationClasses());
BeanDefinitionRegistryPostProcessor
BeanFactoryPostProcessor
//准备此上下文以进行刷新。
prepareRefresh ();
//准备在此上下文中使用的bean工厂。
prepareBeanFactory (beanFactory);
//允许在上下文子类中对bean工厂进行后处理。
postProcessBeanFactory (beanFactory);
//调用上下文中注册为bean的工厂处理器。
invokeBeanFactoryPostProcessors (beanFactory);
//注册拦截bean创建的bean处理器。
registerBeanPostProcessors (beanFactory);
//为这个上下文初始化消息源。
initMessageSource ();
//为这个上下文初始化事件多播器。
initApplicationEventMulticaster ();
//初始化特定上下文子类中的其他特殊bean。
onRefresh ();
//检查侦听器bean并注册它们。
有关registerlistener ();
//实例化所有剩余的(非延迟-init)单例。(这个里面先执行beanpostprocess 这个里面再执行 *Aware)(也不是 *Aware后也执行beanpostprocess)
finishBeanFactoryInitialization (beanFactory);
//最后一步:发布相应的事件。
finishRefresh ();
获取再测试一下beanpostprocess,打断点开什么时候触发
finishBeanFactoryInitialization (beanFactory);
//实例化所有剩余的(非延迟-init)单例。(这个里面先执行beanpostprocess 这个里面再执行 *Aware)(也不是 *Aware后也执行beanpostprocess)
看看是哪个
*Aware与BeanPostProcessor同时存在
标注了*Aware接口的类,加入到容器中,顺序是:
构造函数
*Aware
然后BeanPostProcessor的postProcessBeforeInitialization***方法
(个人感觉这个组件加入到容器的时机是在这里)
然后BeanPostProcessor的postProcessAfterInitialization***方法
TestAware构造器 获取到bean的名字testAware ioc->Aware-->org.springframework.context.annotation.AnnotationConfigApplicationContext@1761e840, started on Thu Nov 26 12:52:57 CST 2020 前postProcessBeforeInitialization-->testAware 后postProcessAfterInitialization-->testAware

BeanPostProcessor(整个流程!)
整个流程:refresh()-->finishBeanFactoryInitialization()-->beanFactory.preInstantiateSingletons()-->getBean()-->doGetBean()-->createBean()-->doCreateBean()-->initializeBean()【line595】

