WCF入门简单教程(图文) VS2010版
转载:http://www.cnblogs.com/finehappy/archive/2009/12/20/1628385.html
在这个例子中我们将使用VS 2010 创建一个WCF服务,其中会了解
[DataContract] [ServiceContract] 等特性。
内置的 WCFSVCHost ,并使用“WCF测试客户端”来测试我们创建的服务。
注意下面的所有类、接口及方法都添加了public 的访问级别。
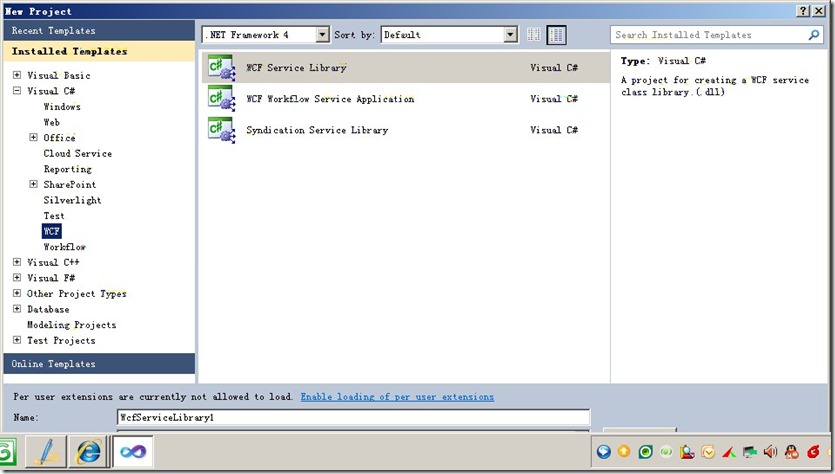
一,建立一个WCF服务库
创建一个WCF服务库项目,
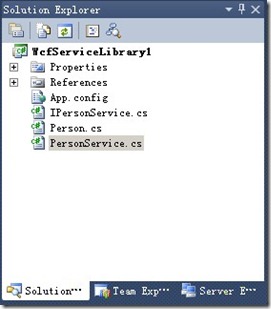
在解决方案中会自动为我们生成两个类文件“IService.cs”和“Service.cs”。
这两个类文件是两个WCF示例文件,对我们开发没有什么用处,现在我们删掉这两个文件。
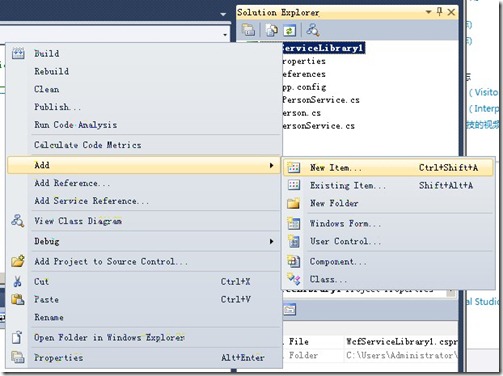
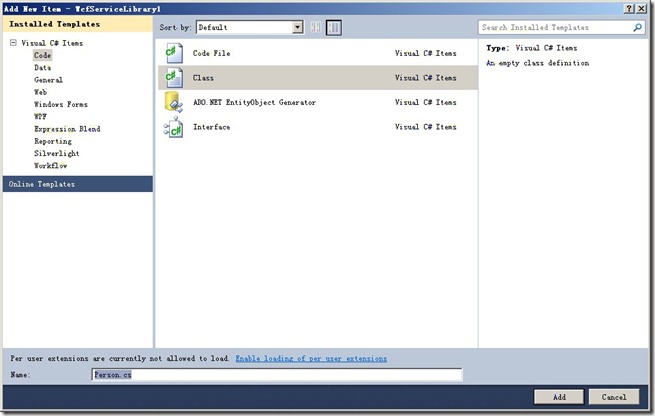
在弹出的“添加新项”窗口中,选择“类”,并在“名称”文本框中写入项名称“Person.cs”。
Person.cs
using System.Collections.Generic;
using System.Linq;
using System.Text;
using System.Runtime.Serialization;
namespace WCFService_Library2010
{
/// DataContract数据约定,Person 就是传递的消息中的内容。好比信中的文字。
/// 为了保证此类在WCF调用中能够被序列化,我们在Person类上面加入[DataContract]标签,在每个需要序列化的成员变量上加入[DataMember]标签。
/// 这两个标签在使用的进候需要导入using System.Runtime.Serialization命名空间。
[DataContract]
public class Person
{
[DataMember]
public string Id;
[DataMember]
public string Name;
[DataMember]
public int Age;
}
}
创建服务接口,声明对外发布的类和方法。
IPersonService.cs
using System.Collections.Generic;
using System.Linq;
using System.Text;
using System.ServiceModel;
namespace WcfServiceLibrary1
{
///<summary>
/// ServiceContract:服务约定,代表我们所能操作的接口集合,提供功能点。
/// 在IPersonService接口上面,我们定义了[ServiceContract]标签,此标签代表此接口及实现此接口的类都是对外发布的Service类,
/// 在每个需要对外发布的方法上都加上[OperationContract]标签,以使外部可以访问到此方法。
/// [ServiceContract]和[OperationContract]这两个标签需要导入using System.ServiceModel命名空间。
/// </summary>
[ServiceContract]
public interface IPersonService
{
///<summary>
/// OperationContract 操作约定,定义每个操作的接口点方法。
/// </summary>
/// <param name="person">要添加的人员实体</param>
[OperationContract]
void AddPerson(Person person);
[OperationContract]
List<Person> GetAllPersons();
[OperationContract]
void RemovePerson(string id);
}
}
实现我们上面声明的服务接口,实现对Person的添加、删除和检索的具体功能。
PersonService.cs
using System.Collections.Generic;
using System.Linq;
using System.Text;
using System.ServiceModel;
namespace WcfServiceLibrary1
{
///<summary>
/// 此类是对IBookService接口的具体实现,在此类的上面我们声明了[ServiceBehavior(InstanceContextMode=InstanceContextMode.Single)]标签,
/// 此标签代表这个类采用SingleTone(单类模式)来生成对象。
/// 使用[ServiceBehavior(InstanceContextMode=InstanceContextMode.Single)]接口需要导入using System.ServiceModel;命名空间。
///
</summary>
[ServiceBehavior(InstanceContextMode = InstanceContextMode.Single)]
public class PersonService : IPersonService
{
List<Person> _Persons = new List<Person>();
public void AddPerson(Person person)
{
person.Id = Guid.NewGuid().ToString();
_Persons.Add(person);
}
public List<Person> GetAllPersons()
{
return _Persons;
}
public void RemovePerson(string id)
{
//拉姆达语句,谓词 p.Id == id
Person person = _Persons.Find(p => p.Id == id);
_Persons.Remove(person);
}
}
}
Ctrl + Shift + B 编译一下
二,配置服务运行
到目前为至,我们建立好了WCF服务,那我们如何让WCFSVCHost(WCF服务主机)理解我们编写的服务类,并能够运行我们编写的服务呢。这需要我们在App.Config里面注册一下我们的WCF服务。
VS为我们提供了可视化的操作界面。
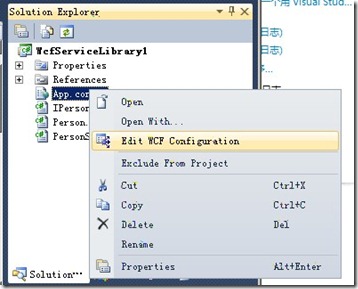
在Services项目中右击“App.Config”配置文件,在弹出的右键菜单中选择“编辑WCF配置”。
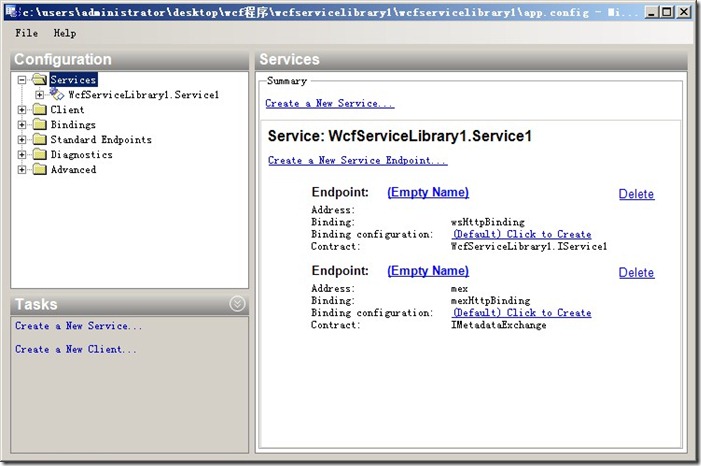
打开之后如下图
在此界面中暴露两个对外的终结点(外部可以访问到的类或接口),其中下面一个是元数据终结点,用来向外提供服务信息的终结点。
而另一个(即上面的终结点),是向外公布我们编写的[ServiceContract]的类,但我们可以看到它的Contract还是我们在第一步中删掉的WcfServiceLibrary1.IService1这个终结点。
不仅如此,在右侧上面的黑字的服务中还依旧是我们在第一步中删除的WcfServiceLibrary1.Service1服务。这说明虽然在第一步中我们删除了那两个自动生成的类文件,但配置文件中仍没有删除这两个类文件的配置信息。
下面我们把它们改变一下。
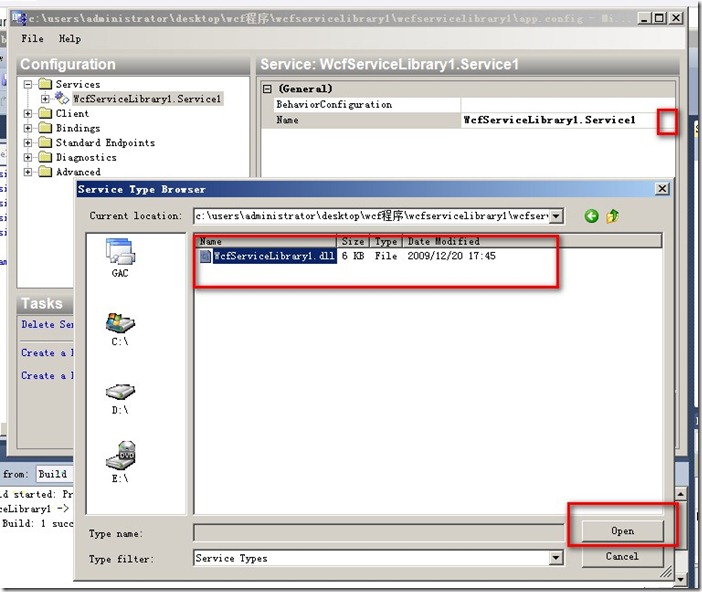
单击左侧的“服务”-“WcfServiceLibrary1.Service1”在右侧的Name,弹出“服务类型浏览器”对话框,在此类型中我们找到 此WCF服务项目编译出来的WcfServiceLibrary1.dll文件,双击它就可以出现此服务中的对外公布的服务,点击选中它单击确定。
这样我们就可以把对外公司的服务改变为我们刚编写的服务了。
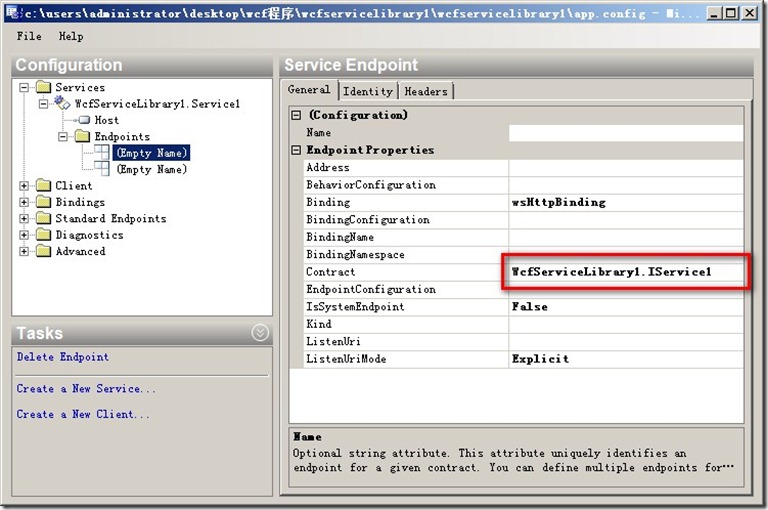
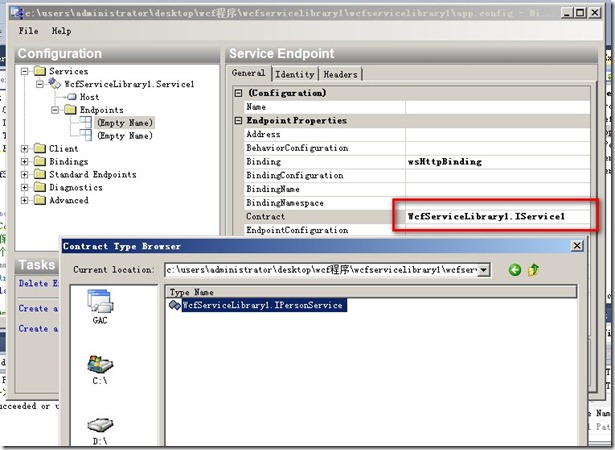
然后,我们展开左侧“服务”->“WcfServiceLibrary1.PersonService”->“终结点”,单击第一个“空名
称”,从右边的“终结点属性”中的Contract中我们可以看到,这里的Contract仍然用的是
WcfServiceLibrary1.IService1。
我们按照上面的做法,找到此WCF服务项目编译出来的WcfServiceLibrary1.dll,双击它找到里面对应的ServiceContract点击确定就可以了。
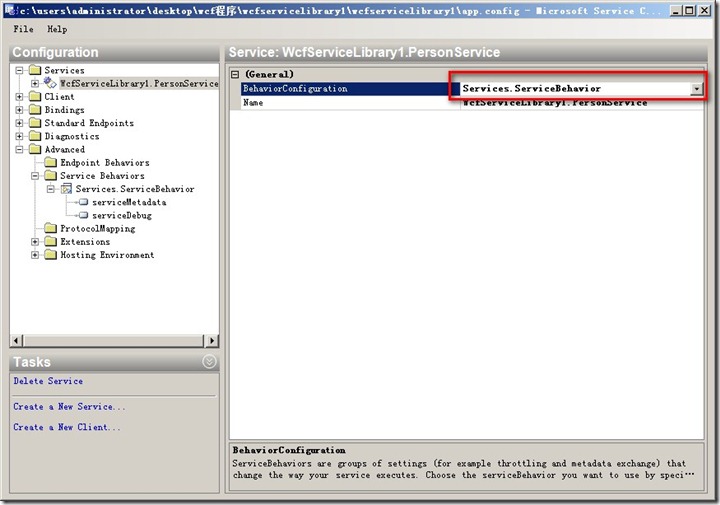
在高级目录树中,为服务行为配置命名,名字你自己决定。
在服务中选中,刚才的行为配置。
重点一定要记着保存,点击菜单“文件”-“保存”就可以把我们对App.Config的修改保存回配置文件了。
App.Config
<configuration>
<system.web>
<compilation debug="true" />
</system.web>
<!-- When deploying the service library project, the content of the config file must be added to the host's
app.config file. System.Configuration does not support config files for libraries. -->
<system.serviceModel>
<services>
<service behaviorConfiguration="WCFService_Library2010.Service1Behavior"
name="WCFService_Library2010.PersonService">
<endpoint address="" binding="wsHttpBinding" contract="WCFService_Library2010.IPersonService">
<identity>
<dns value="localhost" />
</identity>
</endpoint>
<endpoint address="mex" binding="mexHttpBinding" contract="IMetadataExchange" />
<host>
<baseAddresses>
<add baseAddress="http://localhost:8732/Design_Time_Addresses/WCFService_Library2010/Service1/" />
</baseAddresses>
</host>
</service>
</services>
<behaviors>
<serviceBehaviors>
<behavior name="WCFService_Library2010.Service1Behavior">
<!-- To avoid disclosing metadata information,
set the value below to false and remove the metadata endpoint above before deployment -->
<serviceMetadata httpGetEnabled="True"/>
<!-- To receive exception details in faults for debugging purposes,
set the value below to true. Set to false before deployment
to avoid disclosing exception information -->
<serviceDebug includeExceptionDetailInFaults="False" />
</behavior>
</serviceBehaviors>
</behaviors>
</system.serviceModel>
三,测试WCF
在Visual Studio 中为我们提供了测试WCF的工具,按F5启动WCF会出现两个东西
一个是在右下角的托盘图标中会出现WCFSVCHost(WCF服务主机),它为我们在开发时候提供了一个运行WCF的服务器,用来为测试客户端提供WCF服务。
另一个是“WCF测试客户端”
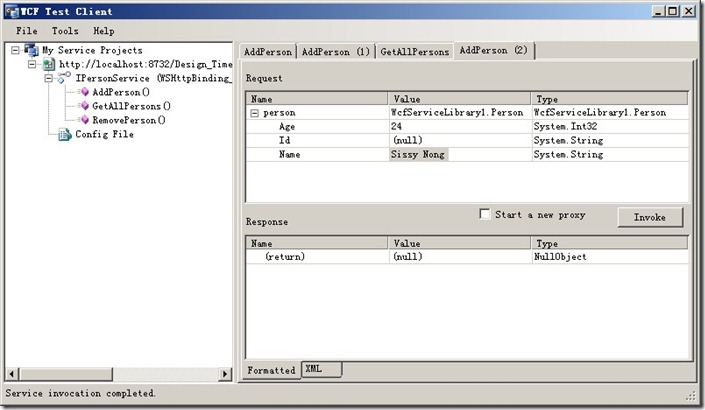
“测试客户端”从WcfSVCHost中取得WCF服务的元数据,解析为左侧的“服务结构树”,从这里面我们可以看到此WCF服务为我们提供了一个服务契约“IPersonService”,此服务契约中对外提供了三个可调用的方法。
点击AddPerson() 方法 输入参数 点击 Invoke 调用
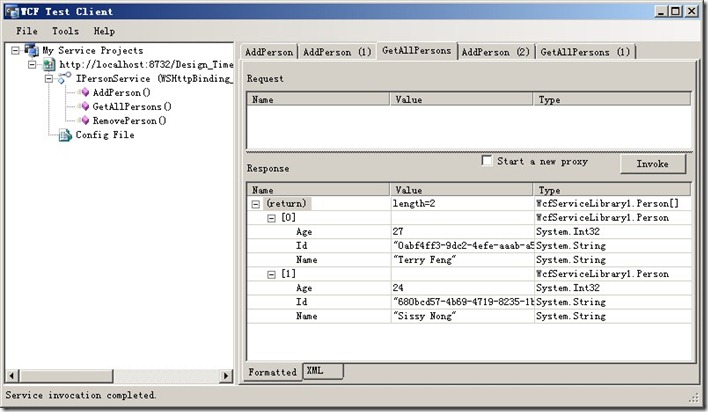
点击GetAllPersons() ,在Response 中我们看到了返回的结果。
在本例中我们看到,WCF作为面向对象和面向服务的桥梁 ,提供了非常方便的工具,无论是开发,配置还是测试,为我们可以快速的上手并提供面向服务的应用。你可以把WCF类库当作普通类库去做,但他提供了更强大的面向服务的特性。
WCF的理论学习复杂程度远大于其的使用难度,而如果你是一名初学者,千万不要先陷入其复杂的理论学习中,花费很多的时间,而且看得晕头转向,最好先去实 践,先去用,这样再去看WCF的深入概念和技术才会在大脑里面形成更好理解的印象和对应,这也是我一直在为初学者所传递的想法,不去学院派说理论,你认为 呢。
源代码下载:WcfServiceLibrary1.rar







【推荐】编程新体验,更懂你的AI,立即体验豆包MarsCode编程助手
【推荐】凌霞软件回馈社区,博客园 & 1Panel & Halo 联合会员上线
【推荐】抖音旗下AI助手豆包,你的智能百科全书,全免费不限次数
【推荐】轻量又高性能的 SSH 工具 IShell:AI 加持,快人一步