.net 实现word、excel、ppt、pdf预览功能
先说一下我的思路:word-->pdf-->swf-->显示 我是把word最终用flash 来显示,所以要经过两个步骤来转化
第一步 word转pdf (其他文档一样
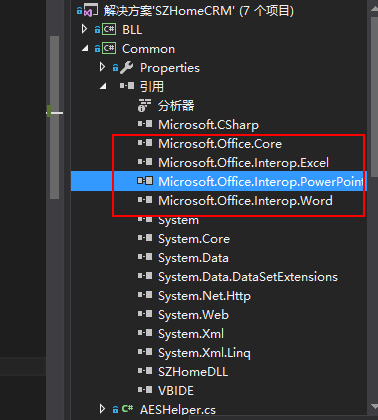
1.引用微软的office组件

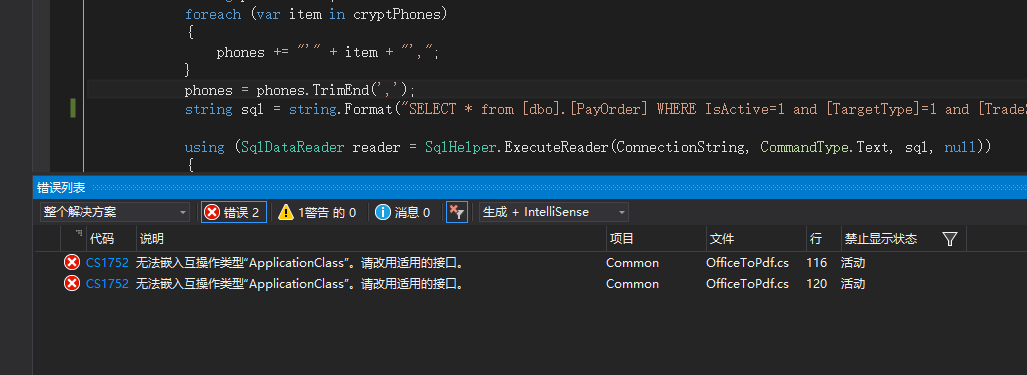
如上图,当然你必须先安装office2007或office2010,直接编译会报错

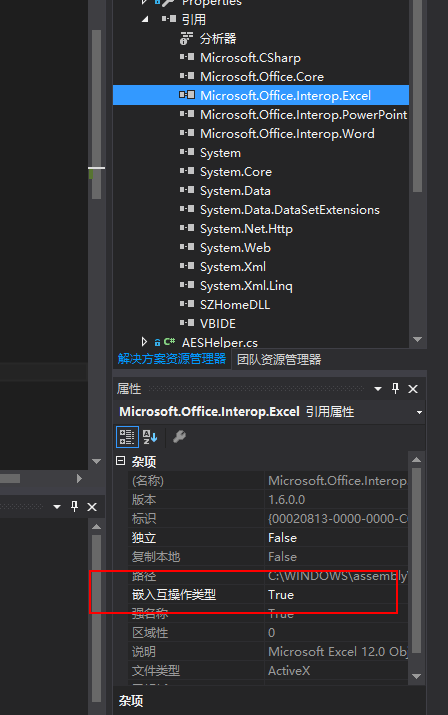
解决方案是把嵌入互操作类型改为false ,如下图

using System;
using Word = Microsoft.Office.Interop.Word;
using Excel = Microsoft.Office.Interop.Excel;
using PowerPoint = Microsoft.Office.Interop.PowerPoint;
using Microsoft.Office.Core;
using System.IO;

namespace SZHomeCRM.Common
{
    /// <summary>
    /// Office2Pdf 将Office文档转化为pdf
    /// </summary>
    public class OfficeToPdf
    {
        /// <summary>
        /// Word转换成pdf
        /// </summary>
        /// <param name="sourcePath">源文件路径</param>
        /// <param name="targetPath">目标文件路径</param>
        /// <returns>true=转换成功</returns>
        public static bool DOCConvertToPDF(string sourcePath,string targetPath)
        {
            bool result = false;
            if (File.Exists(targetPath))
            {
                result = true;
                return result;
            }
            string targetDic=Path.GetDirectoryName(targetPath);
            if (!Directory.Exists(targetDic))
            {
                Directory.CreateDirectory(targetDic);
            }
            Word.WdExportFormat exportFormat = Word.WdExportFormat.wdExportFormatPDF;
            object paramMissing = Type.Missing;
            Word.ApplicationClass wordApplication = new Word.ApplicationClass();
            Word.Document wordDocument = null;
            try
            {
                object paramSourceDocPath = sourcePath;
                string paramExportFilePath = targetPath;
                Word.WdExportFormat paramExportFormat = exportFormat;
                bool paramOpenAfterExport = false;
                Word.WdExportOptimizeFor paramExportOptimizeFor = Word.WdExportOptimizeFor.wdExportOptimizeForPrint;
                Word.WdExportRange paramExportRange = Word.WdExportRange.wdExportAllDocument;
                int paramStartPage = 0;
                int paramEndPage = 0;
                Word.WdExportItem paramExportItem = Word.WdExportItem.wdExportDocumentContent;
                bool paramIncludeDocProps = true;
                bool paramKeepIRM = true;
                Word.WdExportCreateBookmarks paramCreateBookmarks = Word.WdExportCreateBookmarks.wdExportCreateWordBookmarks;
                bool paramDocStructureTags = true;
                bool paramBitmapMissingFonts = true;
                bool paramUseISO19005_1 = false;
                wordDocument = wordApplication.Documents.Open(
                    ref paramSourceDocPath, ref paramMissing, ref paramMissing,
                    ref paramMissing, ref paramMissing, ref paramMissing,
                    ref paramMissing, ref paramMissing, ref paramMissing,
                    ref paramMissing, ref paramMissing, ref paramMissing,
                    ref paramMissing, ref paramMissing, ref paramMissing,
                    ref paramMissing);
                if (wordDocument != null)
                    wordDocument.ExportAsFixedFormat(paramExportFilePath,
                        paramExportFormat, paramOpenAfterExport,
                        paramExportOptimizeFor, paramExportRange, paramStartPage,
                        paramEndPage, paramExportItem, paramIncludeDocProps,
                        paramKeepIRM, paramCreateBookmarks, paramDocStructureTags,
                        paramBitmapMissingFonts, paramUseISO19005_1,
                        ref paramMissing);
                result = true;
            }
            catch(Exception ex)
            {
                result = false;
                throw new ApplicationException(ex.Message);
            }
            finally
            {
                if (wordDocument != null)
                {
                    wordDocument.Close(ref paramMissing, ref paramMissing, ref paramMissing);
                    wordDocument = null;
                }
                if (wordApplication != null)
                {
                    wordApplication.Quit(ref paramMissing, ref paramMissing, ref paramMissing);
                    wordApplication = null;
                }
                GC.Collect();
                GC.WaitForPendingFinalizers();
            }
            return result;
        }

        /// <summary>
        /// 把Excel文件转换成PDF格式文件
        /// </summary>
        /// <param name="sourcePath">源文件路径</param>
        /// <param name="targetPath">目标文件路径</param>
        /// <returns>true=转换成功</returns>
        public static bool XLSConvertToPDF(string sourcePath, string targetPath)
        {
            bool result = false;
            if (File.Exists(targetPath))
            {
                result = true;
                return result;
            }
            string targetDic = Path.GetDirectoryName(targetPath);
            if (!Directory.Exists(targetDic))
            {
                Directory.CreateDirectory(targetDic);
            }
            Excel.XlFixedFormatType targetType = Excel.XlFixedFormatType.xlTypePDF;
            object missing = Type.Missing;
            Excel.ApplicationClass application = null;
            Excel.Workbook workBook = null;
            try
            {
                application = new Excel.ApplicationClass();
                object target = targetPath;
                object type = targetType;
                workBook = application.Workbooks.Open(sourcePath, missing, missing, missing, missing, missing,
                    missing, missing, missing, missing, missing, missing, missing, missing, missing);
                workBook.ExportAsFixedFormat(targetType, target, Excel.XlFixedFormatQuality.xlQualityStandard, true, false, missing, missing, missing, missing);
                result = true;
            }
            catch(Exception ex)
            {
                result = false;
                throw new ApplicationException(ex.Message);
            }
            finally
            {
                if (workBook != null)
                {
                    workBook.Close(true, missing, missing);
                    workBook = null;
                }
                if (application != null)
                {
                    application.Quit();
                    application = null;
                }
                GC.Collect();
                GC.WaitForPendingFinalizers();
            }
            return result;
        }

        ///<summary>
        /// 把PowerPoint文件转换成PDF格式文件
        ///</summary>
        ///<param name="sourcePath">源文件路径</param>
        ///<param name="targetPath">目标文件路径</param>
        ///<returns>true=转换成功</returns>
        public static bool PPTConvertToPDF(string sourcePath, string targetPath)
        {
            bool result = false;
            if (File.Exists(targetPath))
            {
                result = true;
                return result;
            }
            string targetDic = Path.GetDirectoryName(targetPath);
            if (!Directory.Exists(targetDic))
            {
                Directory.CreateDirectory(targetDic);
            }
            PowerPoint.PpSaveAsFileType targetFileType = PowerPoint.PpSaveAsFileType.ppSaveAsPDF;
            object missing = Type.Missing;
            PowerPoint.ApplicationClass application = null;
            PowerPoint.Presentation persentation = null;
            try
            {
                application = new PowerPoint.ApplicationClass();
                persentation = application.Presentations.Open(sourcePath, MsoTriState.msoTrue, MsoTriState.msoFalse, MsoTriState.msoFalse); persentation.SaveAs(targetPath, targetFileType, Microsoft.Office.Core.MsoTriState.msoTrue);
                result = true;
            }
            catch(Exception ex)
            {
                result = false;
                throw new ApplicationException(ex.Message);
            }
            finally
            {
                if (persentation != null)
                {
                    persentation.Close();
                    persentation = null;
                }
                if (application != null)
                {
                    application.Quit();
                    application = null;
                }
                GC.Collect();
                GC.WaitForPendingFinalizers();
            }
            return result;
        }
    }

}
转化代码如上,对于已转化的文件就直接返回,这样能大大加快访问速度
第二步 把pdf 转化为swf
这个很简单,就是安装一个转化工具即可 swftools-0.9.0,百度一下下载
using System;
using System.Collections.Generic;
using System.Linq;
using System.Text;
using System.Threading.Tasks;
using System.Diagnostics;
using System.IO;
using System.Web;
using SZHomeDLL;

namespace SZHomeCRM.Common
{
    public class PdfToSwf
    {
        public static void ConvertToSwf(string pdfPath, string swfPath)
        {
            try
            {
                if (File.Exists(swfPath))
                {
                    return ;
                }
                string targetDic = Path.GetDirectoryName(swfPath);
                if (!Directory.Exists(targetDic))
                {
                    Directory.CreateDirectory(targetDic);
                }
                string exe = ConfigHelper.GetConfigString("pdf2swfPath");
                if (!File.Exists(exe))
                {
                    throw new ApplicationException("Can not find: " + exe);
                }
                StringBuilder sb = new StringBuilder();
                int endPage = GetPageCount(pdfPath);

                sb.Append(" -o \"" + swfPath + "\"");//output

                sb.Append(" -z");

                sb.Append(" -s flashversion=9");//flash version

                sb.Append(" -s disablelinks");//禁止PDF里面的链接

                sb.Append(" -p " + "1" + "-" + endPage);//page range

                sb.Append(" -j 100");//Set quality of embedded jpeg pictures to quality. 0 is worst (small), 100 is best (big). (default:85)

                sb.Append(" \"" + pdfPath + "\"");//input

                Process proc = new Process();

                proc.StartInfo.FileName = exe;

                proc.StartInfo.Arguments = sb.ToString();

                proc.StartInfo.WindowStyle = System.Diagnostics.ProcessWindowStyle.Hidden;

                proc.Start();

                proc.WaitForExit();

                proc.Close();

            }
            catch (Exception ex)
            {
                throw ex;
            }
        }

        /// <summary>

        /// 返回页数

        /// </summary>

        /// <param name="pdfPath">PDF文件地址</param>

        private static int GetPageCount(string pdfPath)
        {

            byte[] buffer = System.IO.File.ReadAllBytes(pdfPath);

            int length = buffer.Length;

            if (buffer == null)

                return -1;

            if (buffer.Length <= 0)

                return -1;

            string pdfText = Encoding.Default.GetString(buffer);

            System.Text.RegularExpressions.Regex rx1 = new System.Text.RegularExpressions.Regex(@"/Type\s*/Page[^s]");

            System.Text.RegularExpressions.MatchCollection matches = rx1.Matches(pdfText);

            return matches.Count;

        }


    }
}
以上就是转化代码,pdf2swfPath 是配置转化工具的安装路径
到这里就已经把word转化成了swf,最后就是要显示的问题了
第三步 用 flexpaper来显示 ,点击下载附件
在本地测试的时候一切顺利,没成想部署到服务器上时一堆问题,真是令人崩溃。
第一个错误就是

百度一查说是权限的问题,好了那就按上面的配置呗,这过程也有些曲折
一.安装office 2007 和 SaveAsPDFandXPS 或 安装office 2010
二.设置组件权限
1. 在"开始"->"运行"中输入dcomcnfg.exe启动"组件服务" (comexp.msc -32)
2. 依次双击"组件服务"->"计算机"->"我的电脑"->"DCOM配置"
3:在"DCOM配置"中找到"Microsoft word 应用程序",在它上面点击右键,然后点击"属性",弹出"Microsoft word 应用程序属性"对话框
4.点击"标识"标签,选择"交互式用户"
5:点击"安全"标签,在"启动和激活权限"上点击"自定义",然后点击对应的"编辑"按钮,在弹出的"安全性"对话框中填加一个"authenticated users"用户(注意要选择本计算机名),并给它赋予"本地启动"和"本地激活"权限.
6:依然是"安全"标签,在"访问权限"上点击"自定义",然后点击"编辑",在弹出的"安全性"对话框中也填加一个"authenticated users"用户,然后赋予"本地访问"权限.
注:网上查到的方法是添加 “NETWORK SERVICE”用户 我试了不行,换成 “authenticated users”就可以了
总结:刚做的时候感觉有点复杂,完成之后再理了理思路就简单多了。刚部署的服务器的时候有问题,我又不好操作服务器,就只能先在本机装一个虚拟机hyper-v,配置一个生产环境,要学习怎么装虚拟机,要装操作系统,要怎么共享网络,要怎么共享文件等等,感觉这次接触的新东西蛮多,收获也多,下次有时间写写这方面的东西。 希望可以帮到有需求的人。
注:如果你还有疑问,可以留言....


 浙公网安备 33010602011771号