
实验三 类与对象Ⅱ
实验任务4:
模拟实验任务2,不使用标准库模板类vector,自己动手设计并实现一个动态的整型数组类Vector_int, 使其支持以下要求: 支持在创建int型数组对象时,指定其大小 支持在创建int型数组对象时,指定其大小,并将数组对象中每个数据项初始化到特定的值value 支持用已经存在的int型数组对象x,来构造新的int型数组对象y(要求实现深复制) 提供方法at()能够支持诸如 x.at(i) 这样通过索引访问动态int型数组对象中第i个数据项 析构函数,释放占用的内存资源 在构造和析构函数里,增加打印输出信息。运行程序时,帮助观察资源是否正确释放。
Vector_int.hpp:
 1 #ifndef VECTOR_INT_H
 2 #define VECTOR_INT_H
 3 #include<iostream>
 4 using namespace std;
 5 class Vector_int
 6 {
 7 public:
 8     Vector_int(int n0)
 9     {
10         n = n0;
11         arr = new int[n];
12         value = 0;
13         for (int i = 0; i < n; i++)
14             arr[i] = value;
15         cout << "Vector构造函数的调用" << endl;
16     }
17     Vector_int(int n0, int x) :n(n0), value(x)
18     {
19         arr = new int[n];
20         for (int i = 0; i < n; i++)
21             arr[i] = value;
22         cout << "Vector构造函数的调用" << endl;
23     }
24     Vector_int(const Vector_int& p)
25     {
26         n = p.n;
27         value = p.value;
28         arr = new int[p.n];
29         for (int i = 0; i < n; i++)
30             arr[i] = value;
31         cout << "Vector拷贝构造函数的调用" << endl;
32     }
33     ~Vector_int()
34     {
35         if (arr != NULL)
36         {
37             delete []arr;
38             arr = NULL;
39         }
40         cout << "Vector析构函数的调用" << endl;
41     }
42     int &at(int x)
43     {
44         return arr[x];
45     }
46     void print()const
47     {
48         for (int i = 0; i < n; i++)
49         {
50             cout << arr[i] << " ";
51         }
52         cout << endl;
53     }
54 private:
55     int n, value;
56     int* arr;
57 };
58 #endif;
task.cpp:
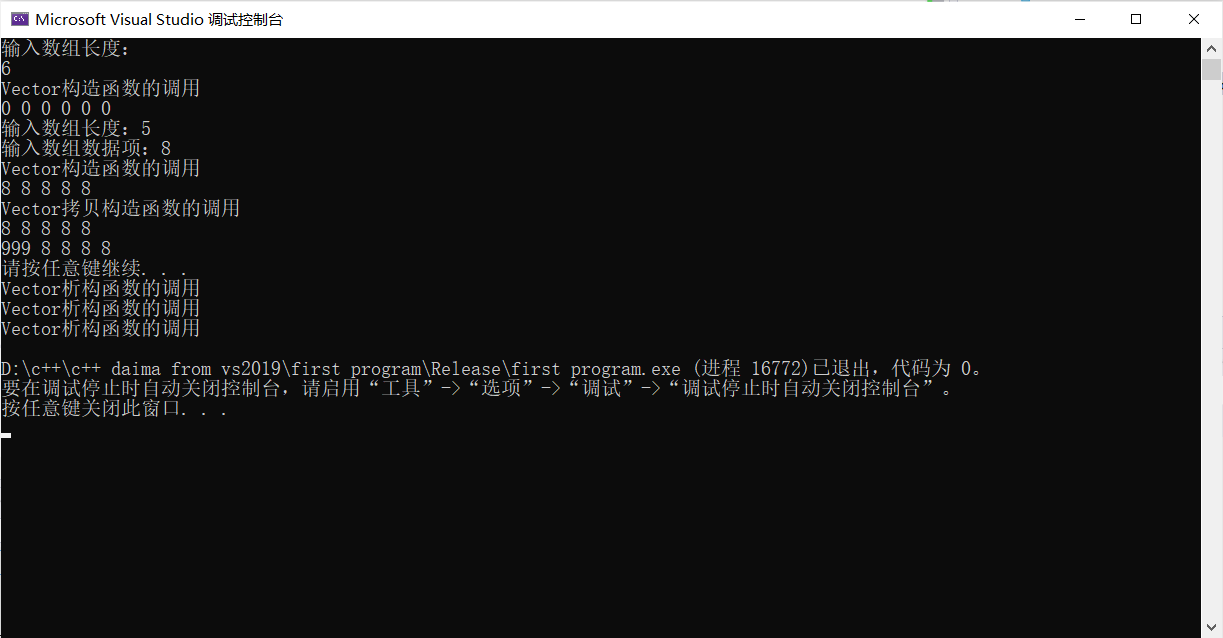
 1 #include<iostream>
 2 #include"vector_int.hpp"
 3 using namespace std;
 4 int main()
 5 {
 6     int n;
 7     cout << "输入数组长度:" << endl;
 8     cin >> n;
 9     Vector_int x(n);
10     x.print();
11     int m, value;
12     cout << "输入数组长度:";
13     cin >> m;
14     cout << "输入数组数据项:";
15     cin >> value;
16     Vector_int x1(m, value);
17     x1.print();
18     Vector_int y(x1);
19     y.print();
20     y.at(0) = 999;
21     y.print();
22     system("pause");
23 }
运行结果截图:
Martix.hpp
 1 #ifndef MATRIX_H
 2 #define MATRIX_H
 3 #include <iostream>
 4 #include <cassert>
 5 using namespace std;
 6 class Matrix
 7 {
 8 public:
 9     Matrix(int n);                     // 构造函数,构造一个n*n的矩阵
10     Matrix(int n, int m);              // 构造函数,构造一个n*m的矩阵
11     Matrix(const Matrix& X);           // 复制构造函数,使用已有的矩阵X构造
12     ~Matrix();                         //析构函数
13     void set(const double* pvalue);     // 用pvalue指向的连续内存块数据为矩阵赋值
14     void set(int i, int j, int value); //设置矩阵第i行第j列元素值为value
15     double& at(int i, int j);          //返回矩阵第i行第j列元素的引用
16     double at(int i, int j) const;     // 返回矩阵第i行第j列元素的值
17     int get_lines() const;             //返回矩阵行数
18     int get_cols() const;              //返回矩列数
19     void print() const;                // 按行打印输出矩阵
20 private:
21     int lines; // 矩阵行数
22     int cols;  // 矩阵列数
23     double* p; // 指向存放矩阵数据的内存块的首地址
24 };
25 Matrix::Matrix(int n)
26 {
27     lines = n;
28     cols = n;
29     p = new double[n * n];
30 }
31 Matrix::Matrix(int n, int m)
32 {
33     lines = n;
34     cols = m;
35     p = new double[n * m];
36 }
37 Matrix::Matrix(const Matrix& X)
38 {
39     lines = X.lines;
40     cols = X.cols;
41     p = new double[X.lines * X.cols];
42     for (int i = 0; i < lines * cols; i++)
43     p[i] = X.p[i];
44 }
45 Matrix::~Matrix()
46 {
47     if (p != NULL)
48     {
49         delete []p;
50         p = NULL;
51     }
52 }
53 void Matrix::set(const double* pvalue)
54 {
55     for (int i = 0; i < lines * cols; i++)
56     {
57         p[i] = pvalue[i];
58     }
59 }
60 void Matrix::set(int i, int j, int value)
61 {
62     p[i * cols + j] = value;
63 }
64 double& Matrix::at(int i, int j)
65 {
66     return p[i * cols + j];
67 }
68 double Matrix::at(int i, int j) const
69 {
70     return p[i * lines + j];
71 }
72 int Matrix::get_lines() const
73 {
74     return lines;
75 }
76 int Matrix::get_cols() const
77 {
78     return cols;
79 }
80 void  Matrix::print() const
81 {
82     for (int i = 0; i < lines; i++)
83     {
84         for (int j = 0; j < cols; j++)
85         {
86             cout << p[i * cols + j] << ", ";
87         }
88         cout << "\b\b " << endl;
89     }
90 }
91 #endif
task5.hpp
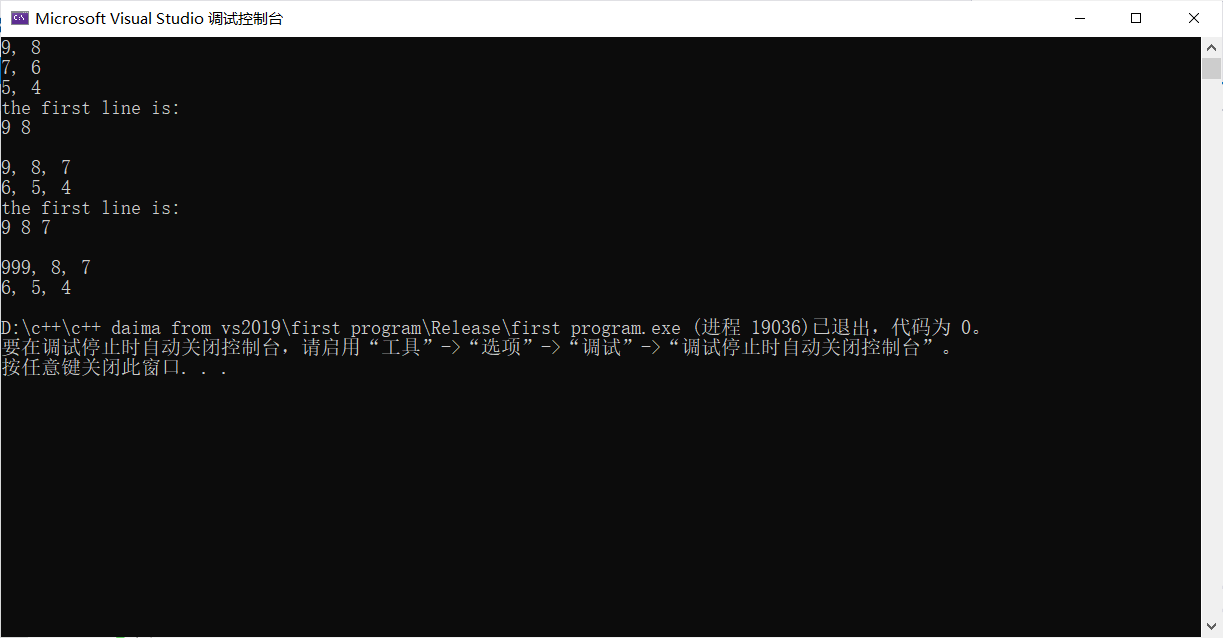
 1 #include <iostream>
 2 #include "matrix.hpp"
 3 int main()
 4 {
 5     using namespace std;
 6     double x[] = { 9, 8, 7, 6, 5, 4 };
 7
 8     Matrix m1(3, 2);    // 创建一个3×2的矩阵
 9     m1.set(x);          // 用一维数组x的值按行为矩阵m1赋值
10     m1.print();         // 打印矩阵m1的值
11     cout << "the first line is: " << endl;
12     cout << m1.at(0, 0) << " " << m1.at(0, 1) << endl;
13     cout << endl;
14     Matrix m2(2, 3);
15     m2.set(x);
16     m2.print();
17     cout << "the first line is: " << endl;
18     cout << m2.at(0, 0) << " " << m2.at(0, 1) << " " << m2.at(0, 2) << endl;
19     cout << endl;
20     Matrix m3(m2);
21     m3.set(0, 0, 999);
22     m3.print();
23 }
更改数据后运行结果截图:
实验总结:
如果需要在一行的末尾用\b退去及格字符,则需要在该行最后一个\b后面加上一个空格(或者任意其他字符)

 浙公网安备 33010602011771号