
zabbix5.0监控mysql
最近开发让对mysql数据库进行监控,由于公司的开发大部分都是以WINDOWS环境下运行的,只有少部分是在LINUX下。我自己先在linux做了一个测试。按照网上教程折腾了三天。最后看着官方教程很轻松的就配置完成了。
先来看一下官方说明:
https://git.zabbix.com/projects/ZBX/repos/zabbix/browse/templates/db/mysql_agent?at=refs%2Fheads%2Ffeature%2FZBX-20728-5.0
Template DB MySQL by Zabbix agent
Overview
For Zabbix version: 5.0 and higher
The template is developed for monitoring DBMS MySQL and its forks.
This template was tested on:
- MySQL, version 5.7, 8.0
- Percona, version 8.0
- MariaDB, version 10.4
Setup
See Zabbix template operation for basic instructions.
- Install Zabbix agent and MySQL client. If necessary, add the path to the
mysqlandmysqladminutilities to the global environment variable PATH. - Copy
template_db_mysql.confinto the folder with Zabbix agent configuration (/etc/zabbix/zabbix_agentd.d/by default). Don't forget to restart Zabbix agent. - Create a MySQL user for monitoring (
<password>at your discretion):
CREATE USER 'zbx_monitor'@'%' IDENTIFIED BY '<password>';
GRANT REPLICATION CLIENT,PROCESS,SHOW DATABASES,SHOW VIEW ON *.* TO 'zbx_monitor'@'%';
For more information, please see MySQL documentation https://dev.mysql.com/doc/refman/8.0/en/grant.html
- Create
.my.cnfin the home directory of Zabbix agent for Linux (/var/lib/zabbixby default ) ormy.cnfin c:\ for Windows. The file must have three strings:
[client]
user='zbx_monitor'
password='<password>'
NOTE: Use systemd to start Zabbix agent on Linux OS. For example, in Centos use "systemctl edit zabbix-agent.service" to set the required user to start the Zabbix agent.
Add the rule to the SELinux policy (example for Centos):
# cat <<EOF > zabbix_home.te
module zabbix_home 1.0;

require {
        type zabbix_agent_t;
        type zabbix_var_lib_t;
        type mysqld_etc_t;
        type mysqld_port_t;
        type mysqld_var_run_t;
        class file { open read };
        class tcp_socket name_connect;
        class sock_file write;
}

#============= zabbix_agent_t ==============

allow zabbix_agent_t zabbix_var_lib_t:file read;
allow zabbix_agent_t zabbix_var_lib_t:file open;
allow zabbix_agent_t mysqld_etc_t:file read;
allow zabbix_agent_t mysqld_port_t:tcp_socket name_connect;
allow zabbix_agent_t mysqld_var_run_t:sock_file write;
EOF
# checkmodule -M -m -o zabbix_home.mod zabbix_home.te
# semodule_package -o zabbix_home.pp -m zabbix_home.mod
# semodule -i zabbix_home.pp
# restorecon -R /var/lib/zabbix
首先要注意Mysql版本及Zabbix Server版本
安装步骤:
1、安装mysql及zabbix agent,把mysql及mysqladmin加入环境变量。
2、复制 template_db_mysql.conf 到 /etc/zabbix/zabbix_agentd.d/目录下。
复制完毕以后记着不要忘记重启zabbix agent . systemctl restart agent客户端
template_db_mysql.conf内容
#template_db_mysql.conf created by Zabbix for "Template DB MySQL" and Zabbix 4.2
#For OS Linux: You need create .my.cnf in zabbix-agent home directory (/var/lib/zabbix by default)
#For OS Windows: You need add PATH to mysql and mysqladmin and create my.cnf in %WINDIR%\my.cnf,C:\my.cnf,BASEDIR\my.cnf https://dev.mysql.com/doc/refman/5.7/en/option-files.html
#The file must have three strings:
#[client]
#user='zbx_monitor'
#password='<password>'
#
UserParameter=mysql.ping[*], mysqladmin -h"$1" -P"$2" ping
UserParameter=mysql.get_status_variables[*], mysql -h"$1" -P"$2" -sNX -e "show global status"
UserParameter=mysql.version[*], mysqladmin -s -h"$1" -P"$2" version
UserParameter=mysql.db.discovery[*], mysql -h"$1" -P"$2" -sN -e "show databases"
UserParameter=mysql.dbsize[*], mysql -h"$1" -P"$2" -sN -e "SELECT COALESCE(SUM(DATA_LENGTH + INDEX_LENGTH),0) FROM INFORMATION_SCHEMA.TABLES WHERE TABLE_SCHEMA='$3'"
UserParameter=mysql.replication.discovery[*], mysql -h"$1" -P"$2" -sNX -e "show slave status"
UserParameter=mysql.slave_status[*], mysql -h"$1" -P"$2" -sNX -e "show slave status"
3、建立zabbix专用的mysql用户用来监控mysql相关性能数据。
CREATE USER 'zbx_monitor'@'%' IDENTIFIED BY '<password>';
GRANT REPLICATION CLIENT,PROCESS,SHOW DATABASES,SHOW VIEW ON *.* TO 'zbx_monitor'@'%';
4、在/var/lib/zabbix 下建立.my.cnf 文件,注意 .my.cnf 前面是有一个标点的.文件内容如下;
[client]
user='zbx_monitor'
password='<password>'
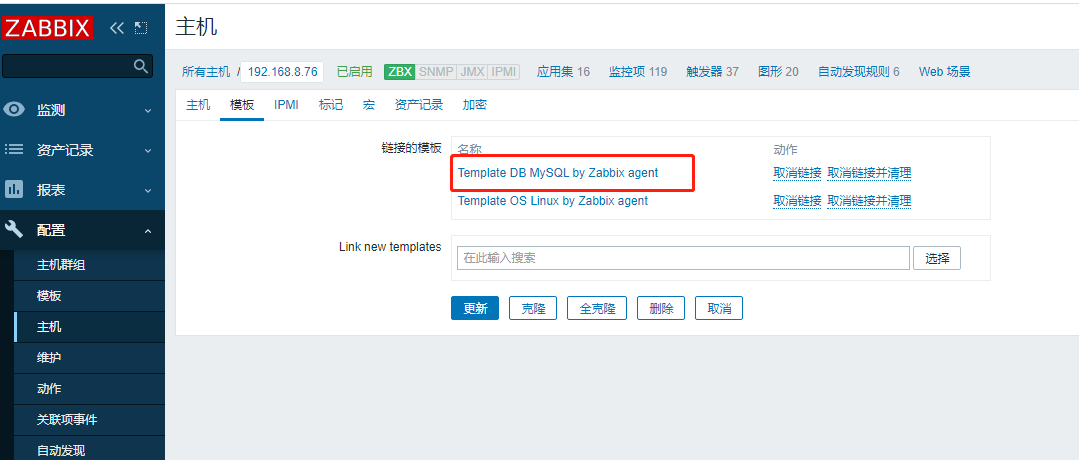
以上步骤完成以后需要在zabbix server中建立监控主机并添加模板Template DB MySQL by Zabbix agent.
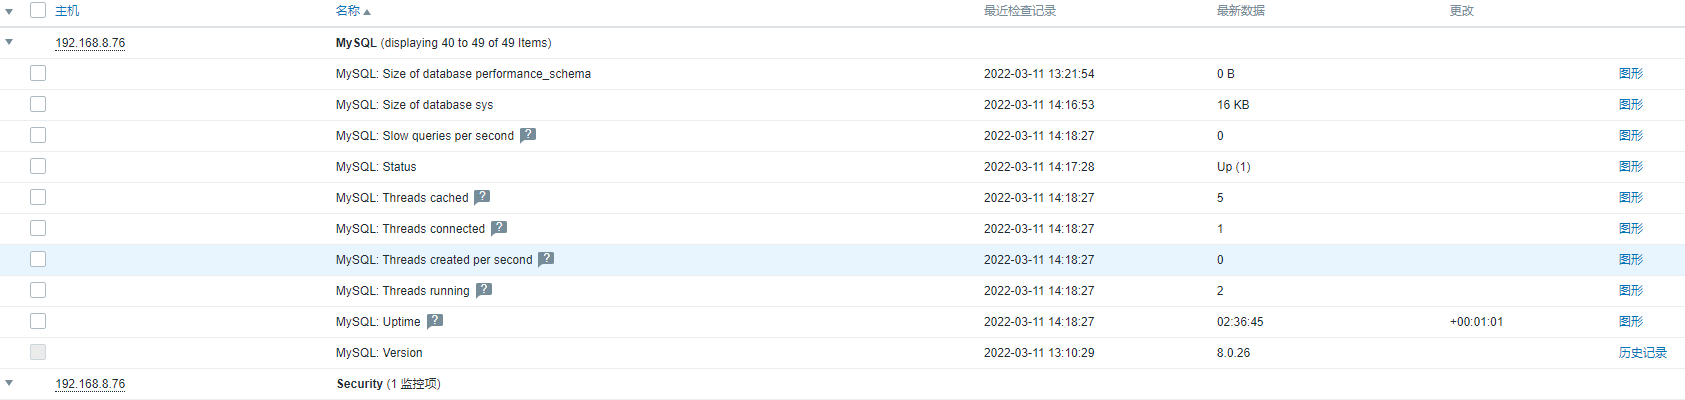
然后需要等待5-10分钏再查看mysql已有监控数据.

 浙公网安备 33010602011771号