OpenCV开发实战1——抖音哈哈镜效果
前言
在抖音中,我们经常看到各种抖音玩家都喜欢使用哈哈镜效果。那么什么是哈哈镜呢?
在现实生活中,哈哈镜是指一种表面凹凸不平的镜子,可以反应出人像及物体的扭曲面貌。简单点来说就是拉伸人脸(物件),或者压缩人脸(物体)的效果。
哈哈镜实现原理
假设输入图像的宽高为w和h,图像中心点的坐标为(cx,cy)。那么图像中任意一点(x,y)到中心点的距离为(x-cx),(y-cy)。
那么拉升放大,图像变换的半径为r(r是哈哈镜的范围大小),得到公式如下:
x=(tx/2)(sqrt(txtx+tyty)/r)+cx
y=(ty/2)(sqrt(txtx+tyty)/r)+cy
同理,压缩缩小的公式如下(compress为压缩强度):
x=cos(atan2(ty,tx))compresssqrt(sqrt(txtx+tyty))+cx
x=cos(atan2(ty,tx))compresssqrt(sqrt(txtx+tyty))+cy
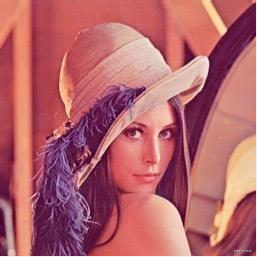
原始图像:
基于OpenCV的哈哈镜放大实现
既然我们了解了其数学公式以及其实现的原理,下面我们来直接实现哈哈镜的放大效果。具体代码如下所示:
import cv2
import math
#哈哈镜放大效果实现
def enlarge_effect(img):
    h, w, n = img.shape
    cx = w / 2
    cy = h / 2
    radius = 100#该值可以自行定义,它决定了哈哈镜的大小,当图像很大时,应该相应的调大
    r = int(radius / 2.0)
    new_img = img.copy()
    for i in range(w):
        for j in range(h):
            tx = i - cx
            ty = j - cy
            distance = tx * tx + ty * ty
            if distance < radius * radius:
                x = int(int(tx / 2.0) * (math.sqrt(distance) / r) + cx)
                y = int(int(ty / 2.0) * (math.sqrt(distance) / r) + cy)
                if x < w and y < h:
                    new_img[j, i, 0] = img[y, x, 0]
                    new_img[j, i, 1] = img[y, x, 1]
                    new_img[j, i, 2] = img[y, x, 2]
    return new_img


if __name__ == "__main__":
    img = cv2.imread("4.jpg")
    enlarge_img = enlarge_effect(img)
    cv2.imshow("4", enlarge_img)
    cv2.waitKey()
    cv2.destroyAllWindows()
运行后的效果:
需要注意的是,上面的计算过程可能导致有浮点数的出现,而像素值必须为整数。所以,为了保证像素值的有效性,必须在计算过程完整之后,进行强制类型转换int()。另外,计算x,y值时,可能会导致超过图像坐标的范围,所以必须用x<w和y<h来判断防止越界。
基于OpenCV的哈哈镜缩小实现
具体代码如下所示:
import cv2
import math

#哈哈镜缩小效果实现
def reduce_effect(img):
    h, w, n = img.shape
    cx = w / 2
    cy = h / 2
    radius = 100
    r = int(radius / 2.0)
    compress = 8
    new_img = img.copy()
    for i in range(w):
        for j in range(h):
            tx = i - cx
            ty = j - cy
            x = int(cx + (math.sqrt(math.sqrt(tx * tx + ty * ty)) * compress * math.cos(math.atan2(ty, tx))))
            y = int(cy + (math.sqrt(math.sqrt(tx * tx + ty * ty)) * compress * math.sin(math.atan2(ty, tx))))
            if x < 0 and x > w:
                x = 0
            if y < 0 and y > h:
                y = 0
            if x < w and y < h:
                new_img[j, i, 0] = img[y, x, 0]
                new_img[j, i, 1] = img[y, x, 1]
                new_img[j, i, 2] = img[y, x, 2]
    return new_img

if __name__ == "__main__":
    img = cv2.imread("lena.jpg")
    frame = reduce_effect(img)
    cv2.imshow("lena1", img)
    cv2.imshow("lena2", frame)
    cv2.waitKey()
    cv2.destroyAllWindows()
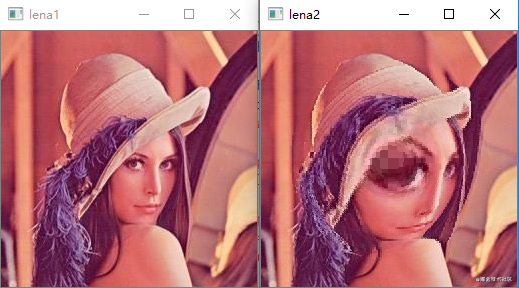
运行后的效果如下:
视频实现哈哈镜效果
抖音上面的哈哈镜都是动态的,并不是单一的图片这么变来变去。其实,只要我们集合摄像头视频录制功能,就可以完成视频哈哈镜的动态效果。具体代码如下:
import cv2
import math

#哈哈镜放大效果实现
def enlarge_effect(img):
    h, w, n = img.shape
    cx = w / 2
    cy = h / 2
    radius = 100#该值可以自行定义,它决定了哈哈镜的大小,当图像很大时,应该相应的调大
    r = int(radius / 2.0)
    new_img = img.copy()
    for i in range(w):
        for j in range(h):
            tx = i - cx
            ty = j - cy
            distance = tx * tx + ty * ty
            if distance < radius * radius:
                x = int(int(tx / 2.0) * (math.sqrt(distance) / r) + cx)
                y = int(int(ty / 2.0) * (math.sqrt(distance) / r) + cy)
                if x < w and y < h:
                    new_img[j, i, 0] = img[y, x, 0]
                    new_img[j, i, 1] = img[y, x, 1]
                    new_img[j, i, 2] = img[y, x, 2]
    return new_img

#哈哈镜缩小效果实现
def reduce_effect(img):
    h, w, n = img.shape
    cx = w / 2
    cy = h / 2
    radius = 100
    r = int(radius / 2.0)
    compress = 8
    new_img = img.copy()
    for i in range(w):
        for j in range(h):
            tx = i - cx
            ty = j - cy
            x = int(cx + (math.sqrt(math.sqrt(tx * tx + ty * ty)) * compress * math.cos(math.atan2(ty, tx))))
            y = int(cy + (math.sqrt(math.sqrt(tx * tx + ty * ty)) * compress * math.sin(math.atan2(ty, tx))))
            if x < 0 and x > w:
                x = 0
            if y < 0 and y > h:
                y = 0
            if x < w and y < h:
                new_img[j, i, 0] = img[y, x, 0]
                new_img[j, i, 1] = img[y, x, 1]
                new_img[j, i, 2] = img[y, x, 2]
    return new_img

if __name__ == "__main__":
    cap = cv2.VideoCapture("video.mp4")
    while (cap.isOpened()):
        ret, frame = cap.read()
        enlarge_img = enlarge_effect(frame)
        frame = reduce_effect(frame)
        cv2.imshow('video1', enlarge_img)
        cv2.imshow('video2', frame)
        c = cv2.waitKey(1)
        if c == 27:
            break
    cap.release()
    cv2.destroyAllWindows()
