zabbix5.0集群部署及钉钉,企业微信,邮件告警对接
注意项:
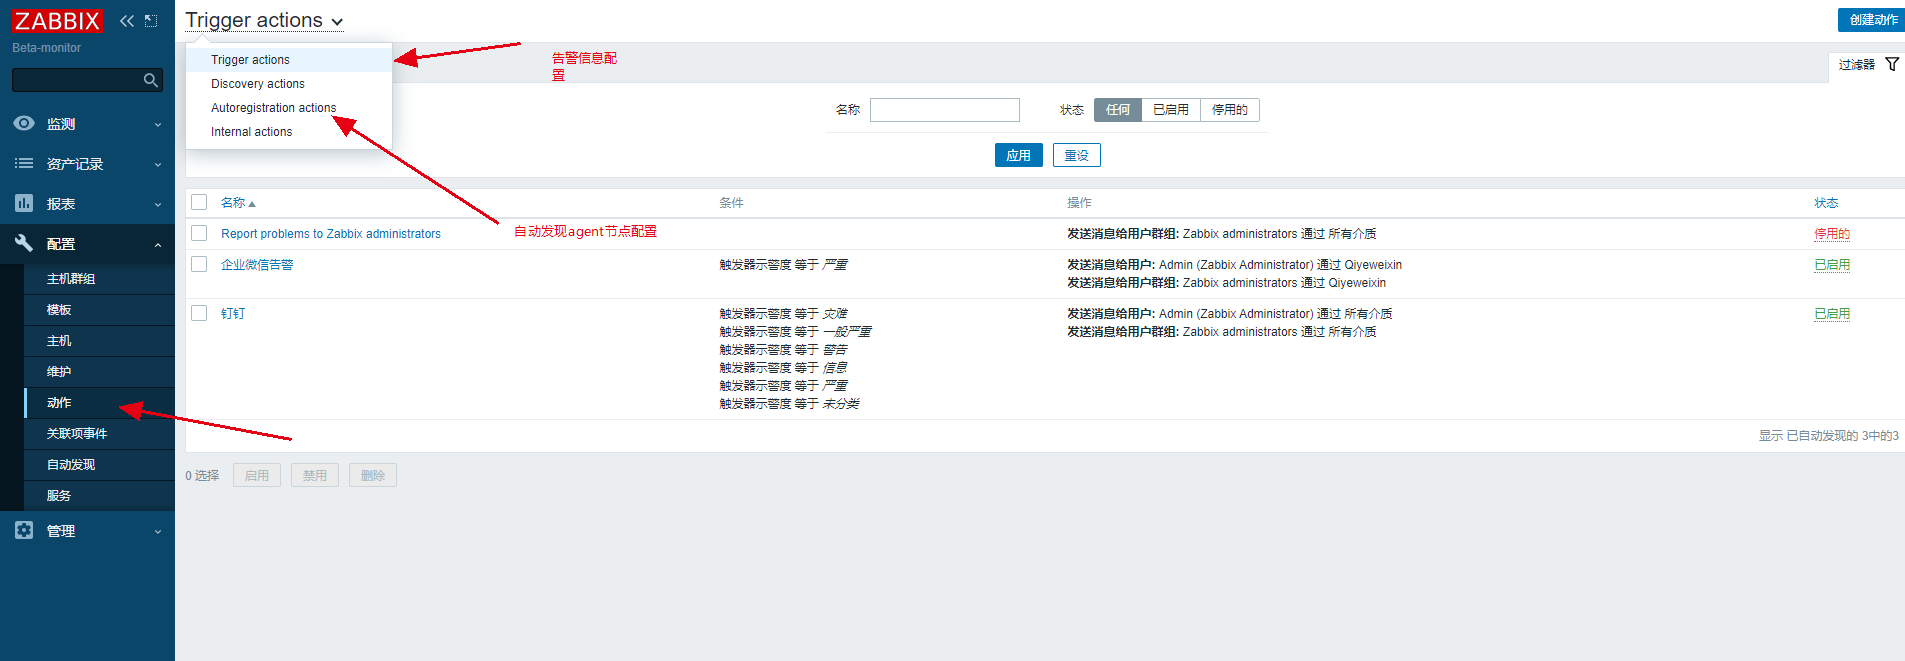
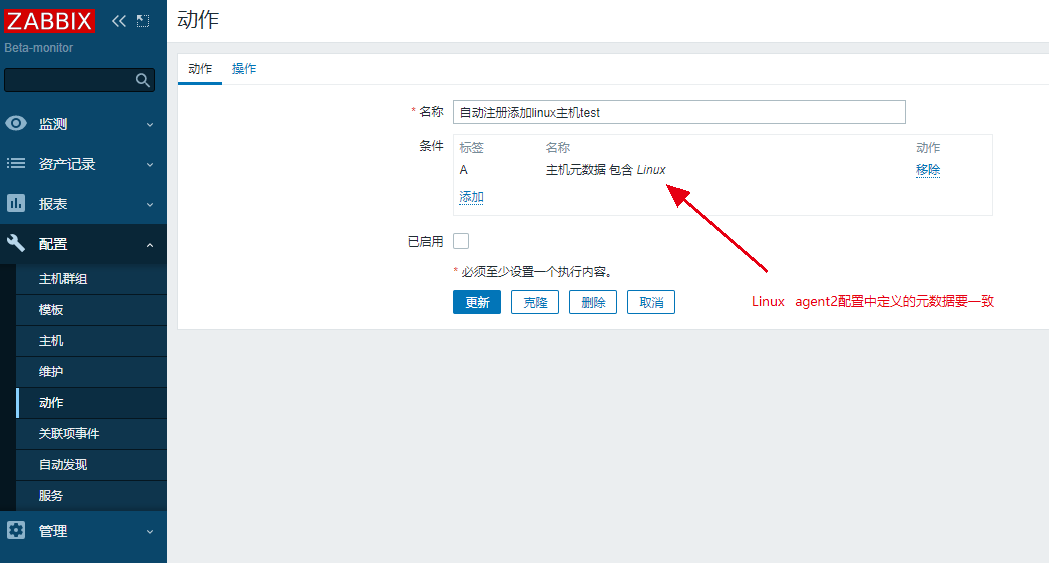
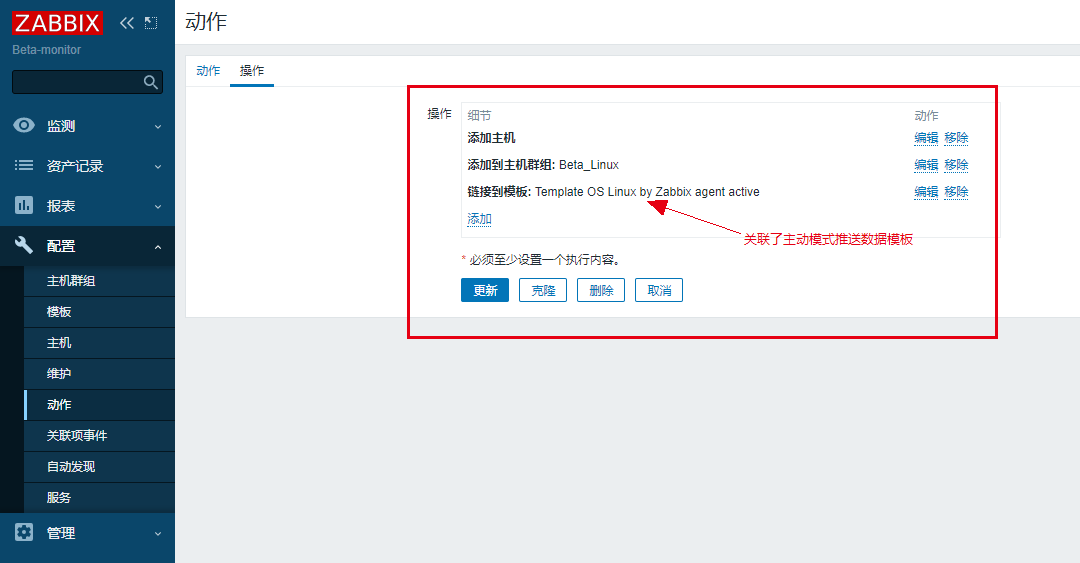
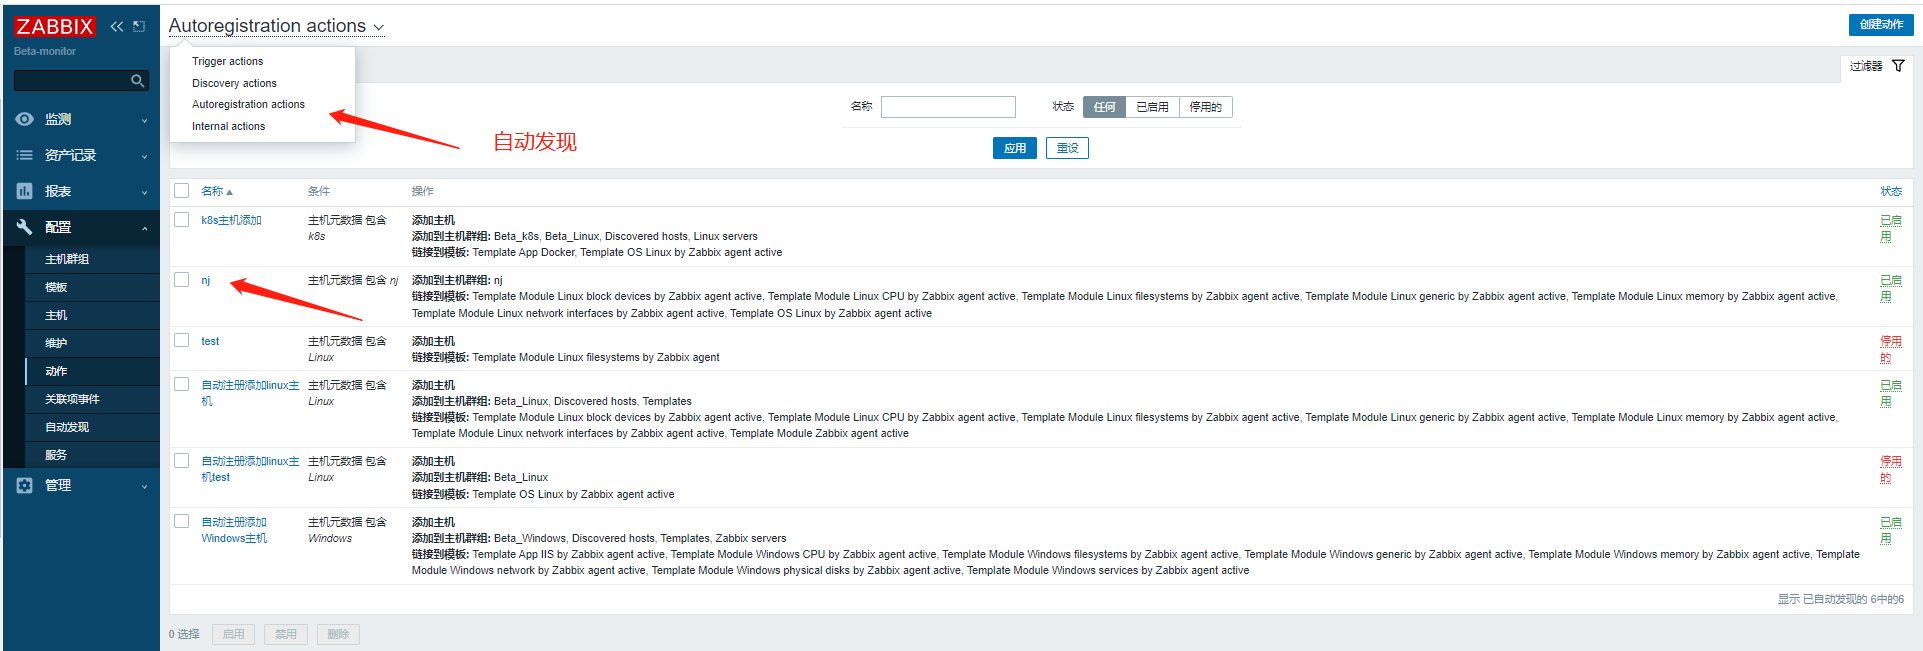
自动注册比自动发现高效,此处为自动注册后,添加主机---->添加主机群组----->链接到模板

官方帮助文档:
https://www.zabbix.com/documentation/5.0/zh/manual/installation
https://www.zabbix.com/cn/download?zabbix=5.0&os_distribution=red_hat_enterprise_linux&os_version=8&db=mysql&ws=nginx
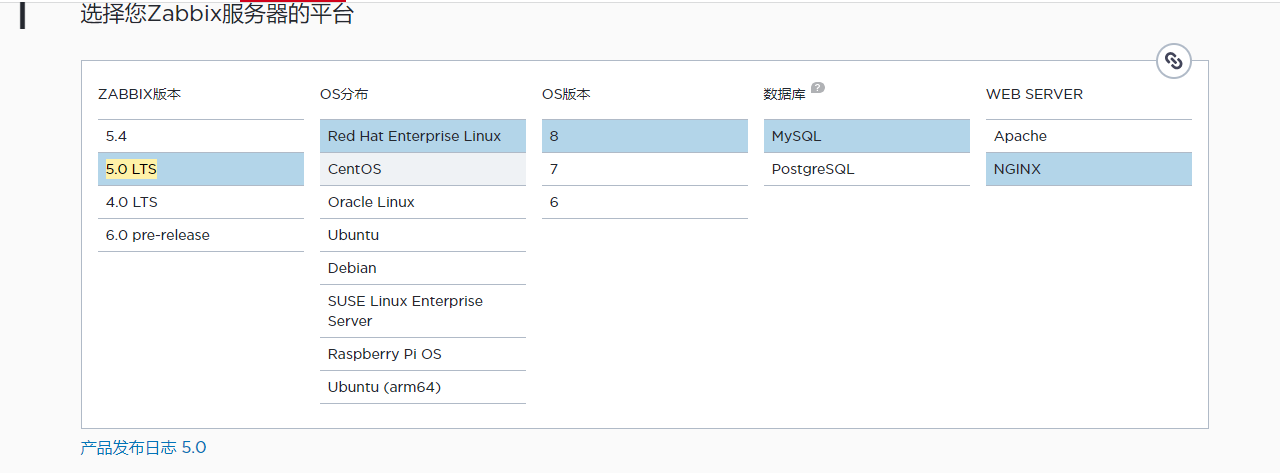
a. Install Zabbix repository
# rpm -Uvh https://repo.zabbix.com/zabbix/5.0/rhel/8/x86_64/zabbix-release-5.0-1.el8.noarch.rpm
# dnf clean all
sed -i "s/gpgcheck=1/gpgcheck=0/g" /etc/yum.repos.d/zabbix.repo
cat zabbix.repo
sed -i "s/enabled=0/enabled=1/g" /etc/yum.repos.d/zabbix.repo
cat zabbix.repo
yum clean all
b. 安装Zabbix server,Web前端,agent
# dnf install zabbix-server-mysql zabbix-web-mysql zabbix-nginx-conf zabbix-agent

c. 创建初始数据库
Make sure you have database server up and running.

在数据库主机上运行以下代码。

# mysql -uroot -p
password
mysql> create database zabbix character set utf8 collate utf8_bin;
mysql> create user zabbix@'%' identified by '123456';
mysql> grant all privileges on zabbix.* to zabbix@'%';
mysql> quit;

导入初始架构和数据,系统将提示您输入新创建的密码。

# zcat /usr/share/doc/zabbix-server-mysql*/create.sql.gz | mysql -uzabbix -p zabbix

d. 为Zabbix server配置数据库
编辑配置文件 /etc/zabbix/zabbix_server.conf

DBPassword=password
e. 为Zabbix前端配置PHP
编辑配置文件 /etc/nginx/conf.d/zabbix.conf, uncomment and set 'listen' and 'server_name' directives.

# listen 80;
# server_name example.com;
        listen          8083;
        server_name     192.168.45.1;


编辑配置文件 /etc/php-fpm.d/zabbix.conf, uncomment and set the right timezone for you.

; php_value[date.timezone] = Europe/Riga
php_value[date.timezone] = Asia/Shanghai

f. 启动Zabbix server和agent进程
启动Zabbix server和agent进程,并为它们设置开机自启:

# systemctl restart zabbix-server zabbix-agent nginx php-fpm
# systemctl enable zabbix-server zabbix-agent nginx php-fpm

Admin/zabbix
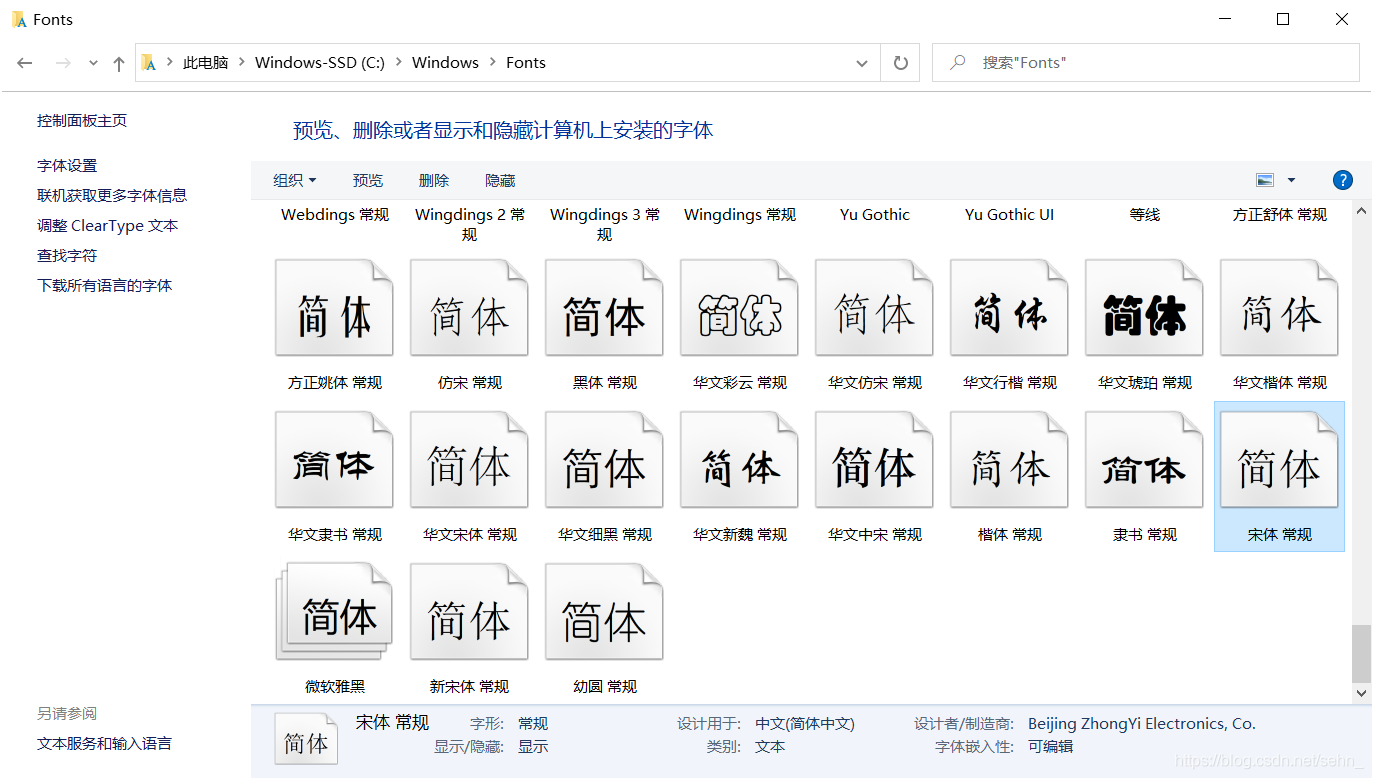
字符乱码集修改
[root@zabbix-server fonts]# pwd
/usr/share/zabbix/assets/fonts   //zabbix5.0字体文件目录
[root@zabbix-server fonts]# ls
graphfont.ttf
[root@zabbix-server fonts]# mv graphfont.ttf graphfont.ttf.bak
[root@zabbix-server fonts]# ls
graphfont.ttf.bak
[root@zabbix-server fonts]# ls
graphfont.ttf.bak  simsun.ttc
[root@zabbix-server fonts]# mv simsun.ttc  graphfont.ttf
最简单的方法有效的方法
Linux配置zabbix_server.conf
[root@BETAWS32 alertscripts]# egrep -v "^#|^$" /etc/zabbix/zabbix_server.conf
LogFile=/var/log/zabbix/zabbix_server.log
LogFileSize=0
PidFile=/var/run/zabbix/zabbix_server.pid
SocketDir=/var/run/zabbix
DBName=zabbix
DBUser=zabbix
DBPassword=123456
DBHost=192.168.45.1
SNMPTrapperFile=/var/log/snmptrap/snmptrap.log
Timeout=4
AlertScriptsPath=/usr/lib/zabbix/alertscripts
ExternalScripts=/usr/lib/zabbix/externalscripts
LogSlowQueries=3000
zabbix_agent部署需要注意,默认用的zabbix用户启动,linux亲测权限问题导致agent端获取自定义key成功,zabbix-server端获取失败,或者获取到,但是值和agent端不一致,后面需要更改配置文件属主数组权限
chown zabbix.zabbix /etc/zabbix -R
systemctl restart zabbix-agent2
Linux 配置zabbix_agent2.conf
PidFile=/var/run/zabbix/zabbix_agent2.pid
LogFile=/var/log/zabbix/zabbix_agent2.log
LogFileSize=0
Server=192.168.45.1
ServerActive=192.168.45.1
Hostname=192.168.45.1
HostMetadata=Linux
Include=/etc/zabbix/zabbix_agent2.d/*.conf
UnsafeUserParameters=1
ControlSocket=/tmp/agent.sock
Windows 配置zabbix_agent2.conf
LogFile=C:\Program Files\Zabbix Agent 2\zabbix_agent2.log
Server=192.168.45.1
ServerActive=192.168.45.1
Hostname=192.168.44.232
HostMetadata=Windows
RefreshActiveChecks=60
BufferSize=10000
Include=C:\Program Files\Zabbix Agent 2\zabbix_agent2.conf.d\*.conf
UnsafeUserParameters=1
ControlSocket=\\.\pipe\agent.sock
Plugins.Log.MaxLinesPerSecond=200
Plugins.WindowsEventlog.MaxLinesPerSecond=200
企业微信机器人告警对接
方式一:
var Qiyeweixin = {
  key: null,

  message: null,
  msgtype: "markdown",
  proxy: null,

  sendMessage: function () {
    var params = {
        msgtype: Qiyeweixin.msgtype,
        markdown: {
          content: Qiyeweixin.message,
        },
      },
      data,
      response,
      request = new CurlHttpRequest(),
      url =
        "https://qyapi.weixin.qq.com/cgi-bin/webhook/send?key=" +
        Qiyeweixin.key;

    if (Qiyeweixin.proxy) {
      request.setProxy(Qiyeweixin.proxy);
    }

    request.AddHeader("Content-Type: application/json");
    data = JSON.stringify(params);

    // Remove replace() function if you want to see the exposed key in the log file.
    Zabbix.Log(
      4,
      "[Qiyeweixin Webhook] URL: " + url.replace(Qiyeweixin.key, "<BOT KEY>")
    );
    Zabbix.Log(4, "[Qiyeweixin Webhook] params: " + data);
    response = request.Post(url, data);
    Zabbix.Log(4, "[Qiyeweixin Webhook] HTTP code: " + request.Status());

    try {
      response = JSON.parse(response);
    } catch (error) {
      response = null;
    }

    if (request.Status() !== 200 || response.errcode !== 0) {
      if (typeof response.errmsg === "string") {
        throw response.errmsg;
      } else {
        throw "Unknown error. Check debug log for more information.";
      }
    }
  },
};

try {
  var params = JSON.parse(value);

  if (typeof params.Key === "undefined") {
    throw 'Incorrect value is given for parameter "Key": parameter is missing';
  }

  Qiyeweixin.key = params.Key;

  if (params.HTTPProxy) {
    Qiyeweixin.proxy = params.HTTPProxy;
  }

  Qiyeweixin.to = params.To;
  Qiyeweixin.message = params.Subject + "\n" + params.Message;
  Qiyeweixin.sendMessage();

  return "OK";
} catch (error) {
  Zabbix.Log(4, "[Qiyeweixin Webhook] notification failed: " + error);
  throw "Sending failed: " + error + ".";
}
Key  50130ee3-0f43-4639-9eaf-dba538032
Message  {ALERT.MESSAGE}
Subject   {ALERT.SUBJECT}

方式二:
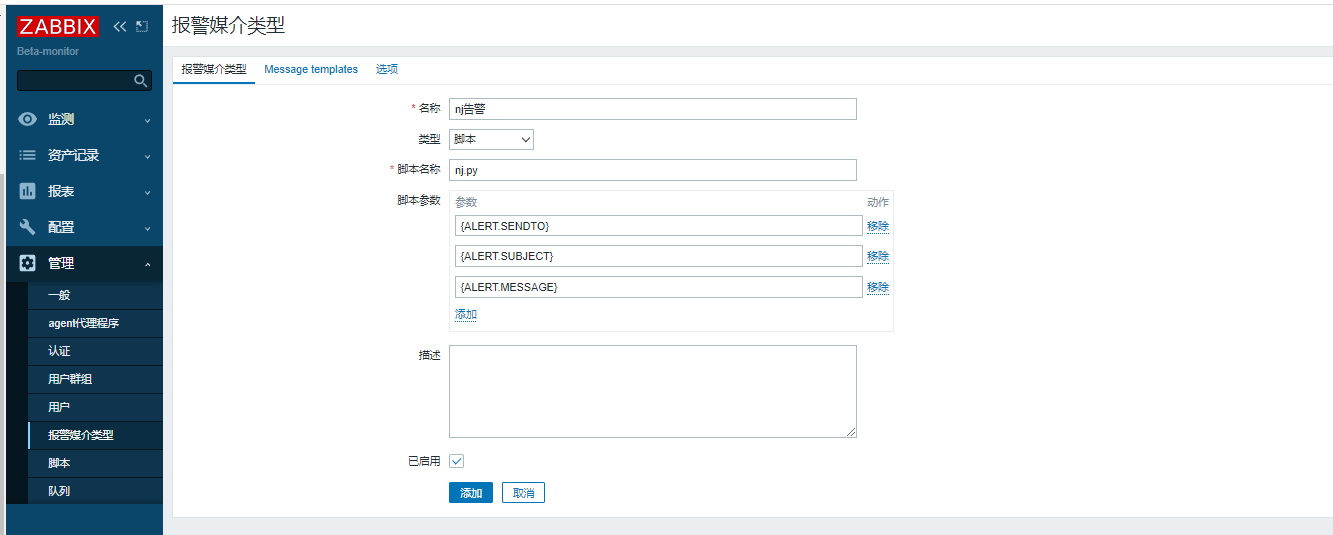
[root@BETAWS32 alertscripts]# pwd
/usr/lib/zabbix/alertscripts
[root@BETAWS32 alertscripts]# cat nj.py
#!/usr/bin/python3.6
#_*_coding:utf-8 _*_
#author:Fei Huang

import requests,sys,json,time
import urllib3
urllib3.disable_warnings()

def SendMessageURL(User,Subject,Messages):
    # 以下URL 引号内的内容替换为你的机器人的webhook的地址
    URL = "https://qyapi.weixin.qq.com/cgi-bin/webhook/send?key=00424382-f290-42e9-93e8-9710c98b3197"
    HEADERS = {"Content-Type": "application/json"}
    Data = {
        "msgtype": "markdown",
        "markdown": {
                "content": Subject + "\n" + Messages,
                #下方代码在群里@相应的人员,注意需要使用userid,就是用户名,不是中文名称,是企业微信通讯录中的“帐号”,这里不用修改,只需要知道账号就可以了。
                "mentioned_list" :[User],
                #"mentioned_list" :[User,"@all"],
                #下方代码可使用手机号进行提示,本示例中并未示例
                #"mentioned_mobile_list" : ["13800000000","@all"]
            }
    }
    r = requests.post(url=URL, headers=HEADERS, json=Data, verify=False)
    print(r.json())

if __name__ == "__main__":
    SENDTO = str(sys.argv[1])
    SUBJECT = str(sys.argv[2])
    MESSAGE = str(sys.argv[3])
    Status = str(SendMessageURL(SENDTO,SUBJECT,MESSAGE))
    print (Status)
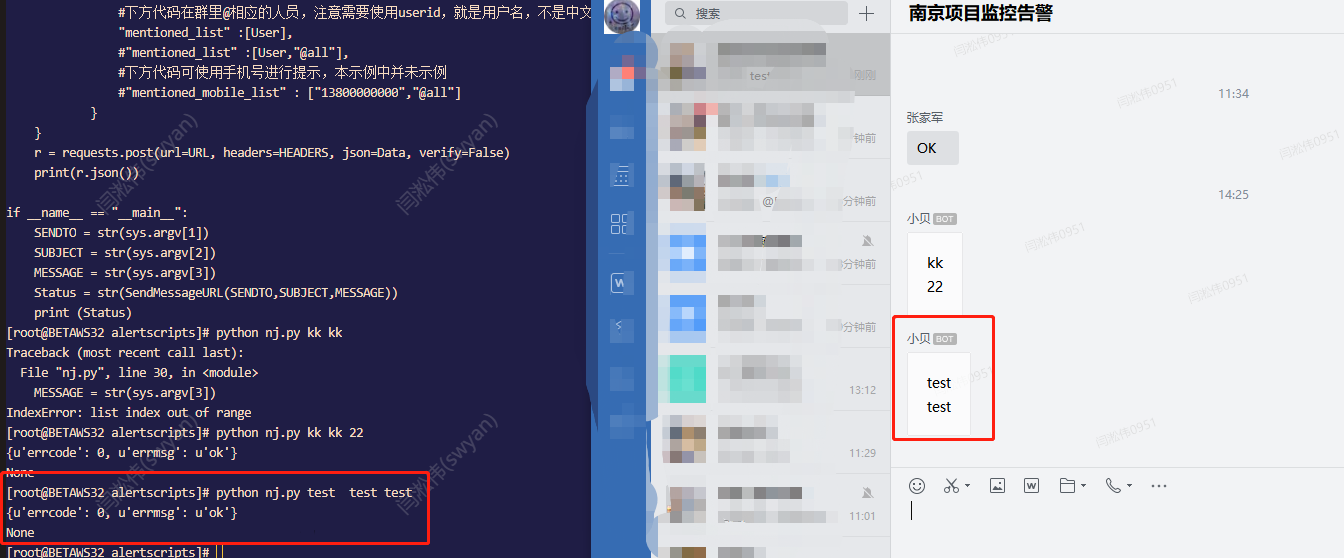
告警测试:

共用告警信息
故障
主题
# 服务故障: <font color="warning">{EVENT.NAME}</font>

消息
{
> 告警主机: **{HOST.NAME}**
> 主机地址: **{HOST.IP}**
> 监控项目: {ITEM.NAME}
> 故障地址: <font color="comment">{TRIGGER.URL}</font>
> 故障详情: {TRIGGER.DESCRIPTION}
> 当前取值: {ITEM.LASTVALUE}
> 告警等级: {TRIGGER.SEVERITY}
> 告警时间: {EVENT.DATE}-{EVENT.TIME}
> 事件ID: {EVENT.ID}
}
恢复
主题
# 故障恢复: <font color="info">{EVENT.NAME}</font>

消息
{
> 主机名称: **{HOST.NAME}**
> 主机地址: **{HOST.IP}**
> 告警名称: {EVENT.NAME}
> 持续时长: {EVENT.DURATION}
> 恢复时间: {EVENT.RECOVERY.DATE}-{EVENT.RECOVERY.TIME}
> 当前状态: {TRIGGER.STATUS}
> 当前取值: {ITEM.LASTVALUE}
> 事件ID: {EVENT.ID}
}
邮件告警对接
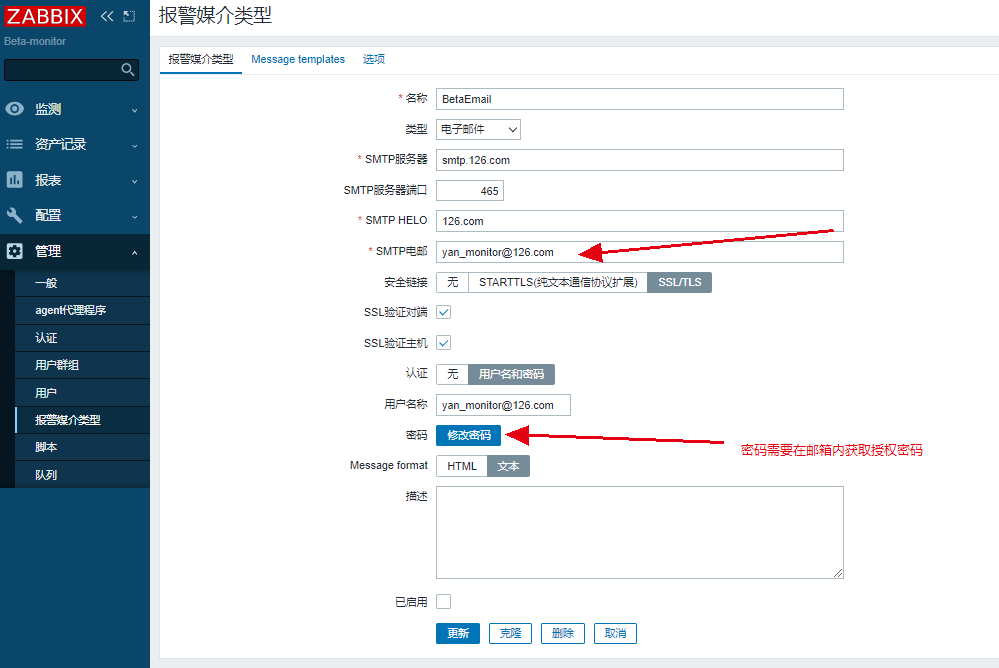
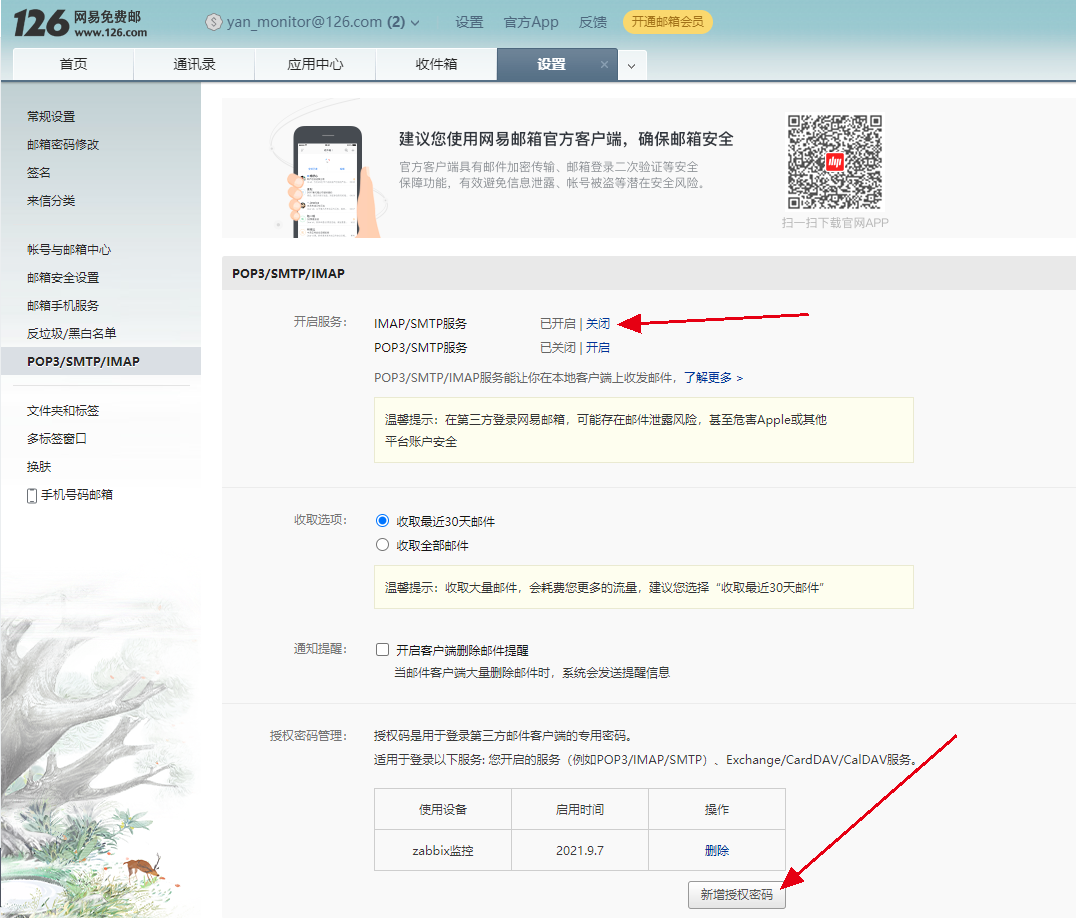
邮件告警动作:
故障:
主题:
{TRIGGER.STATUS}: {TRIGGER.NAME}

消息:
告警主机:   {HOST.NAME}
告警    IP:    {HOST.IP}
告警时间:   {EVENT.DATE}-{EVENT.TIME}
告警等级:   {TRIGGER.SEVERITY}
告警信息:   {TRIGGER.NAME}
问题详情:   {ITEM.NAME}:{ITEM.VALUE}
事件    ID:   {EVENT.ID}
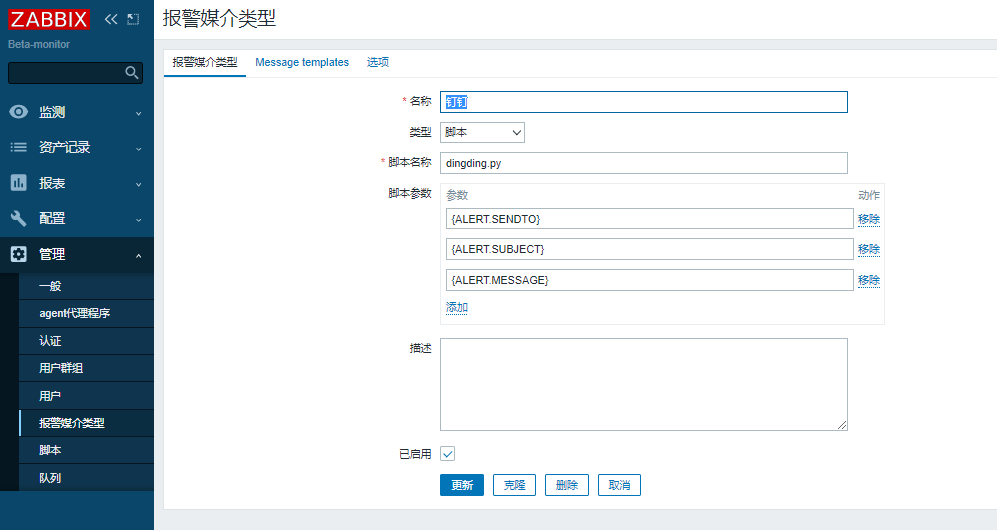
钉钉机器人告警对接
{ALERT.SENDTO}
{ALERT.SUBJECT}
{ALERT.MESSAGE}
vim /usr/lib/zabbix/alertscripts/dingding.py

#!/usr/bin/env python
#coding:utf-8
#zabbix钉钉报警
import requests,json,sys,os,datetime
webhook="https://oapi.dingtalk.com/robot/send?access_token=777ca5d78ade47dc3d51b1034acfdcea1d05eddf6e5224bd10dc6979da57289"
user=sys.argv[1]
text=sys.argv[3]
data={
    "msgtype": "text",
    "text": {
        "content": text
    },
    "at": {
        "atMobiles": [
            user
        ],
        "isAtAll": True
    }
}
headers = {'Content-Type': 'application/json'}
x=requests.post(url=webhook,data=json.dumps(data),headers=headers)
if os.path.exists("/usr/lib/zabbix/logs/dingding.log"):
    f=open("/usr/lib/zabbix/logs/dingding.log","a+")
else:
    f=open("/usr/lib/zabbix/logs/dingding.log","w+")
f.write("\n"+"--"*30)
if x.json()["errcode"] == 0:
    f.write("\n"+str(datetime.datetime.now())+"    "+str(user)+"    "+"发送成功"+"\n"+str(text))
    f.close()
else:
    f.write("\n"+str(datetime.datetime.now()) + "    " + str(user) + "    " + "发送失败" + "\n" + str(text))
    f.close()
钉钉告警动作:
故障
主题:
故障名称(触发器名称):{EVENT.NAME}

消息:
告警状态:【{TRIGGER.STATUS}】
告警主机:【{HOST.NAME}】
主机地址:【{HOST.IP}】
告警时间:【{EVENT.DATE} {EVENT.TIME}】
告警等级:【{TRIGGER.SEVERITY}】
告警名称:【{TRIGGER.NAME}】
告警项目:【{TRIGGER.KEY1}】
当前状态:【{ITEM.NAME}:{ITEM.KEY}={ITEM.VALUE}】
事件代码:【{EVENT.ID}】

恢复
主题:
故障名称(触发器名称):{EVENT.NAME}

消息:
告警状态:【{TRIGGER.STATUS}】
告警主机:【{HOST.NAME}】
主机地址:【{HOST.IP}】
告警时间:【{EVENT.DATE} {EVENT.TIME}】
告警等级:【{TRIGGER.SEVERITY}】
告警名称:【{TRIGGER.NAME}】
告警项目:【{TRIGGER.KEY1}】
当前状态:【{ITEM.NAME}:{ITEM.KEY}={ITEM.VALUE}】
事件代码:【{EVENT.ID}】
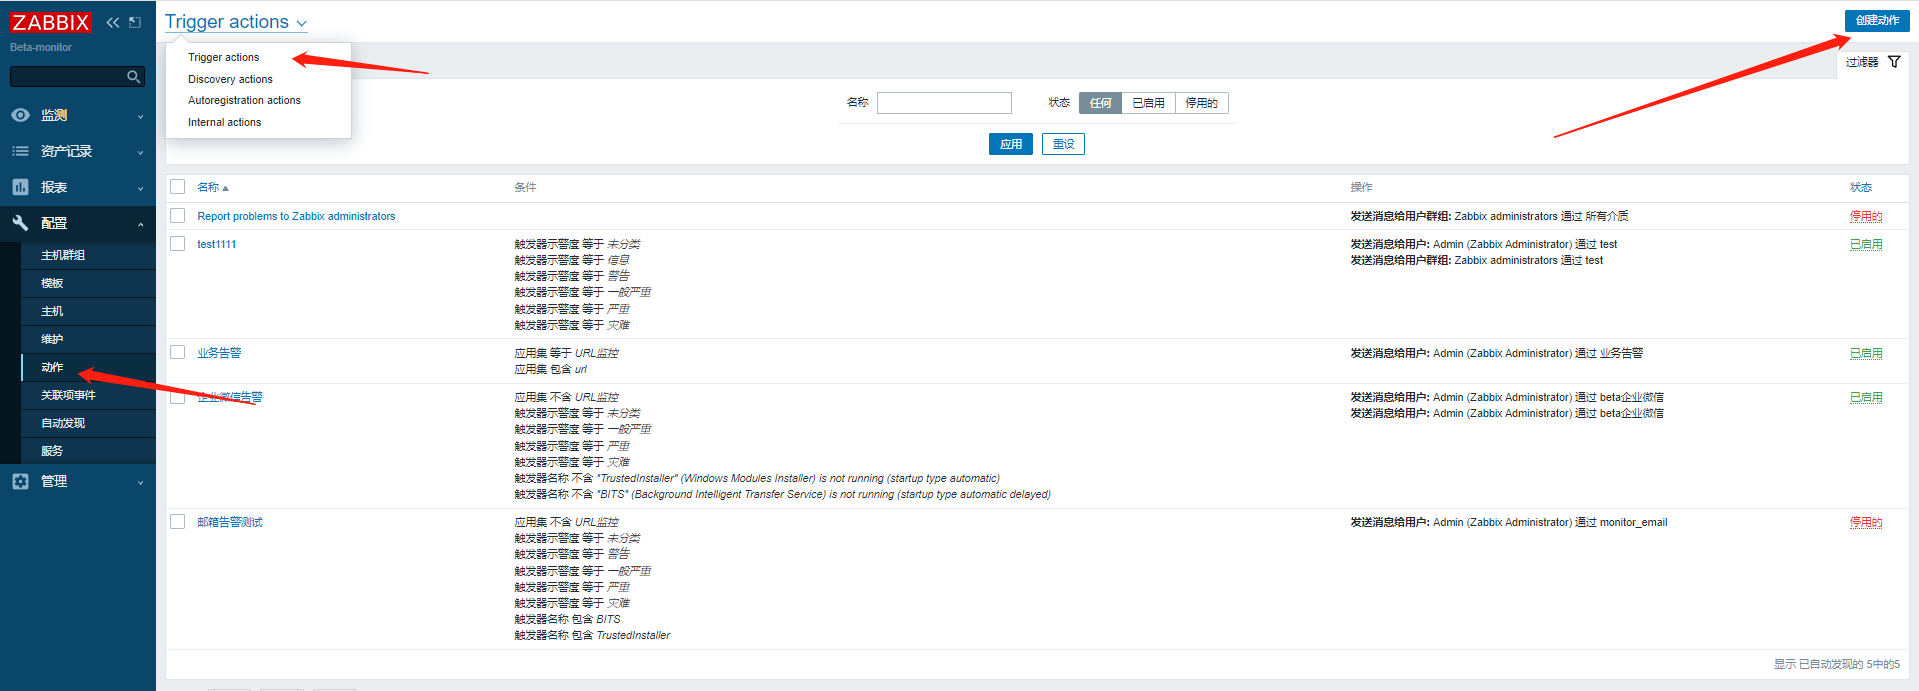
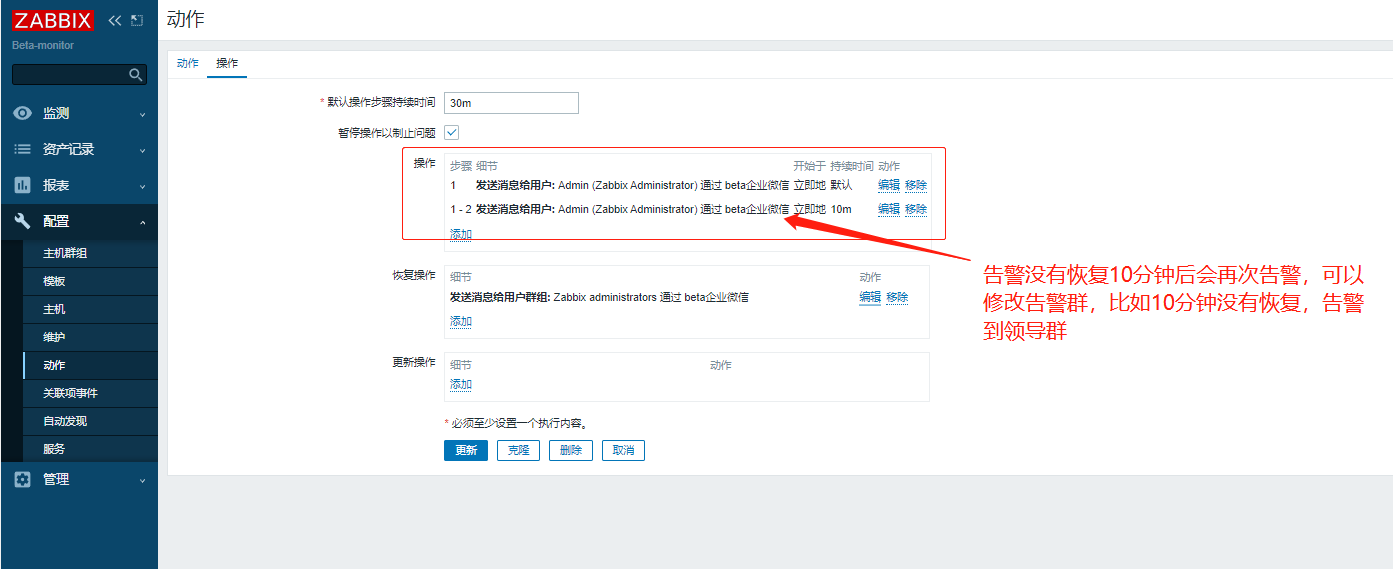
创建动作:


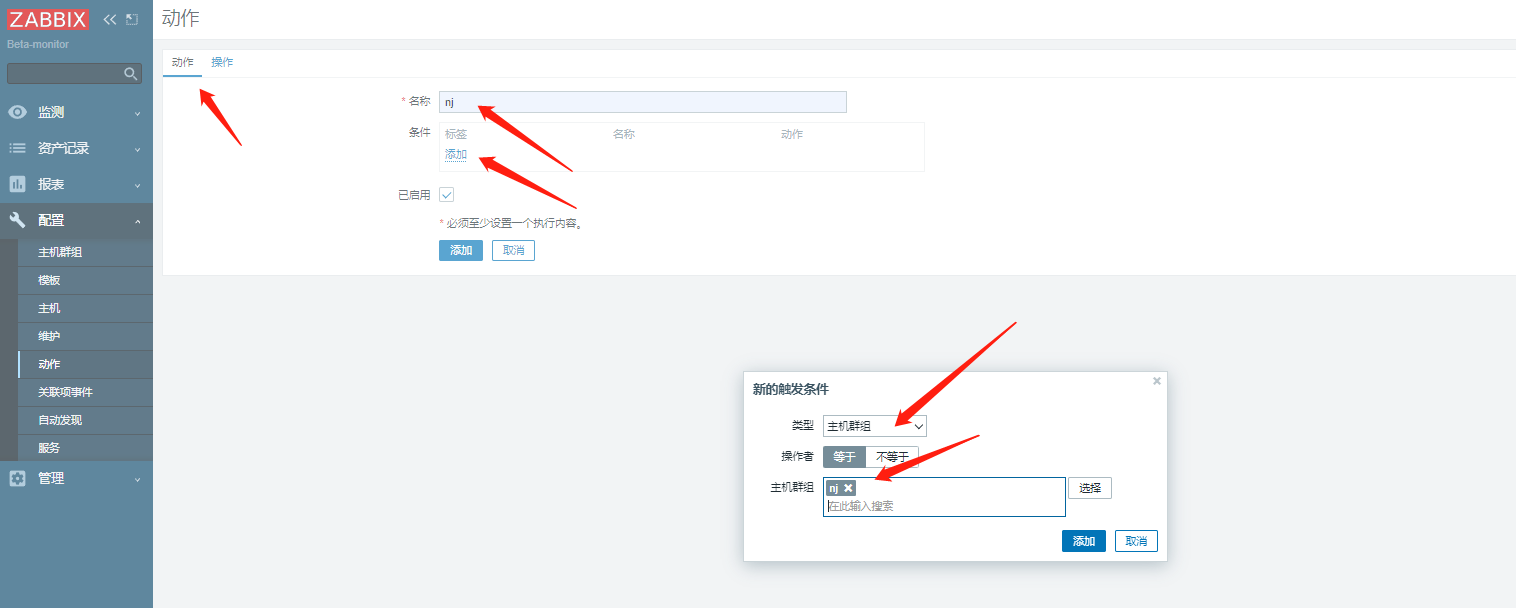
创建告警目标:
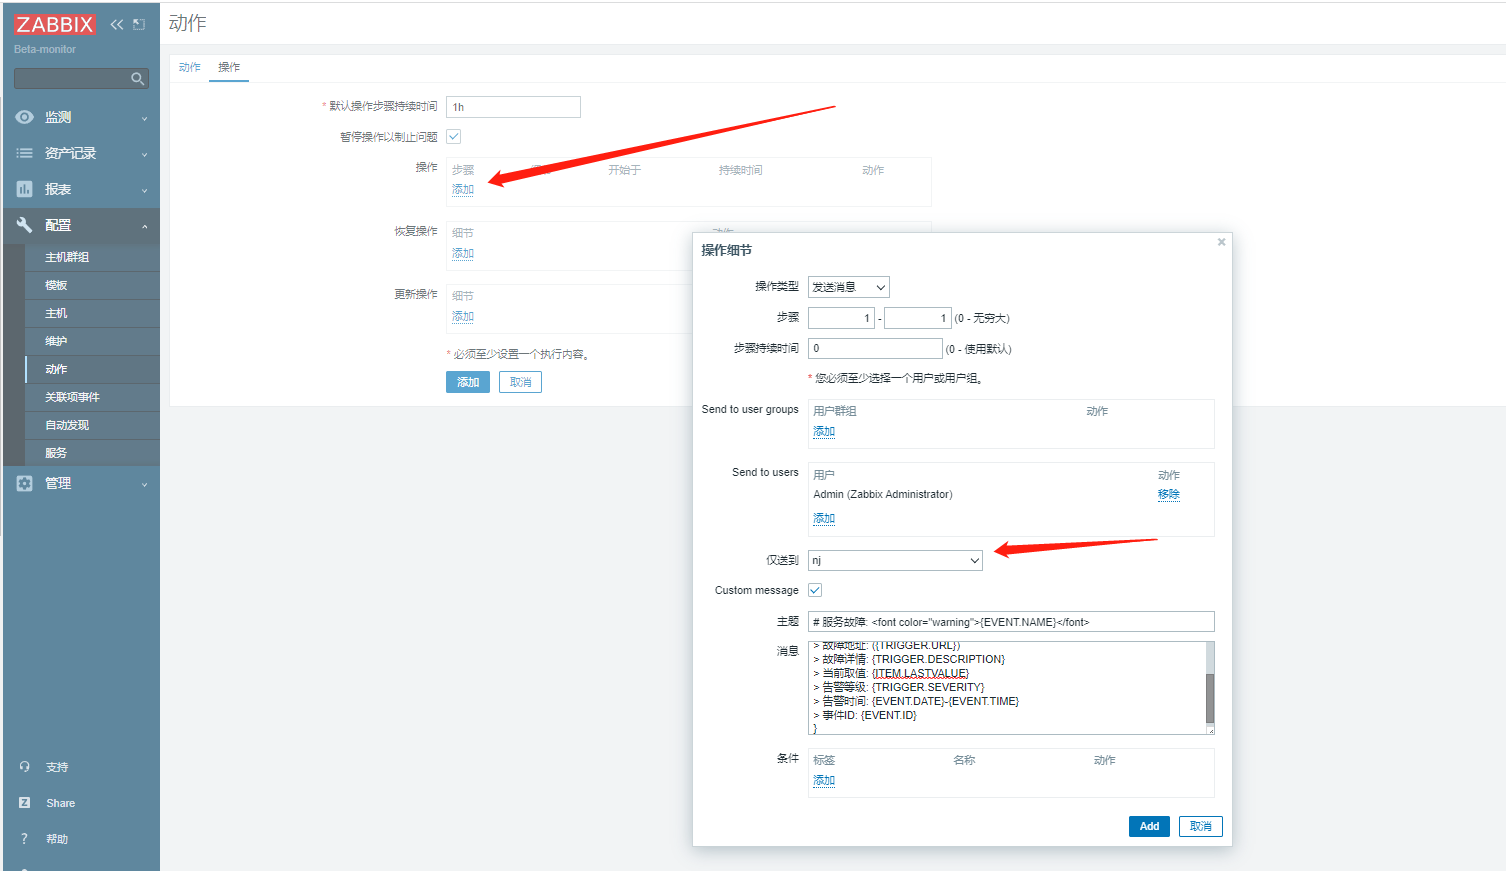
添加故障恢复告警:
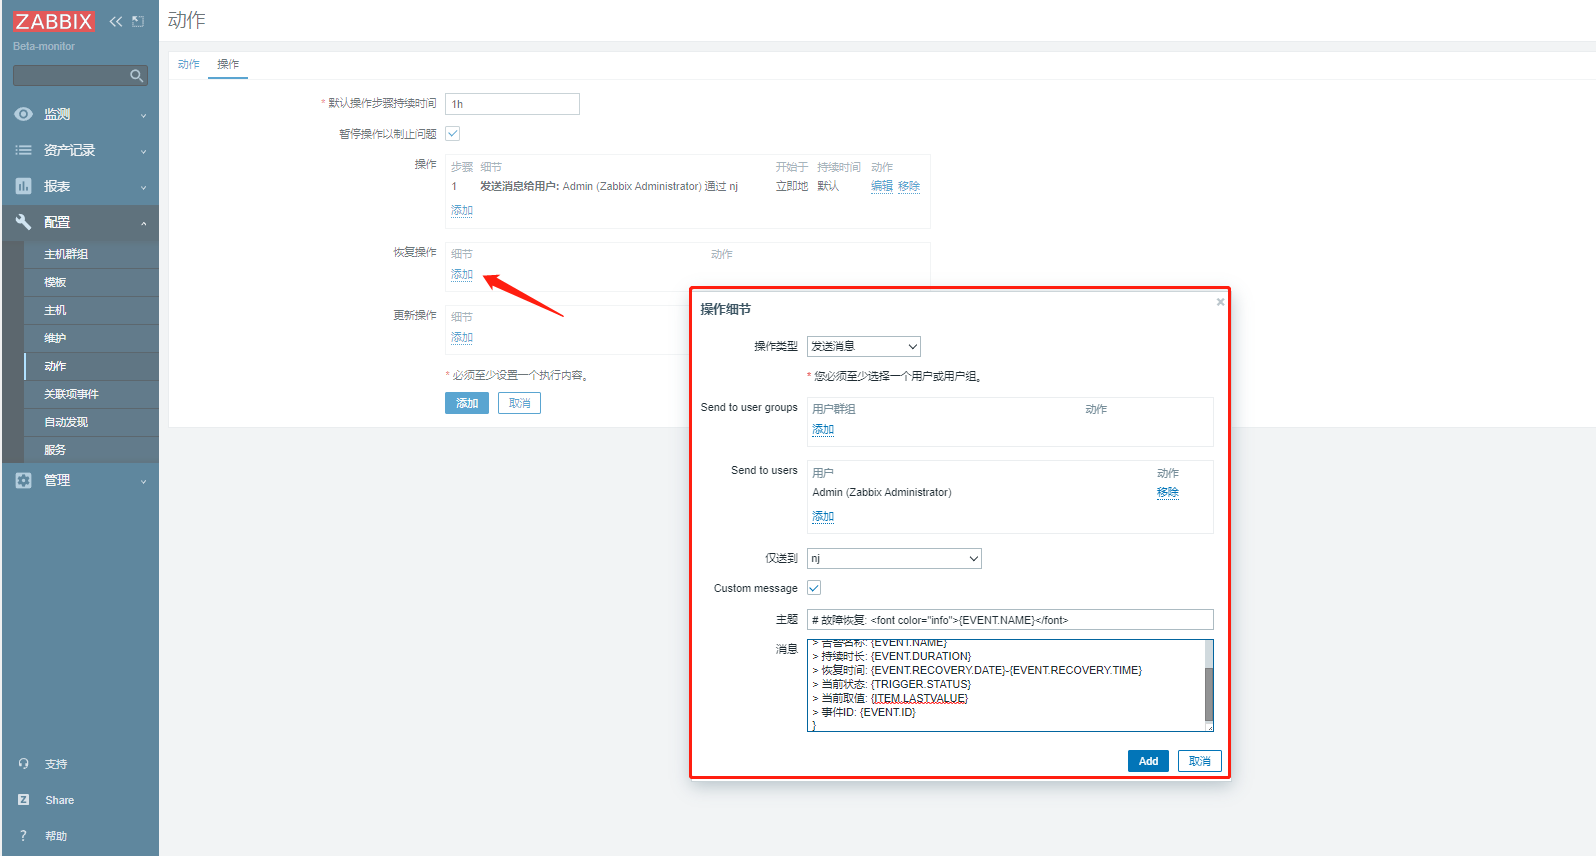
企业微信故障告警模板:

主题
# 服务故障: <font color="warning">{EVENT.NAME}</font>

消息
{
> 告警主机: **{HOST.NAME}**
> 主机地址: **{HOST.IP}**
> 监控项目: {ITEM.NAME}
> 故障地址: ({TRIGGER.URL})
> 故障详情: {TRIGGER.DESCRIPTION}
> 当前取值: {ITEM.LASTVALUE}
> 告警等级: {TRIGGER.SEVERITY}
> 告警时间: {EVENT.DATE}-{EVENT.TIME}
> 事件ID: {EVENT.ID}
}


企业微信恢复告警模板:
主题:
# 故障恢复: <font color="info">{EVENT.NAME}</font>


消息:
{
> 主机名称: **{HOST.NAME}**
> 主机地址: **{HOST.IP}**
> 告警名称: {EVENT.NAME}
> 持续时长: {EVENT.DURATION}
> 恢复时间: {EVENT.RECOVERY.DATE}-{EVENT.RECOVERY.TIME}
> 当前状态: {TRIGGER.STATUS}
> 当前取值: {ITEM.LASTVALUE}
> 事件ID: {EVENT.ID}
}
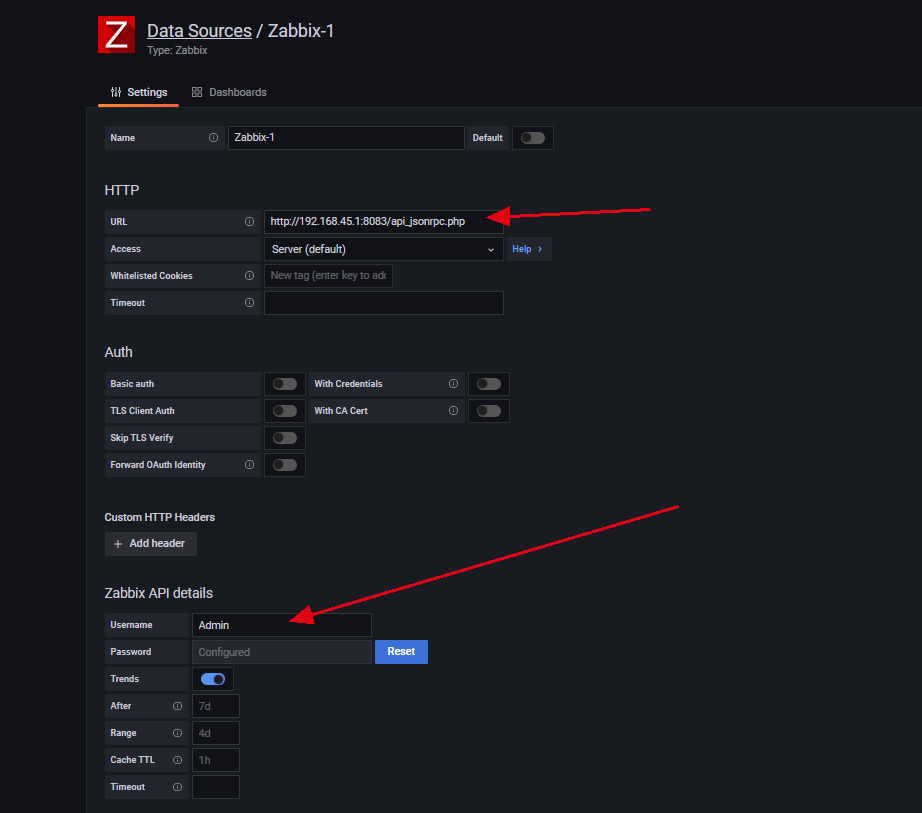
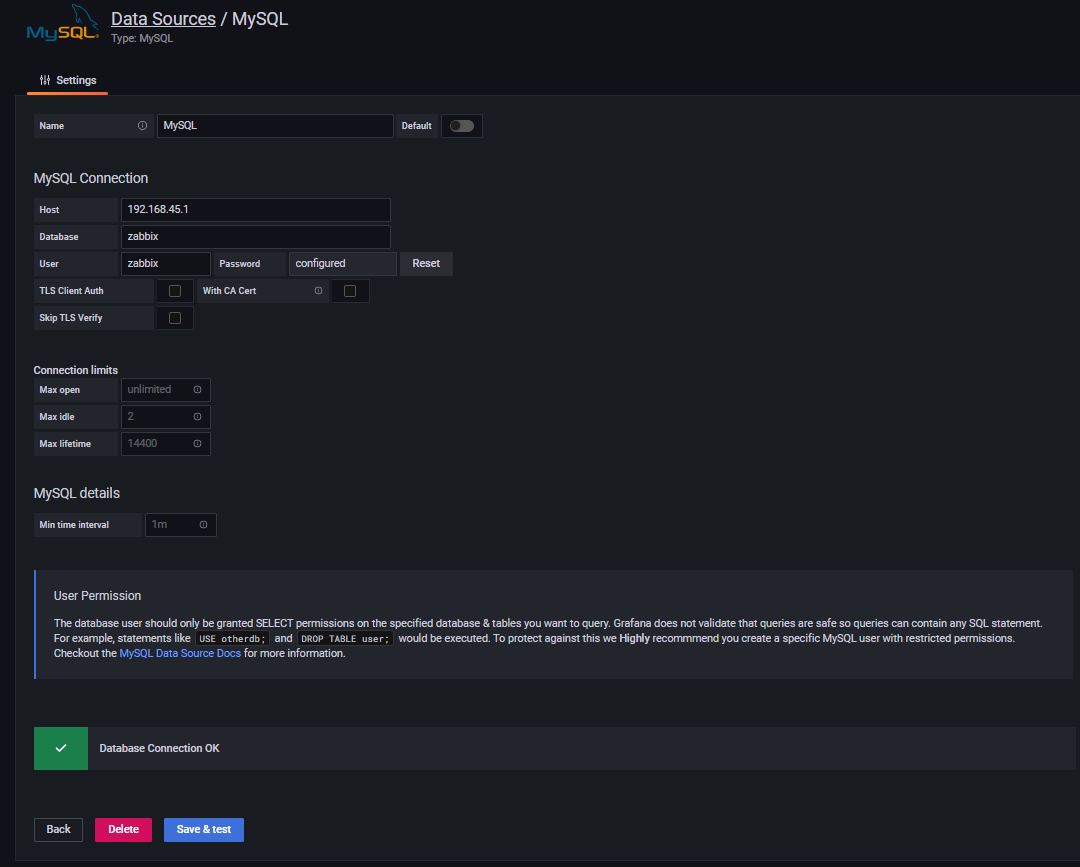
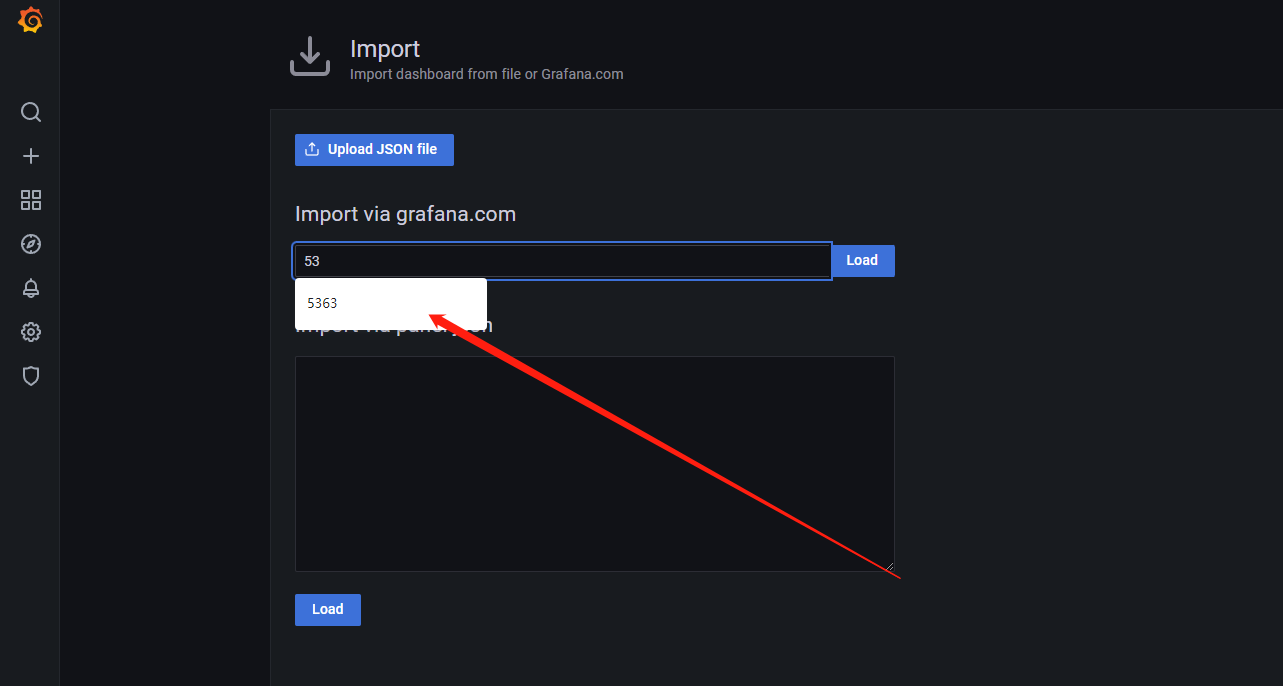
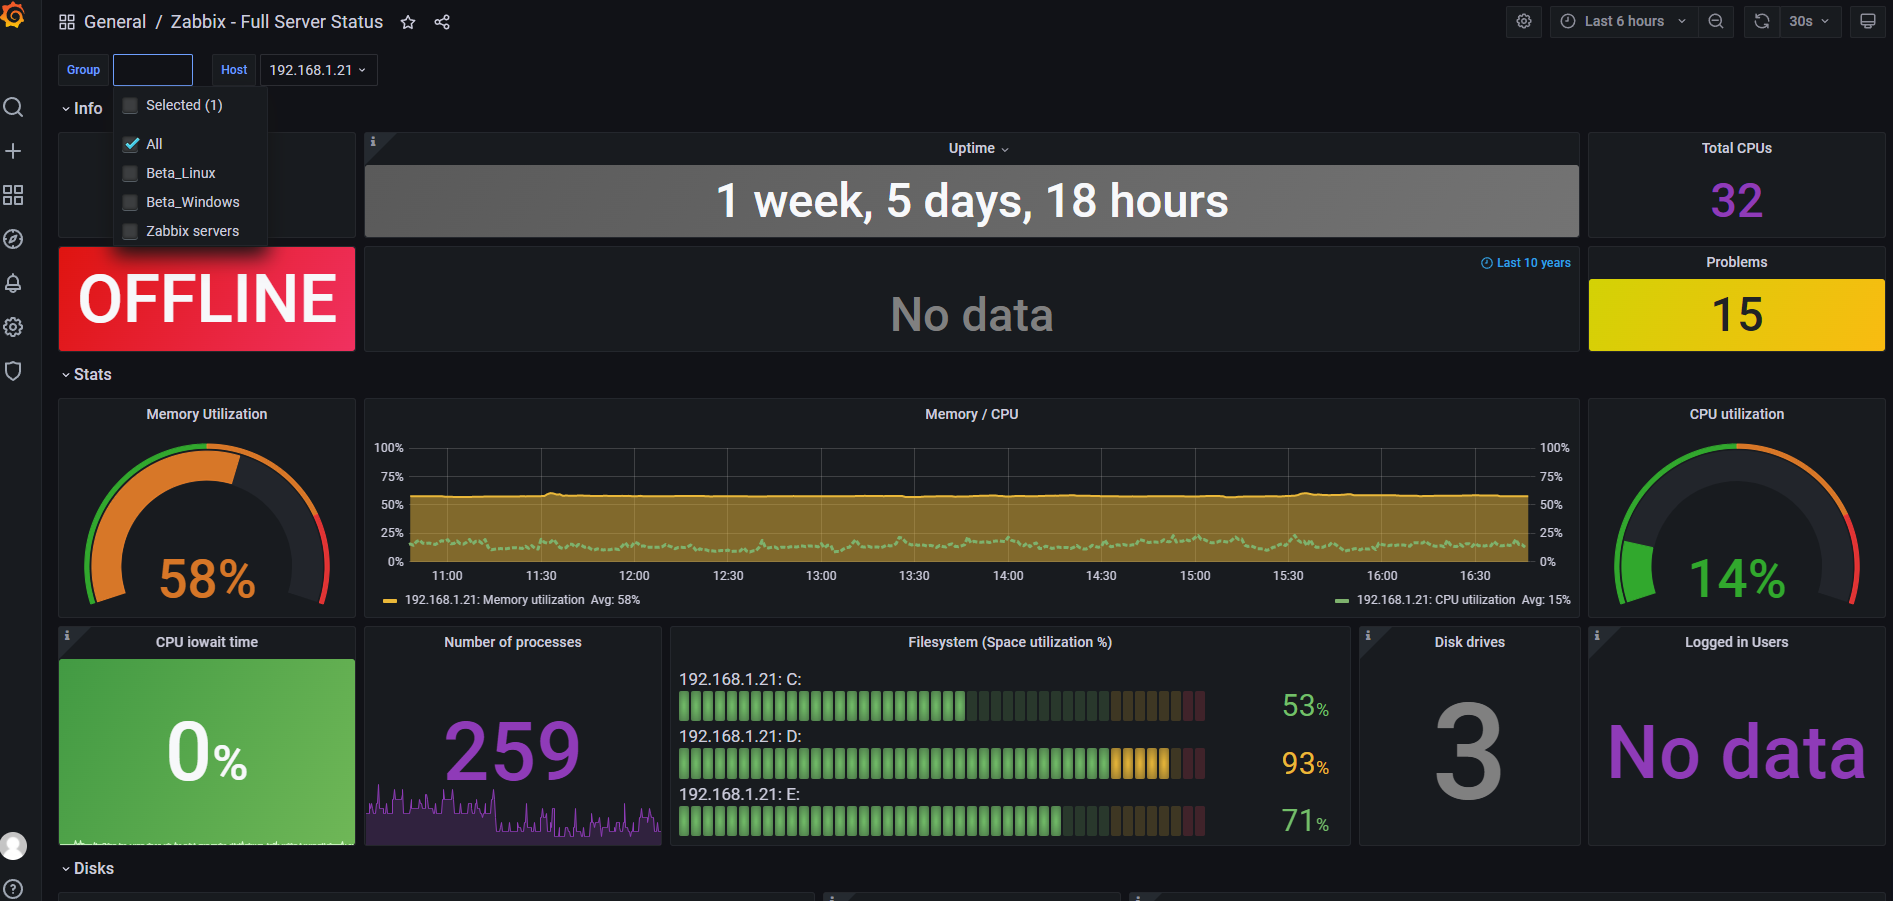
对接gafana
grafana-cli plugins install alexanderzobnin-zabbix-app
systemctl restart grafana-server.service
http://192.168.45.1:8083/api_jsonrpc.php #zabbix的端口,默认80,我修改了默认端口,这里也要更改。
zabbix监控阿里云mysql
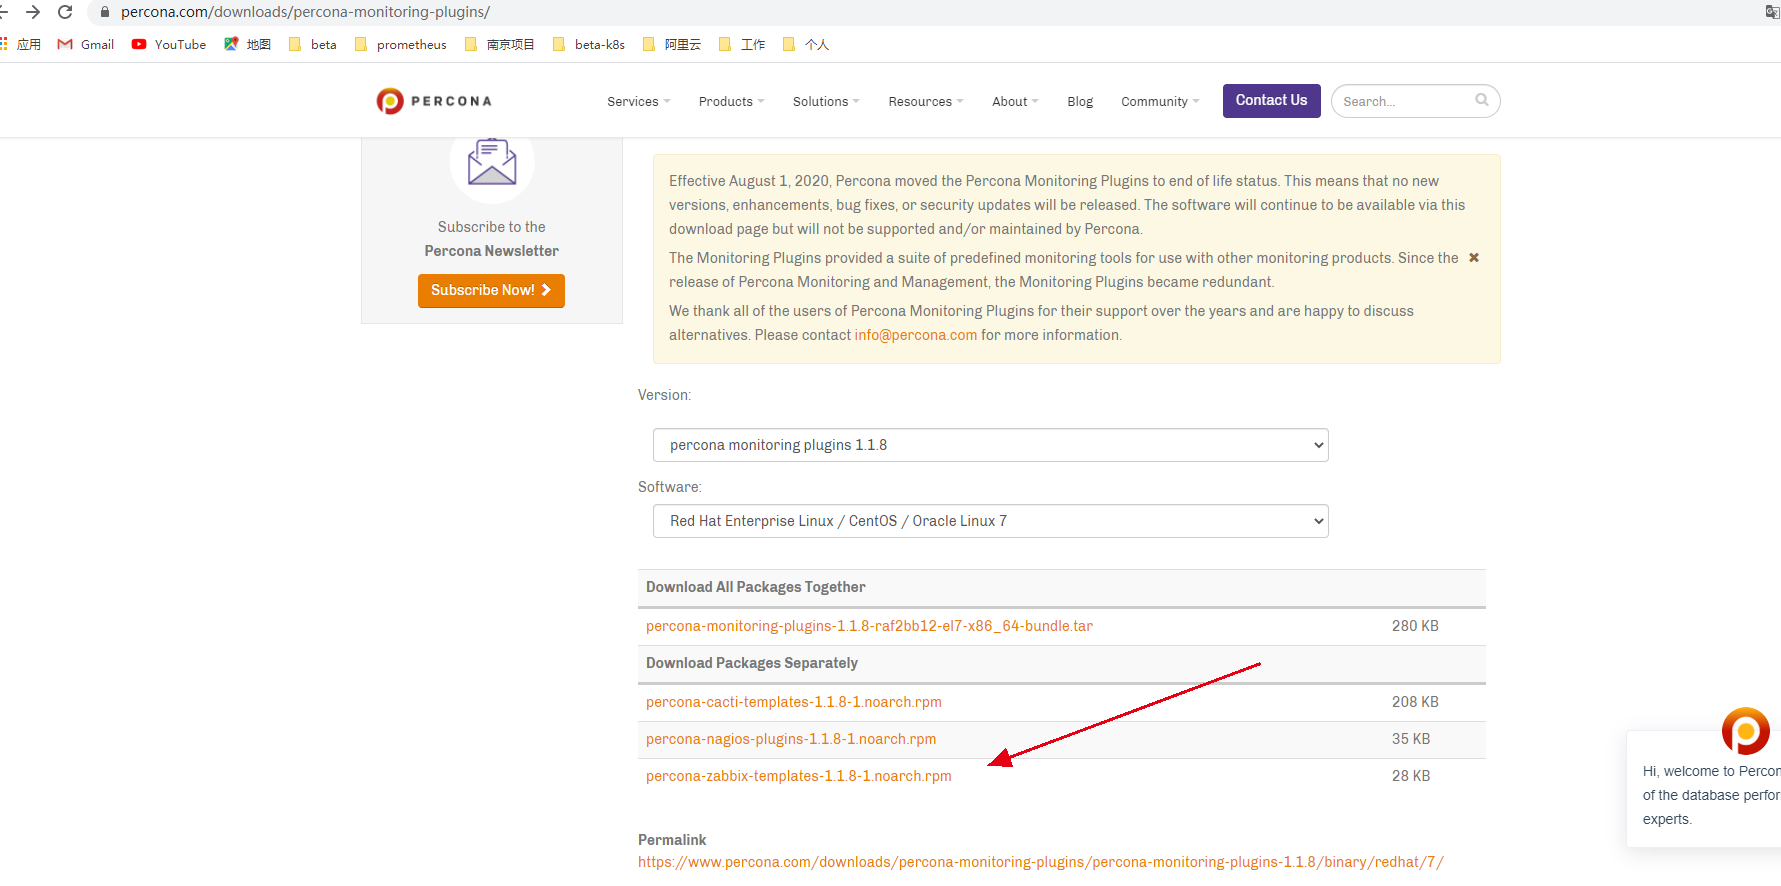
https://www.percona.com/downloads/percona-monitoring-plugins/
下载precona插件

下载地址:https://www.percona.com/downloads/percona-monitoring-plugins/

wget https://downloads.percona.com/downloads/percona-monitoring-plugins/percona-monitoring-plugins-1.1.8/binary/redhat/7/x86_64/percona-zabbix-templates-1.1.8-1.noarch.rpm

[root@k8s-master01 ~]# rpm -ql percona-zabbix-templates
/var/lib/zabbix/percona
/var/lib/zabbix/percona/scripts                                # 插件脚本存放位置
/var/lib/zabbix/percona/scripts/get_mysql_stats_wrapper.sh    # Shell脚本,用于针对监控数据进行取值
/var/lib/zabbix/percona/scripts/ss_get_mysql_stats.php        # php脚本,真正获取Mysql数据库数据的脚本
/var/lib/zabbix/percona/templates
/var/lib/zabbix/percona/templates/userparameter_percona_mysql.conf # zabbix-agent客户端监控项配置文件
/var/lib/zabbix/percona/templates/zabbix_agent_template_percona_mysql_server_ht_2.0.9-sver1.1.8.xml
                                                            # 模板
模板:监控项+触发器+自动发现+web检测+图形化展示
导入模板失败:标签无效 "/zabbix_export/date": "YYYY-MM-DDThh:mm:ssZ" 预计
[root@BETAWS33 templates]# pwd
/var/lib/zabbix/percona/templates
[root@BETAWS33 templates]# cp /var/lib/zabbix/percona/templates/userparameter_percona_mysql.conf /etc/zabbix/zabbix_agent2.d/
[root@BETAWS33 scripts]# pwd
/var/lib/zabbix/percona/scripts
[root@BETAWS33 scripts]# ls
get_mysql_stats_wrapper.sh ss_get_mysql_stats.php
[root@BETAWS33 scripts]# vim ss_get_mysql_stats.php #修改如下三个变量即可
$mysql_user = 'mysql_exporter';
$mysql_pass = 'Beta_mysql';
$mysql_port = 3306;
[root@BETAWS33 scripts]# vim get_mysql_stats_wrapper.sh #修改host地址
HOST='rm-uf66pyw2mf161x4998xxx0.mysql.rds.aliyuncs.com'
服务端测试获取key报异常问题解决
[root@BETAWS32 yum.repos.d]# zabbix_get -s 192.168.45.2 -k MySQL.os-waits
rm: cannot remove ‘/tmp/rm-uf66pyw2mf161x49988350.mysql.rds.aliyuncs.com-mysql_cacti_stats.txt’: Operation not permitted
2795651
需要到agent端添加用户权限即可:
[root@BETAWS33 scripts]# cd /tmp/
[root@BETAWS33 tmp]# ll
total 32
srwx------ 1 zabbix zabbix 0 Sep 9 10:30 agent.sock
-rw------- 1 root root 0 Sep 9 05:25 AliyunAssistClientSingleLock.lock
-rw-r--r-- 1 root root 1738 Sep 9 10:06 rm-uf66pyw2mf161x49988350.mysql.rds.aliyuncs.com-mysql_cacti_stats.txt
[root@BETAWS33 tmp]# chown zabbix.zabbix rm-uf66pyw2mf161x49988350.mysql.rds.aliyuncs.com-mysql_cacti_stats.txt
[root@BETAWS33 tmp]# ll
srwx------ 1 zabbix zabbix 0 Sep 9 10:30 agent.sock
-rw------- 1 root root 0 Sep 9 05:25 AliyunAssistClientSingleLock.lock
-rw-r--r-- 1 zabbix zabbix 1738 Sep 9 10:06 rm-uf66pyw2mf161x49988350.mysql.rds.aliyuncs.com-mysql_cacti_stats.txt
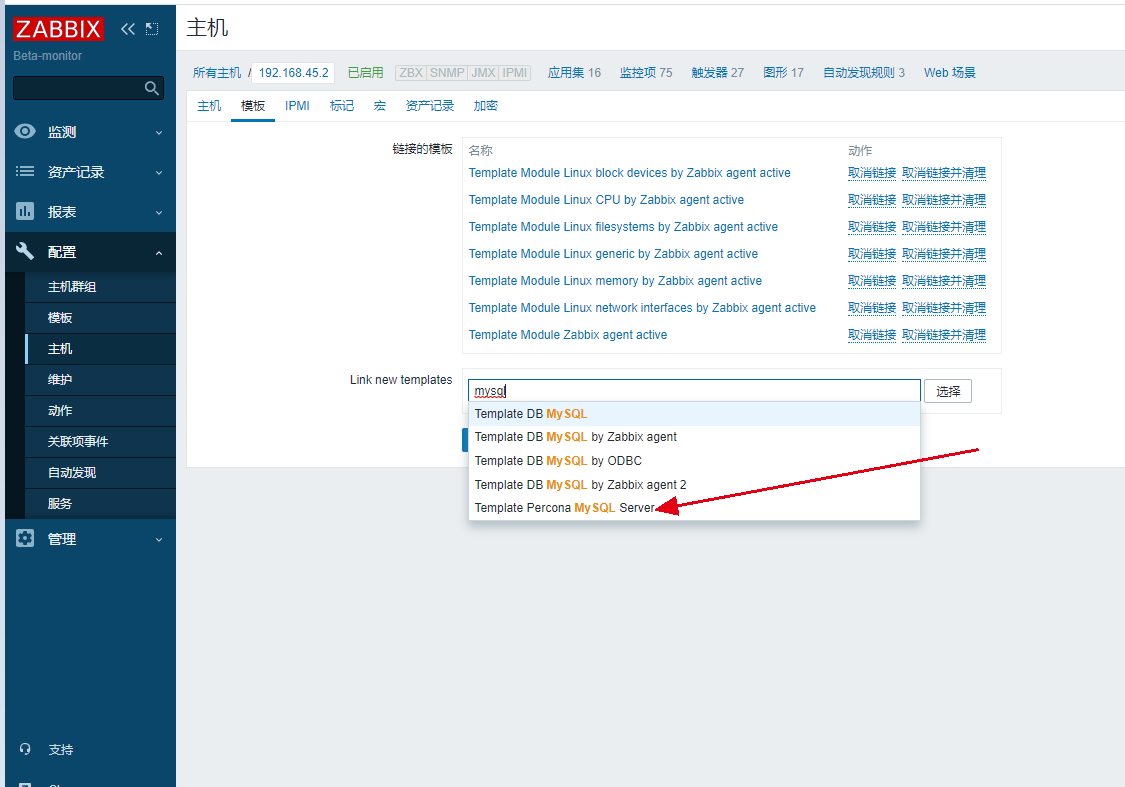
然后导入模板文件默认官方提供的模板文件只适配zabbix2.0以前版本的,后面版本官方没有更新了。
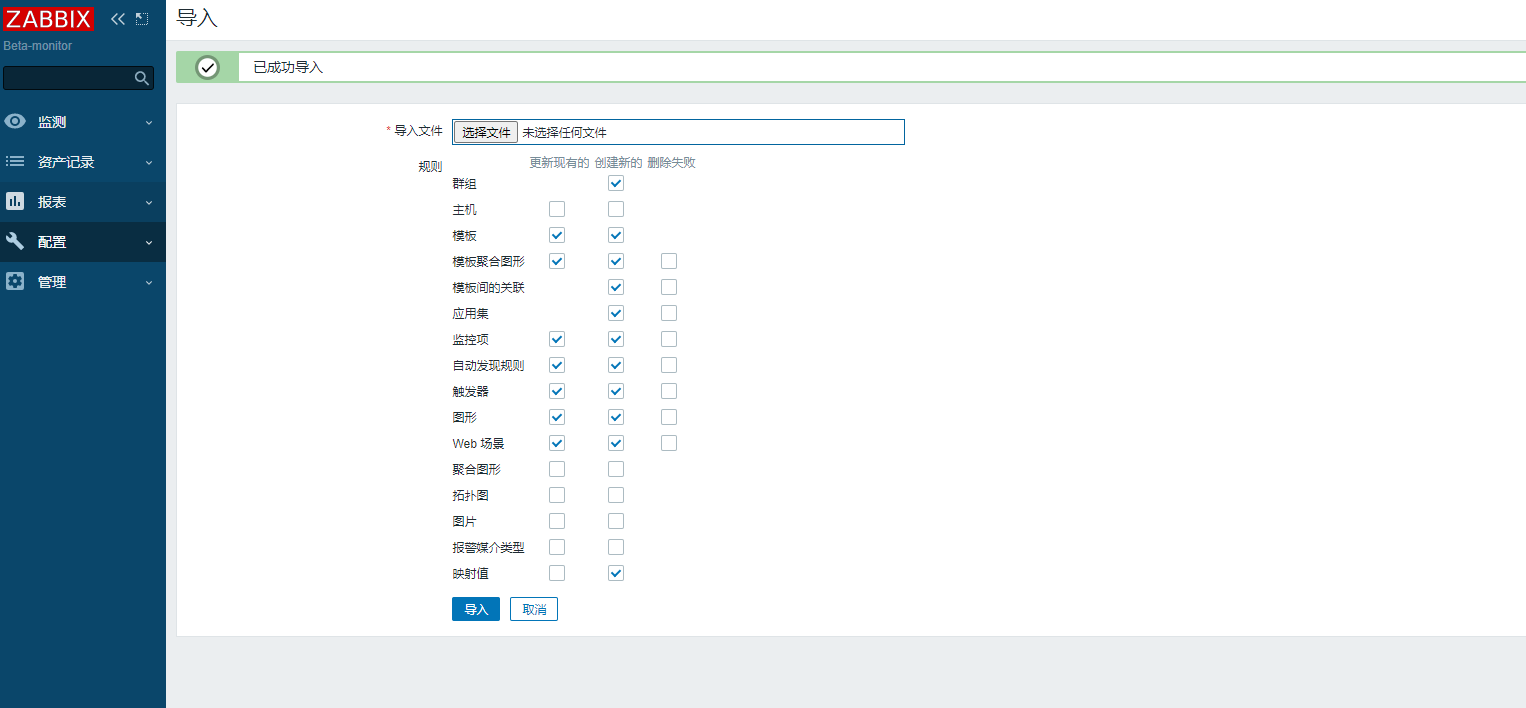
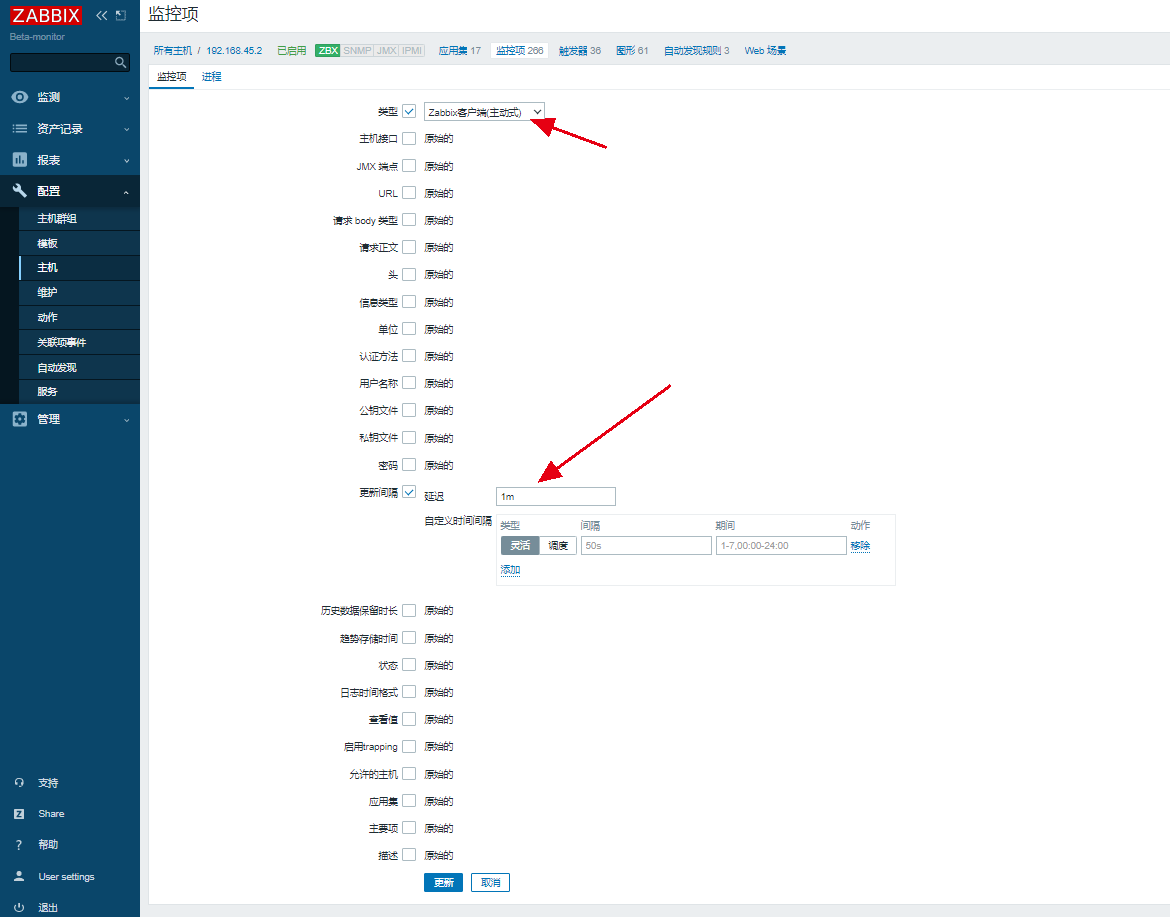
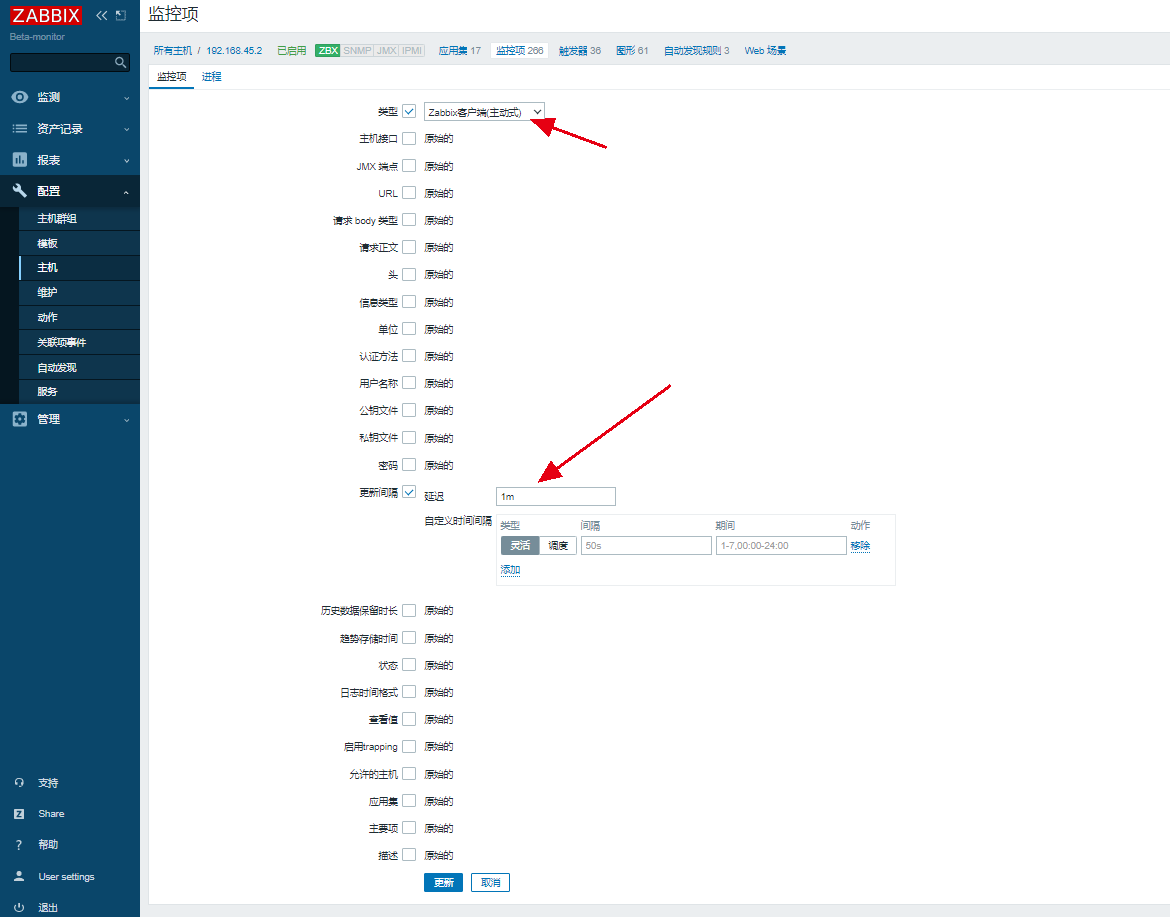
批量修改Percona模板中更新周期时间
