JavaEE互联网轻量级框架整合开发(书籍)阅读笔记(6):Spring IOC容器学习(概念、作用、Bean生命周期)
一、IOC控制反转概念
控制反转(IOC)是一种通过描述(在Java中可以是XML或者是注解)并通过第三方去生产或获取特定对象的方式。
主动创建模式,责任在于开发者,而在被动模式下,责任归于Ioc容器,基于这种被动形式,我们就是对象被反转了。
二、Spring IoC容器的初始化和依赖注入
Bean的定义何处是花再Spring Ioc容器中是两大步骤,它是先定义,然后初始化和依赖注入。
Bean的定义分为3步:
(1)Resource定位,这步是Spring IoC容器根据开发者的配置,进行资源定位,在Spring的开发中,通过xml和注解都是十分常见的方式,
定位的内容是由开发者所提供的。
(2)BeanDefinition的载入,这个时候只是将Resource定位到的信息,保存到Bean定义(BeanDefinition)中,此时不会创建Bean的实例。
(3)BeanDefinition的注册,这个过程就是将BeanDefinition的信息发布到Spring IoC容器中,注意此时仍没有对应的Bean的实例被创建。
做完上述3个步骤,Bean就在Spring IoC容器中被定义,而没有被初始化,更没有完成依赖注入,也就是说没有注入资源给Bean,那么它还不能完全使用。
对于初始化和依赖注入,SpringBean还有一个配置选项--lazy-init,其含义就是是否初始化Spring Bean。在没有任何配置的情况下,它的默认值未default,
实际值是false,也就是说Spring IoC容器会默认自动初始化Bean,如果将它的值设置为true,那么只有我们使用Spring IoC容器的getBean方法获取它时,它才会
进行Bean的初始化,完成依赖注入。
三、Sprng Bean的生命周期:
Spring IoC容器的本质目的就是为了管理Bean。对于Bean而言,在容器中存在其生命周期,它的初始化和销毁也需要一个过程,在一些需要自定义的过程中,我们可
插入代码取改变它们的一些行为,以满足特定的需求,这就需要使用到Spring Bean的生命周期的知识了。
生命周期主要是为了了解Spring IoC容器初始化和销毁Bean的过程,通过对它的学习就可以知道如何在初始化和销毁的时候加入自定义的方法,以满足特定的需求。
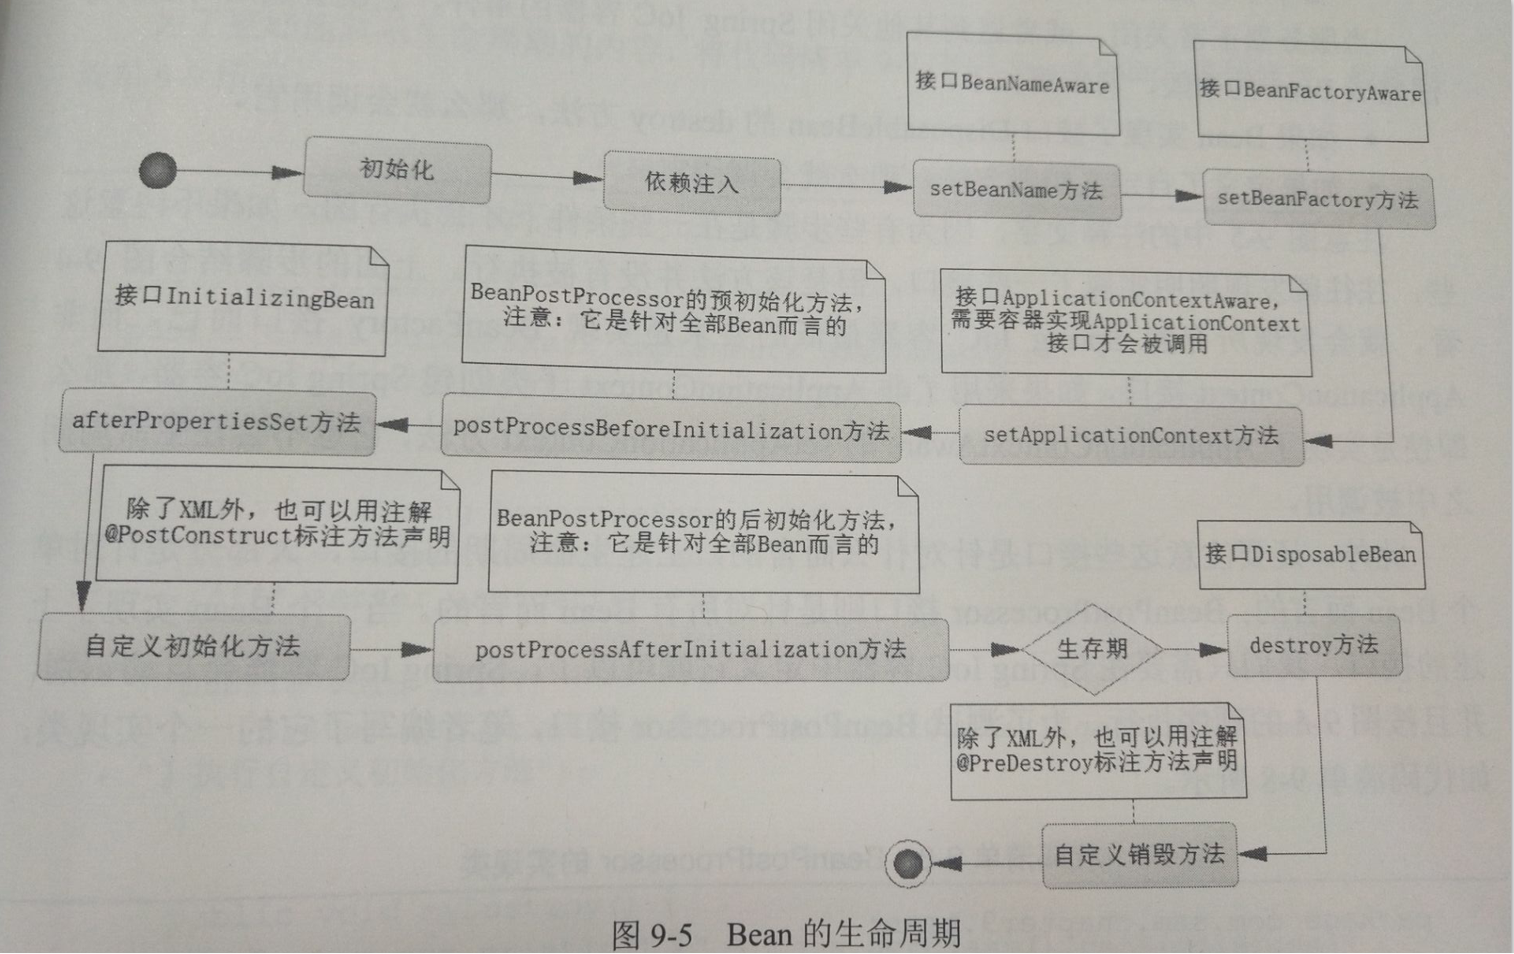
以下是展示Spring IoC容器初始化和销毁Bean的过程
Spring Bean生命周期的步骤:
(1)如果Bean实现了接口BeanNameAware的setBeanName方法,那么它就会调用这个方法。
(2)如果Bean实现了接口BeanFactoryAware的setBeanFactory方法,那么它就会调用这个方法。
(3)如果Bean实现了接口ApplicationContextAware接口的setApplicationContext方法,且Spring IoC容器也必须有一个ApplicationContext接口的实现子类,
那么才会调用这个方法,否则是不调用的。
(4)如果Bean实现了BeanPostProcessBeforeInitalization方法,那么它会调用这个方法。
(5)如果Bean实现了接口BeanFactoryPostProcessor的afterPropertiesSet方法,那么它就会调用这个方法。
(6)如果Bean自定义了初始化方法,它就会调用已定义的初始化方法。
(7)如果Bean实现接口BeanPostProcessor的postProcessAfterInitialization方法,完成了这些调用,这个时候Bean就完成了初始化,那么Bean就生存在Spring IoC
的容器中了,使用者就可以从中获取Bean的服务。
当服务器正常关闭,或者遇到其他关闭SpringIoC容器的事件,它就会调用对应的方法来完成Bean的销毁,其步骤如下:
(1)如果Bean实现了接口DisposableBean的Destory方法,那么就会调用它。
(2)如果定义了自定义销毁方法,那么就会调用它。
四、Spring Bean生命周期测试
创建一个POJO类:UserBean.java
 1 package com.xfwl.spring.beans;
 2 /**
 3  * Pojo实体类
 4  * @author Jason
 5  *
 6  */
 7 public class UserBean {
 8     private String uname;
 9     private String upwd;
10     public UserBean(){}
11     public UserBean(String uname,String upwd){
12         this.uname=uname;
13         this.upwd=upwd;
14     }
15     public String getUname() {
16         return uname;
17     }
18     public void setUname(String uname) {
19         this.uname = uname;
20     }
21     public String getUpwd() {
22         return upwd;
23     }
24     public void setUpwd(String upwd) {
25         this.upwd = upwd;
26     }
27 }
创建一个管理类:Manager.java
 1 package com.xfwl.spring.beans;
 2
 3 import org.springframework.beans.BeansException;
 4 import org.springframework.beans.factory.BeanFactory;
 5 import org.springframework.beans.factory.BeanFactoryAware;
 6 import org.springframework.beans.factory.BeanNameAware;
 7 import org.springframework.beans.factory.DisposableBean;
 8 import org.springframework.beans.factory.InitializingBean;
 9 import org.springframework.context.ApplicationContext;
10 import org.springframework.context.ApplicationContextAware;
11 /**
12  *
13  * @function
14  * @author 小风微凉
15  * @time  2018-7-10 上午11:32:01
16  */
17 public class Manager implements BeanNameAware, BeanFactoryAware,ApplicationContextAware, InitializingBean,DisposableBean{
18     /**属性和setter、getter方法**/
19     private UserBean user=null;
20
21     public UserBean getUser() {
22         return user;
23     }
24     public void setUser(UserBean user) {
25         this.user = user;
26     }
27
28     /**Bean生命周期测试**/
29     public void init(){
30         System.out.println("【"+this.getClass().getSimpleName()+"】执行自定义初始化方法!");
31     }
32     public void mydestory(){
33         System.out.println("【"+this.getClass().getSimpleName()+"】执行自定义销毁法!");
34     }
35     public void login(){
36         System.out.println("【登录操作】,登录信息:uname:"+this.user.getUname()+",upwd="+this.user.getUpwd());
37     }
38     @Override
39     public void afterPropertiesSet() throws Exception {
40         System.out.println("【"+this.getClass().getSimpleName()+"】调用了InitializingBean接口的afterPropertiesSet方法!");
41     }
42
43     @Override
44     public void setApplicationContext(ApplicationContext arg0)throws BeansException {
45         System.out.println("【"+this.getClass().getSimpleName()+"】调用了ApplicationContextAware接口的setApplicationContext方法!");
46     }
47
48     @Override
49     public void setBeanFactory(BeanFactory arg0) throws BeansException {
50         System.out.println("【"+this.getClass().getSimpleName()+"】调用了BeanFactoryAware接口的setBeanFactory方法!");
51     }
52
53     @Override
54     public void setBeanName(String arg0) {
55         System.out.println("【"+this.getClass().getSimpleName()+"】调用了BeanNameAware接口的setBeanName方法!");
56     }
57     @Override
58     public void destroy() throws Exception {
59         System.out.println("调用接口DisposableBean的destory方法!");
60     }
61 }
配置:applicationContext.xml
 1 <?xml version="1.0" encoding="UTF-8"?>
 2 <beans
 3     xmlns="http://www.springframework.org/schema/beans"
 4     xmlns:xsi="http://www.w3.org/2001/XMLSchema-instance"
 5     xsi:schemaLocation="http://www.springframework.org/schema/beans
 6                         http://www.springframework.org/schema/beans/spring-beans-2.0.xsd">
 7     <!-- <bean id="user_Tom" class="com.xfwl.spring.beans.UserBean">
 8         <property name="uname" value="tom"></property>
 9         <property name="upwd" value="123"></property>
10     </bean>
11     <bean id="user_Jack" class="com.xfwl.spring.beans.UserBean">
12         <property name="uname" value="jack"></property>
13         <property name="upwd" value="123"></property>
14     </bean>     -->
15     <bean id="user_xfwl" class="com.xfwl.spring.beans.UserBean">
16         <property name="uname" value="小风微凉"></property>
17         <property name="upwd" value="123456"></property>
18     </bean>
19     <bean id="BeanPostProcessorImpl" class="com.xfwl.spring.beans.BeanPostProcessorImpl"/>
20     <bean id="manager" class="com.xfwl.spring.beans.Manager"
21           init-method="init" destroy-method="mydestory" lazy-init="default">
22         <property name="user" ref="user_xfwl"></property>
23     </bean>
24 </beans>
创建一个测试类:TestBean.java
 1 package com.xfwl.spring.beans;
 2 import org.springframework.context.ApplicationContext;
 3 import org.springframework.context.support.ClassPathXmlApplicationContext;
 4 import org.springframework.context.support.FileSystemXmlApplicationContext;
 5
 6 /**
 7  * Spring Ioc测试
 8  * @function
 9  * @author 小风微凉
10  * @time  2018-7-10 上午9:55:15
11  */
12 public class TestBean {
13     //绝对路径
14     private static final String xmlAbsPath="E:\\JAVA学习[【进阶学习】\\JAVA回炉深造\\进阶测试工作空间\\多线程\\SpringSources\\src\\applicationContext.xml";
15     //项目相对路径
16     private static final String xmlRelPath="applicationContext.xml";
17     public static void main(String[] args) {
18         /*//第一种解析方式
19         FileSystemXmlApplicationContext ctx = new FileSystemXmlApplicationContext(xmlAbsPath);
20         UserBean tom =(UserBean) ctx.getBean("user_Tom");
21         System.out.println(tom.getUname());
22
23         //第二种解析方式
24         ApplicationContext context=new ClassPathXmlApplicationContext(xmlRelPath);
25         UserBean jack =(UserBean) context.getBean("user_Jack");
26         System.out.println(jack.getUname());*/
27
28         //测试Bean的生命周期
29         FileSystemXmlApplicationContext ctx = new FileSystemXmlApplicationContext(xmlAbsPath);
30         Manager manager =(Manager) ctx.getBean("manager");
31         manager.login();
32         ctx.close();
33     }
34 }
运行结果:
log4j:WARN No appenders could be found for logger (org.springframework.core.env.StandardEnvironment).
log4j:WARN Please initialize the log4j system properly.
log4j:WARN See http://logging.apache.org/log4j/1.2/faq.html#noconfig for more info.
【UserBean】对象:user_xfwl开始实例化
【UserBean】对象:user_xfwl完成实例化
【Manager】调用了BeanNameAware接口的setBeanName方法!
【Manager】调用了BeanFactoryAware接口的setBeanFactory方法!
【Manager】调用了ApplicationContextAware接口的setApplicationContext方法!
【Manager】对象:manager开始实例化
【Manager】调用了InitializingBean接口的afterPropertiesSet方法!
【Manager】执行自定义初始化方法!
【Manager】对象:manager完成实例化
【登录操作】,登录信息:uname:小风微凉,upwd=123456
调用接口DisposableBean的destory方法!
【Manager】执行自定义销毁法!
可以看到,在applicationContext.xml中配置一个Bean,然后getBean(),整个Bean的生命周期。
五、上文中Spring的Jar配置說明

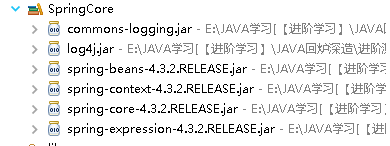
 1 1.Spring依赖包配置:(核心功能:IOC容器)
 2     *spring的核心jar包:spring.jar
 3     *spring-context.jar包:获取xml配置bean对象的相关类支持,比如ApplicationContext.java
 4     *spring-beans.jar包:获取xml配置bean对象的相关类支持,比如BeanFactory.java
 5     *spring-expression.jar:提供类的支持,比如:FileSystemXmlApplicationContext.java,用于解析xml配置信息
 6     *记录日志jar包:log4j.jar
 7     *apache的记录日志jar包:commons-logging.jar(日志的抽象)
 8
 9     特别说明:
10         如果项目的.classpath中有log4j.jar,那么会优先用log4j.jar,
11         如果没有log4j.jar,则会会调用sun的JDK中的记录日志的工具包,
12         如果都没有,最后使用:commons-logging.jar 会调用本身的日志记录功能来记录日志
13
14 commons-logging.jar是日志功能的抽象,
15 优先级别如下:
16     log4j.jar-->jdk本身的日志功能-->commons-logging.jar本身的日志记录功能


 浙公网安备 33010602011771号