java spring boot Swagger2 构建api文档
java spring boot Swagger2 构建api文档
1配置pom.xml
  <!-- swagger -->
    <dependency>
        <groupId>io.springfox</groupId>
        <artifactId>springfox-swagger2</artifactId>
        <version>2.5.0</version>
    </dependency>
    <!-- swagger-ui -->
    <dependency>
        <groupId>io.springfox</groupId>
        <artifactId>springfox-swagger-ui</artifactId>
        <version>2.5.0</version>
    </dependency>
2使用注解来进行启动swagger
package com.template.swagger;

import springfox.documentation.service.Contact;
import org.springframework.context.annotation.Bean;
import org.springframework.context.annotation.Configuration;
import springfox.documentation.builders.ApiInfoBuilder;
import springfox.documentation.builders.PathSelectors;
import springfox.documentation.builders.RequestHandlerSelectors;
import springfox.documentation.service.ApiInfo;
import springfox.documentation.spi.DocumentationType;
import springfox.documentation.spring.web.plugins.Docket;
import springfox.documentation.swagger2.annotations.EnableSwagger2;

/**
 * Created by bianxh on 2019/1/21.
 */
@Configuration
@EnableSwagger2
public class SwaggerApp {
    @Bean
    public Docket createRestApi() {
        return new Docket(DocumentationType.SWAGGER_2)
                .apiInfo(apiInfo())
                .select()
                //为当前包路径
                .apis(RequestHandlerSelectors.basePackage("com.template.controller"))
                .paths(PathSelectors.any())
                .build();
//        return new Docket(DocumentationType.SWAGGER_2).select().apis(RequestHandlerSelectors.withMethodAnnotation(ApiOperation.class)).build();
    }
    //构建 api文档的详细信息函数,注意这里的注解引用的是哪个
    private ApiInfo apiInfo() {
        return new ApiInfoBuilder()
                //页面标题
                .title("Spring Boot 使用 Swagger2 构建RESTful API")
                //创建人
                .contact(new Contact("Bryan", "http://blog.bianxh.top/", ""))
                //版本号
                .version("1.0")
                //描述
                .description("API 描述")
                .build();
    }
}
ps:这个包路径一定要对 不然生成不了
3 操作api
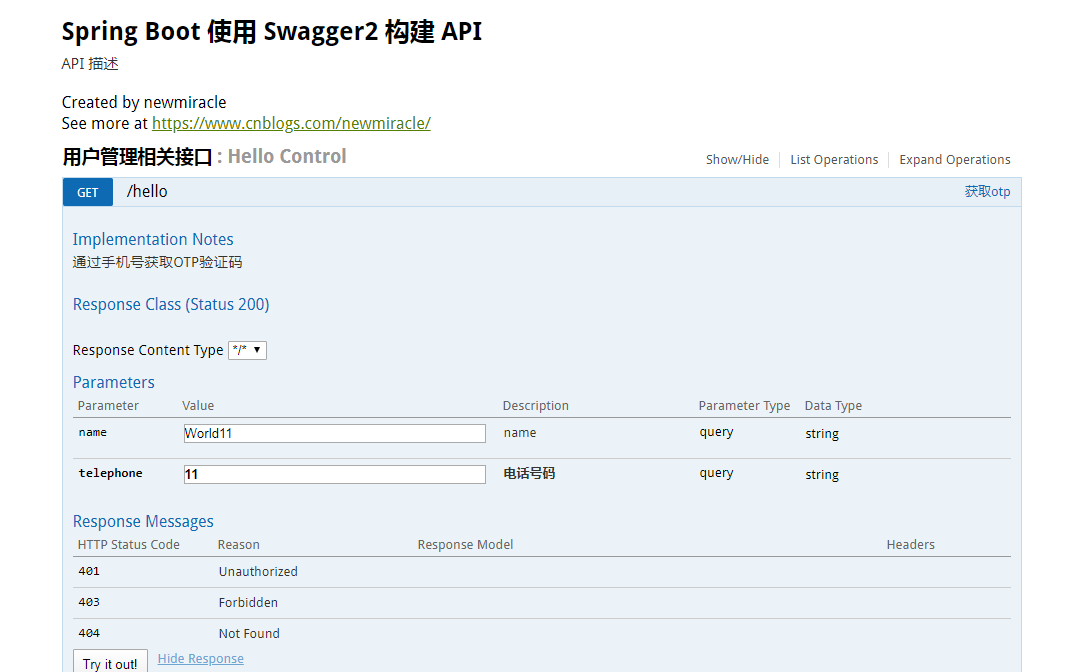
package com.example.demo2122;
import io.swagger.annotations.Api;
import io.swagger.annotations.ApiImplicitParam;
import io.swagger.annotations.ApiOperation;
import org.springframework.amqp.core.AmqpTemplate;
import org.springframework.amqp.rabbit.annotation.RabbitHandler;
import org.springframework.amqp.rabbit.annotation.RabbitListener;
import org.springframework.beans.factory.annotation.Autowired;
import org.springframework.scheduling.annotation.Async;
import org.springframework.scheduling.annotation.Scheduled;
import org.springframework.stereotype.Component;
import org.springframework.web.bind.annotation.*;

import org.slf4j.*;

@Api(tags = "用户管理相关接口")
@RestController
public class HelloControl {
    Logger logger = LoggerFactory.getLogger(getClass());

    @GetMapping("/hello")
    @ApiOperation(value = "获取otp", notes="通过手机号获取OTP验证码")
    @ApiImplicitParam(name = "telephone", value = "电话号码", paramType = "query", required = true, dataType = "Integer")

    public String hello(@RequestParam(value = "name", defaultValue = "World") String name) {

        return "succee1112";

    }


}
可以访问http://localhost:8080/swagger-ui.html 就可以看到了
如果遇到什么不懂的地方直接关注公众号留言(本文版权归作者和博客园共有,欢迎转载,但未经作者同意必须在文章页面给出原文连接,否则保留追究法律责任的权利。)
作者:newmiracle
出处:https://www.cnblogs.com/newmiracle/

 浙公网安备 33010602011771号