如何在springboot中使用jsp
步骤 1 : 视图支持
Springboot的默认视图支持是Thymeleaf(汤么李~~),本知识点记录如何让 Springboot 支持 jsp。
相关:Thymeleaf 教程
步骤 2 : 可运行项目
首先下载一个简单的可运行项目作为演示:网盘链接:https://www.90pan.com/b1868862
下载后解压,比如解压到 E:\project\springboot 目录下
步骤 3 : pom.xml
增加对JSP支持
<?xml version="1.0" encoding="UTF-8"?>
<project xmlns="http://maven.apache.org/POM/4.0.0" xmlns:xsi="http://www.w3.org/2001/XMLSchema-instance"
    xsi:schemaLocation="http://maven.apache.org/POM/4.0.0 http://maven.apache.org/xsd/maven-4.0.0.xsd">
    <modelVersion>4.0.0</modelVersion>

  <groupId>com.ryan</groupId>
  <artifactId>springboot</artifactId>
  <version>0.0.1-SNAPSHOT</version>
  <name>springboot</name>
  <description>springboot</description>

    <parent>
        <groupId>org.springframework.boot</groupId>
        <artifactId>spring-boot-starter-parent</artifactId>
        <version>1.5.9.RELEASE</version>
    </parent>

    <dependencies>
        <dependency>
            <groupId>org.springframework.boot</groupId>
            <artifactId>spring-boot-starter-web</artifactId>
        </dependency>
	    <dependency>
		      <groupId>junit</groupId>
		      <artifactId>junit</artifactId>
		      <version>3.8.1</version>
		      <scope>test</scope>
	    </dependency>

	<!-- servlet依赖. -->
        <dependency>
              <groupId>javax.servlet</groupId>
              <artifactId>javax.servlet-api</artifactId>
        </dependency>
              <dependency>
                     <groupId>javax.servlet</groupId>
                     <artifactId>jstl</artifactId>
              </dependency>

        <!-- tomcat的支持.-->
        <dependency>
               <groupId>org.apache.tomcat.embed</groupId>
               <artifactId>tomcat-embed-jasper</artifactId>
        </dependency>

    </dependencies>

    <properties>
        <java.version>1.8</java.version>
    </properties>

    <build>
        <plugins>
            <plugin>
                <groupId>org.springframework.boot</groupId>
                <artifactId>spring-boot-maven-plugin</artifactId>
            </plugin>
        </plugins>
    </build>

</project>
步骤 4 : application.properties
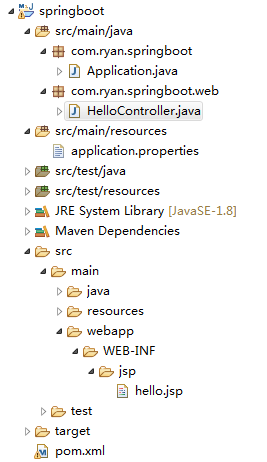
在src/main/resources 目录下增加 application.properties 文件,用于视图重定向jsp文件的位置
spring.mvc.view.prefix=/WEB-INF/jsp/
spring.mvc.view.suffix=.jsp
步骤 5 : HelloController
修改 HelloController,把本来的 @RestController 改为 @Controller。
这时返回"hello"就不再是字符串,而是根据application.properties 中的视图重定向,到/WEB-INF/jsp目录下去寻找hello.jsp文件
package com.ryan.springboot.web;
import java.text.DateFormat;
import java.util.Date;

import org.springframework.stereotype.Controller;
import org.springframework.ui.Model;
import org.springframework.web.bind.annotation.RequestMapping;

@Controller
public class HelloController {

    @RequestMapping("/hello")
    public String hello(Model m) {
        m.addAttribute("now", DateFormat.getDateTimeInstance().format(new Date()));
        return "hello";
    }

}
步骤 6 : hello.jsp
在main目录下,新建 -> webapp/WEB-INF/jsp 目录。
随后新建 hello.jsp 文件,在其中使用 EL表达式 显示放在 HelloController 的model中的当前时间。
<%@ page language="java" contentType="text/html; charset=UTF-8"
pageEncoding="UTF-8"%>
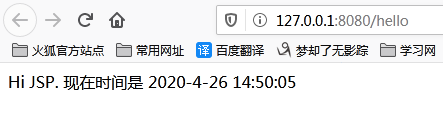
Hi JSP. 现在时间是 ${now}
步骤 7 : 启动测试
测试地址是:
注: 启动方式是 Springboot 特有的,直接运行类:com.ryan.springboot.Application 的主方法。
更多关于 Springboot-jsp 详细内容,点击学习: http://t.cn/A62l72Cn
