Git - 2 使用Git
书接上回:Git -1 工作原理
我们说完了Git init, add, commit操作之后,.git目录的变化,以及Git的四个对象,三个区以及工作流程.
原理讲完,接下来我们主要开始Git的使用了.
当然在讲使用的时候,也会带着看一下.git中数据结构的变化.
0101 Git常用命令使用
0x00 再玩add,commit
在上一个文章中,我们用git init,add,commit操作之后.git内部的变化来理解Git的原理.
那么我们将继续这么干.
先给ReadME.md里加一句话:
tony@ubuntu:~/learnGit$ vim ReadME.md
(加一句:)
**Git is not easy to learn, it takes time.**

tony@ubuntu:~/learnGit$ git status
位于分支 master
尚未暂存以备提交的变更:
  (使用 "git add <文件>..." 更新要提交的内容)
  (使用 "git restore <文件>..." 丢弃工作区的改动)
	修改:     ReadME.md

修改尚未加入提交(使用 "git add" 和/或 "git commit -a")
(## 然后看看index内部:)
tony@ubuntu:~/learnGit$ git ls-files -s
100644 77fd941d361f3f486002a8f569a124466e794d38 0	Firstfile.c
100644 b4b4abe89b9d465a78562a3cd78397530d0448a3 0	ReadME.md
(# Firstfile.c的hash值没变;ReadME.md的hash值已经变了,之前的是:
# 100644 f55dedc2c1c08962615aababc2ff08571a2c2f7f 0	ReadME.md)
.git/objects有了变化:
│   ├── objects
│   │   ├── 24
│   │   │   └── 3f0ddd146da71bc5fe67206b1d35ecac81a9ec
│   │   ├── 77
│   │   │   └── fd941d361f3f486002a8f569a124466e794d38
│   │   ├── b4
│   │   │   └── b4abe89b9d465a78562a3cd78397530d0448a3
│   │   ├── f5
│   │   │   └── 5dedc2c1c08962615aababc2ff08571a2c2f7f
│   │   ├── f8
│   │   │   └── f9cf4b3c915992c04577073db03c58cac5806a
ReadME.md 上一次的blob对象还在,又多了个新的,因为内容变了嘛.
执行commit再看变化:
tony@ubuntu:~/learnGit$git commit -m "insert a line words"
(# 看看.git/objects有变化:)
│   ├── objects
│   │   ├── 24
│   │   │   └── 3f0ddd146da71bc5fe67206b1d35ecac81a9ec
│   │   ├── 59
│   │   │   └── 9f543ab30cbfcba813eb22a3d8bf0574c2f213
│   │   ├── 77
│   │   │   └── fd941d361f3f486002a8f569a124466e794d38
│   │   ├── 94
│   │   │   └── 49491117299aaff28509fdaca835c78866facf
│   │   ├── b4
│   │   │   └── b4abe89b9d465a78562a3cd78397530d0448a3
│   │   ├── f5
│   │   │   └── 5dedc2c1c08962615aababc2ff08571a2c2f7f
│   │   ├── f8
│   │   │   └── f9cf4b3c915992c04577073db03c58cac5806a
(# 多了三个hash:)
599f543ab30cbfcba813eb22a3d8bf0574c2f213
9449491117299aaff28509fdaca835c78866facf
b4b4abe89b9d465a78562a3cd78397530d0448a3

(# 看看.git/log的变化:)
tony@ubuntu:~/learnGit$ cat .git/logs/HEAD
0000000000000000000000000000000000000000 f8f9cf4b3c915992c04577073db03c58cac5806a Tony <xxx@qq.com> 1666166558 +0800	commit (initial): first commit
f8f9cf4b3c915992c04577073db03c58cac5806a 9449491117299aaff28509fdaca835c78866facf Tony <xxx@qq.com> 1666170203 +0800	commit: insert a line words
# 第一次提交的父节点为0,第二次提交的父节点是第一次的hash.

(# 看看.git/ref/heads/master的变化:)
tony@ubuntu:~/learnGit$ cat .git/refs/heads/master
9449491117299aaff28509fdaca835c78866facf
看看多出来的是什么:
tony@ubuntu:~/learnGit$ git cat-file -t 599f543ab30cbfcba813eb22a3d8bf0574c2f213
tree
tony@ubuntu:~/learnGit$ git cat-file -p 599f543ab30cbfcba813eb22a3d8bf0574c2f213
100644 blob 77fd941d361f3f486002a8f569a124466e794d38	Firstfile.c
100644 blob b4b4abe89b9d465a78562a3cd78397530d0448a3	ReadME.md

tony@ubuntu:~/learnGit$ git cat-file -t 9449491117299aaff28509fdaca835c78866facf
commit
tony@ubuntu:~/learnGit$ git cat-file -p 9449491117299aaff28509fdaca835c78866facf
tree 599f543ab30cbfcba813eb22a3d8bf0574c2f213
parent f8f9cf4b3c915992c04577073db03c58cac5806a
author Tony <xxx@qq.com> 1666170203 +0800
committer Tony <xxx@qq.com> 1666170203 +0800

insert a line words

tony@ubuntu:~/learnGit$ git cat-file -t b4b4abe89b9d465a78562a3cd78397530d0448a3
blob
tony@ubuntu:~/learnGit$ git cat-file -p b4b4abe89b9d465a78562a3cd78397530d0448a3
# ReadMe

This Repo is used for learning Git.

**Git is not easy to learn, it takes time.**
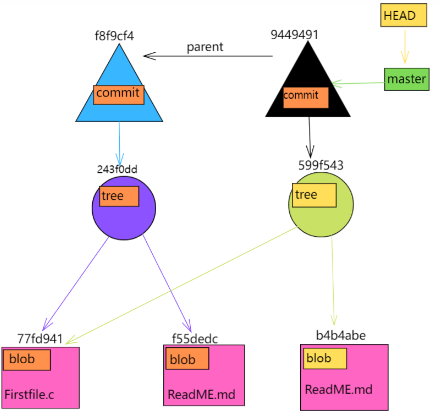
多了一个blob,一个tree,一个commit,我们接着上一篇文章末尾的图.
第二次提交的数据结构图如上所示.
由此我们可以推断:
- add会创建n个改变了内容的blob对象(若这些blob对象对应的工作区文件存放在文件夹里,则还会创建tree对象指向该文件).
- commit会创建一个新的tree对象,(tree对象中有n个指针)指向这些改变了内容的blob对象或者tree对象.
- commit也会创建一个commit对象,该对象里面有一个指针,指向第2步中创建的汇总用的tree对象;还有其他一些commit的信息,如作者,提交者,提交注释说明等,还有这个新commit对象的parent.
由这一通玩,理解了git内部运作的原理, 后面理解branch就很简单了.
再玩一个:
创建一个文件夹,然后把Firstfile.c复制一份到新文件夹下,给它改名.别的都不干.
tony@ubuntu:~/learnGit$ mkdir C
tony@ubuntu:~/learnGit$ mv Firstfile.c ./C
tony@ubuntu:~/learnGit$ cp ./C/Firstfile.c ./
tony@ubuntu:~/learnGit$ mv Firstfile.c cp_first.c
tony@ubuntu:~/learnGit$ git status
位于分支 master
尚未暂存以备提交的变更:
  (使用 "git add/rm <文件>..." 更新要提交的内容)
  (使用 "git restore <文件>..." 丢弃工作区的改动)
	删除:     Firstfile.c

未跟踪的文件:
  (使用 "git add <文件>..." 以包含要提交的内容)
	C/
	cp_first.c

修改尚未加入提交(使用 "git add" 和/或 "git commit -a")
然后add 看一下变化.
tony@ubuntu:~/learnGit$ git add .
tony@ubuntu:~/learnGit$ git ls-files -s
100644 77fd941d361f3f486002a8f569a124466e794d38 0	C/Firstfile.c
100644 b4b4abe89b9d465a78562a3cd78397530d0448a3 0	ReadME.md
100644 77fd941d361f3f486002a8f569a124466e794d38 0	cp_first.c

# 看到了吧,暂存区index确实有三条记录.但是!相同内容,共用一个blob对象.
# C/Firstfile.c cp_first.c同时指向 77fd941 这个blob对象.不生成新的blob对象.
# 此时.git仓库版本区,没有任何动作和变化.
然后commit,看一下变化.
tony@ubuntu:~/learnGit$ git commit -m "a new folder a copy file"
[master b4f6e34] a new folder a copy file
 2 files changed, 9 insertions(+)
 rename Firstfile.c => C/Firstfile.c (100%)
 create mode 100644 cp_first.c

# 看一下.git/objects
├── objects
│   ├── 24
│   │   └── 3f0ddd146da71bc5fe67206b1d35ecac81a9ec
│   ├── 4b
│   │   └── 0cbc99d339be1b4ef5502d8b436fe76ce56651
│   ├── 59
│   │   └── 9f543ab30cbfcba813eb22a3d8bf0574c2f213
│   ├── 77
│   │   └── fd941d361f3f486002a8f569a124466e794d38
│   ├── 94
│   │   └── 49491117299aaff28509fdaca835c78866facf
│   ├── b4
│   │   ├── b4abe89b9d465a78562a3cd78397530d0448a3
│   │   └── f6e3497d9b56de6e4c7225f475709bcac5eda7
│   ├── f4
│   │   └── 56163ce2ce236b6751b370deeebf92359ec102
│   ├── f5
│   │   └── 5dedc2c1c08962615aababc2ff08571a2c2f7f
│   ├── f8
│   │   └── f9cf4b3c915992c04577073db03c58cac5806a
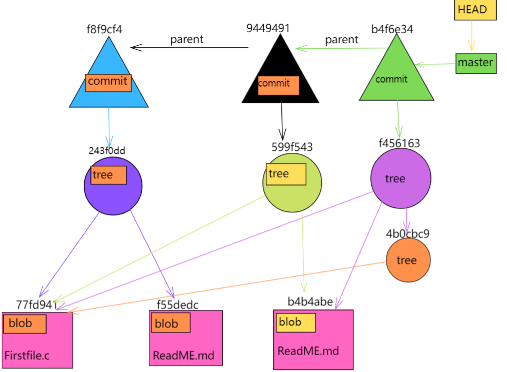
多的对象有:
4b0cbc99d339be1b4ef5502d8b436fe76ce56651
b4f6e3497d9b56de6e4c7225f475709bcac5eda7
f456163ce2ce236b6751b370deeebf92359ec102
盲猜是两个tree对象,一个commit对象.看看猜的对不对:
tony@ubuntu:~/learnGit$ git cat-file -t 4b0cbc99d339be1b4ef5502d8b436fe76ce56651
tree
tony@ubuntu:~/learnGit$ git cat-file -p 4b0cbc99d339be1b4ef5502d8b436fe76ce56651
100644 blob 77fd941d361f3f486002a8f569a124466e794d38	Firstfile.c
tony@ubuntu:~/learnGit$ git cat-file -t b4f6e3497d9b56de6e4c7225f475709bcac5eda7
commit
tony@ubuntu:~/learnGit$ git cat-file -p b4f6e3497d9b56de6e4c7225f475709bcac5eda7
tree f456163ce2ce236b6751b370deeebf92359ec102
parent 9449491117299aaff28509fdaca835c78866facf
author Tony <xxx@qq.com> 1666174244 +0800
committer Tony <xxx@qq.com> 1666174244 +0800

a new folder a copy file
tony@ubuntu:~/learnGit$ git cat-file -t f456163ce2ce236b6751b370deeebf92359ec102
tree
tony@ubuntu:~/learnGit$ git cat-file -p f456163ce2ce236b6751b370deeebf92359ec102
040000 tree 4b0cbc99d339be1b4ef5502d8b436fe76ce56651	C
100644 blob b4b4abe89b9d465a78562a3cd78397530d0448a3	ReadME.md
100644 blob 77fd941d361f3f486002a8f569a124466e794d38	cp_first.c
再看一下,HEAD->ref/heads/master是不是指向了最新的提交:
tony@ubuntu:~/learnGit$ cat .git/refs/heads/master
b4f6e3497d9b56de6e4c7225f475709bcac5eda7

# 没错了,图会画了吧,我就不画了.
# blob对象还是三个,77fd941(.c文件),f55dedc(ReadME.md第一版),b4b4abe(ReadME.md)第二版.
# 只不过多了个C文件夹,因为它,就多出来个tree对象 4b0cbc9.
好吧我知道你们不会自己画的:
0x01 常用命令示范
Git 常用命令清单, Git Reference 可以参考这里的内容进行命令使用的训练.
任何命令后加-h都能查看中文解释,比如下图:
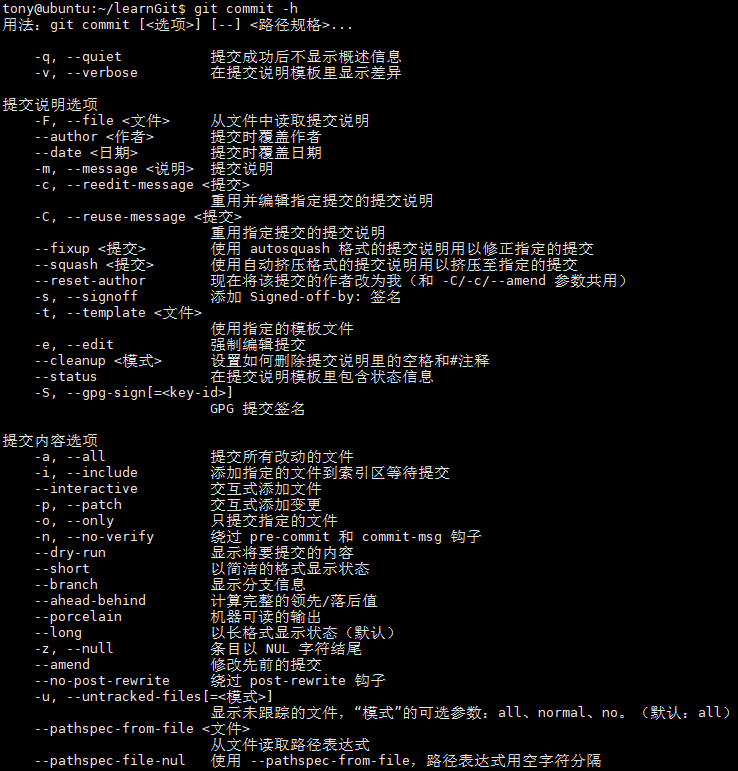
善用这个 -h 帮助功能,因为你不可能把所有命令记住.
commit --amend
使用一次新的commit,替代上一次提交,如果代码没有任何新变化,则用来改写上一次commit的提交信息.
关于git commit --amend其他用法:https://git-scm.com/docs/git-commit
tony@ubuntu:~/learnGit$ git commit -m "add Super man"
[master 1ca0004] add Super man
 1 file changed, 1 insertion(+)

tony@ubuntu:~/learnGit$ git commit --amend -m "try amend add Super man"
[master 7e5efb6] try amend add Super man
 Date: Wed Oct 19 22:04:34 2022 +0800
 1 file changed, 1 insertion(+)

tony@ubuntu:~/learnGit$ git log
commit 7e5efb6759cb6d6a094314f6b21b9fb572a36acc (HEAD -> master)
Author: Tony <xxx@qq.com>
Date:   Wed Oct 19 22:04:34 2022 +0800

    try amend add Super man
git rm
删除工作区文件,同时删除暂存区的相关文件. 但已经保存到.git仓库的,不会删,所以可以恢复.
先看看看仓库里的内容:
tony@ubuntu:~/learnGit$ git ls-tree master
040000 tree 4b0cbc99d339be1b4ef5502d8b436fe76ce56651	C
100644 blob 5d9fa5f8c58694c59d8941a9fe72815e14aa0e66	ReadME.md
100644 blob 77fd941d361f3f486002a8f569a124466e794d38	cp_first.c
100644 blob 0eb0b80be40c25781a504bdee2263d31cb8f579c	hello.c

再看看暂存区index的内容:
tony@ubuntu:~/learnGit$ git ls-files -s
100644 77fd941d361f3f486002a8f569a124466e794d38 0	C/Firstfile.c
100644 5d9fa5f8c58694c59d8941a9fe72815e14aa0e66 0	ReadME.md
100644 77fd941d361f3f486002a8f569a124466e794d38 0	cp_first.c
100644 0eb0b80be40c25781a504bdee2263d31cb8f579c 0	hello.c

执行删除:
tony@ubuntu:~/learnGit$ git rm hello.c
rm 'hello.c'

tony@ubuntu:~/learnGit$ git ls-files -s
100644 77fd941d361f3f486002a8f569a124466e794d38 0	C/Firstfile.c
100644 5d9fa5f8c58694c59d8941a9fe72815e14aa0e66 0	ReadME.md
100644 77fd941d361f3f486002a8f569a124466e794d38 0	cp_first.c

再看看仓库里的呢:
tony@ubuntu:~/learnGit$ git ls-tree master --full-tree
040000 tree 4b0cbc99d339be1b4ef5502d8b436fe76ce56651	C
100644 blob 5d9fa5f8c58694c59d8941a9fe72815e14aa0e66	ReadME.md
100644 blob 77fd941d361f3f486002a8f569a124466e794d38	cp_first.c
100644 blob 0eb0b80be40c25781a504bdee2263d31cb8f579c	hello.c
所以git rm删除的是工作区跟暂存区的文件,不删.git仓库里的.
但如果你执行完 git rm 删掉了工作区跟暂存区的文件,再执行commit就会把.git仓库区的文件也删掉.
git restore
接着上面的删除,恢复删除的工作区文件,暂存区文件.
但是git restore不会改变HEAD和ref/heads/master中的值.
tony@ubuntu:~/learnGit$ git restore --source=master hello.c

tony@ubuntu:~/learnGit$ ls
C  cp_first.c  hello.c  ReadME.md      默认恢复工作区.

tony@ubuntu:~/learnGit$ git ls-files -s
100644 77fd941d361f3f486002a8f569a124466e794d38 0	C/Firstfile.c
100644 5d9fa5f8c58694c59d8941a9fe72815e14aa0e66 0	ReadME.md
100644 77fd941d361f3f486002a8f569a124466e794d38 0	cp_first.c        暂存区还没有

tony@ubuntu:~/learnGit$ git restore --source=master -S hello.c    -S 是恢复暂存区的

tony@ubuntu:~/learnGit$ git ls-files -s
100644 77fd941d361f3f486002a8f569a124466e794d38 0	C/Firstfile.c
100644 5d9fa5f8c58694c59d8941a9fe72815e14aa0e66 0	ReadME.md
100644 77fd941d361f3f486002a8f569a124466e794d38 0	cp_first.c
100644 0eb0b80be40c25781a504bdee2263d31cb8f579c 0	hello.c           有了
git rm --cached
这命令只删除暂存区的文件.
tony@ubuntu:~/learnGit$ git rm --cached hello.c
rm 'hello.c'
tony@ubuntu:~/learnGit$ git ls-files -s
100644 77fd941d361f3f486002a8f569a124466e794d38 0	C/Firstfile.c
100644 5d9fa5f8c58694c59d8941a9fe72815e14aa0e66 0	ReadME.md
100644 77fd941d361f3f486002a8f569a124466e794d38 0	cp_first.c      暂存区确实没了.
tony@ubuntu:~/learnGit$ ls
C  cp_first.c  hello.c  ReadME.md                        工作区的还在
tony@ubuntu:~/learnGit$ git ls-tree master --full-tree
040000 tree 4b0cbc99d339be1b4ef5502d8b436fe76ce56651	C
100644 blob 5d9fa5f8c58694c59d8941a9fe72815e14aa0e66	ReadME.md
100644 blob 77fd941d361f3f486002a8f569a124466e794d38	cp_first.c
100644 blob 0eb0b80be40c25781a504bdee2263d31cb8f579c	hello.c           .git仓库里也还在

tony@ubuntu:~/learnGit$ git status
位于分支 master
要提交的变更:
  (使用 "git restore --staged <文件>..." 以取消暂存)
	删除:     hello.c

未跟踪的文件:
  (使用 "git add <文件>..." 以包含要提交的内容)
	hello.c
没问题.
可以用linux的系统命令/bin/rm
只删除工作区文件.
git diff
比较工作区与暂存区文件内容的差异,如果没有变化 什么都不出输出.
tony@ubuntu:~/learnGit$ git diff
diff --git a/ReadME.md b/ReadME.md
index 5d9fa5f..f6be74e 100644
--- a/ReadME.md
+++ b/ReadME.md
@@ -6,3 +6,4 @@ This Repo is used for learning Git.

 - A new line.
 - Super man
+batman

也可以指定看某个文件,比如:
tony@ubuntu:~/learnGit$ git diff cp_first.c
没变化.
tony@ubuntu:~/learnGit$ git diff ReadME.md
diff --git a/ReadME.md b/ReadME.md
index 5d9fa5f..f6be74e 100644
--- a/ReadME.md
+++ b/ReadME.md
@@ -6,3 +6,4 @@ This Repo is used for learning Git.

 - A new line.
 - Super man
+batman

tony@ubuntu:~/learnGit$ git diff hello.c
也没变化.
- git diff [提交A] [提交B]
比较两次提交的差别.最新的提交就是HEAD, 上一次被记录为HEAD^, 上上次是HEAD^^,
HEAD~n 表示距离最新提交HEAD的前n次提交,HEAD~1就是前一次提交.
tony@ubuntu:~/learnGit$ git diff HEAD HEAD~1

diff --git a/hello.c b/hello.c
deleted file mode 100644
index 0eb0b80..0000000
--- a/hello.c
+++ /dev/null
@@ -1,8 +0,0 @@
-#include <stdio.h>
-
-int main(void)
-{
-   printf("Never too late!\n");
-   return 0;
-
-}

同样的可以指定两次提交的某一个文件的变化:

tony@ubuntu:~/learnGit$ git diff HEAD HEAD~1 cp_first.c
没有变化
- git diff --cached
比较当前暂存区与.git仓库内(最新一次提交的内容不同)
就是暂存区还没commit的内容,与上一次提交有啥不同.
tony@ubuntu:~/learnGit$ git diff --cached
diff --git a/ReadME.md b/ReadME.md
index 5d9fa5f..f6be74e 100644
--- a/ReadME.md
+++ b/ReadME.md
@@ -6,3 +6,4 @@ This Repo is used for learning Git.

 - A new line.
 - Super man
+batman
-
git diff 分支操作
-
git diff branch1 branch2 --stat //--stat参数,显示两分支简单diff信息
-
git diff branch1 branch2 //显示两分支详细的diff信息
-
git diff branch1 branch2 path //显示两分支指定路径下文件的详细diff信息
-
git diff branch1 branch2 file_name(带路径) //显示两分支指定文件的详细diff信息
git reset
重置--可以理解为恢复.把工作区,暂存区还有版本恢复到某个版本(某些操作会覆盖工作区的改动).
《Git权威指南》的第7章第一节,有讲到HEAD与master分离的情况,讲的很细.建议看一下.
简单说就是,HEAD不再指向refs/heads/master.即HEAD不指向任何分支了,挺有意思的.
看下help.
tony@ubuntu:~/learnGit$ git reset -h
用法:git reset [--mixed | --soft | --hard | --merge | --keep] [-q] [<提交>]
   或:git reset [-q] [<树对象>] [--] <路径表达式>...
   或:git reset [-q] [--pathspec-from-file [--pathspec-file-nul]] [<树对象>]
   或:git reset --patch [<树对象>] [--] [<路径表达式>...]

    -q, --quiet           安静模式,只报告错误
    --mixed               (不写的话默认是这个)重置 HEAD 和索引 -- 工作区不覆盖
    --soft                只重置 HEAD --只把.git仓库区重置到某个版本,工作暂存两区不变
    --hard                重置 HEAD、索引和工作区 --三个区同时恢复到某个版本(提交).
    --merge               重置 HEAD、索引和工作区 --上一个命令是pull或者merge生效.
    --keep                重置 HEAD 但保存本地变更
    --recurse-submodules[=<reset>]
                          control recursive updating of submodules
    -p, --patch           交互式挑选数据块
    -N, --intent-to-add   将删除的路径标记为稍后添加
    --pathspec-from-file <文件>
                          从文件读取路径表达式
    --pathspec-file-nul   使用 --pathspec-from-file,路径表达式用空字符分隔
常用的有git reset --mixed or -- soft or --hard.
若是省略 提交这个参数,那么默认就是最新一次提交.
- git reset 恢复暂存区
tony@ubuntu:~/learnGit$ git status
位于分支 master
要提交的变更:
  (使用 "git restore --staged <文件>..." 以取消暂存)
	修改:     ReadME.md

暂存区有一个文件修改过,但是没有commit.

tony@ubuntu:~/learnGit$ git ls-files -s ReadME.md
100644 f6be74e8d44e8b3fbedbd37d291c2a38ae083242 0	ReadME.md

执行reset,这里全参数是:git reset --mixed HEAD
--mixed只会恢复版本库跟暂存区,哪个版本?最新一次的提交.
tony@ubuntu:~/learnGit$ git reset
重置后取消暂存的变更:
M	ReadME.md

暂存区被恢复了.
tony@ubuntu:~/learnGit$ git status
位于分支 master
尚未暂存以备提交的变更:
  (使用 "git add <文件>..." 更新要提交的内容)
  (使用 "git restore <文件>..." 丢弃工作区的改动)
	修改:     ReadME.md

修改尚未加入提交(使用 "git add" 和/或 "git commit -a")

tony@ubuntu:~/learnGit$ git ls-files -s ReadME.md
100644 5d9fa5f8c58694c59d8941a9fe72815e14aa0e66 0	ReadME.md
tony@ubuntu:~/learnGit$ git ls-tree HEAD ReadME.md
100644 blob 5d9fa5f8c58694c59d8941a9fe72815e14aa0e66	ReadME.md
Hash值变的跟.git仓库里一样了.
- 恢复到过往版本(提交)
先看下我们的提交记录.
tony@ubuntu:~/learnGit$ git log
commit a7ad2b421846ac8386012c2fb34951c0dfd333d9 (HEAD -> master)
Author: Tony <xxx@qq.com>
Date:   Wed Oct 19 22:16:42 2022 +0800

    add hello.c

commit 7e5efb6759cb6d6a094314f6b21b9fb572a36acc
Author: Tony <xxx@qq.com>
Date:   Wed Oct 19 22:04:34 2022 +0800

    try amend add Super man

commit 9a83361f18910c3473f55608039aab62df3c7a9b
Author: Tony <xxx@qq.com>
Date:   Wed Oct 19 19:28:43 2022 +0800

    a new line

commit b4f6e3497d9b56de6e4c7225f475709bcac5eda7
Author: Tony <xxx@qq.com>
Date:   Wed Oct 19 18:10:44 2022 +0800

    a new folder a copy file

commit 9449491117299aaff28509fdaca835c78866facf
Author: Tony <xxx@qq.com>
Date:   Wed Oct 19 17:03:23 2022 +0800

    insert a line words

commit f8f9cf4b3c915992c04577073db03c58cac5806a
Author: Tony <xxx@qq.com>
Date:   Wed Oct 19 16:02:38 2022 +0800

    first commit
再看一下其他信息:
tony@ubuntu:~/learnGit$ tree .git/objects/
22 directories, 21 files
记一下,等会看会不会少什么.

tony@ubuntu:~/learnGit$ cat .git/refs/heads/master
a7ad2b421846ac8386012c2fb34951c0dfd333d9
当前master指向最新一次提交.
看上面六条记录,现在我们把版本恢复到b4f6e34这个提交.
哪种方式都行,就用--hard吧.
刚好工作区有个文件没add,等下看它被覆盖掉.所以这个操作很危险,工作区需要保留的要注意了.
tony@ubuntu:~/learnGit$ git status
位于分支 master
尚未暂存以备提交的变更:
  (使用 "git add <文件>..." 更新要提交的内容)
  (使用 "git restore <文件>..." 丢弃工作区的改动)
	修改:     ReadME.md

修改尚未加入提交(使用 "git add" 和/或 "git commit -a")
执行git reset --hard b4f6e34:
tony@ubuntu:~/learnGit$ git reset --hard b4f6e34
HEAD 现在位于 b4f6e34 a new folder a copy file

看一下git log发现,自要恢复的那次提交, 之后的所有提交记录都没了.
六条记录,只剩三条.
tony@ubuntu:~/learnGit$ git log
commit b4f6e3497d9b56de6e4c7225f475709bcac5eda7 (HEAD -> master)
Author: Tony <xxx@qq.com>
Date:   Wed Oct 19 18:10:44 2022 +0800

    a new folder a copy file

commit 9449491117299aaff28509fdaca835c78866facf
Author: Tony <xxx@qq.com>
Date:   Wed Oct 19 17:03:23 2022 +0800

    insert a line words

commit f8f9cf4b3c915992c04577073db03c58cac5806a
Author: Tony <xxx@qq.com>
Date:   Wed Oct 19 16:02:38 2022 +0800

    first commit

之前ReadME.md里没add的内容,也没了.三个区所有内容都变成b4f6e34对象的内容了.
tony@ubuntu:~/learnGit$ git status
位于分支 master
无文件要提交,干净的工作区

master指向目的提交.
tony@ubuntu:~/learnGit$ cat .git/refs/heads/master
b4f6e3497d9b56de6e4c7225f475709bcac5eda7

但是!什么对象都没有删除,所以是可以恢复的.
tony@ubuntu:~/learnGit$ tree .git/objects/
22 directories, 21 files
master存放着最新的提交,所以现在最新提交是b4f6e34,那么它之后提交的log不显示也正常.
那我又后悔了,我们再恢复到刚刚的最新版本a7ad2b421.
tony@ubuntu:~/learnGit$ git reset --hard a7ad2b421
HEAD 现在位于 a7ad2b4 add hello.c
ok,恢复如初,但是之前没add的ReadME.md里的改动没了.
git mv
移动或者重命名
tony@ubuntu:~/learnGit$ git mv cp_first.c cp_firstfile.c
tony@ubuntu:~/learnGit$ ls
C  cp_firstfile.c  cp_first.s  hello.c  ReadME.md
tony@ubuntu:~/learnGit$ git status
位于分支 main
您的分支与上游分支 'TonyK922/main' 一致。

要提交的变更:
  (使用 "git restore --staged <文件>..." 以取消暂存)
	重命名:   cp_first.c -> cp_firstfile.c

未跟踪的文件:
  (使用 "git add <文件>..." 以包含要提交的内容)
	.gitignore

# 先修复一下.gitignore
tony@ubuntu:~/learnGit$ git rm -r --cached . # 删除暂存区
rm 'C/Firstfile.c'
rm 'ReadME.md'
rm 'cp_firstfile.c'
rm 'hello.c'

tony@ubuntu:~/learnGit$ git add .gitignore
tony@ubuntu:~/learnGit$ git add .
tony@ubuntu:~/learnGit$ git commit -m "fix .gitignore"
[main fef5dc6] fix .gitignore
 2 files changed, 5 insertions(+)
 create mode 100644 .gitignore
 rename cp_first.c => cp_firstfile.c (100%)  # 顺便改名完成
git log
查看log的几种参数:
--oneline 简单显示log信息
tony@ubuntu:~/learnGit$ git log  --oneline
fef5dc6 (HEAD -> main) fix .gitignore
7593f36 (TonyK922/main) cp_first.c add #include
c76ca50 merge master and dev
78bdc45 dev branch ReadME.md add one line
a7ad2b4 add hello.c
7e5efb6 try amend add Super man
9a83361 a new line
b4f6e34 a new folder a copy file
9449491 insert a line words
f8f9cf4 first commit
-n+num 显示最近num条提交
tony@ubuntu:~/learnGit$ git log -n2 --oneline  # 显示最近两条
fef5dc6 (HEAD -> main) fix .gitignore
7593f36 (TonyK922/main) cp_first.c add #include  # 确实就显示最近两条信息
--graph
以图的方式显示
tony@ubuntu:~/learnGit$ git log  -n4 --oneline --graph
* fef5dc6 (HEAD -> main) fix .gitignore
* 7593f36 (TonyK922/main) cp_first.c add #include
*   c76ca50 merge master and dev
|\
| * 78bdc45 dev branch ReadME.md add one line
要是不用--oneline就会很长:
tony@ubuntu:~/learnGit$ git log  -n3  --graph
* commit fef5dc665cb7e1b243cb5365659db381f9c4f86e (HEAD -> main)
| Author: Tony <xxx@qq.com>
| Date:   Fri Oct 28 21:08:15 2022 +0800
|
|     fix .gitignore
|
* commit 7593f363c4e134a9983c981a1374bbe3bd84efff (TonyK922/main)
| Author: Tony <xxx@qq.com>
| Date:   Tue Oct 25 22:25:19 2022 +0800
|
|     cp_first.c add #include
|
*   commit c76ca50cfff9df6310d559499f89f64e7a7ba6e8
|\  Merge: a7ad2b4 78bdc45
| | Author: Tony <xxx@qq.com>
| | Date:   Sun Oct 23 20:07:59 2022 +0800
| |
| |     merge master and dev
0110 分支(branch)
Git仓库在init的时候,自动创建一个默认分支master.master分支就是个分支,不特殊.
然后在这个分支写东西,提交,慢慢的就会有一条master分支的版本链.
实际项目非常复杂,功能需求,Bug fix等等,需要测试的东西,不能在稳定版本的分支上写.
必须要在新的分支上,才不会污染原来稳定的版本代码.
由之前章节的介绍,我们知道git的对象和工作原理..
分支的核心就在于:commit对象!
master分支的提交记录:

0x00 创建分支
创建分支有两种命令:
git branch创建分支,但是HEAD不自动指过去.git checkout -b或者git switch -c创建分支,HEAD自动指过去.- 切换分支除了checkout 也可以用switch.
tony@ubuntu:~/learnGit$ git log --oneline
a7ad2b4 (HEAD -> master) add hello.c
7e5efb6 try amend add Super man
9a83361 a new line
b4f6e34 a new folder a copy file
9449491 insert a line words
f8f9cf4 first commit
创建分支有两种情况:
- 就在当前分支的最新提交的那次进行创建
- 两种方式:
git branch newbranchname+git checktout newbranchnamegit checkout -b newbranchnameorgit switch -c newbranchname
- 指定某次提交(非最后一次提交)进行创建
- 也有两种方式:
- 先用
git checkout把HEAD指向该提交, 然后利用1.里的两种命令. - 用
git branch newbranchname commitHash+git checkout newbranchname
git checkout -b newbranchname commitHashorgit switch -c newbranchname commitHash-
参数给全就行了.
-
这里我们从b4f6e34这个commit新建个dev分支来.
关于分支名的补充:分支名必须遵守一些简单的规则
- 可以使用/来创建一个分层的命名方案.但该分支名不能以/结尾.
- 分支名不能以-减号开头
- 以斜杠分割的组件不能以点.开头. 如feature/.new这样的分支名是无效的.
- 分支名的任何地方都不能包含两个连续的点(..)
- 此外,分支名不能包含以下内容:
- 空格或其他空白符
- 在Git中具有特殊含义的字符,包括波浪线(~)、插入符(^)、冒号(: )、问号(?)、星号(*)、左方括号([).
- ASCII码控制字符,即值小于八进制\040的字符, 或DEL字符(八进制\177).
tony@ubuntu:~/learnGit$ git checkout -b dev b4f6e34
切换到一个新分支 'dev'

看一下当前活动的分支.
tony@ubuntu:~/learnGit$ git branch
* dev
  master

└── refs
    ├── heads
    │   ├── dev
    │   └── master
多了个dev文件.

继续看看git log
tony@ubuntu:~/learnGit$ git log --oneline --decorate --all --graph
* a7ad2b4 (master) add hello.c
* 7e5efb6 try amend add Super man
* 9a83361 a new line
* b4f6e34 (HEAD -> dev) a new folder a copy file
* 9449491 insert a line words
* f8f9cf4 first commit

看一下HEAD跟dev指向.
tony@ubuntu:~/learnGit$ cat .git/HEAD
ref: refs/heads/dev
tony@ubuntu:~/learnGit$ cat .git/refs/heads/dev
b4f6e3497d9b56de6e4c7225f475709bcac5eda7

当前分支的最新提交:
tony@ubuntu:~/learnGit$ git log --oneline --decorate --graph
* b4f6e34 (HEAD -> dev) a new folder a copy file
* 9449491 insert a line words
* f8f9cf4 first commit
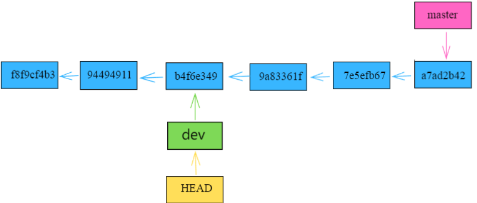
总结:
新建分支,只是新建了个指针指向分支起点提交对象.
新分支的存储原理, 跟默认分支master一模一样.
此时.git仓库,暂存区Index,跟工作区Worktree里的内容,都是b4f6e34这次提交时的内容了.
0x01 做一次Commit
在ReadME.md里多写一行,然后commit.
tony@ubuntu:~/learnGit$ git commit ReadME.md -m "dev branch ReadME.md add one line"
然后.git/objects/里多了三个对象,一个blob,一个tree,一个commit.
668697c15cbd758380ced3aa6f6725628b74b09a
78bdc45a4bee7971886443ca6c9d77dda9d1d37f
809583fa193870b7c335642fad6c0b2c9e59badf
- 看一下他们的类型,跟内容:
tony@ubuntu:~/learnGit$ git cat-file -t 668697c
blob
tony@ubuntu:~/learnGit$ git cat-file -p 668697c
# ReadMe

This Repo is used for learning Git.

**Git is not easy to learn, it takes time.**
branch dev add one line.

tony@ubuntu:~/learnGit$ git cat-file -t 78bdc45
commit
tony@ubuntu:~/learnGit$ git cat-file -p 78bdc45
tree 809583fa193870b7c335642fad6c0b2c9e59badf
parent b4f6e3497d9b56de6e4c7225f475709bcac5eda7
author Tony <xxx@qq.com> 1666521952 +0800
committer Tony <xxx@qq.com> 1666521952 +0800

dev branch ReadME.md add one line

tony@ubuntu:~/learnGit$ git cat-file -t 809583f
tree
tony@ubuntu:~/learnGit$ git cat-file -p 809583f
040000 tree 4b0cbc99d339be1b4ef5502d8b436fe76ce56651	C
100644 blob 668697c15cbd758380ced3aa6f6725628b74b09a	ReadME.md
100644 blob 77fd941d361f3f486002a8f569a124466e794d38	cp_first.c
tony@ubuntu:~/learnGit$ cat .git/logs/refs/heads/dev
0000000000000000000000000000000000000000 b4f6e3497d9b56de6e4c7225f475709bcac5eda7 Tony <xxx@qq.com> 1666518476 +0800	branch: Created from b4f6e34
b4f6e3497d9b56de6e4c7225f475709bcac5eda7 78bdc45a4bee7971886443ca6c9d77dda9d1d37f Tony <xxx@qq.com> 1666521952 +0800	commit: dev branch ReadME.md add one line
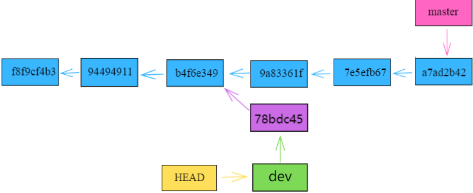
0x02 切换分支
切换分支的两个命令:
git checkout branchname或git switch branchname
tony@ubuntu:~/learnGit$ git switch master
切换到分支 'master'
0x03 合并分支
现在有两个分支dev和master,现在dev的任务完成了,需要把dev分支里写的内容合并到主线master里去.
合并分支:
git switch branch1然后git merge branch2
就是把branch2 合并到 branch1中去.
遇到了冲突(CONFLICT):
tony@ubuntu:~/learnGit$ git merge dev
自动合并 ReadME.md
冲突(内容):合并冲突于 ReadME.md
自动合并失败,修正冲突然后提交修正的结果。
0x04 解决冲突(CONFLICT)
冲突会出现在两个分支处理同一个文件, 也会出现在不同提交者处理同一个文件.
tony@ubuntu:~/learnGit$ git status
位于分支 master
您有尚未合并的路径。
  (解决冲突并运行 "git commit")
  (使用 "git merge --abort" 终止合并)

未合并的路径:
  (使用 "git add <文件>..." 标记解决方案)
	双方修改:   ReadME.md

修改尚未加入提交(使用 "git add" 和/或 "git commit -a")
看看冲突的位置:
tony@ubuntu:~/learnGit$ git diff
diff --cc ReadME.md
index 5d9fa5f,668697c..0000000
--- a/ReadME.md
+++ b/ReadME.md
@@@ -3,6 -3,4 +3,10 @@@
  This Repo is used for learning Git.

  **Git is not easy to learn, it takes time.**
++<<<<<<< HEAD
 +
 +- A new line.
 +- Super man
++=======
+ branch dev add one line.
++>>>>>>> dev
这表示 HEAD 所指示的版本(也就是你的 master 分支所在的位置,因为你在运行 merge 命令的时候已经检出
到了这个分支)在这个区段的上半部分(======= 的上半部分),而 dev 分支所指示的版本在 ======= 的
下半部分. 为了解决冲突,你必须选择使用由 ======= 分割的两部分中的一个,或者你也可以自行合并这些内
容。
vim手动改动:
tony@ubuntu:~/learnGit$ vim ReadME.md

tony@ubuntu:~/learnGit$ git add ReadME.md     -------add到index

tony@ubuntu:~/learnGit$ git commit -m "merge master and dec" -----这里不能commit具体文件,必须是commit全部
[master 2684c36] merge master and dec

tony@ubuntu:~/learnGit$ git commit -amend "merge master and dev"
打错字了,改一下commit message
如果两个分支只有一条提交链,merge默认就会用fast-forward模式,这种模式不会创建新的commit对象节点.
比如在之前master指向的最新commit处创建新的分支,然后就一直在新分支提交,master从此没有新提交,就是只有一条提交链.
若两个分支,有两个不同的提交链,merge默认就不会用fast-forward模式.
可以用git merge --no-ff 强制不用fast-forward模式.
- 完成之后,看看objects里新创建的:
.git/ORIG_HEAD新东西, 看看里面是什么:
tony@ubuntu:~/learnGit$ cat .git/ORIG_HEAD
78bdc45a4bee7971886443ca6c9d77dda9d1d37f
# 就是dev分支最后的提交节点,记录下来以便于你反悔用.
还有几个新的对象:
19ef5443aa5be9610e3bcf749b667a0407dc04ad - commit指向的tree对象
2684c36259f49e95f6980c8091f4a63de1082c1d - git commit --amend之前的commit对象
bcebdf2e1cbe3224f7bc0691e526ad969c110361 - 改完冲突产生的blob对象.
c76ca50cfff9df6310d559499f89f64e7a7ba6e8 - git commit --amend之后的commit对象
da8c03009d0406f573af740fc66ca2dc6c88a74e - 冲突时产生的blob对象.
- 看一下:
tony@ubuntu:~/learnGit$ git cat-file -t bcebdf2
blob
tony@ubuntu:~/learnGit$ git cat-file -p bcebdf2
# ReadMe

This Repo is used for learning Git.

**Git is not easy to learn, it takes time.**

- A new line.
- Super man.

branch dev add one line.

tony@ubuntu:~/learnGit$ git cat-file -t da8c030
blob
tony@ubuntu:~/learnGit$ git cat-file -p da8c030
# ReadMe

This Repo is used for learning Git.

**Git is not easy to learn, it takes time.**
<<<<<<< HEAD

- A new line.
- Super man
=======
branch dev add one line.
>>>>>>> dev

tony@ubuntu:~/learnGit$ git cat-file -t 2684c362
commit
tony@ubuntu:~/learnGit$ git cat-file -p 2684c362
tree 19ef5443aa5be9610e3bcf749b667a0407dc04ad
parent a7ad2b421846ac8386012c2fb34951c0dfd333d9
parent 78bdc45a4bee7971886443ca6c9d77dda9d1d37f
author Tony <xxx@qq.com> 1666526879 +0800
committer Tony <xxx@qq.com> 1666526879 +0800

merge master and dec

tony@ubuntu:~/learnGit$ git cat-file -p c76ca50cff
tree 19ef5443aa5be9610e3bcf749b667a0407dc04ad
parent a7ad2b421846ac8386012c2fb34951c0dfd333d9
parent 78bdc45a4bee7971886443ca6c9d77dda9d1d37f
author Tony <xxx@qq.com> 1666526879 +0800
committer Tony <xxx@qq.com> 1666527061 +0800

merge master and dev
现在的分支是这样的了:
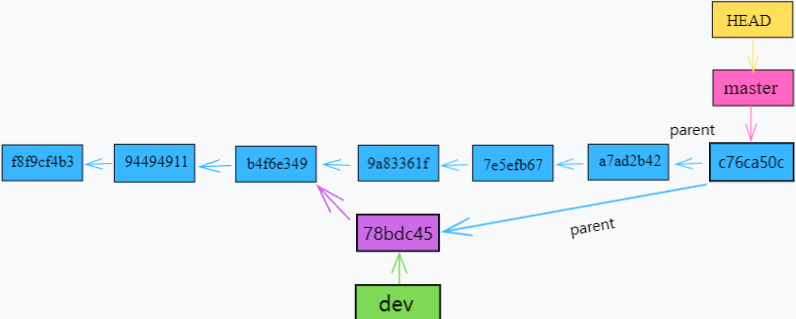
0x05 删除分支
dev分支任务已经完成, 其内容以及merge到主线了.
卸磨杀驴,过河拆桥, 我们来删除dev分支.
删除分支命令:
安全的删除操作:
git branch-dbranchname 当被删除分支内,有未合并的变更时,删除将会失败
危险的删除操作:
git branch-Dbranchname 什么都不管,直接强行删除.
tony@ubuntu:~/learnGit$ git branch -d dev    #因为已经合并完了 所以用-d
已删除分支 dev(曾为 78bdc45)。

# 看一下变化:
tony@ubuntu:~/learnGit$ git log --oneline --graph --decorate
*   c76ca50 (HEAD -> master) merge master and dev
|\
| * 78bdc45 dev branch ReadME.md add one line    # 提交记录还是在的
* | a7ad2b4 add hello.c
* | 7e5efb6 try amend add Super man
* | 9a83361 a new line
|/
* b4f6e34 a new folder a copy file
* 9449491 insert a line words
* f8f9cf4 first commit

tony@ubuntu:~/learnGit$ ls -l .git/objects/78/bdc45a4bee7971886443ca6c9d77dda9d1d37f
-r--r--r-- 1 tony tony 173 10月 23 18:45 .git/objects/78/bdc45a4bee7971886443ca6c9d77dda9d1d37f  # dev最新的commit对象也没删.


tony@ubuntu:~/learnGit$ tree .git/refs/
.git/refs/
├── heads
│   └── master             # dev 文件也被删掉了.
└── tags

tony@ubuntu:~/learnGit$ tree .git/logs/refs/
.git/logs/refs/
└── heads                # log/refs/heads 下记录dev分支提交记录的文件也没了
    └── master
总结一下:
删除分支,只是删除了分支的指针,而commit对象,commit记录都还在.
图是这样了.
0x06 rebase
rebase:变基 必看官网解释 (没被墙)解释的非常细致.
简单理解它的操作就是,将并行分支合并成一条分支.
rebase 有许多用法 后面有时间再补充.如更改以往的commit message,
或者把好几个commit合成一个等
我们先把78bdc45这个提交再新建个bugfix分支来.
# 以78bdc45为起点新建分支并切到新分支
tony@ubuntu:~/learnGit$ git switch -c bugfix 78bdc45
切换到一个新分支 'bugfix'
再做个提交:
tony@ubuntu:~/learnGit$ vim cp_first.c # 添加个#include <stdlib.h>标准库

tony@ubuntu:~/learnGit$ git add cp_first.c

tony@ubuntu:~/learnGit$ git commit cp_first.c -m "cp_first.c add #include"
[bugfix b541de9] cp_first.c add #include
 1 file changed, 1 insertion(+)
现在的版本图是这样了:

两条并行分支,现在我们用rebase命令,把它合并到一条分支来.
语法:
git switch branch1
git rebase branch2 --就是把branch1并到branch2上.
tony@ubuntu:~/learnGit$ git rebase master
首先,回退头指针以便在其上重放您的工作...
应用:cp_first.c add #include

# 看一下git log
tony@ubuntu:~/learnGit$ git log --graph --oneline --abbrev-commit
* 7593f36 (HEAD -> bugfix) cp_first.c add #include
*   c76ca50 (master) merge master and dev
|\
| * 78bdc45 dev branch ReadME.md add one line
* | a7ad2b4 add hello.c
* | 7e5efb6 try amend add Super man
* | 9a83361 a new line
|/
* b4f6e34 a new folder a copy file
* 9449491 insert a line words
* f8f9cf4 first commit
tony@ubuntu:~/learnGit$

# 对象多了三个:
0c25bc3745d6ffe801ce0327668bee1befb0d786   -- blob存放cp_first.c内容
28e2282387c0a97f240a632a243ff0f824b44223   -- tree, commit指向的对象
7593f363c4e134a9983c981a1374bbe3bd84efff   -- commit对象.
从git log可以看出来:
bugfix的分支的 b541de9 没了,在master指向的c76ca50后面,多了个7593f36提交.
我们把现在HEAD->bugfix merge到master分支上.
tony@ubuntu:~/learnGit$ git switch master
切换到分支 'master'
tony@ubuntu:~/learnGit$ git merge bugfix
更新 c76ca50..7593f36
Fast-forward
 cp_first.c | 1 +
 1 file changed, 1 insertion(+)
tony@ubuntu:~/learnGit$ git log --graph --oneline --abbrev-commit
* 7593f36 (HEAD -> master, bugfix) cp_first.c add #include
*   c76ca50 merge master and dev
|\
| * 78bdc45 dev branch ReadME.md add one line
* | a7ad2b4 add hello.c
* | 7e5efb6 try amend add Super man
* | 9a83361 a new line
|/
* b4f6e34 a new folder a copy file
* 9449491 insert a line words
* f8f9cf4 first commit

# 可以把 bugfix删了.
tony@ubuntu:~/learnGit$ git branch -d bugfix
已删除分支 bugfix(曾为 7593f36)。
完成.
tony@ubuntu:~/learnGit$ git log --graph --oneline --abbrev-commit
* 7593f36 (HEAD -> master) cp_first.c add #include
*   c76ca50 merge master and dev
|\
| * 78bdc45 dev branch ReadME.md add one line
* | a7ad2b4 add hello.c
* | 7e5efb6 try amend add Super man
* | 9a83361 a new line
|/
* b4f6e34 a new folder a copy file
* 9449491 insert a line words
* f8f9cf4 first commit
0x07 cherry-pick
cherry-pick 是把另外一个分支的某一次提交的内容,合并到目标分支上.
git switch branch1 # 切换分支
git cherry-pick commitHash 把该提交的内容合并到branch1分支上来.
# 在main分支给ReadME.md加了一行"cherry-pick".然后:
tony@ubuntu:~/learnGit$ git log --oneline --graph --all -n4
* 1375497 (HEAD -> main) add one line:cherry-pick     # main跟tmp分支分叉了
| * 73ef0b4 (TonyK922/tmp, tmp) branch tmp edit cp_firstfile.c
|/
* fef5dc6 (TonyK922/main) fix .gitignore
* 7593f36 cp_first.c add #include
我们把main上的最新改动,cherry-pick 到 tmp上来:
tony@ubuntu:~/learnGit$ git switch tmp
切换到分支 'tmp'
您的分支与上游分支 'TonyK922/tmp' 一致。
tony@ubuntu:~/learnGit$ git cherry-pick main
[tmp 50a5ce2] add one line:cherry-pick
 Date: Fri Oct 28 22:20:30 2022 +0800
 1 file changed, 1 insertion(+)

# ok,看看git log:
tony@ubuntu:~/learnGit$ git log --oneline --graph --all -n4
* 50a5ce2 (HEAD -> tmp) add one line:cherry-pick         # 提交注释直接搬过来了.
* 73ef0b4 (TonyK922/tmp) branch tmp edit cp_firstfile.c
| * 1375497 (main) add one line:cherry-pick
|/
* fef5dc6 (TonyK922/main) fix .gitignore

# 没问题,再看看tmp分支的ReadME.d:
tony@ubuntu:~/learnGit$ cat ReadME.md
# ReadMe

This Repo is used for learning Git.

**Git is not easy to learn, it takes time.**

- A new line.
- Super man.

branch dev add one line.
cherry-pick            # 变更过来了!


