盛科(Centec)交换机 SmartConfig 特性
参考
一. 原理
目前市场上稍微有些实力的交换机厂商,均支持自动化的批量开局部署,虽然具体实现有些区别,但实现原理基本一致。如下图:
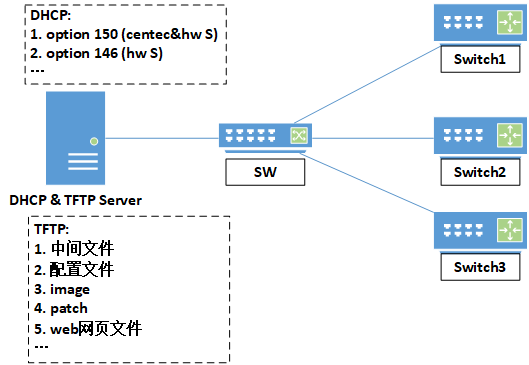
- 1.交换机加电启动,检测到没有配置文件则进入自动化配置模式,从dhcp服务器获取地址;
- 2.交换机从dhcp的option信息中获取文件服务器相关信息(文件服务器地址,需要下载的文件信息等);
- 3.交换机从文件服务器下载image,patch,配置文件等;
- 4.交换机加载配置(是否重启根据厂商不同而不同),完成配置。
二. 设置DHCP & TFTP 服务器
2.1 DHCP服务器
2.1.1 iptables
# dhcp server: udp 67
# dhcp client: udp 68
vim /etc/sysconfig/iptables
-A INPUT -p udp -m state --state NEW -m udp --dport 67 -j ACCEPT
-A INPUT -p udp -m state --state NEW -m udp --dport 68 -j ACCEPT

# 重启服务
service iptables restart
2.1.2 安装配置
# 安装
yum install dhcp -y

# 范例:/usr/share/doc/dhcp-4.2.5/dhcpd.conf.example
cat /etc/dhcp/dhcpd.conf

ddns-update-style none; # interim为DNS互动更新模式,ad-hoc为特殊DNS更新模式,none为不支持动态更新模式
ignore client-updates; # 忽略客户端更新
# option domain-name "centos.org"; # 默认搜索域
# option domain-name-servers 100.64.191.11;
# option ntp-servers 100.64.191.25;
option time-offset -18000; # Eastern Standard Time
default-lease-time 21600; # The default is 43200 seconds
max-lease-time 43200; # If not defined, the default maximum lease time is 86400
#allow booting; # The booting flag is used to tell dhcpd whether or not to respond to queries from a particular client. This keyword only has meaning when it appears in a host declaration. By default, booting is allowed, but if it is disabled for a particular client, then that client will not be able to get an address from the DHCP server.
#allow bootp; # The bootp flag is used to tell dhcpd whether or not to respond to bootp queries. Bootp queries are allowed by default.
option tftp-server-address code 150 = ip-address; # isc-dhcp-server中并没有"tftp-server-address"的option参数,需要提起指定

subnet 100.64.191.0 netmask 255.255.255.0 {
        range 100.64.191.101 100.64.191.200;
        # option subnet-mask 255.255.255.0;
        option routers 100.64.191.1; # 如果在二层网络下操作,是否设置网关并不重要

        # next-server 100.64.191.10; # 一般操作系统的自动安装使用option66指向tftp服务器
        # filename "/pxelinux.0"; # tftp根目录下的启动引导文件
        option tftp-server-address 100.64.191.10; # 一般交换机的自动配置使用option150指向tftp服务器,务必提前确认;另外centec交换机固定读取 "smartdeploy.xml" 文件,不用特别指定并传递中间文件名


        # we want the nameserver to appear at a fixed address
        # host ns {
        #        hardware ethernet 00:1C:25:80:F4:58; # 特殊设备网卡mac
        #        fixed-address 100.64.191.11;
        #}
}

# 启动
systemctl enable dhcpd ; systemctl restart dhcpd

# client获取地址后,可在server端查看租约
cat /var/lib/dhcpd/dhcpd.leases
2.2 TFTP服务器
2.2.1 iptables
# tcftp server: udp 69
vim /etc/sysconfig/iptables
-A INPUT -p udp -m state --state NEW -m udp --dport 69 -j ACCEPT

# 重启服务
service iptables restart
2.2.2 安装配置
# 安装
yum install xinetd tftp-server tftp -y


# 创建tftp根目录;
# 如果有权限问题,可执行"chmod 777 /tftp"
mkdir -p /tftp


# 配置,默认无tftp配置文件;
cat << EOF > /etc/xinetd.d/tftp
# default: off
# description: The tftp server serves files using the trivial file transfer
#       protocol.  The tftp protocol is often used to boot diskless
#       workstations, download configuration files to network-aware printers,
#       and to start the installation process for some operating systems.
service tftp
{
        socket_type          = dgram
        protocol             = udp
        wait                 = yes
        user                 = root
        server               = /usr/sbin/in.tftpd
        server_args          = -u nobody -s /tftp # -s指定tftp根目录
        disable              = no # 默认yes
        per_source           = 11
        cps                  = 100 2
        flags                = IPv4
}
EOF

# 启动服务
systemctl enable xinetd ; systemctl restart xinetd
三. Centec SmartConfig
Centec交换机的初始化配置特性为"SmartConfig"。
SmartConfig流程梳理:
- 1.在设置启用SmartConfig功能后,交换机启动时如果发现没有startup-config文件,则进入"smart-config"模式;
- 2.管理网口从DHCP Server获取IP地址与TFTP Server地址后,便会从获取到的TFTP Server上读取xml格式的中间文件smartdeploy.xml;
- 3.设备匹配smartdeploy.xml中的MAC\Product-id\SN等项,匹配任意一项,便下载匹配项对应的image文件,image文件下载成功后,再下载匹配到的配置文件;
- 4.image与配置文件都下载成功了,smart-config会自动指定设备下次启动的image与配置文件为刚下载的两个文件,然后自动重启(只下载配置文件时不重启);
- 5.启动完成后,E580使用的image及配置即在smartdeploy.xml中指定的,smart-config流程结束。
SmartConfig具体实现步骤如下:
3.1 (option) 检查smart-config是否处于使能状态
# "initial-switch-deployment"显示为"on"为使能状态,"off"为关闭状态;
# 如果为关闭状态,在配置模式下使用"smart-config initial-switch-deployment"命令可打开smart-config功能,此命令重启设备后生效;
# 默认情况下,smart-config处于使能状态
E580# show smart-config config
Smart-Config config:
 initial-switch-deployment: on
 hostname-prefix: on

 Send log message to console: on
3.2 编辑中间文件与配置文件
3.2.1 中间文件smartdeploy.xml范例
- SmartConfig特性中间文件为xml格式,固定命名"smartdeploy.xml";
- 以下xml文件范例对应1台交换机,如果有多台交换机,则需要在smartdeploy.xml文件中写多段类似的控制信息;
cat ~/smartdeploy.xml
<SmartDeploy>
<ftype>init</ftype>    # 不可修改
<hostprefix>E580</hostprefix>    # 此处设置E580的hostname的前缀,完整的hastname为该前缀加上相应设备(非带外管理口)的MAC地址的后六位,如E580的MAC地址为00:1e:08:a9:cc:6d,那么hostname为:"E580A9.CC6D"

# 此段编辑默认匹配项,就是如果有MAC\Productid\SN都不匹配的交换机,则使用这段条目里设置的image和配置文件
<defItem>
<option>disable</option>    #"enable"启用默认匹配,"disable"关闭默认匹配
<image>centecOS-e580-v6.2.26.r.bin</image>   # 根据实际情况修改,如果已"disable"默认匹配,设置与否并不重要
<config>startup-config-default.conf</config>    # 根据实际情况修改,如果已"disable"默认匹配,设置与否并不重要
</defItem>

# 三种匹配方式:设备MAC地址、设备Product-ID、以及设备序列号,只需任意匹配到其中一条,就可以用匹配到的条目下的image及配置启动交换机;
# 此段为使用序列号匹配的范例,如果不需要换image,则将image字段的内容部分删除,如"<image></image>";
# 注意事项:(1). 如果指定了更换image,下载image与配置文件后,设备会再次重启;
#          (2). 只指定配置文件,不指定更换image的情况下,为了避免设备再次重启,可在配置文件中的管理网口的配置前面,添加“no management ip address dhcp"与"no interface vlan 1"两句配置,具体可参考"配置文件示例"
<groups>
<Item>
<type>MAC</type>    # 不用修改
<value></value>   # 根据实际情况修改,如果不采用MAC匹配,建议不设置
<image></image>   # 根据实际情况修改,如果不采用MAC匹配,建议不设置
<config></config>   # 根据实际情况修改,如果不采用MAC匹配,建议不设置
</Item>
<Item>
<type>productid</type>    # 不用修改
<value></value>   # 根据实际情况修改,如果不采用Product-ID匹配,建议不设置
<image></image>   # 根据实际情况修改,如果不采用Product-ID匹配,建议不设置
<config></config>   # 根据实际情况修改,如果不采用Product-ID匹配,建议不设置
</Item>
<Item>
<type>SN</type>    # 不用修改
<value>E163GD172018</value>   # 根据实际情况修改
<image></image>   # 根据实际情况修改
<config>startup-config-test.conf</config>   # 根据实际情况修改
</Item>
</groups>
</SmartDeploy>
3.2.2 配置文件范例
注意事项: 只指定配置文件,不指定更换image的情况下,为了避免设备再次重启,在配置文件中的管理网口的配置前面,添加“no management ip address dhcp"与"no interface vlan 1"两句配置。
# 注意配置文件名与"smartdeploy.xml"中定义的config文件名一致
cat ~/startup-config-test.conf
no service password-encryption
!
username admin privilege 4 password 8 7834ed73c1ee2c999338cd31aaed88ce
!
no management ip address dhcp
no interface vlan 1
!
management ip address 100.64.191.201/24
management route add gateway 100.64.191.1
!
vlan database
 vlan 10
!
interface eth-0-1
!
interface eth-0-2
!
interface eth-0-3
!
interface eth-0-4
!
interface eth-0-5
!
interface eth-0-6
!
interface eth-0-7
!
interface eth-0-8
!
interface eth-0-9
!
interface eth-0-10
!
interface eth-0-11
!
interface eth-0-12
!
interface eth-0-13
!
interface eth-0-14
!
interface eth-0-15
!
interface eth-0-16
!
interface eth-0-17
!
interface eth-0-18
!
interface eth-0-19
!
interface eth-0-20
!
interface eth-0-21
!
interface eth-0-22
!
interface eth-0-23
!
interface eth-0-24
!
interface eth-0-25
!
interface eth-0-26
!
interface eth-0-27
!
interface eth-0-28
!
interface eth-0-29
!
interface eth-0-30
!
interface eth-0-31
!
interface eth-0-32
!
interface eth-0-33
!
interface eth-0-34
!
interface eth-0-35
!
interface eth-0-36
!
interface eth-0-37
!
interface eth-0-38
!
interface eth-0-39
!
interface eth-0-40
!
interface eth-0-41
!
interface eth-0-42
!
interface eth-0-43
!
interface eth-0-44
!
interface eth-0-45
!
interface eth-0-46
!
interface eth-0-47
!
interface eth-0-48
!
interface eth-0-49
!
interface eth-0-50
!
interface eth-0-51
!
interface eth-0-52
!
line con 0
 no line-password
 no login
line vty 0 7
 exec-timeout 35791 0
 privilege level 4
 transport input ssh
 no line-password
 login local
!
end
3.3 在TFTP Server上创建目录
SmartConfig特性已定义从tftp服务获取中间文件及配置文件,image等的路径,严格按其预定义的路径存放相关文件即可。
- 1.在TFTP服务器的根目录上创建一个固定名为"smartconfig"的文件夹;
- 2.在smartconfig文件夹下级目录再创建固定名为"conf"及"images"文件夹,将配置文件放置在conf文件夹中,将image放置在images文件夹中;
- 3.将编辑好的smartdeploy.xml放在smartconfig目录。
# 在tftp根目录下创建相关目录
mkdir -p /tftp/smartconfig/{conf,image}

# 放置文件
mv ~/smartdeploy.xml /tftp/smartconfig/
mv ~/startup-config-test.conf /tftp/smartconfig/conf/

# 查看目录结构
tree /tftp/
/tftp/
└── smartconfig
    ├── conf
    │   └── startup-config-test.conf
    ├── images
    └── smartdeploy.xml
3.4 配置DHCP Server
具体配置请见2.1.2 DHCP服务器安装配置章节,注意事项:
- 1.DHCP Server需要能分发给E580带外管理网口IP地址,务必使用带外管理网口;
- 2.Centec交换机从DHCP Server的option 150获取TFTP Server地址,而非一般操作系统自动部署的option 66,针对linux中开源的isc-dhcp-server,option 150需要提前定义;
- 3.保证E580的管理网口与TFTP Server能通信;
- 4.如果DHCP&TFTP Server与被部署的交换机在不同subnet,则中间网络设备需要具备DHCP中继功能与三层路由功能。
3.5 触发smart-config工作
触发SmartConfig工作的必要条件是:
- 1.flash下没有startup-config.conf文件,默认未保存过配置的新机没有配置文件;
# 如果测试或者已保存过配置的设备,可在特权模式下删除startup-config.conf文件 E580# delete flash:/startup-config.conf - 2.重启,启动完成后,SmartConfig功能开始工作。
3.6 Troubleshooting
如果smart-config未生效,可通过如下方式troubleshooting:
设备在没有startup-config.conf文件重启后,smart-config会自动加载一套默认配置给设备,此默认配置中,管理网口工作在DHCP模式下,可在特权模式下使用show dhcp client verbose指令查看管理网口是否已经从DHCP Server获取到管理IP与TFTP Server IP。
# 重点关注"Allocated IP" 与 "TFTP server addresses" 两个参数
Switch# show dhcp client verbose
DHCP client informations:
============================================================
Management interface DHCP client information:
  Current state: BOUND
  Allocated IP: 100.64.191.101 255.255.255.0
  Lease/renewal/rebinding: 714/71/564 seconds
  Lease from 2019-04-09 15:26:57 to 2019-04-09 15:46:57
  Will Renewal in 0 days 0 hours 1 minutes 11 seconds
  DHCP server: 100.64.191.10
  Transaction ID: 0x16d35160
  Default router: 100.64.191.1
  TFTP server addresses: 100.64.191.10    # 如果未获取到TFTP地址,则不显示此行
  Client ID: switch-001e:08a9:cc:6c-management    # 管理网口MAC不同于设备板卡的MAC地址

 浙公网安备 33010602011771号