net core 3.1使用ElasticSearch 全文搜索引擎
ElasticSearch 是一个开源的搜索引擎,建立在一个全文搜索引擎库 Apache Lucene™ 基础之上。 Lucene 可以说是当下最先进、高性能、全功能的搜索引擎库,无论是开源还是私有。
但是 Lucene 仅仅只是一个库。为了充分发挥其功能,你需要使用 Java 并将 Lucene 直接集成到应用程序中。 更糟糕的是,您可能需要获得信息检索学位才能了解其工作原理。Lucene 非常 复杂。
ElasticSearch 也是使用 Java 编写的,它的内部使用 Lucene 做索引与搜索,但是它的目的是使全文检索变得简单, 通过隐藏 Lucene 的复杂性,取而代之的提供一套简单一致的 RESTful API。
然而,Elasticsearch 不仅仅是 Lucene,并且也不仅仅只是一个全文搜索引擎。 它可以被下面这样准确的形容:
- 一个分布式的实时文档存储,每个字段 可以被索引与搜索
- 一个分布式实时分析搜索引擎
- 能胜任上百个服务节点的扩展,并支持 PB 级别的结构化或者非结构化数据
官方客户端在Java、.NET、PHP、Python、Ruby、Nodejs和许多其他语言中都是可用的。根据 DB-Engines 的排名显示,ElasticSearch 是最受欢迎的企业搜索引擎,其次是Apache Solr,也是基于Lucene。
Elasticsearch文档:https://www.elastic.co/guide/en/elasticsearch/reference/current/index.html
Elasticsearch.Net和Nest官方文档:https://www.elastic.co/guide/en/elasticsearch/client/net-api/7.x/index.html
一.安装
https://www.elastic.co/cn/downloads/下载elasticsearch和可视化工具kibana (两个版本号一定要一样) (下载慢用迅雷或者翻 Q)
1.(这一步忽略 因为我电脑没安装JDK 使用es自带得不香吗)环境配置 (注:Es自带jdk,如果没有特殊情况,可以使用es自带jdk,把java_home这个环境变量删除即可)
jdk下载,链接为:https://www.oracle.com/technetwork/java/javase/downloads/jdk8-downloads-2133151.html
选择对应版本的JDK

将下载好的jdk解压安装(请记住安装目录)
配置环境变量
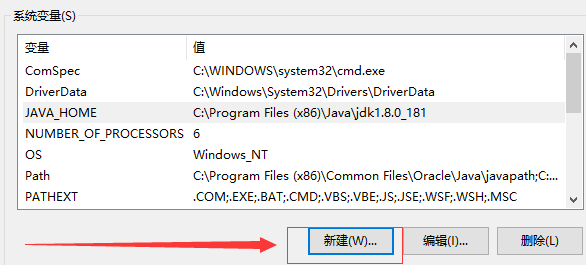
然后点击系统变量下面的新建 (一定要是系统变量,上面的用户变量设置了是不会有效果的) 然后进行如下设置,确定好 就OK了,无需重启

2.下载ElasticSeach并解压运行
将下载好的Elasticsearch解压 然后到 bin 目录下 打开cmd窗口 输入.\elasticsearch 回车 就开始启动了,接下来在浏览器输入 localhost:9200,回车,显示下图的信息就OK了

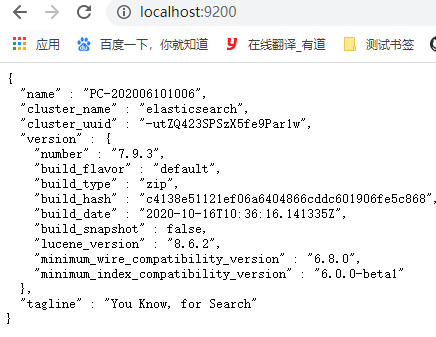
在window服务(w+r 输入services.msc)里面就可以看到elasticsearch的服务了 立即启动 这样可以便捷进行启动的操作。

如果没有服务在ES文件夹的Bin目录下。打开cmd(同上方启动es的方法一致)输入.\elasticsearch-service.bat install 然后安装即可
如果不行输入 .\elasticsearch-service-x64 install 就会出现出现服务不能启动 报错 其中一种方法(安装java 1.8.0 jdk 再执行.\elasticsearch-service.bat install)
Es开启外网访问
9200端口开放外网访问,并修改配置文件。
修改配置文件:
打开根目录下的config文件夹,找到elasticsearch.yml
开启:
cluster.name: my-application
node.name: node-1
network.host: 0.0.0.0
http.port: 9200
cluster.initial_master_nodes: ["node-1"]
开启上面5个参数。注意host要修改成0.0.0.0。这五个参数必须都要开启。
3.安装Kibana到Window上(elasticsearch的可视化工具,类似于navicate)
Kibana 必须和你之前下载的 elasticsearch 版本一致。将下载好的kibana解压到你的 Elasticsearch的目录下

然后相同的方式,到kibana 的bin 目录下打开cmd 启动kibana就好了 输入 .\kibana.bat 操作完后。浏览器打开 localhost:5601 就可以访问kibana了
4.(可以不要)把Kibana安装成WindowSever
(1)下载NSSM,下载地址:http://www.nssm.cc/download
(2)将NSSM解压并将nssm.exe拷贝到kibana的bin\目录下
(3)cmd命令进入到kibana的bin文件夹下
(4)执行安装命令nssm install kibana。文件路径选中kibana.bat

点击安装即可
安装完成后就可以在服务里面看到该sever了
注:刚启动Kiabana时,出现 Kibana server is not ready yet 这个错误的话不要慌,稍等下再访问即可,该错误的意思是服务还没有完全启动。
Kibana开启外网访问 以及开启中文
到config文件夹下找到kibana.yml该配置文件
修改或者添加如下配置
server.port: 5601
server.host: "0.0.0.0"
i18n.locale: "zh-CN"
5.Elasticsearch 装完后可以打开 kibana 进行创建节点及测试使用了。部署完es的地址后。可以进行 .Net Core的部署了
6.IK分词器
下载对应的ik中文分词(https://github.com/medcl/elasticsearch-analysis-ik/releases)和英文分词(https://github.com/medcl/elasticsearch-analysis-pinyin/releases)拼音分词器:https://github.com/medcl/elasticsearch-analysis-pinyin
下载后复制到es的plugins 目录下,解压就行了
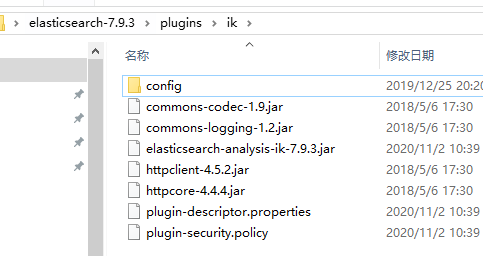
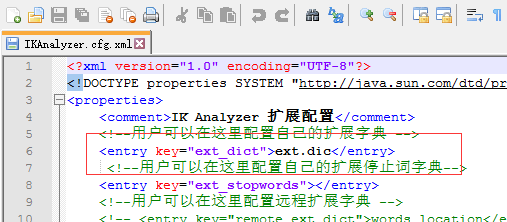
ik也可以自定义分词自己建一个文件放词语(详见github上的示例)
安装完成后需要重启 elasticsearch,然后测试分词器是否OK 有两种参考https://www.cnblogs.com/MrHSR/p/12258466.html
官方mapping制图文档 https://www.elastic.co/guide/en/elasticsearch/client/net-api/current/fluent-mapping.html
//如果不存在该索引 就添加mapping制图的分词
            if (!(await IndexExistsAsync(index)))
            {
                var createIndexResponse = _elasticClient.Indices.Create(index, c => c
                    .Map<BlogInfo>(m => m
                        .Properties(ps => ps
                        .Text(s => s.Name(s => s.Title).Analyzer("ik_smart"))//有两种ik_max_word
                        .Text(s => s.Name(s => s.Content).Analyzer("ik_smart"))
                        )
                    )
                );
            }
            var response = await _elasticClient.IndexAsync(entity,
                s => s.Index(index));
常用命令
GET _cat/indices  所有索引
GET blog/_search
{}     获取blog索引全部的文档

PUT /index  建立索引
POST /blog/_mapping
{
        "properties": {
            "content": {
                "type": "text",
                "analyzer": "ik_max_word",
                "search_analyzer": "ik_smart"
            }

        }
}   给ik搜索设置ik_max_word
DELETE blog  删除索引
GET blog查看当前索引
二.在Asp.netcore 上使用ElasticSearch
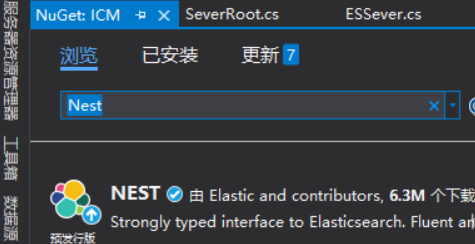
1..安装NuGet包,搜索Nest 并安装
2.开始使用
这里是以服务的方式进行实现的,经过测试ElasticSearch访问性能最高的是注册成单例服务,请求时要使用异步。这样性能可以提升到极致。
直接上代码

public interface IElasticsearchProvider
    {
        IElasticClient GetClient();
    }

public class ElasticsearchProvider : IElasticsearchProvider
    {
        public IElasticClient GetClient()
        {
            var url = AppSettings.Configuration["ElasticSearchContext:Url"];
            //如果有多个节点以|分开
            //var urls = url.Split('|').Select(x => new Uri(x)).ToList();

            //单个节点
            var connectionSettings = new ConnectionSettings(new Uri(url));
            //多个节点
            //var connectionPool = new SniffingConnectionPool(urls);
            //var connectionSetting = new ConnectionSettings(connectionPool).DefaultIndex("");
            //如果有账号密码
            //connectionSettings.BasicAuthentication(UserName, Password);

            return new ElasticClient(connectionSettings);
        }
    }

public interface IElasticsearchService
    {
        /// <summary>
        ///     是否存在索引
        /// </summary>
        /// <param name="index"></param>
        /// <returns></returns>
        Task<bool> IndexExistsAsync(string index = "blog");

        /// <summary>
        ///     新增数据
        /// </summary>
        /// <typeparam name="T"></typeparam>
        /// <param name="entity"></param>
        /// <param name="index"></param>
        Task InsertAsync(BlogInfo entity, string index = "blog");

        /// <summary>
        ///     批量新增
        /// </summary>
        /// <typeparam name="T"></typeparam>
        /// <param name="entity"></param>
        /// <param name="index"></param>
        Task InsertRangeAsync(IEnumerable<BlogInfo> entity, string index = "blog");

        /// <summary>
        /// 根据索引删除数据
        /// </summary>
        /// <param name="index"></param>
        /// <returns></returns>
        Task RemoveIndex(string index = "blog");
        /// <summary>
        /// 根据索引删除数据 ID
        /// </summary>
        /// <param name="Id">实体ID</param>
        /// <param name="index"></param>
        /// <returns></returns>
        Task DeleteAsync(string Id,string index = "blog");
        /// <summary>
        /// 修改
        /// </summary>
        /// <param name="Id"></param>
        /// <param name="index"></param>
        /// <returns></returns>
        Task UpdateAsync(BlogInfo entity, string index = "blog");
        /// <summary>
        /// 查询
        /// </summary>
        /// <param name="page"></param>
        /// <param name="limit"></param>
        /// <param name="index"></param>
        /// <returns></returns>

        Task<Tuple<int, IList<BlogInfo>>> QueryAsync(int page, int limit, string index = "blog");
    }

public class ElasticsearchService : IElasticsearchService
    {
        private readonly IElasticClient _elasticClient;
        public ElasticsearchService(IElasticsearchProvider esClientProvider)
        {
            _elasticClient = esClientProvider.GetClient();
        }

        public async Task<bool> IndexExistsAsync(string index="blog")
        {
            return (await _elasticClient.Indices.ExistsAsync(index)).Exists;
        }

        public async Task InsertAsync(BlogInfo entity, string index = "blog")
        {
            //这里可判断是否存在
            var response = await _elasticClient.IndexAsync(entity,
                s => s.Index(index));

            if (!response.IsValid)
                throw new Exception("新增数据失败:" + response.OriginalException.Message);
        }

        public async Task InsertRangeAsync(IEnumerable<BlogInfo> entity, string index = "blog")
        {
            var bulkRequest = new BulkRequest(index)
            {
                Operations = new List<IBulkOperation>()
            };
            var operations = entity.Select(o => new BulkIndexOperation<BlogInfo>(o)).Cast<IBulkOperation>().ToList();
            bulkRequest.Operations = operations;
            var response = await _elasticClient.BulkAsync(bulkRequest);

            if (!response.IsValid)
                throw new Exception("批量新增数据失败:" + response.OriginalException.Message);
        }

        public async Task UpdateAsync(BlogInfo entity, string index = "blog")
        {
            var response = await _elasticClient.UpdateAsync<BlogInfo>(entity.ID, x => x.Index(index).Doc(entity));
            if (!response.IsValid)
                throw new Exception("更新失败:" + response.OriginalException.Message);
        }

        public async Task DeleteAsync(string Id, string index = "blog")
        {
            await _elasticClient.DeleteAsync<BlogInfo>(Id, x => x.Index(index));
        }

        public async Task RemoveIndex(string index = "blog")
        {
            var exists = await IndexExistsAsync(index);
            if (!exists) return;
            var response = await _elasticClient.Indices.DeleteAsync(index);

            if (!response.IsValid)
                throw new Exception("删除index失败:" + response.OriginalException.Message);
        }

        public async Task<Tuple<int, IList<BlogInfo>>> QueryAsync(int page, int limit, string index = "blog")
        {
            var query = await _elasticClient.SearchAsync<BlogInfo>(x => x.Index(index)
                                    .From((page - 1) * limit)
                                    .Size(limit)
                                    .Sort(x => x.Descending(v => v.CreateDate)));
            return new Tuple<int, IList<BlogInfo>>(Convert.ToInt32(query.Total), query.Documents.ToList());
        }
    }
3.在startup里面在ConfigureServices下面添加如下代码即可
services.AddScoped<IElasticsearchProvider, ElasticsearchProvider>();
            services.AddTransient<IElasticsearchService, ElasticsearchService>();
按照新增、更新、删除、查询的顺序依次调用接口。新增可以多来几次,因为默认是没有数据的,多添加一点可以测试分页是否ok,这里就不再演示了。
3.1查询指定字段
var search = client.Search<AllInformationViewModel>(s => s
     .Index(indexName)
     .From(page)
     .Size(10)
     .Query(q => q
        .Match(m => m
            .Field(f => f.Title)
            .Query(keyword))
3.2全文检索(包括全部字段我都查找,标题啊,描述啊,摘要啊)
var searchAll = client.Search<AllInformationViewModel>(s => s
    .Index(indexName)
    .From(page)
    .Size(10)
    .Query(q => q
        .QueryString(qs => qs
            .Query(keyword).DefaultOperator(Operator.And))
3.3全文检索查的标题,描述都得给我高亮
#方法1
.Highlight(h => h
    .PreTags("<em>")
    .PostTags("</em>")
    .Encoder(HighlighterEncoder.Html)
    .Fields(
        fs => fs
            .Field(p => p.Title),

        fs => fs
                .Field(p => p.Content)
    )
)

#方法2
.Highlight(h => h
    .Fields(
        fs => fs
            .Field(p => p.Title)
                .PreTags("<em>")
                .PostTags("</em>"),


        fs => fs
                .Field(p => p.Content)
                .PreTags("<em>")
                .PostTags("</em>")
    )
)
3.4高亮查询

public ActionResult Index(string keywords="")
{
    var settings = new ConnectionSettings(new Uri("http://192.168.3.8:9200/")).DefaultIndex("article");
    var client = new ElasticClient(settings);

    var search = client.Search<Article>(s => s
        .From(0)
        .Size(10)
        .Query(q => q
            .Match(m => m
                .Field(f => f.Title)
                .Query(keywords))
            )
        .Highlight(h => h.Fields(e => e.Field("title")
                        .PreTags("<b style='color:red'>")
                        .PostTags("</b>")))
        //.Sort(r => r.Descending(q => q.CreateDate))

        //在工作中把<b style='color:red'>这个换成em标签就可以了,然后在css里面给em加上高亮即可
    );

    foreach (var hit in search.Hits)
    {
        foreach (var highlightField in hit.Highlight)
        {
            if (highlightField.Key == "title")
            {
                foreach (var highlight in highlightField.Value)
                {
                    hit.Source.Title = highlight.ToString();
                }
            }
        }
    }

    return View(search.Documents);
}
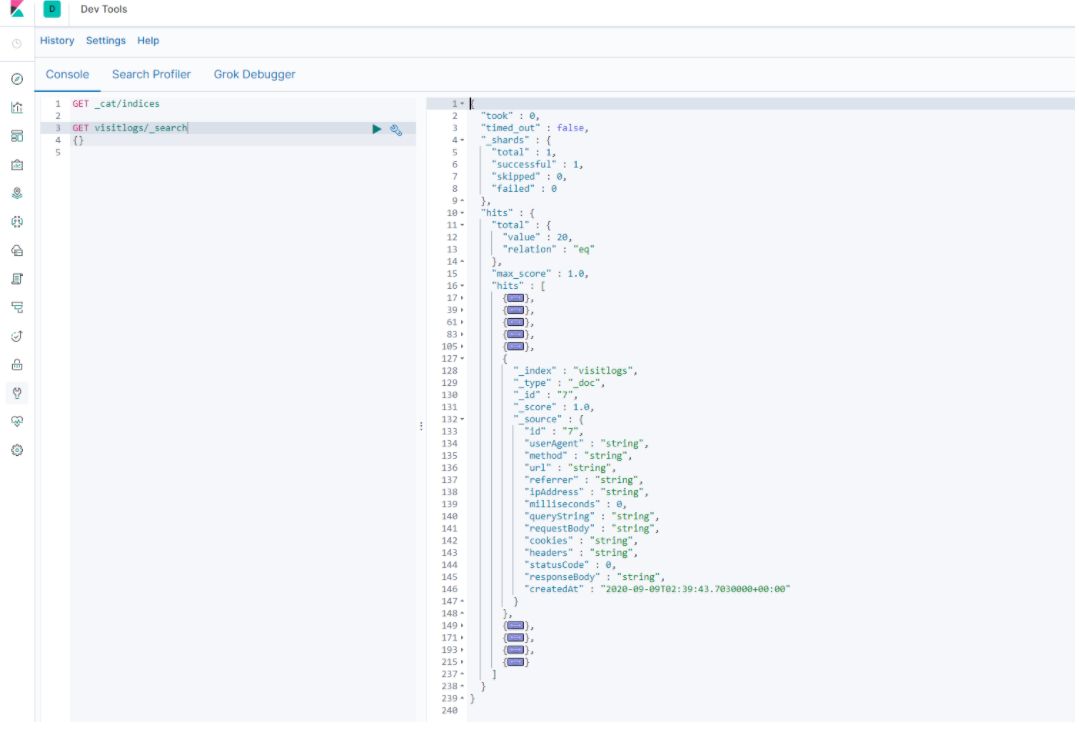
如果你有安装kibana,现在可以满怀惊喜的去查看一下刚才添加的数据。
GET _cat/indices

GET visitlogs/_search
{}
已经有大佬写好ES的增删改查的一个基础类库 (EasyElasticSearch)项目地址: https://github.com/wmchuang/EasyElasticSearch 博客地址https://www.cnblogs.com/mchuang/p/13678080.html
默认分词是一元分词 可以自己扩展就像以前的盘古分词一样 目前有个IK分词器https://github.com/medcl/elasticsearch-analysis-pinyin
搜索命令https://www.dazhuanlan.com/2019/09/14/1603cbb548bc/ https://www.cnblogs.com/yunquan/p/12934209.html
参考地址https://www.cnblogs.com/meowv/p/13614455.html


 浙公网安备 33010602011771号