

.Net Core如何优雅的实现中间件
在.Net Core的源码中,很多地方都有中间件的地方,Kestrel Server和Asp.net Core 等都用了中间件的设计,比如在Kestrel Server中,Http协议的1.0, 1.1, 2.0分别注册了不同的中间件从而导致不同方式的解析报文,这些要求了我们如何设计一个优雅的中间件框架,在MSDN 上这样描述了asp.net core的 中间件,每个中间件都应该
- Chooses whether to pass the request to the next component in the pipeline.(选择是否将请求传递到管道中的下一个组件)
- Can perform work before and after the next component in the pipeline.(可在管道中的下一个组件前后执行工作)
这无疑给了中间件的设计难度,在经典模型里,asp.net还是停留在管道模型里,定义了十几个event,分别执行在不同的时间节点,然后在不同的module里会注册自己的行为到事件上,在当时的观念来看,这是一个非常好的代码设计,面向切面编程,不同的module分工明细降低耦合性,但是随之而来带来的是臃肿全家桶设计,在当前的微服务年代,我们需要动态的添加这些设计,比如认证授权session module。
而现在的asp.net core 的中间件设计非常的好,可以拿到下一个中间件的控制权,并且在下一个中间件之前或者结束做其他的工作。如果不熟悉中间件的同学可以看看 msdn 的描述,这里我们来根据源码自己实现一个优雅的中间件。
首先我们要达成的效果是这样的
public class Startup
{
    public void Configure(IApplicationBuilder app)
    {
        app.Use(async (context, next) =>
        {
            // Do work that doesn't write to the Response.
            await next.Invoke();
            // Do logging or other work that doesn't write to the Response.
        });

        app.Run(async context =>
        {
            await context.Response.WriteAsync("Hello from 2nd delegate.");
        });
    }
}
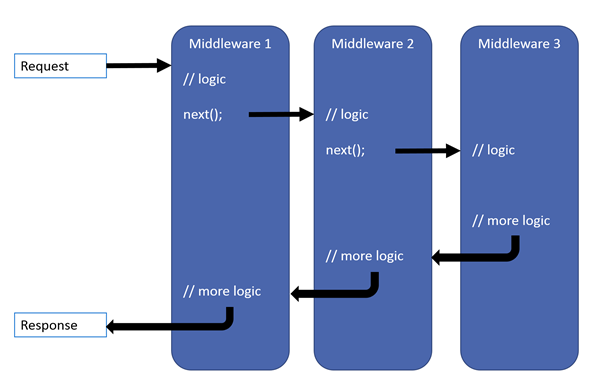
中间件的执行顺序是这样的
从上面的用法可以看到,我们需要定义一个IApplicationBuilder,然后用use去注册中间件到applicationbuild 对象,所以我们定义一个IApplicationBuilder
 public interface IApplicationBuilder {

        IApplicationBuilder Use(Func<HttpContext, Func<Task>, Task> middleware);//注册中间件

        IApplicationBuilder Build();//生成委托链

        IApplicationBuilder Run();//调用委托链

    }
Use的接口设计,是为了我们上面实现的效果,传入一个方法指针(委托,后略),这个指针需要两个参数,一个HttpContext,一个是下一个管道的方法指针,返回一个task对象, 现在为了让我们的代码跑起来,再定义一个HttpContext对象如下。
 public class HttpContext {

    }
现在让我们去实现一个这个接口
   public delegate Task RequestDelegate(HttpContext httpContext);

  class DefaultApplicationBuilder : IApplicationBuilder {

        public static List<Func<RequestDelegate, RequestDelegate>> _components = new ();
public IApplicationBuilder Use(Func<HttpContext,Func<Task>,Task> middleware) {

            Func<RequestDelegate, RequestDelegate> component = next => {
                return context => {
                    Func<Task> task = () => next(context);
                    return middleware(context,task);
                };
            };

            _components.Add(component);

            return this;
        }
    }
现在我们分析Use的实现,首先我们定义了一个方法指针RequestDelegate,这个没啥说的,而这个的设计妙处在DefaultApplicationBuilder中维护了一个 _components对象,是一个集合对象,定义了“二级”方法指针对象,这里的二级指的是Func<Func<T>>对象,得到一个“一级”方法指针处理后返回另一个“一级”方法指针。现在我们看一下这个Use方法的实现,一个中间件middleware就相当于一个方法指针,这时候它定义了一个component,获取一个方法指针,然后返回一个方法指针,注意在返回的方法指针里,它将之前传入的方法指针重新包装了一下得到task对象,这个相当于二级的指针,然后传给中间件。这个地方有点绕。大家需要多看一下理解其中的含义。
然后我们再实现一下build 和run 方法如下。
 public IApplicationBuilder Build() {

            RequestDelegate app = context => Task.CompletedTask;

            _components.Reverse();

            foreach (var component in _components) {

                app = component(app);
            }

            requestDelegate = app;

            return this;
        }

        public IApplicationBuilder Run() {

            var context = new HttpContext();

            requestDelegate(context);

            return this;
        }
简单说一下build方法,这里的设计之妙就在于将“二级”指针转发成“一级”指针并生成一个委托链,其中的next参数装的就是一系列的委托链。返回的就是第一个注册的中间件。现在我们使用一下这个中间件吧。
 static void Main(string[] args) {

            IApplicationBuilder applicationBuilder = new DefaultApplicationBuilder();

            applicationBuilder.Use(async (context, next) => {
                Console.WriteLine(1);
                await next.Invoke();
                Console.WriteLine(2);

            });

            applicationBuilder.Use(async (context, next) => {
                Console.WriteLine(3);
                await next.Invoke();
                Console.WriteLine(4);
            });

            applicationBuilder.Use(async (context, next) => {
                Console.WriteLine(5);
                await next.Invoke();
                Console.WriteLine(6);
            });

            applicationBuilder
                .Build()
                .Run();

            Console.WriteLine("Hello World!");
        }
返回结果就是如下,就是msdn文档所说的调用逻辑。
1
3
5
6
4
2
Hello World!
这一块理解起来比较难,设计了这中间件这一块的人很厉害,已经将代码上传到github 上了,大家有兴趣可以对比代码来研究分析。如果有任何问题欢迎大家留言。谢谢大家的阅读

