Web前端JavaScript笔记(4)节点
如何获取元素节点的属性:
在Web前端JavaScript笔记(3)对象中,介绍了访问行间属性的方法,除此之外,系统还提供了三个方法访问元素的属性:
1. setAttribute:
2. getAttribute:
3. removeAttribute:
区别:
1. class属性的访问,class与className的区别
2. 行间的自定义属性,例如在 div中自定义属性,可以通过getAttribute方法访问到,但上一节中介绍的方法不支持自定义属性。
3. setAttribute还可以自定义属性并且进行赋值,其他的方法不支持。
4. 删除标签的属性,其他方法是没办法删除属性的,只能将属性设置为"",而removeAttribute()可以将属性删除。
5. innerHtml 获取标签间的内容,会解析文本
6. innerText 获取标签间的纯文本, 不会解析标签,设置纯文本
7. outerHTML 从外标签开始到外标签结束
<!DOCTYPE html>
<html lang="en">
<head>
<meta charset="UTF-8">
<title>Title</title>
<script rel="script" src="../JavaScript/tool.js"></script>
<script>
window.onload = function () {
let tag = document.getElementById("div1");
// 访问行间属性
alert(tag.getAttribute("class"));
alert(tag.getAttribute("title"));
alert(tag.getAttribute("self")); // 访问自定义属性
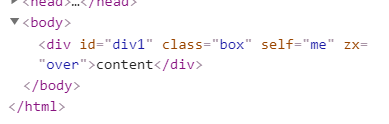
tag.setAttribute("zx", "over"); // 设置自定义的属性
tag.removeAttribute("title");
alert(tag.innerHTML); // 获取标签之间的内容
alert(tag.innerText);
alert(tag.outerHTML);
}
</script>
</head>
<body>
<div id="div1" class="box" title="hello" self="me">
<span>content</span>
</div>
</body>
</html>获取子节点:
系统提供的访问子节点的方法: (这些子节点共分为三类)
1. childNodes():访问当前节点下所有的子节点, 返回对象数组
2. lastChild():访问当前节点下最后一个子节点
3. firstChild():访问当前节点下第一个子节点
4. nextSibling: 当前节点的下一个兄弟节点
5. previousSibling:当前节点的上一个兄弟节点
同时,系统为每个节点提供了三个属性:
| nodeType | nodeName | nodeValue | |
| 元素节点 | 1 | 标签名 | null |
| 属性节点 | 2 | 属性名 | 属性值 |
| 文本节点 | 3 | #text | 文本内容 |
当标签出现换行,缩进的时候,系统也会把换行符,空格当作元素属性,所以通过childNodes获取到的元素子结点个数大于实际的子节点个数,可以通过以下的方法来去除这些空白符的影响:
【注】:下面的方法只能获取子结点中的元素节点
1. children : 只获取元素节点
2. firstElementChild:
3. lastElementChild:
4. nextElementSibling:
5. previousElementSibling:
<!DOCTYPE html>
<html lang="en">
<head>
    <meta charset="UTF-8">
    <title>Title</title>
    <script rel="script" src="../JavaScript/tool.js"></script>
    <script>
        window.onload = function () {
            let tag = document.getElementById("div1");
            alert(tag.childNodes.length);
            alert(tag.childNodes[0]);
            alert(tag.childNodes[1]);
            alert(tag.childNodes[2]);
            alert(tag.lastChild);

            // 元素属性:
            alert(tag.childNodes[0].nodeType);
            alert(tag.childNodes[1].nodeType);
            alert(tag.childNodes[2].nodeType);
        }

    </script>
</head>
<body>
    <div id="div1" class="box" title="hello" self="me">  <!--换行的时候会把换行符,空格也会算作元素-->
        <em>content</em>
        节点
        <strong>new node</strong>
    </div>
</body>
</html>
如何获取元素节点的属性节点:
系统提供了attributes方法用于获取元素节点上的所有属性节点: 获取到元素的属性节点
<!DOCTYPE html>
<html lang="en">
<head>
    <meta charset="UTF-8">
    <title>Title</title>
    <script rel="script" src="../JavaScript/tool.js"></script>
    <script>
        window.onload = function () {
            let tag = document.getElementById("div1");
            alert(tag.attributes);
            alert(tag.attributes.getNamedItem("title"));
            alert(tag.attributes["title"]);   // 简便写法
        }

    </script>
</head>
<body>
    <div id="div1" class="box" title="hello" self="me">  <!--换行的时候会把换行符,空格也会算作元素-->
        节点
    </div>
</body>
</html>
DOM的节点操作:
// document.write()会覆盖掉原来页面上的内容
系统提供的节点操作的方法:
1. document.createElement () : 创建节点, 参数:标签名 返回值:创建好的标签
2. Node.appendChild(node):将某一个节点插入当前节点的子节点内
3. document.createTextNode(文本) 创建文本标签(纯文本,即使有标签也不会解析)
<!DOCTYPE html>
<html lang="en">
<head>
    <meta charset="UTF-8">
    <title>Title</title>
    <script rel="script" src="../JavaScript/tool.js"></script>
    <script>
        window.onload = function () {
            let tag_div = document.getElementById("div1");
            let tag_btn = document.getElementById("btn1");
            tag_btn.onclick = function () {
                let tag_p = document.createElement("p");    // 创建一个p标签
                let text_content = document.createTextNode("hello javascript");
                tag_p.appendChild(text_content);
                tag_div.appendChild(tag_p);
            }
        }

    </script>
</head>
<body>
    <div id="div1" class="box">
        <em>This</em>
        节点
        <strong>Content</strong>
    </div>
    <button id="btn1">节点操作</button>
</body>
</html>
每次点击按钮,会添加新的文本标签到div元素中
4. insertBefore() :格式: box1.parentNode.insertBefore(box2, box1);
功能:将box2添加到box1的前面
5. box1.parentNode.replaceChild(box2, box1); 用box2节点替换box1节点
6. node.cloneNode():克隆出一个新的node节点,返回值就是新创建的node节点, 只克隆节点本身
node.cloneNode(true):克隆node节点本身以及其所有的子节点
7. box.parent.removeChild(box):删除box节点
<!DOCTYPE html>
<html lang="en">
<head>
    <meta charset="UTF-8">
    <title>Title</title>
    <script rel="script" src="../JavaScript/tool.js"></script>
    <script>
        window.onload = function () {
            let tag_div = document.getElementById("div1");
            let tag_btn = document.getElementById("btn1");
            tag_btn.onclick = function () {
                let tag_p = document.createElement("p");    // 创建一个p标签
                let text_content = document.createTextNode("hello javascript");
                tag_p.appendChild(text_content);
                document.body.replaceChild(tag_p, tag_div);   // 替换节点
            }
        }

    </script>
</head>
<body>
    <div id="div1" class="box">
        <em>This</em>
        节点
        <strong>Content</strong>
    </div>
    <button id="btn1">节点操作</button>
</body>
</html>
节点操作的案例:
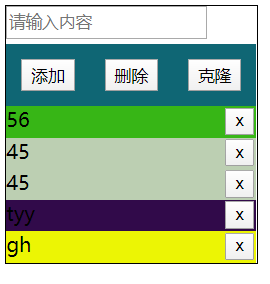
实现在输入框中输入内容,点击添加之后可以添加一条记录,点击删除按钮可以删除最后一条记录,点击克隆按钮可以克隆最后一条记录:
<!DOCTYPE html>
<html lang="en">
<head>
    <meta charset="UTF-8">
    <title>Title</title>
    <script rel="script" src="../JavaScript/tool.js"></script>
    <script>
        window.onload = function () {
            let input_tag = $("input_text");
            let bottom_section = $("bottom");
            $("add").onclick = function () {
                let input_content = input_tag.value;
                if(!input_content){
                    alert("请输入内容");
                }
                else{
                    // 开始创建节点
                    let node = document.createElement("div");
                    let text_node = document.createTextNode(input_content);
                    let btn_node = document.createElement("button");
                    let btn_text_node = document.createTextNode("x");
                    btn_node.appendChild(btn_text_node);
                    node.appendChild(text_node);
                    node.appendChild(btn_node);
                    node.style.background = randomColor();
                    bottom_section.appendChild(node);
                    input_tag.value = "";   // 清空输入框
                    updateItemsButtons();
                }
            };

            $("delete").onclick = function () {
                let last_node = bottom_section.lastChild;
                bottom_section.removeChild(last_node);
                updateItemsButtons();
            };

            $("clone").onclick = function () {
                let last_node = bottom_section.lastChild;
                let clone_node = last_node.cloneNode(true);   // 深拷贝
                bottom_section.appendChild(clone_node);
                updateItemsButtons();
            };

            function updateItemsButtons() {
                // 对每条记录上的删除按钮绑定函数
                let child_nodes = bottom_section.children;  // 只获取div元素节点
                let btn_arr = [];
                for(let i=0; i<child_nodes.length; i++)
                {
                    btn_arr.push(child_nodes[i].firstElementChild);
                    //console.log(child_nodes[i].children);
                }
                // 对标签绑定事件函数
                for (let i=0; i<btn_arr.length; i++)
                {
                    // console.log(btn_arr[i]);
                    btn_arr[i].index = i;
                    btn_arr[i].onclick = function () {
                        bottom_section.removeChild(child_nodes[this.index]);
                    }
                }
            }
        }

    </script>
    <style>
        #container{
            width: 200px;
            border: 1px solid black;
        }
        #top{
            width: 100%;
            height: 30px;
        }
        #top input{
            height: 20px;
            line-height: 30px;
            margin: 0 auto;
        }
        #middle{
            width: 100%;
            height: 50px;
            border: none;
            display: flex;
            flex-direction: row;
            justify-content: space-around;
            background: #0f6674;
        }
        #middle button{
            /*width: 25%;*/
            height: 50%;
            align-self: center;
            /*margin-top: 10px;*/
        }

        #bottom{

        }

        #bottom div{
            height: 25px;
            position: relative;
        }
        #bottom div button{
            position: absolute;
            top: 1px;
            right: 2px;
        }
    </style>
</head>
<body>
    <div id="container">
        <div id="top">
            <input type="text" id="input_text" placeholder="请输入内容">
        </div>
        <div id="middle">
            <button id="add">添加</button>
            <button id="delete">删除</button>
            <button id="clone">克隆</button>
        </div>
        <div id="bottom">
            <!--<div>content<button>x</button></div>-->
        </div>
    </div>
</body>
</html>
选项卡:
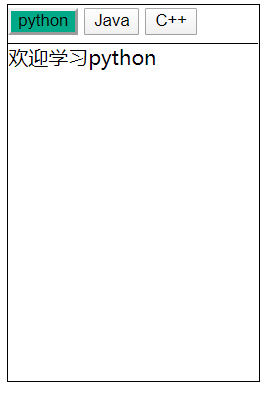
实现选项卡切换的时候,呈现选定状态的样式以及下方显示相对应的内容:
<!DOCTYPE html>
<html lang="en">
<head>
    <meta charset="UTF-8">
    <title>Title</title>
    <script rel="script" src="../JavaScript/tool.js"></script>
    <script>
        window.onload = function(){
            let btn_arr = $("buttons");
            let buttons = btn_arr.getElementsByTagName("button");
            let content_box = $("content");
            let contents = content_box.getElementsByTagName("div");
            // 为按钮添加事件绑定函数
            for (let i=0; i<buttons.length; i++)
            {
                buttons[i].index = i;
                buttons[i].onclick = function () {
                    for (let j=0; j<buttons.length; j++)
                    {
                        buttons[j].className = "";
                        contents[j].style.display = "none";
                    }
                    this.className = "active";
                    contents[this.index].style.display = "block";
                }
            }
        }
    </script>
    <style>
        #container{
            width: 200px;
            height: 300px;
            border: 1px solid black;
        }
        #container #buttons{
            height: 30px;
        }
        #container #content{
            border-top: 1px solid black;
        }
        .active{
            background: #00aa88;
        }
    </style>
</head>
<body>
    <div id="container">
        <div id="buttons">
            <button class="active">python</button>
            <button>Java</button>
            <button>C++</button>
        </div>
        <div id="content">
            <div style="display: block">欢迎学习python</div>
            <div style="display: none">欢迎学习Java</div>
            <div style="display: none">欢迎学习C++</div>
        </div>
    </div>
</body>
</html>
offset系列方法-快速获取当前页面上的宽,高,距左距离和距右距离:
1. offsetWidth:
2. offsetHeight:
3. offsetLeft:
4. offsetTop:
区别:
通过node.style.width / height获取的是html盒模型中content的大小
offsetWidth / offsetHeight获取的是盒模型中content+padding+border的大小
offsetLeft / offsetTop得到的是距离页面左上角的距离
文档碎片:
利用文档碎片可以大幅提高文档的运行效率:
应用:例如需要在页面上创建10万个节点,将10万个节点全部添加到页面上
提示: 官方提示的计时器: console.time("hh") 代码 console.timeEdn();
<!DOCTYPE html>
<html lang="en">
<head>
    <meta charset="UTF-8">
    <title>Title</title>
    <script rel="script" src="../JavaScript/tool.js"></script>
    <script>
        window.onload = function(){
            //创建十万个节点,没创建一个,插入一个到body中
            console.time("test1");
            for (let i=0; i<100000; i++)
            {
                let new_tag = document.createElement("div");
                document.body.appendChild(new_tag);
            }
            console.timeEnd("test1");     // 官方提供的计时器

            // // 先创建所有节点,在插入节点
            console.time("test2");
            let node = document.createElement("div");    // 先创建一个标签
            for (let i=0; i<100000; i++)
            {
                let new_node = document.createElement("div");
                node.appendChild(new_node);
            }
            document.body.appendChild(node);
            console.timeEnd("test2");     // 官方提供的计时器
        }
    </script>
</head>
<body>

</body>
</html>
第二种方法插入节点的速度更快,称之为文档碎片操作。
数组元素的遍历方法:
1. for循环
2. for-in
3. for-each方法:
<script>
        window.onload = function(){
            let arr = [1,4,2,3,4,2];
            for (let i=0; i<arr.length; i++)
            {
                console.log(i);
            }

            for(let elem in arr){
                console.log(elem);
            }

            arr.forEach(function (item, index, arr) {
                console.log(item);
            })
        }
</script>
------------------------------------------------------------------------------------------------------------------------

 浙公网安备 33010602011771号