Web前端JavaScript笔记(5)事件-拖拽
阻止默认行为和超链接
在浏览器上运行网页后,右击会弹出菜单,这属于浏览器的默认行为。如何禁止这一默认行为:
<script>
        window.onload = function () {
            document.oncontextmenu = function () {
                return false
            }
        }
</script>
对于a链接,如果点击a链接后,会默认直接进行跳转,如何组织这一默认行为,在点击a连接后,想用户进行询问之后,在进行是否跳转。
<!DOCTYPE html>
<html lang="en">
<head>
    <meta charset="UTF-8">
    <title>Title</title>
    <script rel="script" src="../JavaScript/tool.js"></script>
    <script>
        window.onload = function () {
            let tag_a = $("baidu");
            tag_a.onclick = function () {
                return confirm("Quit?");   // confirm会返回true和false
            };
        }
    </script>
</head>
<body>
    <a id="baidu" href="https://ww.baidu.com" target="_blank">百度</a>
</body>
</html>
另一种方法,阻止超链接默认行为的方法,由系统提供的属性和方法实现:
1. preventDefault(); W3C, 阻止默认行为
2. window.event.returnValue = false; // IE浏览器,阻止默认行为
在实际应用中,需要自定义个能兼容不同浏览器的版本:
<!DOCTYPE html>
<html lang="en">
<head>
    <meta charset="UTF-8">
    <title>Title</title>
    <script rel="script" src="../JavaScript/tool.js"></script>
    <script>
        window.onload = function () {
            let tag_a = $("baidu");
            tag_a.onclick = function (ev) {
                let e = ev || window.event;
                preventDefaultAction(e);
                alert("后续操作");
            };
        };

        // 跨浏览器阻止默认行为
        function preventDefaultAction(e) {
            if(e.preventDefault)
            {
                e.preventDefault();
            }
            else
            {
                window.event.returnValue = false;
            }
        }
    </script>
</head>
<body>
    <a id="baidu" href="https://ww.baidu.com" target="_blank">百度</a>
</body>
</html>
拖拽实现:
1. mousedown
记录鼠标按下时鼠标相对于被拖拽的物体的位置:
offsetX = e.clientX - offsetX
offsetY = e.clientY - offsetY
2. mousemove
在鼠标一定的过程中,需要一致保持被拖拽物体与鼠标的相对距离
3. mouseup
取消拖拽
<!DOCTYPE html>
<html lang="en">
<head>
    <meta charset="UTF-8">
    <title>Title</title>
    <script rel="script" src="../JavaScript/tool.js"></script>
    <script>
        window.onload = function () {
            let tag_div = $("box");
            let absolute_x = 0;
            let absolute_y = 0;
            let current_x = 0;
            let current_y = 0;

            tag_div.onmousedown = function (ev) {
                let e = ev || window.event;
                absolute_x = e.clientX - tag_div.offsetLeft;
                absolute_y = e.clientY - tag_div.offsetTop;

                // 绑定鼠标移动事件 document上
                document.onmousemove = function (ev) {
                    let e = ev || window.event;
                    current_x = e.clientX;
                    current_y = e.clientY;
                    tag_div.style.left = current_x - absolute_x + "px";
                    tag_div.style.top = current_y - absolute_y + "px";
                }
            };

            window.onmouseup = function () {
                document.onmousemove = null;
            };

        }
    </script>
    <style>
        #box{
            width: 200px;
            height: 100px;
            border: 1px solid black;
            background: #ffcf3f;
            position: absolute;
        }
    </style>
</head>
<body>
    <div id="box"></div>
</body>
</html>
对拖拽的改进,使得被推拽的物体不能超过屏幕的范围:
<!DOCTYPE html>
<html lang="en">
<head>
    <meta charset="UTF-8">
    <title>Title</title>
    <script rel="script" src="../JavaScript/tool.js"></script>
    <script>
        window.onload = function () {
            let tag_div = $("box");
            let absolute_x = 0;
            let absolute_y = 0;
            let current_x = 0;
            let current_y = 0;

            tag_div.onmousedown = function (ev) {
                let e = ev || window.event;
                absolute_x = e.clientX - tag_div.offsetLeft;
                absolute_y = e.clientY - tag_div.offsetTop;
                // 获取窗口的大小
                let window_width = document.documentElement.clientWidth || document.body.clientWidth;
                let window_height = document.documentElement.clientHeight || document.body
                // 绑定鼠标移动事件 document上
                document.onmousemove = function (ev) {
                    let e = ev || window.event;
                    current_x = e.clientX;
                    current_y = e.clientY;
                    let adjust_x = current_x - absolute_x;
                    let adjust_y = current_y - absolute_y;
                    if(adjust_x < 0)
                    {
                        adjust_x = 0;
                    }
                    if(adjust_x >= window_width - tag_div.offsetWidth)
                    {
                        adjust_x = window_width - tag_div.offsetWidth;
                    }
                    if(adjust_y < 0)
                    {
                        adjust_y = 0;
                    }
                    if(adjust_y >= window_height - tag_div.offsetHeight)
                    {
                        adjust_y = window_height - tag_div.offsetHeight;
                    }
                    tag_div.style.left = adjust_x + "px";
                    tag_div.style.top = adjust_y + "px";
                };
            };

            window.onmouseup = function () {
                document.onmousemove = null;
            }

        }
    </script>
    <style>
        #box{
            width: 200px;
            height: 100px;
            border: 1px solid black;
            background: #ffcf3f;
            position: absolute;
        }
    </style>
</head>
<body>
    <div id="box"></div>
</body>
</html>
可以对上述的实现拖拽代码进行封装,成为一个独立的函数,放到too.js中可供使用
事件委托:
例如,对于如下的结构:
<body>
    <ul id="list">
        <li>11</li>
        <li>22</li>
        <li>33</li>
        <li>44</li>
    </ul>
</body>
需要给<li>标签添加相同的点击事件,按照之前的做法,是先获得所有的<li>标签,再通过循环为每一个<li>标签添加点击事件。如果需要在添加一个按钮,每次点击按钮后,都需要新增一个<li>标签,则新增的<li>标签是没有绑定点击事件的。
这样做的缺点是:
1. for循环添加相同的事件函数,浪费资源
2. 不能解决新增的节点事件绑定问题
解决方法:事件委托
A委托---->B代理,B执行动作,A受益
1. 找到当前节点的父节点或者祖先节点
2. 将事件添加到父节点或者祖先节点
3. 找到触发对象,判断触发对象是否满足条件,如果是执行后续操作
所以可以通过上述的操作,实现<li>标签委托<ul>,此时只需要为<ul>标签添加事件函数,同时新增的<li>节点也可以响应点击事件,这个事件是<li>委托给ul的。
<!DOCTYPE html>
<html lang="en">
<head>
    <meta charset="UTF-8">
    <title>Title</title>
    <script rel="script" src="../JavaScript/tool.js"></script>
    <script>
        window.onload = function () {
            let btn = $("add");
            let tag_ul = $("list");   // 找到li的父节点
            tag_ul.onclick = function (ev) {
                let e = ev || window.event;
                let target_e = e.target || window.event.srcElement;  // 获取事件对象
                if(target_e.nodeName.toLowerCase() === "li")   // 判断触发对象是否满足条件
                {
                    target_e.style.background = "red";
                }
            };
            let cnt = 1;    // 增加新节点
            btn.onclick = function () {
                let newLi = document.createElement("li");
                newLi.innerHTML = (cnt++ * 1111).toString();
                tag_ul.appendChild(newLi);
            }
        }
    </script>
    <style>

    </style>
</head>
<body>
    <button id="add">增加</button>
    <ul id="list">

    </ul>
</body>
</html>
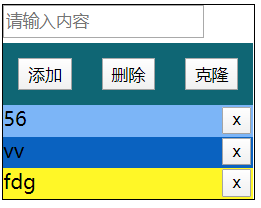
可以利用事件委托对前面的增加记录案例进行改进:
这样只需要添加一个点击就可以实现所有按钮绑定事件:
<!DOCTYPE html>
<html lang="en">
<head>
    <meta charset="UTF-8">
    <title>Title</title>
    <script rel="script" src="../JavaScript/tool.js"></script>
    <script>
        window.onload = function () {
            let input_tag = $("input_text");
            let bottom_section = $("bottom");
            $("add").onclick = function ()
            {
                let input_content = input_tag.value;
                if(!input_content){
                    alert("请输入内容");
                }
                else{
                    // 开始创建节点
                    let node = document.createElement("div");
                    let text_node = document.createTextNode(input_content);
                    let btn_node = document.createElement("button");
                    let btn_text_node = document.createTextNode("x");
                    btn_node.appendChild(btn_text_node);
                    node.appendChild(text_node);
                    node.appendChild(btn_node);
                    node.style.background = randomColor();
                    bottom_section.appendChild(node);
                    input_tag.value = "";   // 清空输入框
                    // updateItemsButtons();
                }
            };

            $("delete").onclick = function () {
                let last_node = bottom_section.lastChild;
                bottom_section.removeChild(last_node);
                // updateItemsButtons();
            };

            $("clone").onclick = function () {
                let last_node = bottom_section.lastChild;
                let clone_node = last_node.cloneNode(true);   // 深拷贝
                bottom_section.appendChild(clone_node);
                // updateItemsButtons();
            };

            // 事件委托
            bottom_section.onclick = function (ev) {
                let e = ev || window.event;
                let target = e.target || window.event.srcElement;   // 找到触发对象
                if(target.nodeName.toLowerCase() === "button")   // 要转换成小写
                {
                    bottom_section.removeChild(target.parentNode);   // 删除当前对象的父节点
                }
            };

            input_tag.onkeydown = function (ev)
            {
                // 给输入框添加快捷键
                let e = ev || window.event;
                let key_code = e.keyCode || e.which;   // 判断回车键
                if(e.ctrlKey && key_code===13)
                {
                    $("add").onclick();
                }
            }
        }

    </script>
    <style>
        #container{
            width: 200px;
            border: 1px solid black;
        }
        #top{
            width: 100%;
            height: 30px;
        }
        #top input{
            height: 20px;
            line-height: 30px;
            margin: 0 auto;
        }
        #middle{
            width: 100%;
            height: 50px;
            border: none;
            display: flex;
            flex-direction: row;
            justify-content: space-around;
            background: #0f6674;
        }
        #middle button{
            /*width: 25%;*/
            height: 50%;
            align-self: center;
            /*margin-top: 10px;*/
        }

        #bottom{

        }

        #bottom div{
            height: 25px;
            position: relative;
        }
        #bottom div button{
            position: absolute;
            top: 1px;
            right: 2px;
        }
    </style>
</head>
<body>
    <div id="container">
        <div id="top">
            <input type="text" id="input_text" placeholder="请输入内容">
        </div>
        <div id="middle">
            <button id="add">添加</button>
            <button id="delete">删除</button>
            <button id="clone">克隆</button>
        </div>
        <div id="bottom">
            <!--<div>content<button>x</button></div>-->
        </div>
    </div>
</body>
</html>
事件监听器:
传统的事件绑定,需要先获取到相应的节点,再去绑定事件,但是在一些场景中,这种传统的方法不能够满足需求:
1. 例如,对一个按钮重复绑定同一个是按,当事件被触发的时候,前面的事件会被后面的事件覆盖
<!DOCTYPE html>
<html lang="en">
<head>
    <meta charset="UTF-8">
    <title>Title</title>
    <script rel="script" src="../JavaScript/tool.js"></script>
    <script>
        window.onload = function () {
            let btn = $("add");
            btn.onclick = function () {
                alert("点击1");
            };
            btn.onclick = function () {
                alert("点击2");
            };
        }
    </script>
    <style>

    </style>
</head>
<body>
    <button id="add">增加</button>
</body>
</html>
当点击按钮后只能出现"点击2","点击1"会被覆盖掉。
而事件监听器是另一种绑定事件的方式,addEventListener()用于向指定元素添加事件句柄,IE8以下不支持,火狐和谷歌支持/
removeEventListener()删除事件监听器。
addEventListener("click", functionName, bool):
第一个参数表示需要监听的操作,例如click
第二个参数表示绑定的事件函数,函数名或者匿名函数
第三个参数表示 true: 事件捕获,false事件冒泡, 默认/ 事件捕获:与事件冒泡案例中的顺序正好相反。
<!DOCTYPE html>
<html lang="en">
<head>
    <meta charset="UTF-8">
    <title>Title</title>
    <script rel="script" src="../JavaScript/tool.js"></script>
    <script>
        window.onload = function () {
            let btn = $("add");
            btn.addEventListener("click", function () {
                alert("点击1");
            }, false);
            btn.addEventListener("click", function () {
                alert("点击2");
            }, false);
        }
    </script>
    <style>

    </style>
</head>
<body>
    <button id="add">增加</button>
</body>
</html>
而利用事件监听器就可以执行所有绑定的事件。利用事件监听器,可以给标签绑定多个事件函数,同时,也能够精确的去删除标签上绑定的某一个事件函数,但是传统事件绑定方法,一是会后绑定的事件函数会覆盖掉前面的事件函数,在一个是,如果需要删除事件函数,则会将所有的事件函数都删除。(node.onclick = null)
低版本浏览器需要兼容事件监听器:
1. attachEvent()
2. detachEvent()
function addEvent(node, eventType, funcName) {
    if (node.addEventListener)   // 判断是否支持
    {
        node.addEventListener(eventType, funcName, false);
    }
    else {
        node.attachEvent("on" + eventType, funcName);
    }
}

function removeEvent(node, eventType, funcName) {
    if(node.removeEventListener)
    {
        node.removeEventListener(eventType, funcName);
    }
    else
    {
        node.detachEvent("on" + eventType, funcName);
    }
}
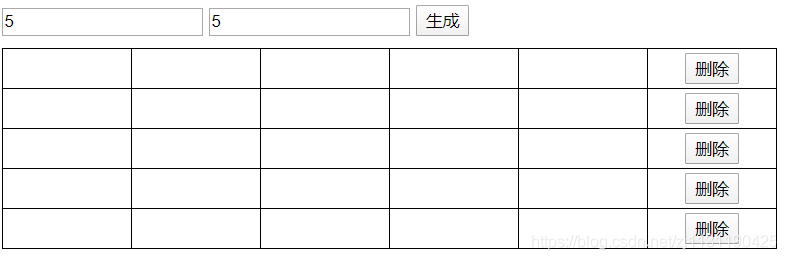
案例:动态生成表格
输入表格的行数和列数,自动生成表格:
<!DOCTYPE html>
<html lang="en">
<head>
    <meta charset="UTF-8">
    <title>Title</title>
    <script rel="script" src="../JavaScript/tool.js"></script>
    <script>
        window.onload = function () {
            let btn = $("gen");
            let row = $("row");
            let col = $("col");
            let table = $("t1");
            btn.onclick = function () {
                let row_num = row.value;
                let col_num = col.value;
                if(!row_num || !col_num)
                {
                    alert("请输入完整的行列");
                }
                else
                {
                    let row_max = parseInt(row_num);
                    let col_max = parseInt(col_num);
                    if (isNaN(row_max) || isNaN(col_max))   //行列必须是数字
                    {
                        alert("行列必须是数字");
                    }
                    else
                    {
                        for(let row_cnt=0; row_cnt<row_max; row_cnt++)
                        {
                            // 控制行数
                            let tr = document.createElement("tr");  // 创建行
                            for (let col_cnt=0; col_cnt<col_max; col_cnt++)
                            {
                                let td = document.createElement("td");
                                tr.appendChild(td);
                            }
                            let td_del = document.createElement("td");
                            td_del.innerHTML = "<button>删除</button>";
                            tr.appendChild(td_del);
                            table.appendChild(tr);
                        }
                    }
                }

            };
            table.onclick = function (ev) {
                let e = ev || window.event;
                let target = e.target || window.event.srcElement;
                if(target.nodeName.toLowerCase() === "button")
                {
                    table.removeChild(target.parentNode.parentNode);
                }
            };

        }
    </script>
    <style>
        #t1 tr td{
            width: 100px;
            height: 30px;
            border: 1px solid black;
        }

        #t1 tr td:last-child button{
            display: block;
            margin: 0 auto;
        }

        #t1{
            border: 1px solid black;
            border-collapse: collapse;
            margin-top: 10px;
        }
    </style>
</head>
<body>
    <input type="text" placeholder="行数" id="row">
    <input type="text" placeholder="列数" id="col">
    <button id="gen">生成</button>
    <table id="t1">

    </table>
</body>
</html>
效果如下图所示:
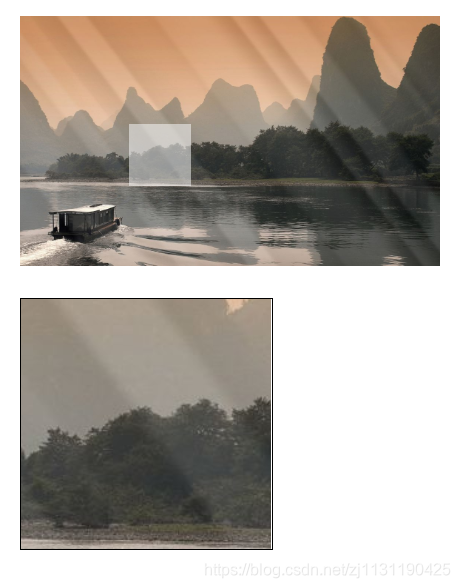
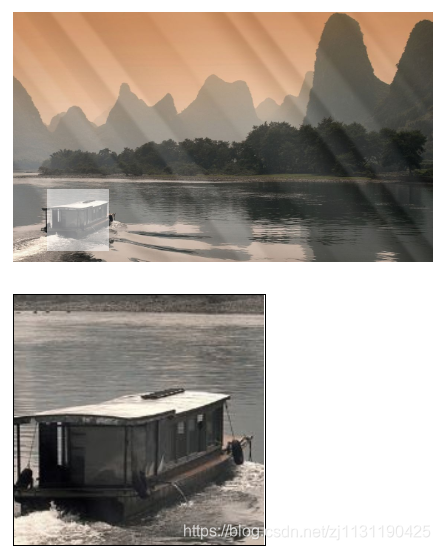
案例:放大镜
在图片中,随着鼠标的移动,图片的局部区域会在另一个地方被放大一定的倍数:
<!DOCTYPE html>
<html lang="en">
<head>
    <meta charset="UTF-8">
    <title>Title</title>
    <script rel="script" src="../JavaScript/tool.js"></script>
    <script>
        window.onload = function () {
            let tag_mark = $("mark");
            let tag_sourcePic = $("source-pic");
            let tag_largePic = $("large-pic");
            let tag_img = tag_largePic.getElementsByTagName("img")[0];
            tag_sourcePic.onmouseover = function () {
                tag_mark.style.display = "block";
            };
            tag_sourcePic.onmouseout = function () {
                tag_mark.style.display = "none";
            };
            tag_sourcePic.onmousemove = function (ev) {
                let e = ev || window.event;
                let temp_x = e.clientX - tag_sourcePic.offsetLeft -tag_mark.offsetWidth /2;
                let temp_y = e.clientY - tag_sourcePic.offsetTop - tag_mark.offsetHeight/2;
                if (temp_x < 0){
                    temp_x = 0;
                }
                if (temp_x > tag_sourcePic.offsetWidth - tag_mark.offsetWidth)
                {
                    temp_x = tag_sourcePic.offsetWidth - tag_mark.offsetWidth;
                }
                if (temp_y < 0)
                {
                    temp_y = 0;
                }

                if (temp_y > tag_sourcePic.offsetHeight - tag_mark.offsetHeight)
                {
                    temp_y = tag_sourcePic.offsetHeight - tag_mark.offsetHeight;
                }
                tag_mark.style.left = temp_x + "px";
                tag_mark.style.top = temp_y + "px";

                // 放大效果
                tag_img.style.left = temp_x * -3.2 +"px";
                tag_img.style.top = temp_y * -3.2 + "px";
            }


        }
    </script>
    <style>
        *{
            margin: 0;
            padding: 0;
        }
        #source-pic{
            width: 336px;
            height: 200px;
            position: absolute;
            left: 20px;
            top: 25px;
        }
        #source-pic img{
            display: block;
            width: 100%;
            height: 100%;
        }

        #source-pic #mark{
            width: 50px;
            height: 50px;
            opacity: 0.5;
            background: white;
            position: absolute;
            left: 0;
            top: 0;
            display: none;
        }

        #large-pic{
            width: 200px;
            height: 200px;
            border: 1px solid black;
            position: absolute;
            left: 20px;
            top: 250px;
            overflow: hidden;
        }

        #large-pic img
        {
            position: absolute;
            left: 0;
            top: 0;
        }

    </style>
</head>
<body>
    <div id="source-pic">
        <img src="../picture/others/timg1.jpg" alt="">
        <div id="mark"></div>
    </div>
    <div id="large-pic">
        <img src="../picture/others/timg1.jpg" alt="">
    </div>
</body>
</html>


 浙公网安备 33010602011771号