Web后端学习笔记Flask(2)模板
模板渲染:
在flask中,视图函数可以直接通过render_template进行模板渲染。在flask中,模板文件是存放在template文件夹中:在调用模板文件的时候,模板文件的路径从template文件夹之后开始写,必须写完整的路径,在渲染模板的时候,默认是从项目的templates文件夹查找模板。
from flask import Flask, render_template

app = Flask(__name__)
app.config.from_pyfile("config.py", silent=False)   # 加载配置文件config, 也可以加载普通的txt文件


@app.route('/')
def hello_world():
    return 'Hell Wold!'


@app.route('/index/')
def index():
    return render_template("index/index.html")


if __name__ == '__main__':
    app.run(debug=True)     # 开启debug模式
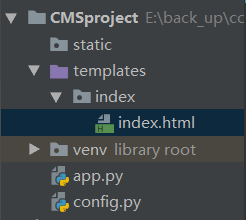
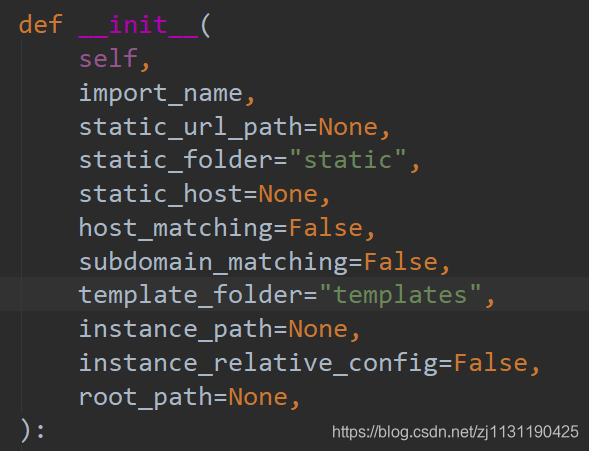
如果不想将模板文件放到template文件夹下,则可以修改Flask默认的模板文件路径,进入Flask的定义文件,可以看到Flask的初始化的默认参数,在初始化Flask的时候修改对应的路径即可:
模板传参及其技巧:
在模板渲染的时候,同时也需要将后台的数据渲染到前台。
后端的代码:
from flask import Flask, render_template

app = Flask(__name__)
app.config.from_pyfile("config.py", silent=False)   # 加载配置文件config, 也可以加载普通的txt文件


@app.route('/')
def hello_world():
    return 'Hell Wold!'


@app.route('/index/')
def index():
    return render_template("index/index.html", username="Knight-boy", age=18, country="China")    # 传递参数


if __name__ == '__main__':
    app.run(debug=True)     # 开启debug模式
前端代码:
<!DOCTYPE html>
<html lang="en">
<head>
    <meta charset="UTF-8">
    <title>访问首页</title>
    <style>
        .container{
            width: 200px;
            height: 200px;
            border: 1px solid blanchedalmond;
            background: burlywood;
        }
    </style>
</head>
<body>
    <div class="container">
        <h4>用户名: {{ username }}</h4>
        <h4>年龄: {{ age }}</h4>
        <h4>国别: {{ country }}</h4>
    </div>
</body>
</html>
渲染的结果:

如果需要传入的参数较多,可以将参数写入到字典中,在进行传参
后台代码:
from flask import Flask, render_template

app = Flask(__name__)
app.config.from_pyfile("config.py", silent=False)   # 加载配置文件config, 也可以加载普通的txt文件


@app.route('/')
def hello_world():
    return 'Hell Wold!'


@app.route('/index/')
def index():
    info = {
        "username": "knight",
        "age": 33,
        "country": "China"
    }
    return render_template("index/index.html", info=info)  # 这里参数名字与变量名相同即可


if __name__ == '__main__':
    app.run(debug=True)     # 开启debug模式
前端代码:
<!DOCTYPE html>
<html lang="en">
<head>
    <meta charset="UTF-8">
    <title>访问首页</title>
    <style>
        .container{
            width: 200px;
            height: 200px;
            border: 1px solid blanchedalmond;
            background: burlywood;
        }
    </style>
</head>
<body>
    <div class="container">
        <h4>用户名: {{ info["username"] }}</h4>
        <h4>年龄: {{ info["age"] }}</h4>
        <h4>国别: {{ info["country"] }}</h4>
    </div>
</body>
</html>
还有一种写法,在前端代码中,如果不需要通过字典名获取变量,可以在后端渲染页面传入参数的时候,将字典转换成关键字参数即可,(这种方法使用较多)
from flask import Flask, render_template

app = Flask(__name__)
app.config.from_pyfile("config.py", silent=False)   # 加载配置文件config, 也可以加载普通的txt文件


@app.route('/')
def hello_world():
    return 'Hell Wold!'


@app.route('/index/')
def index():
    info = {
        "username": "knight-b",
        "age": 20,
        "country": "China"
    }
    return render_template("index/index.html", **info)


if __name__ == '__main__':
    app.run(debug=True)     # 开启debug模式
<!DOCTYPE html>
<html lang="en">
<head>
    <meta charset="UTF-8">
    <title>访问首页</title>
    <style>
        .container{
            width: 200px;
            height: 200px;
            border: 1px solid blanchedalmond;
            background: burlywood;
        }
    </style>
</head>
<body>
    <div class="container">
        <h4>用户名: {{ username }}</h4>
        <h4>年龄: {{ age }}</h4>
        <h4>国别: {{ country }}</h4>
    </div>
</body>
</html>
模板中使用URL_FOR
在模板中也会使用url_for,例如在首页中,一般会有一个跳转按钮,再点击跳转按钮之后,会跳转到登录界面
{{ 适合存放变量 }}
{% 适合执行逻辑代码 %}
代码实现:在html代码中,可以使用url_for获取视图函数对应的url
后端代码:
from flask import Flask, render_template

app = Flask(__name__)
app.config.from_pyfile("config.py", silent=False)   # 加载配置文件config, 也可以加载普通的txt文件


@app.route('/')
def index():
    return render_template("HTML/index.html")


@app.route('/login/')
def login():
    return render_template("HTML/login.html")


if __name__ == '__main__':
    app.run(debug=True)     # 开启debug模式
首页代码:
<!DOCTYPE html>
<html lang="en">
<head>
    <meta charset="UTF-8">
    <title>访问首页</title>
    <style>
        .container{
            width: 200px;
            height: 150px;
            border: 1px solid blanchedalmond;
            background: burlywood;
        }
    </style>
</head>
<body>
    <div class="container">
        <a href="{{ url_for("login") }}">登陆</a>
    </div>
</body>
</html>
登录页代码:
<!DOCTYPE html>
<html lang="en">
<head>
    <meta charset="UTF-8">
    <title>登陆</title>
    <style>
        .container{
            width: 250px;
            height: 170px;
            border: 1px solid black;
            background: aquamarine;
            margin: 20px auto;
        }

        .container .username
        {
            display: block;
            margin: 0 auto;
            margin-top: 15px;
        }

        .container .password{
            display: block;
            margin: 0 auto;
            margin-top: 15px;
        }

        .container .sub{
            display: block;
            margin: 0 auto;
            margin-top: 15px;
        }
    </style>
</head>
<body>
    <div class="container">
        <input type="text" placeholder="用户名" class="username">
        <input type="password" placeholder="密码" class="password">
        <input type="submit" class="sub">
    </div>
</body>
</html>
过滤器基本使用:
过滤器是通过管道符号(|)进行使用的,例如{{ name|length }},将返回name的长度。过滤器相当于一个函数,把当前的变量传入到过滤器中,过滤器根据自己的功能,再返回相应的值,之后再将结果渲染到页面。jingja2中内置了很多的过滤器,常用到的过滤器有:
1. abs(value), -1 | abs
2. first(value): 返回一个序列的第一个值 value | first
3. last(value): 返回最后一个值 value | last
更多的可以参考jingja2的手册:
后端代码:
from flask import Flask, render_template

app = Flask(__name__)
app.config.from_pyfile("config.py", silent=False)   # 加载配置文件config, 也可以加载普通的txt文件


@app.route('/')
def index():
    return render_template("HTML/index.html", position=-6)


if __name__ == '__main__':
    app.run(debug=True)     # 开启debug模式
前端代码:
<!DOCTYPE html>
<html lang="en">
<head>
    <meta charset="UTF-8">
    <title>访问首页</title>
    <style>
        .container{
            width: 200px;
            height: 150px;
            border: 1px solid blanchedalmond;
            background: burlywood;
        }
    </style>
</head>
<body>
    <div class="container">
        <span>The position is : {{ position|abs }}</span>
    </div>
</body>
</html>
default过滤器详解:
对于传入的变量,如果有值,就返回变量的值,否则就返回default值,再在过滤器中,设置boolean参数为真,才可以将空字符串,空列表,null,None当作false来处理,否则即使有这些值,也会当作有值来处理。
escape过滤器:
转义字符,会将< >等符号转义成html中的符号。例如: content | escape, jingja2中的转义是默认开启的。
safe过滤器:
关闭字符串的自动转义 ,功能与{%autoescape off%} , {%endautoescape%}的类似
first / last过滤器:
获取序列的第一个或者最后一个元素
format过滤器:
用于格式化输出字符串 {{ “%s -- %s" }} | format(str1, str2)
length过滤器:
获取序列的长度
join过滤器:
将一个序列用特定的符号进行拼接
int, float, string过滤器:(用于模板的条件渲染)
对数值进行转换
lower, upper过滤器:
进行大小写转换
wordcount过滤器:
计算一个字符串中的单词数量
replace过滤器
实现字符串中的替换功能,replace(oldstr, newstr)
truncate过滤器:
截取一定长度的字符串,truncate(value, length, killwords=false), 后面的内容使用...表示,用于当显示内容较多时,显示缩略的内容。
stringtags过滤器:
删除字符串中所有的html标签,如果出现多个空格,将替换成一个空格。
后端代码:
from flask import Flask, render_template

app = Flask(__name__)
app.config.from_pyfile("config.py", silent=False)   # 加载配置文件config, 也可以加载普通的txt文件


@app.route('/')
def index():
    info = {
        "position": -6,
        "signature": None,
        "content": '<script>alert("Hell")</script>',
        "persons": ["tom", "lily", "Cart"],
        "age": "14",
        "text": "This is aa cc aa"
    }
    return render_template("HTML/index.html", **info)


if __name__ == '__main__':
    app.run(debug=True)     # 开启debug模式
前端代码:
<!DOCTYPE html>
<html lang="en">
<head>
    <meta charset="UTF-8">
    <title>访问首页</title>
    <style>
        .container{
            width: 300px;
            height: 250px;
            border: 1px solid blanchedalmond;
            background: burlywood;
        }
        .container span{
            display: block;
        }
    </style>
</head>
<body>
    <div class="container">
        <span>The position is : {{ position|abs }}</span>
        <span>The signature is : {{ signature|default('no signature at all', boolean=True) }}</span>
        <span>The content is: {{ content|escape }}</span>
        <span>The content is: {{ content|safe }}</span>   <!--关闭了自动转义,会弹出模态对话框-->
        <span>First person is {{ persons|first }}</span>
        <span>Last person is {{ persons|last }}</span>
        <sapn>format use: {{ "%s -- %s" | format("hello", "cute")}}</sapn>
        <span>Persons number is: {{ persons|length }}</span>
        {% if age|int >= 18 %}    <!--模板的条件选择渲染-->
            <span>The age is ok</span>
        {% else %}
            <span>The age is not ok</span>
        {% endif %}
        <span>Replace result: {{ text|replace("aa", "***") }}</span>
        <span>Truncated text is: {{ text|truncate(length=5) }}</span>
    </div>
</body>
</html>
自定义过滤器:
在Jingja2内置的过滤器不能满足需求的时候,需要使用自定义的过滤器:
from flask import Flask, render_template

app = Flask(__name__)
app.config.from_pyfile("config.py", silent=False)   # 加载配置文件config, 也可以加载普通的txt文件
app.config["TEMPLATES_AUTO_RELOAD"] = True          # 保证模板修改后能够自动加载


@app.route('/')
def index():
    info = {
        "text": "This is aa cc aa"
    }
    return render_template("HTML/index.html", **info)


@app.template_filter("cut_xx")     # 注册过滤器的名称
def cut_xx(string, newstr, oldstr):
    """
    自定义过滤器
    :param string:
    :param newstr:
    :param oldstr:
    :return:
    """
    value = string.replace(oldstr, newstr)
    return value


if __name__ == '__main__':
    app.run(debug=True)     # 开启debug模式
自定义时间处理过滤器:
from flask import Flask, render_template
from datetime import datetime


app = Flask(__name__)
app.config.from_pyfile("config.py", silent=False)   # 加载配置文件config, 也可以加载普通的txt文件
app.config["TEMPLATES_AUTO_RELOAD"] = True          # 保证模板修改后能够自动加载


@app.route('/')
def index():
    info = {
        "text": "This is aa cc aa",
        "content": None,
        "create_time": datetime(2020, 4, 5, 2, 12, 22)
    }
    return render_template("HTML/index.html", **info)


@app.template_filter("cut_xx")     # 注册过滤器的名称
def cut_xx(string, newstr, oldstr):
    """
    自定义过滤器
    :param string:
    :param newstr:
    :param oldstr:
    :return:
    """
    value = string.replace(oldstr, newstr)
    return value


@app.template_filter("handle_time")
def handle_time(time):
    """
    发表时间距离现在时间
    1. 一分钟以内,显示刚刚
    2. 一小时以内,显示xx分钟
    3. 24小时以内,显示xx小时
    4. 大于二十四小时,显示xx天前
    :param time:
    :return:
    """
    if isinstance(time, datetime):
        time_span = datetime.now() - time
        seconds = time_span.total_seconds()
        if seconds < 60:
            return "刚刚"
        elif seconds < 60 * 60:
            return "%d分钟前" % (seconds/60)
        elif seconds < 24 * 60 * 60:
            return "%d小时以前" % (seconds/60/60)
        else:
            return "%d天以前" % (seconds/24/60/60)
    else:
        return time


if __name__ == '__main__':
    app.run(debug=True)     # 开启debug模式
<!DOCTYPE html>
<html lang="en">
<head>
    <meta charset="UTF-8">
    <title>访问首页</title>
    <style>
        .container{
            width: 300px;
            height: 250px;
            border: 1px solid blanchedalmond;
            background: burlywood;
        }
        .container span{
            display: block;
        }
    </style>
</head>
<body>
    <div class="container">
        <span>The time is: {{ create_time|handle_time }}</span>
    </div>
</body>
</html>
实现效果:

jingja2模板中条件判断,循环:
<!DOCTYPE html>
<html lang="en">
<head>
    <meta charset="UTF-8">
    <title>访问首页</title>
    <style>
       .right{
           color: #7666c1;
       }
        .wrong{
            color: #19a71f;
        }
    </style>
</head>
<body>
    {% if username=="tom" %}
        <p class="right">hello, this is tom</p>
    {% else %}
        <p class="wrong">This is not tom</p>
    {% endif %}
</body>
</html>
for循环可以遍历任何一个序列,包括列表,字典,元组,并且可以进行反向遍历:
但是jingja模板中,不支持用continue和break来控制循环,且for循环中还提供了以下的变量,用来获取遍历的状态:
loop.index 当前迭代的索引(从1开始)
loop.index0 当前迭代的索引(从0开始)
loop.first 是否是第一次迭代,返回bool值
loop.last 是否是最后一次迭代,返回bool值
loop.length 序列的长度
jingja2中的for循环可以由else,如果序列为空的话,会进入else语句:
后端代码:
from flask import Flask, render_template


app = Flask(__name__)
app.config.from_pyfile("config.py", silent=False)   # 加载配置文件config, 也可以加载普通的txt文件
app.config["TEMPLATES_AUTO_RELOAD"] = True          # 保证模板修改后能够自动加载


@app.route('/')
def index():
    info = {
        "username": "kit",
        "persons": ["kit", "hack", "tom", "nancy"],
        "books": [
            {"name": "gone with wind",
             "author": "unknown",
             "price": 120,
             "count": 35},
            {"name": "Pride and Prejudice",
             "author": "Jane Austing",
             "price": 30,
             "count": 120},
            {"name": "Become Jane",
             "author": "Jane Austing",
             "price": 670,
             "count": 40}
        ]
    }
    return render_template("HTML/index.html", **info)


if __name__ == '__main__':
    app.run(debug=True)     # 开启debug模式
前端代码:
<!DOCTYPE html>
<html lang="en">
<head>
    <meta charset="UTF-8">
    <title>访问首页</title>
    <style>
        *{
            margin: 0;
            padding: 0;
        }
        .person{
            width: 200px;
            border: 1px solid #fcffe8;
            margin-bottom: 20px;
            overflow: hidden;
        }

        .person p{
            font-size: 18px;
            color: #783476;
            font-weight: bold;
            display: block;
            background: aqua;
        }

        .person .info
        {
            width: 100%;
            line-height: 20px;
            font-size: 16px;
            color: #123;
            background: #917e46;
        }

        table
        {
            border: 1px solid black;
            text-align: center;
        }

        table td, th{
            border: 1px solid black;
        }

    </style>
</head>
<body>
    {% for person in persons %}
        <div class="person">
            <p>Hello, I am {{ person }}</p>
            <div class="info">
                coco
            </div>
        </div>
    {% else %}
        <div class="person">
            <p>Hello, no person</p>
            <div class="info">
                no one is here
            </div>
        </div>
    {% endfor %}

    <table>
        <thead>
            <tr>
                <th>index</th>
                <th>book name</th>
                <th>author</th>
                <th>price</th>
                <th>count</th>
            </tr>
        </thead>
        <tbody>
            {% for book in books %}
                {% if loop.first %}
                    <tr style="background: red">   <!--将第一行设置为背景颜色为红色-->
                {% elif loop.last %}
                    <tr style="background: orange">
                {% else %}
                    <tr>
                {% endif %}
                    <td>{{ loop.index }}</td>
                    <td>{{ book["name"] }}</td>
                    <td>{{ book["author"] }}</td>
                    <td>{{ book["price"] }}</td>
                    <td>{{ book["count"] }}</td>
                </tr>
            {% endfor %}
        </tbody>
    </table>

</body>
</html>
实际效果: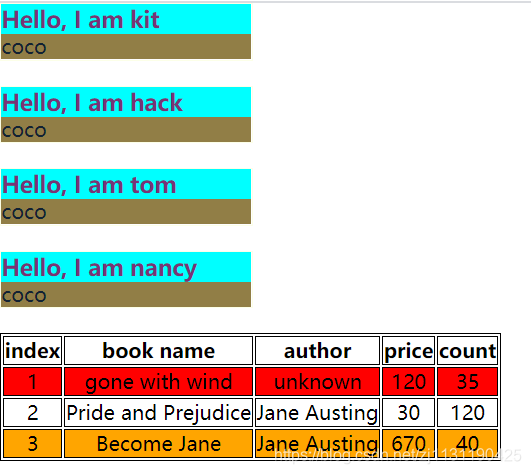
jinja2中的宏,基本概念及使用:
宏类似于python中的函数,当一段代码需要反复使用的时候,可以将其封装为函数,这样在需要使用的时候就可以进行调用。模板中的宏可以传递参数,但是不能有返回值,可以将经常使用的代码片段放到宏中,然后把一些不固定的值抽取出来当成变量。
<!DOCTYPE html>
<html lang="en">
<head>
    <meta charset="UTF-8">
    <title>访问首页</title>
    <style>

    </style>
</head>
<body>
    <!--定义宏-->
    {% macro input(name, type="text", value="") %}
        <input type="{{ type }}" name="{{ name }}" value="{{ value }}">
    {% endmacro %}

    <!--使用宏-->
    <div class="container">
        <label>
            <p>用户名</p>
            {{ input("username") }}
        </label>
        <label>
            <p>密码</p>
            {{ input("password", "password") }}
        </label>
        {{ input("submit", "submit", "提交") }}
    </div>
</body>
</html>
宏的导入和注意事项:
通常在开发中,会将宏进行分类,放到单独的文件中,所以在其他的文件中需要调用宏的时候,首先需要将宏导入到文件中,才能够调用。
导入宏的方式和python中导入包非常类似,import xxx, import xxx as yyy, from xxx import yyy
{% from "HTML/login_form.html" import input %}
<!DOCTYPE html>
<html lang="en">
<head>
    <meta charset="UTF-8">
    <title>访问首页</title>
    <style>

    </style>
</head>
<body>
    <!--使用宏-->
    <div class="container">
        <label>
            <p>用户名</p>
            {{ input("username") }}
        </label>
        <label>
            <p>密码</p>
            {{ input("password", "password") }}
        </label>
        {{ input("submit", "submit", "提交!") }}
    </div>
</body>
</html>
宏文件在其他文件夹中的时候,需要以templates文件夹为根目录,开始查找。不能通过相对路径查找。
如果需要在导入宏的时候,将当前一些模板的参数传给宏所在的模板,那么在导入的时候应该使用with context, 例如:
from xxx import yyy with context
include 标签使用:
1. include表示将另一个文件中的代码,复制粘贴到include的当前位置。(有点c++中inline函数的意思)
2. include完全可以直接调用父模板中的变量:
3. 在include文件的路径时,只需要按照templates根目录进行加载,不能使用相对路径。跟import的路径形式一样
例如,分别定义header.html以及footer.html

header.html:(html +css代码)
<style>
    .nav{
            width: 100%;
            height: 40px;
            overflow: hidden;
            background: aquamarine;
    }

    .nav ul{
        font-size: 18px;
        color: black;
        line-height: 40px;
    }

    .nav ul li:hover{
        background: blue;
    }

    .nav ul li{
        float: left;
        margin-left: 15px;
    }
</style>

<div class="nav">
    <ul>
        <li>首页</li>
        <li>课程详情</li>
        <li>视屏教程</li>
        <li>关于我们~</li>
        <li>{{ username }}</li>
    </ul>
</div>
footer.html
<style>
    .footer{
            width: 100%;
            height: 200px;
            background: black;
            color: white;
        }
</style>

<div class="footer">
    这是底部footer
</div>
例如,需要在index.html中include文件header.html以及footer.html
<!DOCTYPE html>
<html lang="en">
<head>
    <meta charset="UTF-8">
    <title>访问首页</title>
    <style>
        *{
            margin: 0;
            padding: 0;
        }
        ul{
            list-style: none;
        }
        a{
            text-decoration: none;
        }

        .middle{
            width: 100%;
            height: 300px;
            background: burlywood;
        }

    </style>
</head>
<body>
    {% include "common/header.html" %}

    <div class="middle">
        中间部分
    </div>

    {% include  "common/footer.html" %}
</body>
</html>
此时,如果需要在不同的页面中使用header.html和footer.html.只需要在页面中include这两个文件即可。
set,with语句以及模板中定义常量:
在模板中,应该如何定义常量:{% set username=" xxx" %}
还可以使用with语句定义变量,with语句有起始和结束的地方,所以在with语句块内,可以使用该变量,但是在with语句块以外,不能使用这一变量。
{% with username="hell" %}
可以使用变量username的语句块
{% endwith %}
<body>
    {% set username="Tom" %}     <!--定义常量-->
    <p>用户名:{{ username }}</p>

    {% with name="hell" %}
        <p>This is user {{ name }}</p>
    {% endwith %}
</body>
也可以定义一个空的with语句,在这个空的with语句中,可以使用set定义变量,定义的变量也只能在这个with语句块中使用:
{% with %}
{% set name="xxx" %}
可以使用变量username的语句块
{% endwith %}
jingja2中加载静态文件:
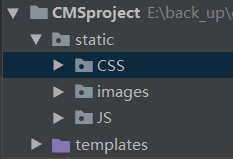
静态文件: css文件,js文件,字体文件,图片文件,在flask中,静态文件存储在static文件夹下,在flask中加载静态文件,文件路径需要使用url_for("static", filename="路径")进行加载,其中路径需要以static文件夹为根目录。
<!DOCTYPE html>
<html lang="en">
<head>
    <meta charset="UTF-8">
    <title>访问首页</title>
    <link rel="stylesheet" href="{{ url_for('static', filename='css/index.css') }}">
    <script rel="script" src="{{ url_for('static', filename='JS/index.js') }}"></script>

</head>
<body>
    <div class="container">
        加载静态文件
    </div>
    <div class="picture">
        <img src="{{ url_for('static', filename='images/sunset.png') }}" alt="">
    </div>
</body>
</html>
jingja2中模板继承:
1. 为什么需要模板继承:
模板继承可以把一些公用的代码单独抽取出来,放到父模板中,以后子模版直接继承就可以使用了,减少重复性的代码,修改起来也更加的简单。
2. 使用extends来指明继承的父模板,父模板的路径也是相对于templates文件夹下的绝对路径。
3. 在父模板中,只能实现一些公共的代码。这时候父模板应该有能力提供一个接口,让父模板来实现
实例:
父类的html代码:设计整个模板,header, footer是共用的部分
<!DOCTYPE html>
<html lang="en">
<head>
    <meta charset="UTF-8">
    <title>
        {% block title %}
        {% endblock %}
    </title>
    <style>
        .nav{
                width: 100%;
                height: 40px;
                overflow: hidden;
                background: aquamarine;
        }

        .nav ul{
            font-size: 18px;
            color: black;
            line-height: 40px;
        }

        .nav ul li:hover{
            background: blue;
        }

        .nav ul li{
            float: left;
            margin-left: 15px;
        }


        .footer{
            width: 100%;
            height: 200px;
            background: black;
            color: white;
        }

    </style>
</head>
<body>
    <div class="nav">
        <ul>
            <li>首页</li>
            <li>课程详情</li>
            <li>视屏教程</li>
            <li>关于我们~</li>
        </ul>
    </div>

    {% block content %}
      <!--相当于占位的功能,具体的内容在子模板中实现-->
    {% endblock %}

    <div class="footer">
        这是底部footer
    </div>
</body>
</html>
定义自类的代码,继承父类:
<!--首页实现,继承自模板-->
{% extends "common/base_template.html" %}   <!--继承父类-->

{% block title %}
    CMS系统
{% endblock %}

{% block content %}
    <style>
        *{
            margin: 0;
            padding: 0;
        }
        ul{
            list-style: none;
        }
        .content-block{
            width: 100%;
            height: 200px;
            background: purple;
            margin-top: 20px;
        }
        .content-block span{
            font-size: 18px;
            color: #ab811e;
            display: block;
        }
        .content-block .item{
            width: 50%;
            height: 100px;
            margin-top: 20px;
            z-index: 2;
        }
    </style>

    <div class="content-block">
        <span>This is content</span>
        <div class="item"></div>
    </div>
{% endblock %}
----------------------------------------------------------------------------------------------------------------------------------------

 浙公网安备 33010602011771号